在上一篇的入微一星里面,简单地说了sdk的搭建,接下来说下如何打包Lib和Framework。
基础知识
在上一节中,有说到 architecture,首先来温习下基础的知识:
在工程指令集选项中:
- Architectures:指定工程被编译成可支持哪些指令集类型,支持多少种,就会编译出包多少个指令集的数据包。
- Valid Architectures:限制可能被支持的指令集的范围,最终打包编译出哪种指令集的包,将由Architectures与Valid Architectures 的交集来确定。
- Build Active Architecture Only:是否只对当前连接设备所支持的指令集编译,yes 只编译当前的architecture版本,而设置为no时,会编译所有支持的版本。
- Generate Debug Symbols:Enables or disables generation of debug symbols. When debug symbols are enabled, the level of detail can be controlled by the build 'Level of Debug Symbols' setting. 官方的说明是这样的,设置为 YES 时,编译产生包会大一点。设置为NO的时候,在Xcode中设置的断点不会中断。但是在程序中打印[NSThread callStackSymbols],依然可以看到类名和方法名(详细就自行google)。
在iOS中的指令集有:armv7、armv7s、arm64、i386、x86_64,其中 armv7、armv7s、arm64 是ARM处理器的指令集,i386、x86_64 是Mac处理器的指令集。指令集支持的设备如下:
- arm64:5s, 6, 6p, 6s, 6sp, 7, 7p
- armv7s:5, 5c
- arm7:4, 4s
- i386:模拟器32位
- x86_64:模拟器64位
制作.a静态库时,为了保证最大的兼容性,ValidArchitectures 应当设置为:armv7|armv7s|arm64|i386|x86_64
打包前的准备
设置 ValidArchitectures, 将 Lib 和 Framework 保持一致:
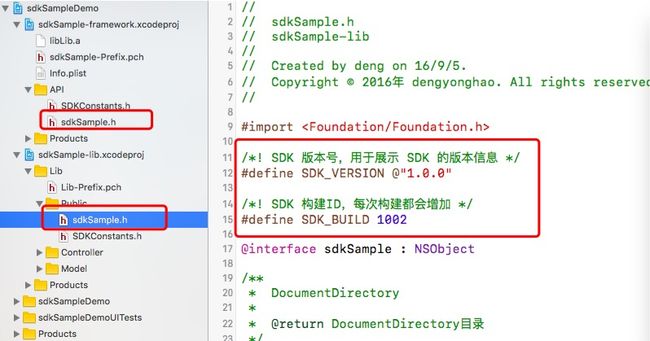
给 Lib 添加版本号和构建ID,Framework 中的 sdkSample.h 和 Lib 中的保持一致:
版本号和构建ID的作用你懂的 _
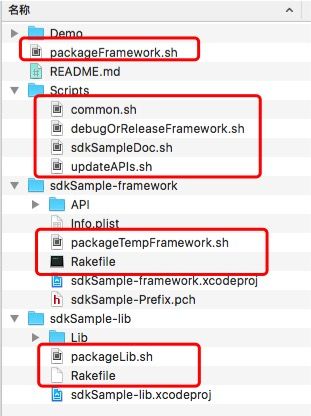
然后我们在上sdkSample的根目录(入微一星中有详细讲解)下创建如下的脚本内容:
如上图,我们在根目录下创建 Scripts 来存放相关脚本文件,我们先创建一个公共方法的脚本common.sh,这个里使用的是shell:
#!/bin/sh

##########################
# 确认当前运行环境。如果 SDK_REPO_DIR 不存在,则赋值
# 其他脚本只需要单纯地检查,SDK_REPO_DIR 不存在就不执行
# 提供几个常用的方法接口
##########################

#重置并创建路径
clearAndPrepare() {
    cd $SDK_REPO_DIR

    if [ -d ./dist ]; then
        rm -rf ./dist;
    fi
    if [ -d ./build ]; then
        rm -rf ./build;
    fi

    mkdir dist/
    mkdir build/
}

#异常退出处理
exitAbnormal() {
    resetGitworkspace $SDK_REPO_DIR
    exit 1
}

if [ ! $SDK_REPO_DIR ]; then
    BASEDIR=`pwd`
    if [ ! -d sdkSample-lib ]; then
        echo "It is in bad dir to execute script - $BASEDIR"
        exit 1
    fi
    if [ ! -d sdkSample-framework ]; then
        echo "It is in bad dir to execute script - $BASEDIR"
        exit 1
    fi

    SDK_REPO_DIR=$BASEDIR
    export SDK_REPO_DIR
    echo "sdkSample repo base dir: $SDK_REPO_DIR"
fi

### 变更内部 debug 开关
### 必须要有一个参数: debug/release
changeInternalVersion() {
    echo "\n Action - changeInternalVersion - $1"
    if [ ! $1 ]; then
        echo "This func expect one param - debug/release";
        return 1;
    fi
    if [ ! $1 = "debug" -a ! $1 = "release" ]; then
        echo "This func expect one param - debug/release";
        return 1;
    fi

    if [ $1 = "debug" ]; then
        expectInternalVersion=1;
    else
        expectInternalVersion=0;
    fi

    currentDir=`pwd`

    # 设置开发测试环境,日志显示内容等等,主要就是为开发都提供文件
    # 可以根据 expectInternalVersion 来控制相关逻辑

    cd $currentDir
}

### 打开或者关闭工程配置文件里的 debug symbol 配置项
### 必须要有一个参数 open/close
symbolConfig() {
    echo "\n Action - symbolConfig - $1"

    if [ ! $1 ]; then
        echo "Expect one param - open/close";
        return 1;
    fi

    if [ ! $1 = "open" -a ! $1 = "close" ]; then
        echo "Expect one param - open/close";
        return 1;
    fi

    # 工作目录不特定
    echo "Current dir - `pwd`"

    projectFile=`ls *.xcodeproj/project.pbxproj`
    if [ ! projectFile ]; then
        echo "Failed to find project.pbxproj file unser *.xcodeproj dir. Please confirm xcode project exists. "
        return 1
    fi

    if [ $1 = open ]; then
        CUR_SYMBOL=NO;
        EXPECT_SYMBOL=YES;
    else
        CUR_SYMBOL=YES;
        EXPECT_SYMBOL=NO;
    fi

    findResult=`grep -o -c "GCC_GENERATE_DEBUGGING_SYMBOLS = ${CUR_SYMBOL}" $projectFile`

    if [ ${findResult:=0} -gt 0 ]; then
        echo "Find the symbol - GCC_GENERATE_DEBUGGING_SYMBOLS = ${CUR_SYMBOL}. Change it."
        sed -i "" "s/GCC_GENERATE_DEBUGGING_SYMBOLS = ${CUR_SYMBOL}/GCC_GENERATE_DEBUGGING_SYMBOLS = ${EXPECT_SYMBOL}/g" $projectFile

        findResult2=`grep -o -c "GCC_GENERATE_DEBUGGING_SYMBOLS = ${CUR_SYMBOL}" $projectFile`
        if [ ${findResult2:=0} -gt 0 ]; then
            echo "Unepxected - still find the symbol. "
        fi
    else
        echo "No need to change."
    fi
}

### 从代码里获取当前 Version/BuildID
getVersion() {
    echo "\n Action - getVersion"

    cd $SDK_REPO_DIR/sdkSample-lib

    VERSION_LINE=`grep -o '^#define SDK_VERSION @\"[0-9.]*\"$' Lib/Public/sdkSample.h`
    echo "VERSION_LINE:$VERSION_LINE"
    if [ ! "$VERSION_LINE" ]; then
        echo "Not found version definition. "
        return 1
    fi

    SDK_VERSION=`echo $VERSION_LINE | awk -F \" '{print $2}'`
    echo "Found SDK version: $SDK_VERSION"

    # 得到了版本号,导出到环境变量
    export SDK_VERSION

    BUILDID_LINE=`grep -o '^#define SDK_BUILD [0-9.]*' Lib/Public/sdkSample.h`
    if [ ! "$BUILDID_LINE" ]; then
        echo "Not found buildId definition. "
        return 1
    fi

    SDK_BUILDID=`echo $BUILDID_LINE | awk '{print $3}'`
    echo "Found sdkSample buildId: ${SDK_BUILDID}"

    # 得到了Build号,导出到环境变量
    export SDK_BUILDID
}

### 打包时更新代码里的 buildID
updateBuildID() {
    getVersion
    cd $SDK_REPO_DIR/sdkSample-lib
     # 每次构建版本,build + 1
    newbuildID=$((10#${SDK_BUILDID}+1))
     # 替换原来的版本号
    sed -i "" "/#define SDK_BUILD /s/$SDK_BUILDID/$newbuildID/g" Lib/Public/sdkSample.h
    if [ $? != 0 ]; then return 1; fi

    echo "buildID updated to: ${newbuildID}"
    # 将更新提交
    git add Lib/Public/sdkSample.h
    git commit -m "updateBuildID"
}

# 检查仓库是否干净
checkGitWorkspaceClean() {
    echo "Action - checkGitWorkspaceClean"

    if [ $# -lt 1 ]; then
        echo "One param is required - the check dir.";
        exit 1;
    fi

    if [ ! -d $1 ]; then
        echo "The dir does not exist - $1";
        exit 1;
    fi

    currentDir=`pwd`
    cd $1

    result=`git status -s`
    if [ -n "$result" ]; then
        echo "The git workspace is not clean - $1"
        exit 1
    fi

    cd $currentDir
}

resetGitworkspace() {
    echo "Action - resetGitworkspace"

    if [ $# -lt 1 ]; then
        echo "One param is required - the check dir.";
        exit 1;
    fi

    if [ ! -d $1 ]; then
        echo "The dir does not exist - $1";
        exit 1;
    fi

    currentDir=`pwd`
    cd $1
    git checkout .
    cd $currentDir
}
这里工程用了git来管理,使用 shell、Rakefile,作为一个程序猿,还是那句话,不懂,google 去~~~这里的几个共用方法都有相关的解释,就不详细说了,把核心还是放在打包中去。
Lib 打包
接下来说下如何将 Lib 工程打包成静态包:
先在 Lib 工程的根目录下创建一个 packageLib.sh 的打包脚本,这个脚本应该提供一个参数来控制是打 debug 包还是 release 包,但注意了 这里 debug 和 release 并不是实际意义的 debug 或 release 包 ,为什么要这样说呢,不管是 debug 还是 release, 最终打包都是使用了 release 来打包,这里的 debug 和 release 参数只是方便设置下测试环境或者日志显示内容等,简单来说就是控制内部 debug 的开头,再看 common.sh 里的 changeInternalVersion 方法:
### 变更内部 debug 开关
### 必须要有一个参数: debug/release
changeInternalVersion() {
    echo "\n Action - changeInternalVersion - $1"
    if [ ! $1 ]; then
        echo "This func expect one param - debug/release";
        return 1;
    fi
    if [ ! $1 = "debug" -a ! $1 = "release" ]; then
        echo "This func expect one param - debug/release";
        return 1;
    fi

    if [ $1 = "debug" ]; then
        expectInternalVersion=1;
    else
        expectInternalVersion=0;
    fi

    currentDir=`pwd`

    # 设置开发测试环境,日志显示内容等等,主要就是为开发都提供文件
    # 可以根据 expectInternalVersion 来控制相关逻辑

    cd $currentDir
}
为什么要提供这样一个 debug 版本呢,举例说,你可以在 debug 模式下接入的是测试环境的后台,后台需要更新内容时,可以在测试环境通过 debug 版本的 SDK 调试完了再上线生产环境,其它用处可以根据实际需要来选择,这个功能是不一定需要了。
所以我们可以在 packageLib.sh 里这样写:
#!/bin/sh

################################
### 打包 sdkSample lib 库
################################

echo "\n =================================================="
echo "Action - packageLib - $1"
echo "Current dir - `pwd`"

# 引用公共的文件
if [ ! -f Scripts/common.sh ]; then
    echo "ERROR: not found Scripts/common.h"
    exit 1
fi
source Scripts/common.sh

if [ $# -lt 1 ]; then
    echo "At least one param is required - debug/release";
    exit 1;
fi

if [ ! $1 = debug -a ! $1 = release ]; then
    echo "First param should be debug/release";
    exit 1;
fi

buildVersion=$1

# All operations in sdkSample-lib dir
cd $SDK_REPO_DIR/sdkSample-lib
先引入下 common.sh,然后判断是 debug 或者 release 模式,再进行开sdkSample-lib的根目录下,这里的 SDK_PERO_DIR 在 common.sh 初始化的,就是整个工程的根目录。
然后我们再在 packageLib.sh 里面提供几个用到的方法:
preBuild() {
    # 关闭 symbol 配置项
    symbolConfig close
}

postBuild() {
    # 打开 symbol 配置项
    symbolConfig open

    # 恢复为开发模式
    changeInternalVersion debug
}

exitAbnormal() {
    postBuild
    exit 1
}
symbolConfig 这个方法是也在 common.sh 里面的公共方法,这个方法在文章开始的基础知识说过了,这里就不详细说了。
现在开始我们的打包工作:
echo "\n\n ====================== Begin of building"

preBuild

if [ $buildVersion = debug ]; then
    changeInternalVersion debug
else
    changeInternalVersion release
fi

### Call the rake to process building with Rakefile
rake

if [ $? == 0 ]; then
    echo "Rake build success."

    # Validdate result of rake
    if [ ! -f $SDK_LIB_FILE ]; then
        echo "The expect rake build outoput file does not exist - ${SDK_LIB_FILE}"
        exitAbnormal
    fi
else
    echo "Rake build failed."
fi

postBuild

echo "====================== End of building \n\n"
这里通过 Rakefile 来打包,上面我们已经在 Lib 工程下创建了一个 Rakefile 文件。先说下思路,先分别打包各个指令集的静态包,根据各个指令集成的不同,又分为真机和模拟器两种,最后再将各个指令集的静态包合成一个兼容真机和模拟器同时使用的包,指令集的相关内容在文章开始的基础知识有提及,不懂可以回过头去看,现在我们来看下如何通过 Rakefile 来打静态包,先直接上脚本:
puts "\nAction - sdkSample-lib rake build"

outputFile = ENV['SDK_LIB_FILE']
if !outputFile
  outputFile = "../build/sdkSample.a"
  puts "WARN - Running rake with no build dependency."
end

puts "Will put dist file into - '#{outputFile}'"

## No need "Debug" mode
$config = "Release"

def xcodebuild(sdk, archs, iphoneos_deployment_target, products_dir, bitcodeEnable)
  puts $config
  config = $config
if bitcodeEnable
  sh "xcodebuild -project 'sdkSample-lib.xcodeproj' -target Lib -configuration '#{config}' -sdk '#{sdk}' clean build ARCHS='#{archs}' VALID_ARCHS='#{archs}' IPHONEOS_DEPLOYMENT_TARGET='#{iphoneos_deployment_target}'  TARGET_BUILD_DIR='#{products_dir}' BUILT_PRODUCTS_DIR='#{products_dir}' OTHER_CFLAGS='-fembed-bitcode' | egrep -A 5 \"(error|warning):\"    "
else
  sh "xcodebuild -project 'sdkSample-lib.xcodeproj' -target Lib -configuration '#{config}' -sdk '#{sdk}'  ARCHS='#{archs}' VALID_ARCHS='#{archs}' IPHONEOS_DEPLOYMENT_TARGET='#{iphoneos_deployment_target}'  TARGET_BUILD_DIR='#{products_dir}' BUILT_PRODUCTS_DIR='#{products_dir}' clean build  "
end
end

desc "Build arm"
task :build_arm do
  xcodebuild('iphoneos', 'armv7 armv7s', '7.0', 'build-arm', true)
end

desc "Build arm64"
task :build_arm64 do
  xcodebuild('iphoneos', 'arm64', '7.0', 'build-arm64', true)
end

desc "Build i386"
task :build_i386 do
  xcodebuild('iphonesimulator', 'i386', '7.0', 'build-i386', false)
end

desc "Build x86_64"
task :build_x86_64 do
  xcodebuild('iphonesimulator', 'x86_64', '7.0', 'build-x86_64', false)
end

desc "Build fat"
task :build_fat => [:build_arm, :build_arm64, :build_i386, :build_x86_64] do
  sh "lipo -create ./build-arm/libLib.a ./build-arm64/libLib.a  ./build-i386/libLib.a ./build-x86_64/libLib.a -output '#{outputFile}'"
end

desc "Clean"
task :clean do
  Dir["build-*"].each{ |x|
    `rm -r '#{x}'`
  }
end

desc "Clean binary"
task :distclean => [:clean] do
  Dir["build/*.a"].each{ |x|
    `rm -r '#{x}'`
  }
  Dir["build/libDbgPushSDK.a"].each{ |x|
    `rm -r '#{x}'`
  }
end

task :debug => [:distclean, :debug_fat]
task :default => [:distclean, :build_fat, :distclean]
这里需要注意的主要是在真机的时候,需要设置下 bitcode。还有开始部分的变量 SDK_LIB_FILE 是为后面内容做准备的,这里可以无视他的存在。
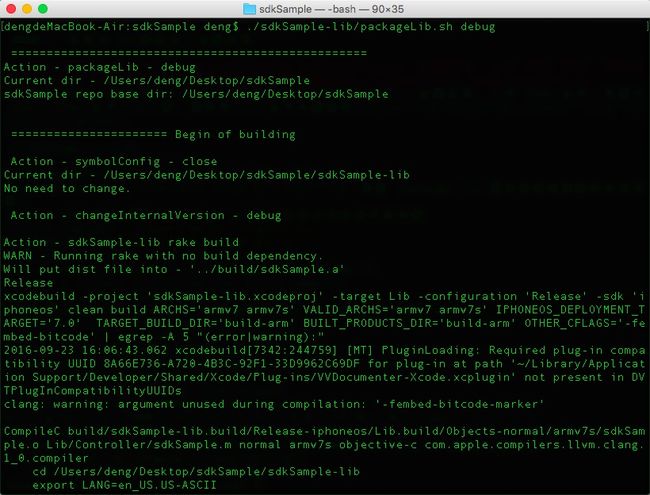
写到这里,lib 打包的基本说完了,现在可以试下打包,在打包前保持git仓库是干净的,然后在终端cd 到工程根目录,执行 ./sdkSample-lib/packageLib.sh debug:
不行了,老板催我解 bug 了,这里就先写到这里,Framework 留到下个章节再说了,争取周末把 Framework 完成哈。有兴趣的欢迎关注下,源码将在说完 Framework 放出。


