第1章 基础介绍
(1)进程
系统中正在运行的一个应用程序。进程间相互独立,运行于专有空间,且该空间受保护,一个进程不能访问另一个进程的专有空间。
(2)线程
(3)任务执行方式
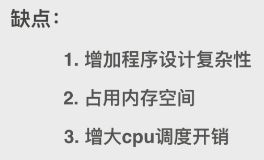
(4)多线程原理及优缺点
第2章 实现技术方案
一、pThread(不常用):C语言框架书写
#import
- (void)viewDidLoad {
    [super viewDidLoad];
    // Do any additional setup after loading the view, typically from a nib.
    UIButton *btn1 = [UIButton buttonWithType:UIButtonTypeCustom];
    btn1.frame = CGRectMake(100, 100, 100, 30);
    [btn1 setTitle:@"pthread" forState:UIControlStateNormal];
    [btn1 setTitleColor:[UIColor blackColor] forState:UIControlStateNormal];
    [btn1 addTarget:self action:@selector(clickPthread) forControlEvents:UIControlEventTouchUpInside];
    [self.view addSubview:btn1];
}
-(void)clickPthread{
    NSLog(@"主线程下执行!!!");
    pthread_t pthread;
    pthread_create(&pthread, NULL, run, NULL);//创建线程
}
void *run(void *data){//C语言
    NSLog(@"子线程下执行!!!");
    for (int i=0; i<5; i++) {
        sleep(1);                 //暂停一秒
        NSLog(@"%d",i);
    }
    return NULL;
}
二、NSThread:经封装,面向对象
(1)创建方式
1)通过创建线程对象方式(优点:可调用线程对象,可设置线程对象属性)
-(void)clickNSthread{
    NSLog(@"主线程下执行-NSThread!!!");
    NSThread *thread1 = [[NSThread alloc]initWithTarget:self selector:@selector(runThread1) object:nil];
    [thread1 start];
}
-(void)runThread1{
    NSLog(@"子线程下执行-NSThread!!!");
    for (int i=0; i<5; i++) {
        sleep(1);
        NSLog(@"%d",i);
    }
}
-(void)clickNSthread{
    NSLog(@"主线程下执行-NSThread!!!");
    //1.通过alloc init 方式创建并执行线程,可设置属性name,ThreadPriority
    NSThread *thread1 = [[NSThread alloc]initWithTarget:self selector:@selector(runThread1) object:nil];
    // name用于bug追溯及某些逻辑执行
    [thread1 setName:@"Name_Thread1"];
    [thread1 setThreadPriority:0.2];// 0-1之间
    [thread1 start];

    NSThread *thread2 = [[NSThread alloc]initWithTarget:self selector:@selector(runThread1) object:nil];
    [thread2 setName:@"Name_Thread2"];
    [thread2 setThreadPriority:0.5];
    [thread2 start];
}
-(void)runThread1{
    NSLog(@"%@,子线程下执行-NSThread!!!",[NSThread currentThread].name);
    for (int i=0; i<5; i++) {
        sleep(1);
        NSLog(@"%d",i);
    }
    /* 返回主线程方法 */
    [self performSelectorOnMainThread:@selector(runMineThread) withObject:nil waitUntilDone:YES];
}
-(void)runMineThread{
    NSLog(@"回到主线程!!!");
}
2)通过detachNewThreadSelecor 方式
-(void)clickNSthread{
    NSLog(@"主线程下执行-NSThread!!!");
    //2.通过detachNewThreadSelecor 方式创建并执行线程,不需要创建线程对象
    [NSThread detachNewThreadSelector:@selector(runThread1) toTarget:self withObject:nil];
}
-(void)runThread1{
    NSLog(@"%@,子线程下执行-NSThread!!!",[NSThread currentThread].name);
    for (int i=0; i<5; i++) {
        sleep(1);
        NSLog(@"%d",i);
    }
    [self performSelectorOnMainThread:@selector(runMineThread) withObject:nil waitUntilDone:YES];
}
-(void)runMineThread{
    NSLog(@"回到主线程!!!");
}
3)通过performSelectorInBackground 方式
-(void)clickNSthread{
    NSLog(@"主线程下执行-NSThread!!!");
    //3.通过performSelectorInBackground 方式创建并执行线程
    [self performSelectorInBackground:@selector(runThread1) withObject:nil];
    // 有延迟的方法
    [self performSelector:@selector(runThread1) withObject:nil afterDelay:1];
}
-(void)runThread1{
    NSLog(@"%@,子线程下执行-NSThread!!!",[NSThread currentThread].name);
    for (int i=0; i<5; i++) {
        sleep(1);
        NSLog(@"%d",i);
    }
    [self performSelectorOnMainThread:@selector(runMineThread) withObject:nil waitUntilDone:YES];
}
-(void)runMineThread{
    NSLog(@"回到主线程!!!");
}
(2)线程锁(简单售票系统)
#import

@interface TicketManager : NSObject

-(void)startToSale;

@end
#import "TicketManager.h"
#define Total 10 // 总票数为10张

@interface TicketManager()

@property int tickets;   // 剩余票数
@property int saleCount; // 售出票数

@property(nonatomic,strong) NSThread *threadBJ; // 北京售票
@property(nonatomic,strong) NSThread *threadSH; // 上海售票

@property(nonatomic,strong) NSCondition *ticketCondition;

@end

@implementation TicketManager

- (instancetype)init
{
    self = [super init];
    if (self) {
        self.ticketCondition = [[NSCondition alloc]init];
        self.tickets = Total;
        self.threadBJ = [[NSThread alloc]initWithTarget:self selector:@selector(sale) object:nil];
        [self.threadBJ setName:@"BJ_Thread"];
        self.threadSH = [[NSThread alloc]initWithTarget:self selector:@selector(sale) object:nil];
        [self.threadSH setName:@"SH_Thread"];
    }
    return self;
}

-(void)sale{
    while (true) {
        // 1.加锁一
        @synchronized (self) {
            if (self.tickets>0) {
                [NSThread sleepForTimeInterval:0.5];
                self.tickets--;
                self.saleCount = Total - self.tickets;
                NSLog(@"%@:当前余票:%d,售出:%d",[NSThread currentThread].name,_tickets,_saleCount);
            }
        }
        // 2.加锁二
        [self.ticketCondition lock];
        if (self.tickets>0) {
            [NSThread sleepForTimeInterval:0.5];
            self.tickets--;
            self.saleCount = Total - self.tickets;
            NSLog(@"%@:当前余票:%d,售出:%d",[NSThread currentThread].name,_tickets,_saleCount);
        }
        [self.ticketCondition unlock];
    }
}

-(void)startToSale{
    [self.threadBJ start];
    [self.threadSH start];
}
@end
- Objective-C支持程序中的多线程。这就意味着两个线程有可能同时修改同一个对象,这将在程序中导致严重的问题。为了避免这种多个线程同时执行同一段代码的情况,Objective-C提供了@synchronized()指令。
指令@synchronized()通过对一段代码的使用进行加锁。其他试图执行该段代码的线程都会被阻塞,直到加锁线程退出执行该段被保护的代码段,也就是说@synchronized()代码块中的最后一条语句已经被执行完毕的时候。
指令@synchronized()需要一个参数。该参数可以是任何的Objective-C对象,包括self。这个对象就是互斥信号量。他能够让一个线程对一段代码进行保护,避免别的线程执行该段代码。针对程序中的不同的关键代码段,我们应该分别使用不同的信号量。只有在应用程序编程执行多线程之前就创建好所有需要的互斥信号量对象来避免线程间的竞争才是最安全的。 - NSCondition 的对象实际上作为一个锁和一个线程检查器:锁主要为了当检测条件时保护数据源,执行条件引发的任务;线程检查器主要是根据条件决定是否继续运行线程,即线程是否被阻塞。
NSConditon *condition = [[NSCondition alloc]init];//创建对象
[condition lock];//一般用于多线程同时访问、修改同一个数据源,保证在同一时间内数据源只被访问、修改一次,其他线程的命令需要在lock外等待,只到unlock才可访问
[condition unlock];//与lock同时使用
[condition wait];//让当前线程处于等待状态
[condition signal];//CPU发信号告诉线程不用在等待,可以继续执行
三、GCD(常用):多核并行运算,自动管理线程生命周期
任务:同步、异步
队列:串行、并行
dispatch_get_main_queue:主线程
dispatch_get_global_gueue:全局的并发的线程
-(void)clickGCD{
    NSLog(@"执行GCD");
    dispatch_async(dispatch_get_global_queue(0, 0), ^{
        NSLog(@"start task 1");
        //执行耗时任务
        [NSThread sleepForTimeInterval:3];
        dispatch_async(dispatch_get_main_queue(), ^{
            //回到主线程刷新UI
            NSLog(@"刷新UI");
        });
    });
}
    NSLog(@"执行GCD");
    dispatch_async(dispatch_get_global_queue(0, 0), ^{
        NSLog(@"start task 1");
        [NSThread sleepForTimeInterval:2];
        NSLog(@"end task 1");
    });
    dispatch_async(dispatch_get_global_queue(0, 0), ^{
        NSLog(@"start task 2");
        [NSThread sleepForTimeInterval:2];
        NSLog(@"end task 2");
    });
    dispatch_async(dispatch_get_global_queue(0, 0), ^{
        NSLog(@"start task 3");
        [NSThread sleepForTimeInterval:2];
        NSLog(@"end task 3");
    });
(1)全局并发线程
dispatch_get_global_queue(long identifier, unsigned long flags);
-
long identifier(优先级):越高执行概率越大
iOS 8.0:
告诉队列执行任务的“服务质量 quality of service”,系统提供的参数有:
QOS_CLASS_USER_INTERACTIVE 0x21,     用户交互(希望尽快完成,用户对结果很期望,不要放太耗时操作)
QOS_CLASS_USER_INITIATED 0x19,       用户期望(不要放太耗时操作)
QOS_CLASS_DEFAULT 0x15,              默认(不是给程序员使用的,用来重置对列使用的)
QOS_CLASS_UTILITY 0x11,              实用工具(耗时操作,可以使用这个选项)
QOS_CLASS_BACKGROUND 0x09,           后台
QOS_CLASS_UNSPECIFIED 0x00,          未指定
iOS 7.0 之前:
DISPATCH_QUEUE_PRIORITY_HIGH 2                 高优先级
DISPATCH_QUEUE_PRIORITY_DEFAULT 0              默认优先级
DISPATCH_QUEUE_PRIORITY_LOW (-2)               低优先级
DISPATCH_QUEUE_PRIORITY_BACKGROUND INT16_MIN   后台优先级
-
unsigned long flags:
苹果官方文档解释: Flags that are reserved for future use。标记是为了未来使用保留的!所以这个参数一般指定为0
NSLog(@"执行GCD");
dispatch_async(dispatch_get_global_queue(DISPATCH_QUEUE_PRIORITY_LOW, 0), ^{
        NSLog(@"start task 1");
        [NSThread sleepForTimeInterval:2];
        NSLog(@"end task 1");
});
dispatch_async(dispatch_get_global_queue(DISPATCH_QUEUE_PRIORITY_HIGH, 0), ^{
        NSLog(@"start task 2");
        [NSThread sleepForTimeInterval:2];
        NSLog(@"end task 2");
});
dispatch_async(dispatch_get_global_queue(DISPATCH_QUEUE_PRIORITY_DEFAULT, 0), ^{
        NSLog(@"start task 3");
        [NSThread sleepForTimeInterval:2];
        NSLog(@"end task 3");
});
(2)自定义线程
dispatch_queue_create(const char *_Nullable label,dispatch_queue_attr_t _Nullable attr);
-
const char *_Nullable label
队列的名称,用于调试程序,尽量不要重名,填写“---”不是@“---”。 dispatch_queue_attr_t _Nullable attr
DISPATCH_QUEUE_SERIAL、NULL //生成一个串行队列,队列中的block按照先进先出(FIFO)的顺序去执行,实际上为单线程执行。
DISPATCH_QUEUE_CONCURRENT //生成一个并发执行队列,block被分发到多个线程去执行
    NSLog(@"执行GCD");
    dispatch_queue_t queue = dispatch_queue_create("com.test.gcd.queue", NULL);
    dispatch_async(queue, ^{
        NSLog(@"start task 1");
        [NSThread sleepForTimeInterval:2];
        NSLog(@"end task 1");
    });
    dispatch_async(queue, ^{
        NSLog(@"start task 2");
        [NSThread sleepForTimeInterval:2];
        NSLog(@"end task 2");
    });
    dispatch_async(queue, ^{
        NSLog(@"start task 3");
        [NSThread sleepForTimeInterval:2];
        NSLog(@"end task 3");
    });
(3)dispatch_async与dispatch_sync函数
dispatch_async或dispatch_sync函数用来加载需要运行的block。
dispatch_async(queue, ^{

  //block具体代码

}); //异步执行block,函数立即返回
dispatch_sync(queue, ^{

  //block具体代码

}); //同步执行block,函数不返回,一直等到block执行完毕。编译器会根据实际情况优化代码,所以有时候你会发现block其实还在当前线程上执行,并没用产生新线程。
建议尽可能避免使用dispatch_sync,嵌套使用时容易引起程序死锁。
如果queue1是一个串行队列的话,这段代码立即产生死锁:
dispatch_sync(queue1, ^{

      dispatch_sync(queue1, ^{
    ......
  });
  ......
});
那实际运用中,一般可以用dispatch这样来写,常见的网络请求数据多线程执行模型:
dispatch_async(dispatch_get_global_queue(DISPATCH_QUEUE_PRIORITY_DEFAULT, 0), ^{
  //子线程中开始网络请求数据
  //更新数据模型
  dispatch_sync(dispatch_get_main_queue(), ^{
    //在主线程中更新UI代码
  });
});
(4)GCD_Group
    NSLog(@"执行GCD");
    dispatch_queue_t queue = dispatch_queue_create("com.test.gcd.queue", DISPATCH_QUEUE_CONCURRENT);
    dispatch_group_t group = dispatch_group_create();
    dispatch_group_async(group, queue, ^{
        NSLog(@"start task 1");
        [NSThread sleepForTimeInterval:2];
        NSLog(@"end task 1");
    });
    dispatch_group_async(group, queue, ^{
        NSLog(@"start task 2");
        [NSThread sleepForTimeInterval:2];
        NSLog(@"end task 2");
    });
    dispatch_group_async(group, queue, ^{
        NSLog(@"start task 3");
        [NSThread sleepForTimeInterval:2];
        NSLog(@"end task 3");
    });
    // 统一回调通知
    dispatch_group_notify(group, queue, ^{
        NSLog(@"All tasks over");
        dispatch_async(dispatch_get_main_queue(), ^{
            NSLog(@"回到主线程刷新UI");
        });
    });
    NSLog(@"执行GCD");
    dispatch_queue_t queue = dispatch_queue_create("com.test.gcd.queue", DISPATCH_QUEUE_CONCURRENT);
    dispatch_group_t group = dispatch_group_create();
    dispatch_group_async(group, queue, ^{
        [self sendRequest1:^{          //异步请求,请求不在group_async内,直接完成
            NSLog(@"request1 done");
        }];
    });
    dispatch_group_async(group, queue, ^{
        [self sendRequest2:^{          //异步请求,请求不在group_async内,直接完成
            NSLog(@"request2 done");
        }];
    });
    dispatch_group_notify(group, queue, ^{  //异步请求完成,统一回调
        NSLog(@"All tasks over");
        dispatch_async(dispatch_get_main_queue(), ^{
            NSLog(@"回到主线程刷新UI");
        });
    });

-(void)sendRequest1:(void(^)())block{     // 异步请求1
    dispatch_async(dispatch_get_global_queue(0, 0), ^{
        NSLog(@"start task 1");
        [NSThread sleepForTimeInterval:2];
        NSLog(@"end task 1");
        dispatch_async(dispatch_get_main_queue(), ^{
            if (block) {
                block();
            }
        });
    });
}
-(void)sendRequest2:(void(^)())block{     // 异步请求2
    dispatch_async(dispatch_get_global_queue(0, 0), ^{
        NSLog(@"start task 2");
        [NSThread sleepForTimeInterval:2];
        NSLog(@"end task 2");
        dispatch_async(dispatch_get_main_queue(), ^{
            if (block) {
                block();
            }
        });
    });
}
    NSLog(@"执行GCD");
    dispatch_queue_t queue = dispatch_queue_create("com.test.gcd.queue", DISPATCH_QUEUE_CONCURRENT);
    dispatch_group_t group = dispatch_group_create();
    //enter与leave成对出现
    dispatch_group_enter(group);//将request1放入group中
    [self sendRequest1:^{
        NSLog(@"request1 done");
        dispatch_group_leave(group);//request1完成后释放
    }];
    dispatch_group_enter(group);//将request2放入group中
    [self sendRequest2:^{
        NSLog(@"request2 done");
        dispatch_group_leave(group);//request2完成后释放
    }];
    // 统一回调通知
    dispatch_group_notify(group, queue, ^{
        NSLog(@"All tasks over");
        dispatch_async(dispatch_get_main_queue(), ^{
            NSLog(@"回到主线程刷新UI");
        });
    });
(5)单例dispatch_once
在整个程序的生命周期内,只执行一次,执行完不销毁,一直存在于内存中。
#import
@interface TestSingle : NSObject
+(instancetype)instance;
@end
#import "TestSingle.h"
@implementation TestSingle
+(instancetype)instance{
    static dispatch_once_t onceToken;
    static TestSingle *testSingle = nil;
    dispatch_once(&onceToken, ^{
        NSLog(@"init the TestSingle");
        testSingle = [[TestSingle alloc]init];
    });
    return testSingle;
}
@end
-(void)clickSingle{
    TestSingle *single = [TestSingle instance];
    NSLog(@"%@",single);
}
(6)延迟dispatch_after
-(void)clickTime{
    NSLog(@"---begin---");
    // 两秒后执行
    dispatch_after(dispatch_time(DISPATCH_TIME_NOW, (int64_t)(2 * NSEC_PER_SEC)), dispatch_get_main_queue(), ^{
        NSLog(@"delay excute");
    });
}
延迟显示
问题:在某页面一旦设置延迟执行,退出该页面依然会执行
四、NSOperation(基类):GCD的封装
相关概念:
- NSOperationQueue:队列,线程池,可将NSOperation对象添加进去,系统根据当前资源进行分配。
1). addOperation
2). setMaxConcurrentOperationCount:设置最大变化数,同一时间只能有该数个线程执行 - 状态
ready、cancelled、executing、finish、asynchronous - 依赖
addDependency
(1) NSInvocationOperation与 NSBlockOperation
-(void)operationTest{
    NSLog(@"main thread");
    // 同步执行
    NSInvocationOperation *invocationOper = [[NSInvocationOperation alloc]initWithTarget:self selector:@selector(invocationAction) object:nil];
    [invocationOper start];
    NSLog(@"end");
}
-(void)invocationAction{
    for (int i=0; i<3; i++) {
        NSLog(@"invocation %d",i);
        [NSThread sleepForTimeInterval:1];
    }
}
-(void)operationTest{
    NSLog(@"main thread");
    // 同步执行
    NSBlockOperation *blockOper=[NSBlockOperation blockOperationWithBlock:^{
        for (int i=0; i<3; i++) {
            NSLog(@"invocation %d",i);
            [NSThread sleepForTimeInterval:1];
        }
    }];
    [blockOper start];
    NSLog(@"end");
}
@interface ViewController ()
@property(nonatomic,strong)NSOperationQueue *operQueue;
@end
-(void)operationTest{
    NSLog(@"main thread");
    NSBlockOperation *blockOper=[NSBlockOperation blockOperationWithBlock:^{
        for (int i=0; i<3; i++) {
            NSLog(@"invocation %d",i);
            [NSThread sleepForTimeInterval:1];
        }
    }];
    if (!self.operQueue) {
        self.operQueue = [[NSOperationQueue alloc]init];
    }
    [self.operQueue addOperation:blockOper];
    NSLog(@"end");
}
(2)自定义NSOperation
#import

@interface CustomOperation : NSOperation
-(instancetype)initWithName:(NSString*)name;
@end
#import "CustomOperation.h"

@interface CustomOperation()
@property(nonatomic,strong) NSString* operName;
@end

@implementation CustomOperation
-(instancetype)initWithName:(NSString*)name{
    if (self = [super init]) {
        self.operName = name;
    }
    return self;
}
-(void)main{
    for (int i=0; i<3; i++) {
        NSLog(@"%@ %d",self.operName,i);
        [NSThread sleepForTimeInterval:1];
    }
}
@end
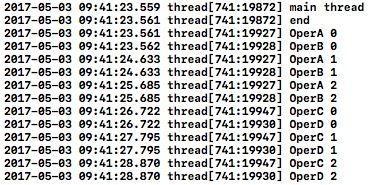
    NSLog(@"main thread");
    CustomOperation *customOperA = [[CustomOperation alloc]initWithName:@"OperA"];
    CustomOperation *customOperB = [[CustomOperation alloc]initWithName:@"OperB"];
    CustomOperation *customOperC = [[CustomOperation alloc]initWithName:@"OperC"];
    CustomOperation *customOperD = [[CustomOperation alloc]initWithName:@"OperD"];

    if (!self.operQueue) {
        self.operQueue = [[NSOperationQueue alloc]init];
    }
    [self.operQueue addOperation:customOperA];
    [self.operQueue addOperation:customOperB];
    [self.operQueue addOperation:customOperC];
    [self.operQueue addOperation:customOperD];

    NSLog(@"end");
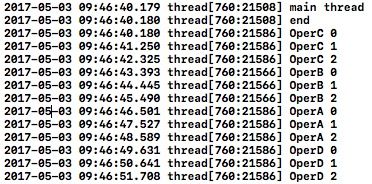
[self.operQueue setMaxConcurrentOperationCount:1];
[customOperD addDependency:customOperA];
[customOperA addDependency:customOperB];
[customOperB addDependency:customOperC];
@interface CustomOperation()

@property(nonatomic,strong) NSString* operName;
@property BOOL over;

@end

@implementation CustomOperation

-(instancetype)initWithName:(NSString*)name{
    if (self = [super init]) {
        self.operName = name;
    }
    return self;
}
-(void)main{
    dispatch_async(dispatch_get_global_queue(0, 0), ^{
        [NSThread sleepForTimeInterval:1];
        if (self.cancelled) {
            return ;
        }
        NSLog(@"%@",self.operName);
    });
}

@end
#import "CustomOperation.h"

@interface CustomOperation()

@property(nonatomic,strong) NSString* operName;
@property BOOL over;

@end

@implementation CustomOperation

-(instancetype)initWithName:(NSString*)name{
   if (self = [super init]) {
       self.operName = name;
   }
   return self;
}
-(void)main{
   dispatch_async(dispatch_get_global_queue(0, 0), ^{
       [NSThread sleepForTimeInterval:1];
       if (self.cancelled) {
           return ;
       }
       NSLog(@"%@",self.operName);
       self.over = YES;
   });
   // 异步完成前一直执行,线程不会立即结束
   while (!self.over && self.cancelled) {
       // 循环监听状态
       [[NSRunLoop currentRunLoop] runMode:NSDefaultRunLoopMode beforeDate:[NSDate distantFuture]];
   }
}

@end
来源1:慕课网_iOS基础之搞定多线程


