版权声明:原创作品,谢绝转载!否则将追究法律责任。
前言
最近中国和印度的局势也是愈演愈烈。作为一个爱国青年我有些愤怒,但有时又及其的骄傲。不知道是因为中国外交强势还是软弱,怎样也应该有个态度吧?这是干嘛?就会抗议 在不就搞一些军演。有毛用啊?
自己判断可能是国家有自己的打算吧!就好比狮子和疯狗一样何必那!中国和印度的纷纷扰扰,也不知道怎样霸气侧漏还是在伤仲永。
霸气侧漏是航母的电子弹射还是核潜艇或者是无人机.....
项目开始
我想大家都知道docker 但是也都玩过k8s吧!
搭建kubernetes集群时遇到一些问题,网上有不少搭建文档可以参考,但是满足以下网络互通才能算k8s集群ready。
需求如下:
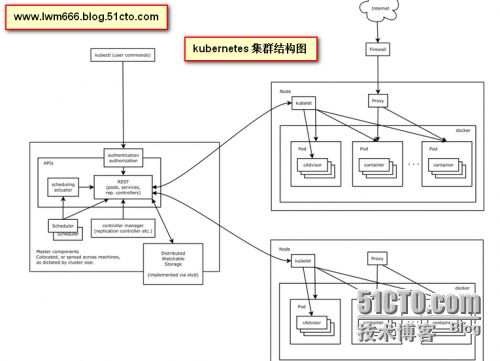
k8s结构图如下:
以下是版本和机器信息:
节点初始化
更新CentOS-Base.repo为阿里云yum源
mv -f /etc/yum.repos.d/CentOS-Base.repo /etc/yum.repos.d/CentOS-Base.repo.bk;
curl -o /etc/yum.repos.d/CentOS-Base.repo http://mirrors.aliyun.com/repo/Centos-7.repo
设置bridge
cat < /etc/sysctl.d/k8s.conf
net.bridge.bridge-nf-call-ip6tables = 1
net.bridge.bridge-nf-call-iptables = 1
net.bridge.bridge-nf-call-arptables = 1
EOF
sudo sysctl --system
disable selinux (请不要用setenforce 0)
sed -i 's/SELINUX=enforcing/SELINUX=disabled/' /etc/selinux/config
关闭防火墙
sudo systemctl disable firewalld.service
sudo systemctl stop firewalld.service
关闭iptables
sudo yum install -y iptables-services;iptables -F; #可略过sudo systemctl disable iptables.service
sudo systemctl stop iptables.service
安装相关软件
sudo yum install -y vim wget curl screen git etcd ebtables flannel
sudo yum install -y socat net-tools.x86_64 iperf bridge-utils.x86_64
安装docker (目前默认安装是1.12)
sudo yum install -y yum-utils device-mapper-persistent-data lvm2
sudo yum install -y libdevmapper* docker
安装kubernetes
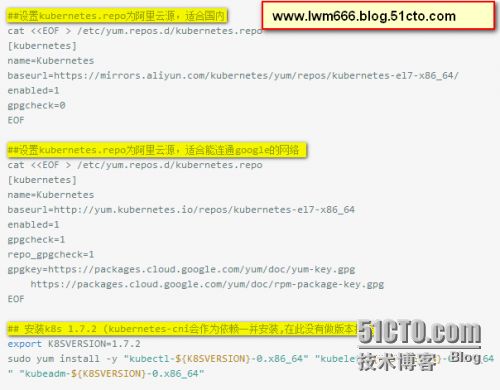
方便复制粘贴如下:
##设置kubernetes.repo为阿里云源,适合国内cat < /etc/yum.repos.d/kubernetes.repo [kubernetes] name=Kubernetes baseurl=https://mirrors.aliyun.com/kubernetes/yum/repos/kubernetes-el7-x86_64/ enabled=1 gpgcheck=0 EOF##设置kubernetes.repo为阿里云源,适合能连通google的网络cat < /etc/yum.repos.d/kubernetes.repo [kubernetes] name=Kubernetes baseurl=http://yum.kubernetes.io/repos/kubernetes-el7-x86_64 enabled=1 gpgcheck=1 repo_gpgcheck=1 gpgkey=https://packages.cloud.google.com/yum/doc/yum-key.gpg https://packages.cloud.google.com/yum/doc/rpm-package-key.gpg EOF## 安装k8s 1.7.2 (kubernetes-cni会作为依赖一并安装,在此没有做版本指定)exportK8SVERSION=1.7.2 sudo yum install -y"kubectl-${K8SVERSION}-0.x86_64""kubelet-${K8SVERSION}-0.x86_64""kubeadm-${K8SVERSION}-0.x86_64"
重启机器 (这一步是需要的)
reboot
重启机器后执行如下步骤
配置docker daemon并启动docker
cat
OPTIONS="-H unix:///var/run/docker.sock -H tcp://127.0.0.1:2375 --storage-driver=overlay --exec-opt native.cgroupdriver=cgroupfs --graph=/localdisk/docker/graph --insecure-registry=gcr.io --insecure-registry=quay.io --insecure-registry=registry.cn-hangzhou.aliyuncs.com --registry-mirror=http://138f94c6.m.daocloud.io"EOF
systemctl start docker
systemctl status docker -l
拉取k8s 1.7.2 需要的镜像
quay.io/calico/node:v1.3.0
quay.io/calico/cni:v1.9.1
quay.io/calico/kube-policy-controller:v0.6.0
gcr.io/google_containers/pause-amd64:3.0
gcr.io/google_containers/kube-proxy-amd64:v1.7.2
gcr.io/google_containers/kube-apiserver-amd64:v1.7.2
gcr.io/google_containers/kube-controller-manager-amd64:v1.7.2
gcr.io/google_containers/kube-scheduler-amd64:v1.7.2
gcr.io/google_containers/etcd-amd64:3.0.17
gcr.io/google_containers/k8s-dns-dnsmasq-nanny-amd64:1.14.4
gcr.io/google_containers/k8s-dns-kube-dns-amd64:1.14.4
gcr.io/google_containers/k8s-dns-sidecar-amd64:1.14.4
在非k8s master节点 10.12.0.22 上启动ETCD (也可搭建成ETCD集群)
screen etcd -name="EtcdServer" -initial-advertise-peer-urls=http://10.12.0.22:2380 -listen-peer-urls=http://0.0.0.0:2380 -listen-client-urls=http://10.12.0.22:2379 -advertise-client-urls http://10.12.0.22:2379 -data-dir /var/lib/etcd/default.etcd
在每个节点上check是否可通达ETCD, 必须可通才行, 不通需要看下防火墙是不是没有关闭
etcdctl --endpoint=http://10.12.0.22:2379 member list
etcdctl --endpoint=http://10.12.0.22:2379 cluster-health
在k8s master节点上使用kubeadm启动,
pod-ip网段设定为10.68.0.0/16, cluster-ip网段为默认10.96.0.0/16
如下命令在master节点上执行
cat << EOF >kubeadm_config.yaml
apiVersion: kubeadm.k8s.io/v1alpha1
kind: MasterConfiguration
api:
advertiseAddress: 10.12.0.18 bindPort: 6443
etcd:
endpoints:
- http://10.12.0.22:2379
networking:
dnsDomain: cluster.local
serviceSubnet: 10.96.0.0/16
podSubnet: 10.68.0.0/16
kubernetesVersion: v1.7.2#token: #tokenTTL: 0EOF##kubeadm init --config kubeadm_config.yaml
执行kubeadm init命令后稍等几十秒,master上api-server, scheduler, controller-manager容器都启动起来,以下命令来check下master
如下命令在master节点上执行
rm -rf $HOME/.kube
mkdir -p $HOME/.kube
sudo cp -i /etc/kubernetes/admin.conf $HOME/.kube/config
sudo chown $(id -u):$(id -g) $HOME/.kube/config
kubectl get cs -o wide --show-labels
kubectl get nodes -o wide --show-labels
节点加入, 需要kubeadm init命令输出的token, 如下命令在node节点上执行
systemctl start docker
systemctl start kubelet
kubeadm join --token *{6}.*{16} 10.12.0.18:6443 --skip-preflight-checks
在master节点上观察节点加入情况, 因为还没有创建网络,所以,所有master和node节点都是NotReady状态, kube-dns也是pending状态
kubectl get nodes -o wide
watch kubectl get all --all-namespaces -o wide
对calico.yaml做了修改
删除ETCD创建部分,使用外部ETCD
修改CALICO_IPV4POOL_CIDR为10.68.0.0/16
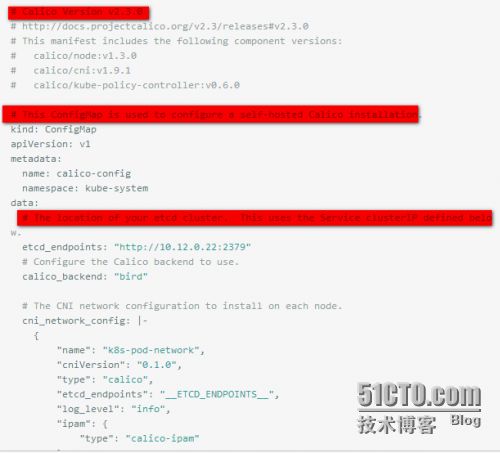
calico.yaml如下:
# Calico Version v2.3.0
#http://docs.projectcalico.org/v2.3/releases#v2.3.0
# This manifest includes the following component versions:
# calico/node:v1.3.0
# calico/cni:v1.9.1
# calico/kube-policy-controller:v0.6.0
# This Config Map is used to configure a self-hosted Calico installation.kind:Config MapapiVersion:v1metadata:name:calico-confignamespace:kube-systemdata:
# The location of your etcd cluster. This uses the Service clusterIP defined below.etcd_endpoints:"http://10.12.0.22:2379"
# Configure the Calico backend to use.calico_backend:"bird"
# The CNI network configuration to install on each node.cni_network_config:|- {"name":"k8s-pod-network","cniVersion":"0.1.0","type":"calico","etcd_endpoints":"__ETCD_ENDPOINTS__","log_level":"info","ipam":{"type":"calico-ipam"},"policy":{"type":"k8s","k8s_api_root":"https://__KUBERNETES_SERVICE_HOST__:__KUBERNETES_SERVICE_PORT__","k8s_auth_token":"__SERVICEACCOUNT_TOKEN__"},"kubernetes":{"kubeconfig":"/etc/cni/net.d/__KUBECONFIG_FILENAME__"} }---
# This manifest installs the calico/node container, as well
# as the Calico CNI plugins and network config on
# each master and worker node in a Kubernetes cluster.kind:DaemonSetapiVersion:extensions/v1beta1metadata:name:calico-nodenamespace:kube-systemlabels:k8s-app:calico-nodespec:selector:matchLabels:k8s-app:calico-nodetemplate:metadata:labels:k8s-app:calico-nodeannotations:
# Mark this pod as a critical add-on; when enabled, the critical add-on scheduler
# reserves resources for critical add-on pods so that they can be rescheduled after
# a failure. This annotation works in tandem with the toleration below.scheduler.alpha.kubernetes.io/critical-pod:''spec:hostNetwork:truetolerations:- key:node-role.kubernetes.io/mastereffect:NoSchedule
# Allow this pod to be rescheduled while the node is in "critical add-ons only" mode.
# This, along with the annotation above marks this pod as a critical add-on.key:CriticalAddonsOnlyoperator:ExistsserviceAccountName:calico-cni-plugincontainers:
# Runs calico/node container on each Kubernetes node. This# container programs network policy and routes on each# host.- name:calico-nodeimage:quay.io/calico/node:v1.3.0env:
# The location of the Calico etcd cluster.- name:ETCD_ENDPOINTSvalueFrom:configMapKeyRef:name:calico-configkey:etcd_endpoints
# Enable BGP. Disable to enforce policy only.- name:CALICO_NETWORKING_BACKENDvalueFrom:config MapKeyRef:name:calico-configkey:calico_backend
# Disable file logging so `kubectl logs` works.- name:CALICO_DISABLE_FILE_LOGGINGvalue:"true"
# Set Felix endpoint to host default action to ACCEPT.- name:FELIX_DEFAULTENDPOINTTOHOSTACTIONvalue:"ACCEPT"
# Configure the IP Pool from which Pod IPs will be chosen.- name:CALICO_IPV4POOL_CIDRvalue:"10.68.0.0/16"- name:CALICO_IPV4POOL_IPIPvalue:"always"
# Disable IPv6 on Kubernetes.- name:FELIX_IPV6SUPPORTvalue:"false"
# Set Felix logging to "info"- name:FELIX_LOGSEVERITYSCREENvalue:"info"
# Auto-detect the BGP IP address.- name:IPvalue:""securityContext:privileged:trueresources:requests:cpu:250mvolumeMounts:- mountPath:/lib/modulesname:lib-modulesreadOnly:true- mountP/var/run/caliconame:var-run-calicoreadOnly:false
# This container installs the Calico CNI binaries
# and CNI network config file on each node.- name:install-cniimage:quay.io/calico/cni:v1.9.1command:["/install-cni.sh"]env:
# The location of the Calico etcd cluster.- name:ETCD_ENDPOINTSvalueFrom:configMapKeyRef:name:calico-configkey:etcd_endpoints
# The CNI network config to install on each node.- name:CNI_NETWORK_CONFIGvalueFrom:configMapKeyRef:name:calico-configkey:cni_network_configvolumeMounts:- mountPath:/host/opt/cni/biname:cni-bin-dir- mountPath:/host/etc/cni/net.dname:cni-net-dirvolumes:
# Used by calico/node.- name:lib-moduleshostPath:path:/lib/modules- name:var-run-calicohostPath:path:/var/run/calico# Used to install CNI.- name:cni-bin-dirhostPath:path:/opt/cni/bin- name:cni-net-dirhostPath:path:/etc/cni/net.d---# This manifest deploys the Calico policy controller on Kubernetes.
# See https://github.com/projectcalico/k8s-policyapiVersion:extensions/v1beta1kind:Deploymentmetadata:name:calico-policy-controllernamespace:kube-systemlabels:k8s-app:calico-policyspec:
# The policy controller can only have a single active instance.replicas:1strategy:type:Recreatetemplate:metadata:name:calico-policy-controllernamespace:kube-systemlabels:k8s-app:calico-policy-controllerannotations:
# Mark this pod as a critical add-on; when enabled, the critical add-on scheduler
# reserves resources for critical add-on pods so that they can be rescheduled after
# a failure. This annotation works in tandem with the toleration below.scheduler.alpha.kubernetes.io/critical-pod:''spec:
# The policy controller must run in the host network namespace so that
# it isn't governed by policy that would prevent it from working.hostNetwork:truetolerations:- key:node-role.kubernetes.io/mastereffect:NoSchedule# Allow this pod to be rescheduled while the node is in "critical add-ons only" mode.
# This, along with the annotation above marks this pod as a critical add-on.- key:CriticalAddonsOnlyoperator:ExistsserviceAccountName:calico-policy-controllercontainers:- name:calico-policy-controllerimage:quay.io/calico/kube-policy-controller:v0.6.0env:
# The location of the Calico etcd cluster.- name:ETCD_ENDPOINTSvalueFrom:configMapKeyRef:name:calico-configkey:etcd_endpoints
# The location of the Kubernetes API. Use the default Kubernetes
# service for API access.- name:K8S_APIvalue:"https://kubernetes.default:443"
# Since we're running in the host namespace and might not have KubeDNS
# access, configure the container's /etc/hosts to resolve
# kubernetes.default to the correct service clusterIP.- name:CONFIGURE_ETC_HOSTSvalue:"true"---apiVersion:rbac.authorization.k8s.io/v1beta1kind:ClusterRoleBindingmetadata:name:calico-cni-pluginroleRef:apiGroup:rbac.authorization.k8s.iokind:ClusterRolename:calico-cni-pluginsubjects:- kind:ServiceAccountname:calico-cni-pluginnamespace:kube-system---kind:ClusterRoleapiVersion:rbac.authorization.k8s.io/v1beta1metadata:name:calico-cni-pluginnamespace:kube-systemrules:- apiGroups:[""]resources:-pods-nodesverbs:-get---apiVersion:v1kind:ServiceAccountmetadata:name:calico-cni-pluginnamespace:kube-system---apiVersion:rbac.authorization.k8s.io/v1beta1kind:ClusterRoleBindingmetadata:name:calico-policy-controllerroleRef:apiGroup:rbac.authorization.k8s.iokind:ClusterRolename:calico-policy-controllersubjects:- kind:ServiceAccountname:calico-policy-controllernamespace:kube-system---kind:ClusterRoleapiVersion:rbac.authorization.k8s.io/v1beta1metadata:name:calico-policy-controllernamespace:kube-systemrules:- apiGroups:-""-extensionsresources:-pods-namespaces-networkpoliciesverbs:-watch-list---apiVersion:v1kind:ServiceAccountmetadata:name:calico-policy-controllernamespace:kube-system
创建calico跨主机网络, 在master节点上执行如下命令
kubectl apply -f calico.yaml
注意观察每个节点上会有名为calico-node-****的pod起来, calico-policy-controller和kube-dns也会起来, 这些pod都在kube-system名字空间里
>kubectl get all --all-namespaces
NAMESPACE NAME READY STATUS RESTARTS AGE
kube-system po/calico-node-2gqf2 2/2 Running 0 19h
kube-system po/calico-node-fg8gh 2/2 Running 0 19h
kube-system po/calico-node-ksmrn 2/2 Running 0 19h
kube-system po/calico-policy-controller-1727037546-zp4lp 1/1 Running 0 19h
kube-system po/etcd-izuf6fb3vrfqnwbct6ivgwz 1/1 Running 0 19h
kube-system po/kube-apiserver-izuf6fb3vrfqnwbct6ivgwz 1/1 Running 0 19h
kube-system po/kube-controller-manager-izuf6fb3vrfqnwbct6ivgwz 1/1 Running 0 19h
kube-system po/kube-dns-2425271678-3t4g6 3/3 Running 0 19h
kube-system po/kube-proxy-6fg1l 1/1 Running 0 19h
kube-system po/kube-proxy-fdbt2 1/1 Running 0 19h
kube-system po/kube-proxy-lgf3z 1/1 Running 0 19h
kube-system po/kube-scheduler-izuf6fb3vrfqnwbct6ivgwz 1/1 Running 0 19h
NAMESPACE NAME CLUSTER-IP EXTERNAL-IP PORT(S) AGE
default svc/kubernetes 10.96.0.1 443/TCP 19h
kube-system svc/kube-dns 10.96.0.10 53/UDP,53/TCP 19h
NAMESPACE NAME DESIRED CURRENT UP-TO-DATE AVAILABLE AGE
kube-system deploy/calico-policy-controller 1 1 1 1 19h
kube-system deploy/kube-dns 1 1 1 1 19h
NAMESPACE NAME DESIRED CURRENT READY AGE
kube-system rs/calico-policy-controller-1727037546 1 1 1 19h
kube-system rs/kube-dns-2425271678 1 1 1 19h
部署dash-board
wget https://raw.githubusercontent.com/kubernetes/dashboard/master/src/deploy/kubernetes-dashboard.yaml
kubectl create -f kubernetes-dashboard.yaml
部署heapster
wget https://github.com/kubernetes/heapster/archive/v1.4.0.tar.gz
tar -zxvf v1.4.0.tar.gzcd heapster-1.4.0/deploy/kube-config/influxdb
kubectl create -f ./
其他命令
强制删除某个pod
kubectl delete pod --namespace= --grace-period=0 --force
重置某个node节点
kubeadm reset
systemctl stop kubelet;
docker ps -aq | xargs docker rm -fv
find /var/lib/kubelet | xargs -n 1 findmnt -n -t tmpfs -o TARGET -T | uniq | xargs -r umount -v;
rm -rf /var/lib/kubelet /etc/kubernetes/ /var/lib/etcd
systemctl start kubelet;
访问dashboard (在master节点上执行)
kubectl proxy --address=0.0.0.0 --port=8001 --accept-hosts='^.*'
or
kubectl proxy --port=8011 --address=192.168.61.100 --accept-hosts='^192\.168\.61\.*'
access to http://0.0.0.0:8001/ui
Access to API with authentication token
APISERVER=$(kubectl config view | grep server | cut -f 2- -d ":" | tr -d " ")
TOKEN=$(kubectl describe secret $(kubectl get secrets | grep default | cut -f1 -d ' ') | grep -E '^token' | cut -f2 -d':' | tr -d '\t')
curl $APISERVER/api --header "Authorization: Bearer $TOKEN" --insecure
让master节点参与调度,默认master是不参与到任务调度中的
kubectl taint nodes --all node-role.kubernetes.io/master-
or
kubectl taint nodes --all dedicated-
kubernetes master 消除隔离之前 Annotations
Name: izuf6fb3vrfqnwbct6ivgwzRole:Labels: beta.kubernetes.io/arch=amd64
beta.kubernetes.io/os=linux
kubernetes.io/hostname=izuf6fb3vrfqnwbct6ivgwz
node-role.kubernetes.io/master=Annotations: node.alpha.kubernetes.io/ttl=0
volumes.kubernetes.io/controller-managed-attach-detach=true
kubernetes master 消除隔离之后 Annotations
Name: izuf6fb3vrfqnwbct6ivgwzRole:Labels: beta.kubernetes.io/arch=amd64
beta.kubernetes.io/os=linux
kubernetes.io/hostname=izuf6fb3vrfqnwbct6ivgwz
node-role.kubernetes.io/master=Annotations: node.alpha.kubernetes.io/ttl=0
volumes.kubernetes.io/controller-managed-attach-detach=trueTaints:
总结:通过测试已经完成但是还有错看过文档的伙伴能猜到吗?
本文出自 “李世龙” 博客,谢绝转载!


