由于redis集群需要使用ruby命令,所以我们需要安装ruby(所有的操作都是在单机部署的伪集群模式下进行)
(1)yum install ruby
(2)yum install rubygems
(3)gem install redis (安装redis和ruby的接口)
一、原始集群(6节点 3主3从):
(1)启动集群:
[root@centos~]#/usr/local/redis/bin/redis-server /usr/local/redis-cluster/7001/redis.conf
[root@ centos ~]#/usr/local/redis/bin/redis-server /usr/local/redis-cluster/7002/redis.conf
[root@ centos ~]# /usr/local/redis/bin/redis-server/usr/local/redis-cluster/7003/redis.conf
[root@ centos ~]#/usr/local/redis/bin/redis-server /usr/local/redis-cluster/7004/redis.conf
[root@ centos ~]#/usr/local/redis/bin/redis-server /usr/local/redis-cluster/7005/redis.conf
[root@ centos ~]# /usr/local/redis/bin/redis-server/usr/local/redis-cluster/7006/redis.conf
(2)查看服务器运行状态:
[root@centos~]# ps -el | grep redis
5 S 0 1999 1 0 80 0 - 34359 ep_pol ? 00:00:00 redis-server
5 S 0 2003 1 0 80 0 - 34359 ep_pol ? 00:00:00 redis-server
5 S 0 2007 1 0 80 0 - 34359 ep_pol ? 00:00:00 redis-server
5 S 0 2011 1 0 80 0 - 34359 ep_pol ? 00:00:00 redis-server
5 S 0 2017 1 0 80 0 - 34359 ep_pol ? 00:00:00 redis-server
5 S 0 2023 1 0 80 0 - 34359 ep_pol ? 00:00:00 redis-server
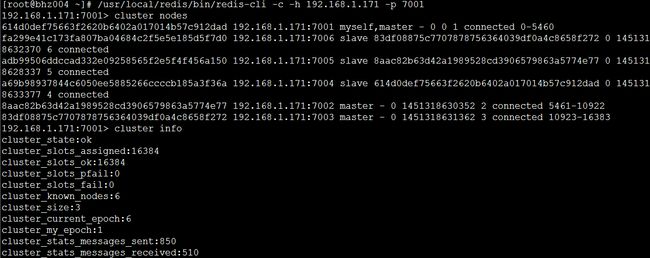
(3)查看集群状态
二、新集群操作
(1)我们新建俩个服务,按照之前搭建的集群方式新增俩个节点:(一主一从 master、slave)
Master:7007 Slave:7008
步骤一:创建7007/7008文件夹。拷贝redis.conf文件到对于的7007,7008目录下要
进行修改配置文件。
[root@centos redis-cluster]# mkdir 7007
[root@centos redis-cluster]# mkdir 7008
[root@centos redis-cluster]# cd 7001
[root@centos 7001]# cp redis.conf /usr/local/redis-cluster/7007/
[root@centos 7001]# cp redis.conf /usr/local/redis-cluster/7008/
[root@centos 7001]# vim/usr/local/redis-cluster/7007/redis.conf
修改内容如下:
port:7007
dir /usr/local/redis-cluster/7007/
cluster-config-file nodes7007.conf
[root@centos 7001]# vim/usr/local/redis-cluster/7008/redis.conf
修改内容如下:
port:7008
dir /usr/local/redis-cluster/7008/
cluster-config-file nodes7008.conf
步骤二:启动7007和7008俩个服务并查看服务状态。
[root@centos 7001]#/usr/local/redis/bin/redis-server /usr/local/redis-cluster/7007/redis.conf
[root@centos 7001]#/usr/local/redis/bin/redis-server /usr/local/redis-cluster/7008/redis.conf
[root@centos 7001]# ps -el | grep redis
(2)学习redis-trib命令使用:
[root@centos local]# cd/usr/local/redis3.0/src
[root@centos src]# redis-trib.rb
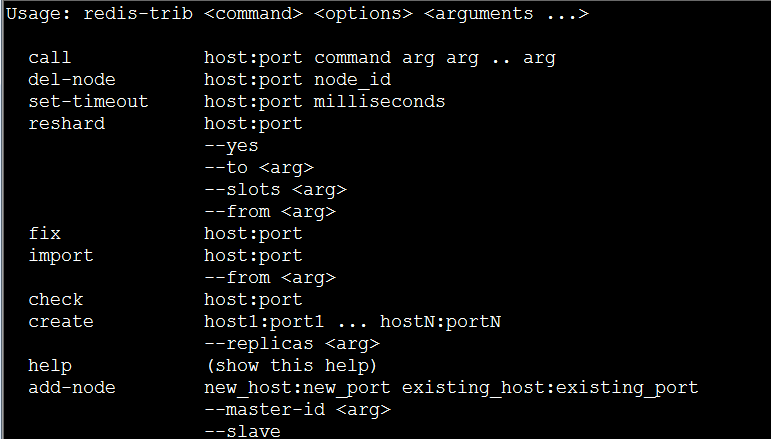
1 create:创建一个集群环境host1:port1 ... hostN:portN(集群中的主从节点比例)
2 call:可以执行redis命令
3 add-node:将一个节点添加到集群里,第一个参数为新节点的ip:port,第二个参数为集群中任意一个已经存在的节点的ip:port
4 del-node:移除一个节点
5 reshard:重新分片
6 check:检查集群状态
(3)新增一个主节点7007(master)
步骤一:使用add-node命令:绿色为新增节点,红色为已知存在节点
[root@centos 7001]#
/usr/local/redis3.0/src/redis-trib.rbadd-node192.168.1.171:7007192.168.1.171:7001
输出如下:
>>> Addingnode 192.168.1.171:7007 to cluster 192.168.1.171:7001
Connecting to node192.168.1.171:7001: OK
Connecting to node192.168.1.171:7006: OK
Connecting to node192.168.1.171:7005: OK
Connecting to node192.168.1.171:7004: OK
Connecting to node192.168.1.171:7002: OK
Connecting to node192.168.1.171:7003: OK
>>> PerformingCluster Check (using node 192.168.1.171:7001)
M:614d0def75663f2620b6402a017014b57c912dad 192.168.1.171:7001
slots:0-5460 (5461 slots) master
1 additional replica(s)
S:fa299e41c173fa807ba04684c2f5e5e185d5f7d0 192.168.1.171:7006
slots: (0 slots) slave
replicates83df08875c7707878756364039df0a4c8658f272
S:adb99506ddccad332e09258565f2e5f4f456a150 192.168.1.171:7005
slots: (0 slots) slave
replicates8aac82b63d42a1989528cd3906579863a5774e77
S:a69b98937844c6050ee5885266ccccb185a3f36a 192.168.1.171:7004
slots: (0 slots) slave
replicates614d0def75663f2620b6402a017014b57c912dad
M: 8aac82b63d42a1989528cd3906579863a5774e77192.168.1.171:7002
slots:5461-10922 (5462 slots) master
1 additional replica(s)
M:83df08875c7707878756364039df0a4c8658f272 192.168.1.171:7003
slots:10923-16383 (5461 slots) master
1 additional replica(s)
[OK] All nodes agreeabout slots configuration.
>>> Check foropen slots...
>>> Checkslots coverage...
[OK] All 16384 slotscovered.
Connecting to node192.168.1.171:7007: OK
>>> SendCLUSTER MEET to node 192.168.1.171:7007 to make it join the cluster.
[OK] New node added correctly.
步骤二:查看集群状态:
[root@centos src]#/usr/local/redis/bin/redis-cli -c -h 192.168.1.171 -p 7001
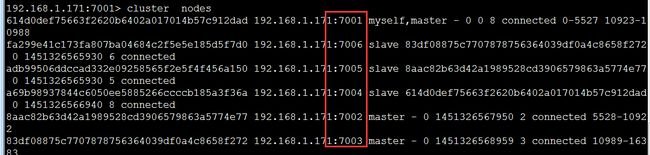
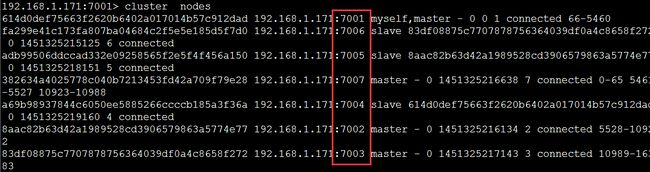
192.168.1.171:7001> cluster nodes

注意:当添加节点成功以后,新增的节点不会有任何数据,因为它没有分配任何的slot(hash槽)。我们需要为新节点手工分配slot。
为7007分配slot槽。
步骤一:使用redis-trib命令,找到集群中的任意一个主节点(红色位置表现集群中的任意一个主节点),对其进行重新分片工作。
[root@centos 7001]#/usr/local/redis3.0/src/redis-trib.rb reshard192.168.1.171:7001
输出如下:
>>> PerformingCluster Check (using node 192.168.1.171:7001)
M:614d0def75663f2620b6402a017014b57c912dad 192.168.1.171:7001
slots:0-5460 (5461 slots) master
1 additional replica(s)
S:fa299e41c173fa807ba04684c2f5e5e185d5f7d0 192.168.1.171:7006
slots: (0 slots) slave
replicates83df08875c7707878756364039df0a4c8658f272
S:adb99506ddccad332e09258565f2e5f4f456a150 192.168.1.171:7005
slots: (0 slots) slave
replicates8aac82b63d42a1989528cd3906579863a5774e77
M:382634a4025778c040b7213453fd42a709f79e28 192.168.1.171:7007
slots: (0 slots) master
0 additional replica(s)
S:a69b98937844c6050ee5885266ccccb185a3f36a 192.168.1.171:7004
slots: (0 slots) slave
replicates614d0def75663f2620b6402a017014b57c912dad
M:8aac82b63d42a1989528cd3906579863a5774e77 192.168.1.171:7002
slots:5461-10922 (5462 slots) master
1 additional replica(s)
M:83df08875c7707878756364039df0a4c8658f272 192.168.1.171:7003
slots:10923-16383 (5461 slots) master
1 additional replica(s)
[OK] All nodes agreeabout slots configuration.
>>> Check foropen slots...
>>> Checkslots coverage...
[OK] All 16384 slotscovered.
(提示一)
How many slots do you
want to move (from 1 to 16384)? 200
(提示二)
What is the receiving
node ID? 382634a4025778c040b7213453fd42a709f79e28
Please enter all thesource node IDs.
Type 'all' to use all the nodes as sourcenodes for the hash slots.
Type 'done' once you entered all the sourcenodes IDs.
Source node #1:all
Ready to move 200slots.
Source
nodes:
M: 614d0def75663f2620b6402a017014b57c912dad192.168.1.171:7001
slots:0-5460 (5461 slots) master
1 additional replica(s)
M: 8aac82b63d42a1989528cd3906579863a5774e77192.168.1.171:7002
slots:5461-10922 (5462 slots) master
1 additional replica(s)
M: 83df08875c7707878756364039df0a4c8658f272192.168.1.171:7003
slots:10923-16383 (5461 slots) master
1 additional replica(s)
Destination
node:
M: 382634a4025778c040b7213453fd42a709f79e28192.168.1.171:7007
slots: (0 slots) master
0 additional replica(s)
Resharding plan:(分片执行计划日志)
Moving slot 5461 from8aac82b63d42a1989528cd3906579863a5774e77
...
Moving slot 0 from 614d0def75663f2620b6402a017014b57c912dad
...
Moving slot 10923 from83df08875c7707878756364039df0a4c8658f272
...
(提示三)
Do you want to
proceed with the proposed reshard plan (yes/no)? yes
Moving slot 65 from192.168.1.171:7001 to 192.168.1.171:7007:
...
Moving slot 10923 from 192.168.1.171:7003to 192.168.1.171:7007:
...
Moving slot 5527 from192.168.1.171:7002 to 192.168.1.171:7007:
...
1提示一:是希望你需要多少个槽移动到新的节点上,可以自己设置,比如200个槽。
2提示二:是你需要把这200个slot槽移动到那个节点上去(需要指定节点id),并且下个 提示是输入all为从所有主节点(7001 7002 7003)中分别抽取响应的槽数(一共为200个槽到指定的新节点中!,并且会打印执行分片的计划。)
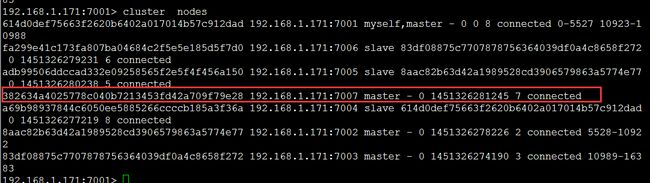
3提示三:输入yes确认开始执行分片任务。在最后我们再次看一下集群状态:

如上图所示,现在我们的7007已经有slot槽了,也就是说可以在7007上进行读写数据啦!到此为止我们的7007已经加入到集群中啦,并且是主节点(Master)
添加从节点(7008)到集群中去。
步骤一:还是需要执行add-node命令:
[root@centos 7001]#/usr/local/redis3.0/src/redis-trib.rbadd-node 192.168.1.171:7008 192.168.1.171:7001
提示添加成功后我们继续看一下集群的状态:
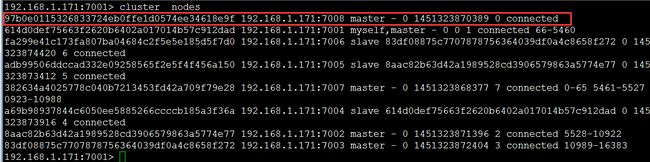
如图所示,还是一个master节点,没有被分配任何的slot槽。
步骤二:我们需要执行replicate命令来指定当前节点(从节点)的主节点id为哪个。
首先需要登录新加的7008节点的客户端,然后使用集群命令进行操作,把当前的7008(slave)节点指定到一个主节点下(这里使用之前创建的7007主节点,红色表示节点id)
[root@centos ~]# /usr/local/redis/bin/redis-cli-c -h 192.168.1.171 -p 7008
192.168.1.171:7008> cluster replicate382634a4025778c040b7213453fd42a709f79e28
192.168.1.171:7008> OK(提示OK则操作成功)
我们继续看一下当前集群的状态,如下图:我们已经成功的把7008放到7007这个主节点下面了,到此为止我们已经成功的添加完一个从节点了。

我们可以对集群进行操作,来验证下是否可以进行读写(当然可以)。
我们现在尝试删除一个节点(7008 slave)
步骤一:删除从节点7008,输入del-node命令,指定删除节点ip和端口,以及节点id(红色为7008节点id)
[root@centos 7001]#/usr/local/redis3.0/src/redis-trib.rb
del-node 192.168.1.171:700897b0e0115326833724eb0ffe1d0574ee34618e9f
输出如下:
>>> Removing node 97b0e0115326833724eb0ffe1d0574ee34618e9ffrom cluster 192.168.1.171:7008
Connecting to node 192.168.1.171:7008: OK
Connecting to node 192.168.1.171:7003: OK
Connecting to node 192.168.1.171:7006: OK
Connecting to node 192.168.1.171:7002: OK
Connecting to node 192.168.1.171:7005: OK
Connecting to node 192.168.1.171:7001: OK
Connecting to node 192.168.1.171:7004: OK
Connecting to node 192.168.1.171:7007: OK
>>> Sending CLUSTER FORGETmessages to the cluster...
>>> SHUTDOWN the node.
步骤二:再次查看一下集群状态,如下图所示,我们已经成功的移除了7008 slave节点,另外我们发现移除一个节点以后,当前节点的服务进程也会随之销毁。可以使用ps命令查看当前的服务(ps -el | grep
redis),发现少了一个运行的server,也就是刚移除的7008从节点。
最后,我们尝试删除之前加入的主节点7007
这个步骤会相对比较麻烦一些,因为主节点的里面是有分配了slot槽的,所以我们这里必须先把7007里的slot槽放入到其他的可用主节点中去,然后再进行移除节点操作才行,不然会出现数据丢失问题。
步骤一:删除7007(master)节点之前,我们需要先把其全部的数据(slot槽)移动到其他节点上去(目前只能把master的数据迁移到一个节点上,暂时做不了平均分配功能)。
[root@centos 7001]#/usr/local/redis3.0/src/redis-trib.rb reshard 192.168.1.171:7007
输出如下:
>>> Performing Cluster Check(using node 192.168.1.171:7007)
M:382634a4025778c040b7213453fd42a709f79e28 192.168.1.171:7007
slots:0-65,5461-5527,10923-10988 (199 slots) master
0 additional replica(s)
S: fa299e41c173fa807ba04684c2f5e5e185d5f7d0192.168.1.171:7006
slots: (0 slots) slave
replicates 83df08875c7707878756364039df0a4c8658f272
S: a69b98937844c6050ee5885266ccccb185a3f36a192.168.1.171:7004
slots: (0 slots) slave
replicates 614d0def75663f2620b6402a017014b57c912dad
M: 614d0def75663f2620b6402a017014b57c912dad192.168.1.171:7001
slots:66-5460 (5395 slots) master
1additional replica(s)
M: 8aac82b63d42a1989528cd3906579863a5774e77192.168.1.171:7002
slots:5528-10922 (5395 slots) master
1additional replica(s)
S: adb99506ddccad332e09258565f2e5f4f456a150192.168.1.171:7005
slots: (0 slots) slave
replicates 8aac82b63d42a1989528cd3906579863a5774e77
M: 83df08875c7707878756364039df0a4c8658f272192.168.1.171:7003
slots:10989-16383 (5395 slots) master
1additional replica(s)
[OK] All nodes agree about slotsconfiguration.
>>> Check for open slots...
>>> Check slots coverage...
[OK] All 16384 slots covered.
How many slots do you
want to move (from 1 to 16384)? 199
(注释:这里不会是正好200个槽)
What is the receiving
node ID? 614d0def75663f2620b6402a017014b57c912dad
(注释:这里是需要把数据移动到哪?7001的主节点id)
Please enter all thesource node IDs.
Type 'all' to use all the nodes as sourcenodes for the hash slots.
Type 'done' once you entered all the sourcenodes IDs.
Source node #1:382634a4025778c040b7213453fd42a709f79e28
(注释:这里是需要数据源,也就是我们的7007节点id)
Source node #2:done
(注释:这里直接输入done 开始生成迁移计划)
Ready to move 199 slots.
Source nodes:
M: 382634a4025778c040b7213453fd42a709f79e28192.168.1.171:7007
slots:0-65,5461-5527,10923-10988 (199 slots)master
0 additional replica(s)
Destination
node:
M: 614d0def75663f2620b6402a017014b57c912dad192.168.1.171:7001
slots:66-5460 (5395 slots) master
1 additional replica(s)
Resharding plan:
Moving slot 0 from 382634a4025778c040b7213453fd42a709f79e28
...
Do you want to
proceed with the proposed reshard plan (yes/no)?Yes
(注释:这里输入yes开始迁移)
Moving slot 0 from 192.168.1.171:7007 to192.168.1.171:7001:
...
到此为止我们已经成功的把7007主节点的数据迁移到7001上去了,我们可以看一下现在的集群状态如下图,你会发现7007下面已经没有任何数据(slot)槽了,证明迁移成功!
步骤二:最后我们直接使用del-node命令删除7007主节点即可(红色表示7007的节点id)。
[root@centos 7001]#/usr/local/redis3.0/src/redis-trib.rb del-node
192.168.1.171:7007382634a4025778c040b7213453fd42a709f79e28
输出如下:
>>> Removing node382634a4025778c040b7213453fd42a709f79e28 from cluster 192.168.1.171:7007
Connecting to node 192.168.1.171:7007: OK
Connecting to node 192.168.1.171:7006: OK
Connecting to node 192.168.1.171:7004: OK
Connecting to node 192.168.1.171:7001: OK
Connecting to node 192.168.1.171:7002: OK
Connecting to node 192.168.1.171:7005: OK
Connecting to node 192.168.1.171:7003: OK
>>> Sending CLUSTER FORGETmessages to the cluster...
>>> SHUTDOWN the node。
最后:我们查看集群状态,一切还原为最初始状态啦!OK 结束!