1. 组件的data为什么必须是函数?
组件中的 data 写成一个函数,数据以函数返回值形式定义,这样每复用一次组件,就会返回一份新的 data ,类似于给每个组件实例创建一个私有的数据空间,让各个组件实例维护各自的数据。而单纯的写成对象形式,就使得所有组件实例共用了一份data,就会造成一个组件的值发生改变,全部组件都会变的结果。
这样的好处就是每各个组件可以维护各自的数据,如果 data 是一个对象则会影响到其他组件。
2. 问 v-if 和 v-show 有什么区别?
相同点:v-if与v-show都可以动态控制dom元素显示隐藏
不同点:v-if隐藏是将dom元素整个删除,而v-show隐藏则是为该元素添加css--display:none,dom元素还在。
3. vue几种常用的指令
v-text:元素的innerText属性(不带标签)
v-html:元素的innerHTML属性(带标签)
v-bind:绑定属性
v-on:绑定事件,绑定的事件从methods中获取
事件修饰符
.stop:阻止冒泡,调用 event.stopPropagation()
.prevent:阻止默认事件,调用 event.preventDefault()
.capture:添加事件侦听器时使用事件捕获模式
v-model
作用:在表单元素上创建双向数据绑定
说明:监听用户的输入事件以更新数据
所谓的双向绑定,就是你在view视图层里面改变了值,vue里面对应的值也会改变。只能给具备value属性的元素进行双向数据绑定。
v-if 和 v-show
条件渲染
v-if:根据表达式的值的真假条件,销毁或重建DOM元素
v-show:根据表达式之真假值,切换元素的 display: block/none 属性
v-for
作用:基于源数据多次渲染元素或模板块,使用 v-for 的时候提供 key 属性,可以提高列表渲染的效率,提高页面的性能。
v-once 提升性能
说明:只渲染元素和组件一次。随后的重新渲染,元素/组件及其所有的子节点将被视为静态内容并跳过。这可以用于优化更新性能。
4. 对于Vue是一套渐进式框架的理解
Vue.js是一个渐进式框架,只需要具备基本的HTML/CSS/JavaScript基础就可以快速上手。在用Vue.js构建大型应用时推荐使用NPM安装,但是需要注意npm的版本需要大于3.0。
在通过npm安装项目后,我们需要对其目录进行解析:
(1) build:项目构建(webpack)相关代码;
(2) config:配置目录,包括端口号等。
(3) node_modules:npm加载的项目依赖模块
(4) src:这个目录当中的内容包含了我们基本上要做的事情,这里包含了几个文件:
(一)assets:存放图片
(二)components:存放组件文件
(三)App.vue:项目入口文件,组件也可以直接写在这里不适用components
(四)main.js:核心文件
(5) static:静态资源目录
(6) test:初始测试目录
(7) .xxxx:配置文件,包括git配置和语法配置等
(8) index.html:首页
(9) package.json:项目配置文件
(10) README.md:说明文档
Vue的mvvm框架给了前端一种思路:完全基于数据驱动,帮助你从繁杂的dom操作中解脱出来
使用Vue的过程就是定义MVVM各个组成部分过程的过程:
(1) 定义View
(2) 定义Model
(3) 创建一个Vue实例或“ViewModel”
在创建Vue实例的时候,需要传入选项对象,可以包含挂载元素、数据等。
Vue实例被创建前会经过初始化,然后在数据变化时更新DOM,在这个期间也会调用一些生命周期钩子,从而我们可以自定义逻辑。总共可以分为8个段:
(1) beforeCreate 初始化实例后 数据观测和事件配置之前调用
(2) created 实例创建完成后调用
(3) beforeMount 挂载开始前被用
(4) mounted el被新建vm.$el替换并挂在到实例上之后调用
(5) beforeUpdate 数据更新时调用
(6) updated 数据更改导致的DOM重新渲染后调用
(7) beforeDestory 实例被销毁前调用
(8) destoryed 实例销毁后调用
需要注意的是created和mounted的区别,created是实例已经创建但未挂载,所以一些dom操作要放在mounted中。
Vue组件的API来自props(允许外部环境传递数据给组件)、events(允许组件触发外部环境副作用)和slots(允许外部环境将额外的内容组合在组件中)三个部分,组件的data属性必须是函数。
渐进的理解:vue只是个轻量视图而已,只做自己该做的事,不做不该做的事。
5. vue中使用 v-for 时,绑定key的作用
可以提高列表渲染的效率,提升页面的性能。
6. v-for 与 v-if 的优先级
当 v-if 与 v-for 一起使用时,v-for 具有比 v-if 更高的优先级,这意味着 v-if 将分别重复运行于每个 v-for 循环中,所以,不推荐v-if和v-for同时使用。
7. axios 解决跨域问题
一、使用脚手架创建好项目
全局安装 vue-cli
npm install --global vue-cli
创建一个基于 webpack 模板的新项目
vue init webpack vue-demo
进入项目,安装依赖,启动项目
cd vue-demo
npm install
npm run dev
二、安装axios,并配置相应文件。这里跨域请求的接口来自豆瓣的api
安装 npm install axios --save
配置:
1、在 src/main.js 中引入使用
import axios from 'axios';
Vue.prototype.$axios=axios;
2、在 config/index.js 中的 的dev 添加以下代码,设置一下proxyTable;
proxyTable:{
    '/api': {
          target : 'https://movie.douban.com/',    //设置你调用的接口域名和端口号.别忘了加http
          changeOrigin : true,   //允许跨域
          pathRewrite : {
               '^/api': ''
               // '/'这里理解成用‘/api’代替target里面的地址,后面组件中我们掉接口时直接用api代替。比如我要调用'https://movie.douban.com/v2/movie/top250',直接写‘/api/v2/movie/top250’即可.
          }
    }
},
3、在 config/dev.env.js 中设置以下代码
module.exports = merge(prodEnv, {
  NODE_ENV: '"development"',  //开发环境
  API_HOST: "/api/"
})
4、在 config/prod.env.js 中设置以下代码
module.exports = {
  NODE_ENV: '"production"',//生产环境
  API_HOST: '"https://movie.douban.com/"'
}
5、修改 src/components/HelloWorld.vue 文件
{{ msg }}
-
{{item.title}}
到此 axios 跨域成功解决。
8. axios 封装http请求
- 在main.js 中引入
import axios from 'axios'
import {get, post, patch, put} from './config/http'
// 定义全局变量
Vue.prototype.$get=get;
Vue.prototype.$post=post;
Vue.prototype.$patch=patch;
Vue.prototype.$put=put;
2.src目录下创建config文件夹,config文件夹创建http.js
import axios from 'axios';

axios.defaults.timeout = 5000;
axios.defaults.baseURL ='';


//http request 拦截器
axios.interceptors.request.use(
  config => {
    // const token = getCookie('名称');注意使用的时候需要引入cookie方法,推荐js-cookie
    config.data = JSON.stringify(config.data);
    config.headers = {
      'Content-Type':'application/json;charset=UTF-8'         // 处理json
      // 'Content-Type':'application/x-www-form-urlencoded'   // 处理hash
    }
    // if(token){
    //   config.params = {'token':token}
    // }
    return config;
  },
  error => {
    return Promise.reject(err);
  }
);


//http response 拦截器
axios.interceptors.response.use(
  response => {
    if(response.data.errCode ==2){
      router.push({
        path:"/login",
        querry:{redirect:router.currentRoute.fullPath}//从哪个页面跳转
      })
    }
    return response;
  },
  error => {
    return Promise.reject(error)
  }
)


/**
 * 封装get方法
 * @param url
 * @param data
 * @returns {Promise}
 */

export function fetch(url,params={}){
  return new Promise((resolve,reject) => {
    axios.get(url,{
      params:params
    })
    .then(response => {
      resolve(response.data);
    })
    .catch(err => {
      reject(err)
    })
  })
}


/**
 * 封装post请求
 * @param url
 * @param data
 * @returns {Promise}
 */

 export function post(url,data = {}){
   return new Promise((resolve,reject) => {
     axios.post(url,data)
          .then(response => {
            resolve(response.data);
          },err => {
            reject(err)
          })
   })
 }

 /**
 * 封装patch请求
 * @param url
 * @param data
 * @returns {Promise}
 */

export function patch(url,data = {}){
  return new Promise((resolve,reject) => {
    axios.patch(url,data)
         .then(response => {
           resolve(response.data);
         },err => {
           reject(err)
         })
  })
}

 /**
 * 封装put请求
 * @param url
 * @param data
 * @returns {Promise}
 */

export function put(url,data = {}){
  return new Promise((resolve,reject) => {
    axios.put(url,data)
         .then(response => {
           resolve(response.data);
         },err => {
           reject(err)
         })
  })
}
- 在项目的 config/index.js 解决跨域请求
proxyTable: {
    '/apis': {
        // target: 'http://39.105.189.51:8052',
        target: 'http://api.edgvip.cn',
        changeOrigin: true,
        pathRewrite: {
          '^/apis': ''
        }
    }
},
-
组件中引入使用
eg: 接口文档为下图
methods: {
    login() {
      this.$post('apis/api/user/login1',{mobilePhone: this.mobilePhone, password: this.password}).then((res) => {
        // console.log(res)
        if(res.rs == 1){
          this.$toast(res.info);
          this.$router.push('/home');  // 路由跳转
        }else{
          this.$toast(res.info);
        }
      })
    },
  },
此时,完成axios的封装。
9. vue 实现tab切换
其实就是路由的使用
- src下创建router文件夹,内部包含index.js
import Vue from 'vue'
import Router from 'vue-router'
import Home from '@/components/Home'
import News from '@/components/News'

Vue.use(Router)

export default new Router({
  routes: [
        {
            path: '/',
            component: Home
        },
        {
            path: '/home',
            name: 'Home',
            component: Home
        },
        {
            path: '/news',
            name: 'News',
            component: News
        }
    ]
})
- 在main.js 中引入router
import router from './router'
new Vue({
el: '#app',
router,
components: { App },
template: '- 在App.vue中使用

主页
新闻
10. 如何配置 vue 打包生成文件的路径?
- 将 config.js 文件下index.js中的assersPublishPath,改为‘./’
build: {
    // Template for index.html
    index: path.resolve(__dirname, '../dist/index.html'),

    // Paths
    assetsRoot: path.resolve(__dirname, '../dist'),
    assetsSubDirectory: 'static',
 // 将 build 中的 assetsPublicPath 改为 './', 修改dev,无效
    assetsPublicPath: './',

    /**
     * Source Maps
     */

    productionSourceMap: true,
    // https://webpack.js.org/configuration/devtool/#production
    devtool: '#source-map',

    // Gzip off by default as many popular static hosts such as
    // Surge or Netlify already gzip all static assets for you.
    // Before setting to `true`, make sure to:
    // npm install --save-dev compression-webpack-plugin
    productionGzip: false,
    productionGzipExtensions: ['js', 'css'],

    // Run the build command with an extra argument to
    // View the bundle analyzer report after build finishes:
    // `npm run build --report`
    // Set to `true` or `false` to always turn it on or off
    bundleAnalyzerReport: process.env.npm_config_report
  }
- 将build/utils.js 加入 publicPath: '../../'
// Extract CSS when that option is specified
    // (which is the case during production build)
    if (options.extract) {
      return ExtractTextPlugin.extract({
        use: loaders,
        fallback: 'vue-style-loader',
        // 在 utils.js 的此处加上下面代码,即可
        publicPath: '../../'
      })
    } else {
      return ['vue-style-loader'].concat(loaders)
    }
11. vue如何适配移动端?
在 main.js 引入 rem.js
import './config/rem'
rem.js 代码如下:
window.onload = function() {
    getRem(750, 100);
}

window.onresize = function() {
    getRem(750, 100);
}

function getRem(pwidth, prem) {
    var html = document.documentElement;
    var oWidth = document.body.clientWidth || document.documentElement.clientWidth;
    html.style.fontSize = oWidth/pwidth*prem + 'px';
}
12. vue如何优化首屏加载速度?
- 使用CDN资源,减小服务器带宽压力;
- 将静态js css放到其他地方(如OSS),减小服务器压力;
- 按需加载第三方UI资源;
- 服务端开启gzip,减小网络传输的流量大小;
- 按照页面或者组件分块懒加载
13. vue.js的两个核心思想
数据驱动 和 组件系统
14. vue数据的双向绑定
在vue.js里面只需要改变数据,Vue.js通过directives指令去操作DOM元素,当数据发生变化,会通知指令去修改对应的DOM,数据的变化驱动DOM的变化,DOM是数据的一种映射。vue.js还会对DOM做一些监听(DOM Listener),当我们修改视图的时候,vue.js监听到这些变化,从而改变数据。这样就形成了数据的双向绑定。
15. MVVM框架的理解
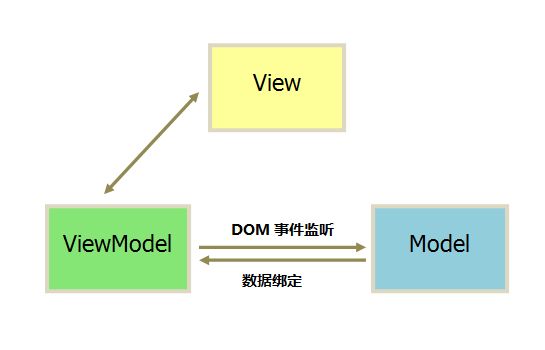
MVVM 由 Model、View、ViewModel 三部分构成,Model 代表数据层;View 代表视图层,它负责将数据模型转化成UI 展现出来;ViewModel 是一个同步View 和 Model的实例对象。
【model模型】指的是后端传递的数据。【view视图】指的是所看到的页面。【viewmodel视图模型】是mvvm模式的核心,它是连接view和model的桥梁。它有两个方向:一是将【模型】转化成【视图】,即将后端传递的数据转化成所看到的页面。实现的方式是:数据绑定。二是将【视图】转化成【模型】,即将所看到的页面转化成后端的数据。实现的方式是:DOM 事件监听。这两个方向都实现的,我们称之为数据的双向绑定。
在MVVM模式下,View 和 Model 之间并没有直接的联系,而是通过ViewModel进行交互,Model 和 ViewModel 之间的交互是双向的, 因此View 数据的变化会同步到Model中,而Model 数据的变化也会立即反应到View 上。
15. 自定义指令和自定义过滤器
自定义指令
自定义指令的参数有:
el: 指令所绑定的元素,可以用来直接操作 DOM 。
binding: 一个对象,包含以下属性:
name: 指令名,不包括 v- 前缀。
value: 指令的绑定值, 例如: v-my-directive="1 + 1", value 的值是 2。
oldValue: 指令绑定的前一个值,仅在 update 和 componentUpdated 钩子中可用。无论值是否改变都可用。
expression: 绑定值的字符串形式。 例如 v-my-directive="1 + 1" , expression 的值是 "1 + 1"。
arg: 传给指令的参数。例如 v-my-directive:foo, arg 的值是 "foo"。
modifiers: 一个包含修饰符的对象。 例如: v-my-directive.foo.bar, 修饰符对象 modifiers 的值是 { foo: true, bar: true }。
eg:
自定义指令
自定义指令,背景色为红色,固定在左上角
自定义指令,固定在右下角
自定义过滤器
自定义指令
{{length}}m={{length | meter("cm")}}
{{price | myCurrency('$')}}
16. vue-cli 工程常用的 npm 命令有哪些?
下载 node_modules 资源包的命令:
npm install

// 安装模块;
// -save-dev(-D) 是指将包信息添加到 package.json 里的 devDependencies节点,表示开发时依赖的包。
npm install 模块名 --save-dev(-D)

// -save(-S) 是指将包信息添加到 package.json 里的dependencies节点,表示发布时依赖的包。
npm install 模块名 --save(-S)
启动 vue-cli 开发环境的 npm命令:
npm run dev
vue-cli 生成 生产环境部署资源 的 npm命令:
npm run build
用于查看 vue-cli 生产环境部署资源文件大小的 npm命令:
npm run build --report
17. vue常用的修饰符
// event.preventDefault(); //取消默认事件
...
...
18. vue事件中如何使用event对象?
// 三种写法
1. DOM 事件 click 上,不加(),methods 方法中 click,可加可不加 event;
2. DOM 事件 click 上,加(),methods 方法中 click,不能加 event;
3. DOM 事件 click 上,加($event),并传入 $event,methods 方法中 click,可加可不加 event;
19. nextTick的使用
nextTick
{{message}}
{{msg}}
解析:使用v-show进行显示隐藏,methods里面是直接可以获取到文本值,如果用v-if,是不能获取的文本值的。
this.$nextTick的作用是在下次dom更新循环完成之后进行调用
ref 被用来给元素或子组件注册引用信息。引用信息将会注册在父组件的 $refs 对象上。
元素上绑定 ref (eg: ref='txt') 属性,获取该元素使用 this.$refs.txt 即可。也可使用事件(event)获取当前元素(var el = event.currentTarget)。
20. vue中 keep-alive 组件的作用
主页
新闻
说明:
(1) 在Home页面输入框输入“home”,然后通过路由跳转到News页面;
(2) 回到Home页面发现 input 之前输入的"home"依然保留,说明页面信息成功保存在内存中;
keep-alive的作用:keep-alive 是Vue的内置组件,能在组件切换过程中将状态保留在内存中,防止重复渲染DOM。
keep-alive的属性:
include: 字符串或正则表达式。只有匹配的组件会被缓存。
exclude: 字符串或正则表达式。任何匹配的组件都不会被缓存。
21. vue等单页面应用及其优缺点
优点:
Vue 的目标是通过尽可能简单的 API 实现响应的数据绑定和组合的视图组件,核心是一个响应的数据绑定系统。MVVM、数据驱动、组件化、轻量、简洁、高效、快速、模块友好。
1、具有桌面应用的即时性、网站的可移植性和可访问性。
2、用户体验好、快,内容的改变不需要重新加载整个页面。
3、基于上面一点,SPA相对对服务器压力小。
4、良好的前后端分离。SPA和RESTful架构一起使用,后端不再负责模板渲染、输出页面工作,web前端和各种移动终端地位对等,后端API通用化。
5、同一套后端程序代码,不用修改就可以用于Web界面、手机、平板等多种客户端;
缺点:
不支持低版本的浏览器,最低只支持到IE9;
不利于SEO的优化(如果要支持SEO,建议通过服务端来进行渲染组件);
第一次加载首页耗时相对长一些;
不可以使用浏览器的导航按钮,需自行实现前进、后退。
22. vue中子组件调用父组件的方法
Vue中子组件调用父组件的方法,这里有三种方法提供参考
第一种方法是直接在子组件中通过this.$parent.event来调用父组件的方法
第二种方法是在子组件里用$emit向父组件触发一个事件,父组件监听这个事件就行了。
第三种是父组件把方法传入子组件中,在子组件里直接调用这个方法
23. package.json的文件解析
name:项目名称
version:项目版本号
description:描述信息,有助于搜索
scripts:支持的脚本,默认是一个空的 test
private:公有私有
keywords:关键字,有助于在人们使用 npm search 搜索时发现你的项目
author:作者信息
license:证书信息(默认是 MIT)
dependencies:在生产环境中需要用到的依赖
devDependencies:在开发环境中用到的依赖,上线打包后的代码是不存在的
engines:node和npm的版本要求
browserslist:浏览器要求
24. vue 全局变量和函数的使用
- 首先在src下创建global文件夹,创建global_data.js
const url = 'http://www.baicu.com'
const name = 'zhangsan'

// 暴露变量
export default {
  url,
  name
}
//或者
// module.exports = {
//  url,
//  name
// }
- 引用(局部引用,全局引用)
// 全局变量的局部全局引入
// App.vue引用   哪个页面需要哪个页面引入(局部)
import GLOBAL from '@/global/global_data'
export default {
  name: 'App',
  data() {
    return {
      url: GLOBAL.url,
    }
  }
}

// main.js 引入 (全局)
import globalData from '@/global/global_data'
// 挂载vue原型
Vue.prototype.GLOBAL = globalData

// App.vue 使用
export default {
  name: 'App',
  data() {
    return {
      url: this.GLOBAL.url,
    }
  }
}

// 全局函数的引入
// 第一种方法
// main.js 直接绑定
Vue.prototype.global_fun1 = function() {
  return console.log('fun1');
}
// App.vue 页面输出
export default {
  name: 'App',
  mounted() {
    this.global_fun1();   // 打印 fun1
  }
}

// 第二种方法
// global/新建global_fun.js
import Vue from 'vue'
function fun11(params){
  console.log(params);
}
export default {
  Vue.prototype.global_fun11 = (params) => fun11(params);
}
// next main.js 引入
import globalFun from '@/global/global_fun'
Vue.use(globalFun);
// App.vue 使用
export default {
  name: 'App',
  mounted() {
    this.global_fun11('zhangsan');   // 打印 zhangsan
  }
}
25. vue弹出窗口之后禁止页面滑动
先阻止默认时间,然后给body添加overflow:hidden;
export default {
  methods: {
    stop() {
      var stop = function(event) {
        event.preventDefault();
      }
      document.body.style.overflow = 'hidden';
      document.addEventListener('touchmove', stop, false);  // 禁止页面滑动
    }
    move() {
      var move = function(event) {
        event.preventDefault();
      };
      document.body.style.overflow = '';  //出现滚动条
      document.removeEventListener("touchmove", move, false); //开启页面滑动
    }
  }
}
26. v-for产生的列表,实现active的切换?
-
{{item}}
27. vue实现路由懒加载
懒加载:也叫延迟加载,即在需要的时候进行加载,随用随载。
为什么需要使用懒加载?
像vue这种单页面应用,如果不应用懒加载,运用 webpack 打包后的文件将会异常的大,造成进入首页时,需要加载的内容过多,时间过长,会出现长时间的白屏,即使做了loading也是不利于用户体验,而运用懒加载则可以将页面进行划分,需要的时候加载页面,可以有效的分担首页所承担的加载压力,减少首页加载用时
不使用懒加载的路由配置:
import Vue from 'vue'
import Router from 'vue-router'
import HelloWorld from '@/components/HelloWorld'
import Home from '@/components/Home'
import News from '@/components/News'

Vue.use(Router)

export default new Router({
    routes: [
        {
            path: '/',
            component: Home
        },
        {
            path: '/helloworld',
            name: 'HelloWorld',
            component: HelloWorld,
            meta: {
                keepAlive: true
            }
        },
        {
            path: '/home',
            name: 'Home',
            component: Home,
            // 组件切换时,将状态保存在内存中,防止重复渲染
            meta: {
                keepAlive: true  // true表示需要使用缓存  false表示不需要被缓存
            }
        },
        {
            path: '/news',
            name: 'News',
            component: News,
            meta: {
                keepAlive: true
            }
        }
    ]
})
使用懒加载的路由配置:
import Vue from 'vue'
import Router from 'vue-router'
import HelloWorld from '@/components/HelloWorld'

Vue.use(Router)

export default new Router({
    routes: [
        {
            path: '/',
        },
        {
            path: '/helloworld',
            name: 'HelloWorld',
            component: resolve => require(['@/components/HelloWorld'], resolve)
        },
        {
            path: '/home',
            name: 'Home',
            component: resolve => require(['@/components/Home'], resolve),
            children: [{
                path: '/detail',
                name: 'Detail',
                component: resolve => require(['@/components/Detail'], resolve)
            }],
            meta: {
                keepAlive: true
            }
        },
        {
            path: '/news',
            name: 'News',
            component: resolve => require(['@/components/News'], resolve),
            meta: {
                keepAlive: true
            }
        }
    ]
})
28. vue-router 的两种模式
hash 模式 和 history 模式
hash 模式:
hash 发生变化之后,url 都会被浏览器记录下来,所以你会发现浏览器的前进后退都可以用了,点击前进、后退,可以跳转页面。
hash模式的工作原理是onhashchange事件,可以在window监听hash的变化。
event 事件里边有两个属性newURL和oldURL。可以通过模拟改变 hash 的值,动态改变页面数据。
// 页面的URL:http://kuayu.lc/hash.html#pink,通过改变 hash 的颜色值,来改变 div 的颜色。
尽管浏览器没有向服务器发送请求,但页面状态已经和 url 关联起来了,这就是所谓的前端路由,单页应用的标配。
网易云音乐,百度网盘就采用了hash路由,看起来就是这个样子:
- 网易云音乐:http://music.163.com/#/friend
- 百度网盘:https://pan.baidu.com/disk/home#list/vmode=list
history模式:
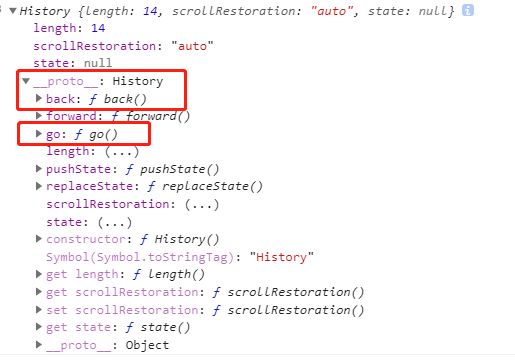
把window.history 对象打印出来之后,可以看到里边提供的方法和记录长度(__ proto__ 原型链上)
console.log(window.history);
前进,后退,跳转操作方法:
  history.go(-2);        //后退2次
  history.go(2);         //前进2次
  history.go(0);         //刷新当前页面
  history.back();        //后退
  history.forward();     //前进
如果不想用 # 的 hash,我们可以用路由的 history 模式。
export default new VueRouter({
  mode: 'history',
  routes: [...]
})
当你使用 history 模式时,URL 就像正常的 url : http://localhost:8080/news
不过这种模式要玩好的话,还需要后台配置支持。因为我们的应用是个单页客户端应用,如果后台没有正确的配置,当用户在浏览器直接访问 http://localhost:8080/news1234 (没有路由,访问不到的情况) 就会返回 404,这就不好看了。
为了避免这种情况,你应该在 Vue 应用里面覆盖所有的路由情况,然后在给出一个 404 的组件页面。
export default {
  mode: 'history',
  routes: [
    {path: '*', component: resolve => require(['@/components/NotFound'], resolve)}
  ]
}
29. $router 和 $route 的区别
$router 为 VueRouter 实例,想要导航到不同 URL,使用 $router.push 方法。
$route 为当前 router 跳转对象,里面可以获取 name 、 path 、 query 、 params、meta 等信息。


