- **
通知机制(消息机制)是一个应用程序级别的操作UIApplication -
通知中心实际上是iOS程序内部之间的一种消息广播机制,主要为了解决应用程序内部不同对象之间解耦而设计。它是基于观察者模式设计的,不能跨应用程序进程通信,当通知中心接收到消息之后会根据内部的消息转发表,将消息发送给订阅者。
通知机制 与 NSNotification 区别
- NSNotification是抽象的,不可见的
- 推送通知是可见的(能用肉眼看到)
- 对于很多初学者往往会把iOS中的本地通知、推送通知和iOS通知中心的概念弄混。其实二者之间并没有任何关系,事实上它们都不属于一个框架,前者属于UIKit框架,后者属于Foundation框架。
下面是一个简单的通知中心流程示意图:
了解通知中心需要熟悉NSNotificationCenter和NSNotification两个类:
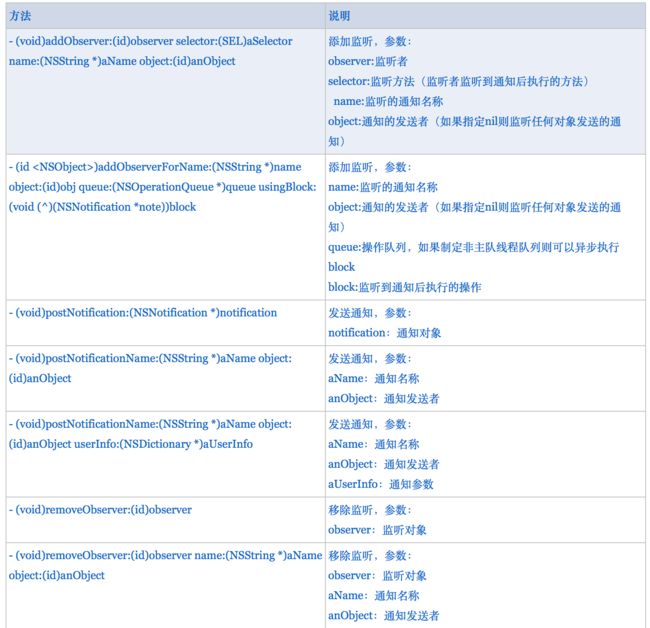
- NSNotificationCenter:是通知系统的中心,用于注册和发送通知,下表列出常用的方法
NSNotification:代表通知内容的载体,主要有三个属性:name代表通知名称,object代表通知的发送者,userInfo代表通知的附加信息。
很多东西都是通过通知中心来进行应用中各个组件通信。例如说道应用程序生命周期问题,当应用程序启动后、进入后台、进入前台、获得焦点、失去焦点,窗口大小改变、隐藏等都会发送通知。这个通知可以通过前面NSNotificationCenter进行订阅即可接收对应的消息,下面的示例演示如何添加监听获得UIApplication的进入后台和获得焦点的通知:
//
//  LTYViewController.m
//  NotificationCenter
//

#import "LTYViewController.h"

@interface LTYViewController ()

@end

@implementation LTYViewController

- (void)viewDidLoad {
    [super viewDidLoad];

    [self addObserverToNotificationCenter];

}

#pragma mark 添加监听
-(void)addObserverToNotificationCenter{
    /*添加应用程序进入后台监听
     * observer:监听者
     * selector:监听方法(监听者监听到通知后执行的方法)
     * name:监听的通知名称(下面的UIApplicationDidEnterBackgroundNotification是一个常量)
     * object:通知的发送者(如果指定nil则监听任何对象发送的通知)
     */
    [[NSNotificationCenter defaultCenter] addObserver:self selector:@selector(applicationEnterBackground) name:UIApplicationDidEnterBackgroundNotification object:[UIApplication sharedApplication]];

    /* 添加应用程序获得焦点的通知监听
     * name:监听的通知名称
     * object:通知的发送者(如果指定nil则监听任何对象发送的通知)
     * queue:操作队列,如果制定非主队线程队列则可以异步执行block
     * block:监听到通知后执行的操作
     */
    NSOperationQueue *operationQueue=[[NSOperationQueue alloc]init];
    [[NSNotificationCenter defaultCenter] addObserverForName:UIApplicationDidBecomeActiveNotification object:[UIApplication sharedApplication] queue:operationQueue usingBlock:^(NSNotification *note) {
        NSLog(@"Application become active.");
    }];
}

#pragma mark 应用程序启动监听方法
- (void)applicationEnterBackground{
    NSLog(@"Application enter background.");
}
@end
- 当然很多时候使用通知中心是为了添加自定义通知,并获得自定义通知消息。比如多视图之间参数传递,其实利用自定义通知也可以进行参数传递。通常一个应用登录后会显示用户信息,而登录信息可以通过登录界面获取。下面就以这样一种场景为例,在主界面中添加监听,在登录界面发送通知,一旦登录成功将向通知中心发送成功登录的通知,此时主界面中由于已经添加通知监听所以会收到通知并更新UI界面。
主界面LTYViewController.m
//
//  LTYViewController.m
//  NotificationCenter
//

#import "LTYViewController.H"
#import "LTYoginViewController.h"
#define UPDATE_LGOGIN_INFO_NOTIFICATION @"updateLoginInfo"

@interface LTYViewController () {
    UILabel *_lbLoginInfo;
    UIButton *_btnLogin;
}

@end

@implementation LTYViewController

- (void)viewDidLoad {
    [super viewDidLoad];
    [self setupUI];
}

- (void)setupUI{
    UILabel *label = [[UILabel alloc] initWithFrame:CGRectMake(0, 100,320 ,30)];
    label.textAlignment = NSTextAlignmentCenter;
    label.textColor=[UIColor colorWithRed:23/255.0 green:180/255.0 blue:237/255.0 alpha:1];
    _lbLoginInfo = label;
    [self.view addSubview:label];

    UIButton *button = [UIButton buttonWithType:UIButtonTypeSystem];
    button.frame=CGRectMake(60, 200, 200, 25);
    [button setTitle:@"登录" forState:UIControlStateNormal];
    [button addTarget:self action:@selector(loginOut) forControlEvents:UIControlEventTouchUpInside];
    _btnLogin = button;

    [self.view addSubview:button];
}

- (void)loginOut{
    //添加监听
    [self addObserverToNotification];

    LTYLoginViewController *loginController=[[LTYLoginViewController alloc] init];

    [self presentViewController:loginController animated:YES completion:nil];
}

/**
 *  添加监听
 */
- (void)addObserverToNotification{
    [[NSNotificationCenter defaultCenter] addObserver:self selector:@selector(updateLoginInfo:) name:UPDATE_LGOGIN_INFO_NOTIFICATION object:nil];
}

/**
 *  更新登录信息,注意在这里可以获得通知对象并且读取附加信息
 */
- (void)updateLoginInfo:(NSNotification *)notification{
    NSDictionary *userInfo=notification.userInfo;
    _lbLoginInfo.text=userInfo[@"loginInfo"];
    _btnLogin.titleLabel.text=@"注销";
}

- (void)dealloc{
    //移除监听
    [[NSNotificationCenter defaultCenter] removeObserver:self];
}
@end
登录界面LTYLoginViewController.m
//
//  LTYLoginViewController.m
//  NotificationCenter
//

#import "LTYLoginViewController.H"
#define UPDATE_LGOGIN_INFO_NOTIFICATION @"updateLoginInfo"

@interface LTYLoginViewController (){
    UITextField *_txtUserName;
    UITextField *_txtPassword;
}

@end

@implementation LTYLoginViewController

- (void)viewDidLoad {
    [super viewDidLoad];

    [self setupUI];
}

/**
 *  UI布局
 */
- (void)setupUI{
    //用户名
    UILabel *lbUserName=[[UILabel alloc]initWithFrame:CGRectMake(50, 150, 100, 30)];
    lbUserName.text=@"用户名:";
    [self.view addSubview:lbUserName];

    _txtUserName=[[UITextField alloc]initWithFrame:CGRectMake(120, 150, 150, 30)];
    _txtUserName.borderStyle=UITextBorderStyleRoundedRect;
    [self.view addSubview:_txtUserName];

    //密码
    UILabel *lbPassword=[[UILabel alloc]initWithFrame:CGRectMake(50, 200, 100, 30)];
    lbPassword.text=@"密码:";
    [self.view addSubview:lbPassword];

    _txtPassword=[[UITextField alloc]initWithFrame:CGRectMake(120, 200, 150, 30)];
    _txtPassword.secureTextEntry=YES;
    _txtPassword.borderStyle=UITextBorderStyleRoundedRect;
    [self.view addSubview:_txtPassword];

    //登录按钮
    UIButton *btnLogin=[UIButton buttonWithType:UIButtonTypeSystem];
    btnLogin.frame=CGRectMake(70, 270, 80, 30);
    [btnLogin setTitle:@"登录" forState:UIControlStateNormal];
    [self.view addSubview:btnLogin];
    [btnLogin addTarget:self action:@selector(login) forControlEvents:UIControlEventTouchUpInside];

    //取消登录按钮
    UIButton *btnCancel=[UIButton buttonWithType:UIButtonTypeSystem];
    btnCancel.frame=CGRectMake(170, 270, 80, 30);
    [btnCancel setTitle:@"取消" forState:UIControlStateNormal];
    [self.view addSubview:btnCancel];
    [btnCancel addTarget:self action:@selector(cancel) forControlEvents:UIControlEventTouchUpInside];
}

#pragma mark 登录操作
-(void)login{
    if ([_txtUserName.text isEqualToString:@"ayuan"] && [_txtPassword.text isEqualToString:@"123"] ) {
        //发送通知
        [self postNotification];
        [self dismissViewControllerAnimated:YES completion:nil];
    }else{
        //登录失败弹出提示信息
        UIAlertView *alertView=[[UIAlertView alloc]initWithTitle:@"系统信息" message:@"用户名或密码错误,请重新输入!" delegate:nil cancelButtonTitle:@"取消" otherButtonTitles:nil];
        [alertView show];
    }

}

#pragma mark 点击取消
-(void)cancel{
    [self dismissViewControllerAnimated:YES completion:nil];
}

/**
 *  添加通知,注意这里设置了附加信息
 */
-(void)postNotification{
    NSDictionary *userInfo=@{@"loginInfo":[NSString stringWithFormat:@"Hello,%@!",_txtUserName.text]};
    NSLog(@"%@",userInfo);
    NSNotification *notification=[NSNotification notificationWithName:UPDATE_LGOGIN_INFO_NOTIFICATION object:self userInfo:userInfo];
   [[NSNotificationCenter defaultCenter] postNotification:notification];
//也可直接采用下面的方法
//    [[NSNotificationCenter defaultCenter] postNotificationName:UPDATE_LGOGIN_INFO_NOTIFICATION object:self userInfo:userInfo];

}
@end
- 通知中心是一种低耦合设计,和代理模式有异曲同工之妙。相对于后者而言,通知中心可以将一个通知发送给多个监听者,而每个对象的代理却只能有一个。当然代理也有其优点,例如使用代理代码分布结构更加清晰,它不像通知一样随处都可以添加订阅等,实际使用过程中需要根据实际情况而定。

