最近需要开发微信公众号,前端使用的vue框架,看完腾讯的,我的内心无比沉重,天噜啦,生无可恋~~~
简单的总结一下吧,
1页面绘制
微信公众号开发而言还是使用基础的html、css、js绘制画面就行,就像h5一样,(一开始没做之前我以为还需要,,,单独学习语言,会死人的啊。还好腾讯比较照顾我们前端)
2获取openid
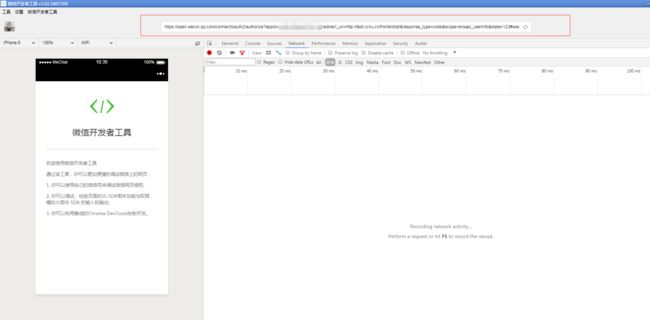
其实这个做完之后也感觉非常easy了,你只需要把你的页面部署到服务器上,然后呢,后端会给你这样一段url
https://open.weixin.qq.com/connect/oauth2/authorize?appid=APPID&redirect_uri='+ redirect_uri +'&response_type=code&scope=snsapi_userinfo&state=STATE#wechat_redirect'
每个参数的意义请查看:微信网页授权
其中redirect_uri成功回调跳转到你的网页,然后后台会给你拼接点参数,从这样
vue微信公众号开发
变成这样
vue微信公众号开发
你就需要从url上获取code/state然后调取后台给你定义的接口就能取到openid了,前端不需要做的太复杂,无非取参数,调接口获取openid。
3vue调取微信sdk分享功能
1.全局分享的页面都是一样的
npm install weixin-js-sdk --save
在你需要的页面引入
import wx from 'weixin-js-sdk'
直接上代码:
vue微信公众号开发
注意,调取sdk都需要先wx.config,如果成功的话,就再wx.ready里执行,你在wx.config.jsApiList里面能执行的业务,在微信开发者工具里能看到结果。真机调试的时候wx.config.debug=true,用苹果机能弹出详情。
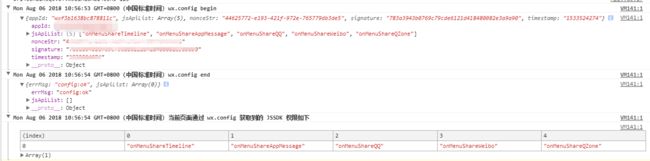
vue微信公众号开发
2.业务需要,有邀请页分享有二维码,其它页面分享都一样
写一个common.js,
import {
verifyConfigForShare
} from '@/api/weiconfig/weiconfig'
import wx from 'weixin-js-sdk'
export default {
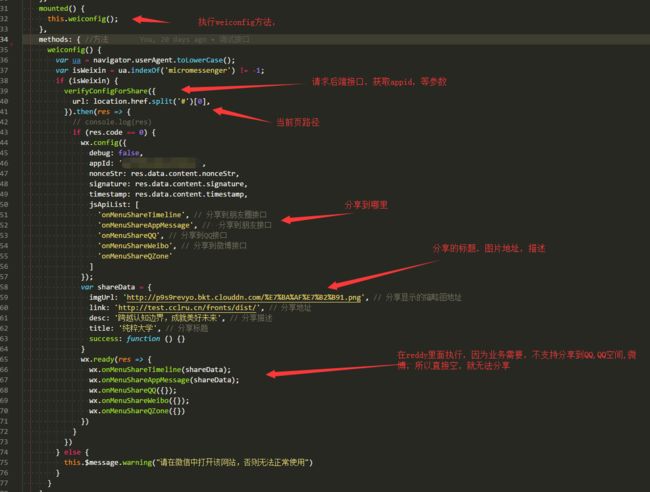
weiconfig: function () {
verifyConfigForShare({
url: location.href.split('#')[0],
}).then(res => {
// console.log(res)
if (res.code == 0) {
wx.config({
debug: false,
appId:appId,
nonceStr: res.data.content.nonceStr,
signature: res.data.content.signature,
timestamp: res.data.content.timestamp,
jsApiList: [
'onMenuShareTimeline', // 分享到朋友圈接口
'onMenuShareAppMessage', // 分享到朋友接口
'onMenuShareQQ', // 分享到QQ接口
'onMenuShareWeibo', // 分享到微博接口
'onMenuShareQZone'
]
});
var shareData = {
imgUrl: 'http://p9s9revyo.bkt.clouddn.com/%E7%BA%AF%E7%B2%B91.png', // 分享显示的缩略图地址
link: 'https://home.vankin.com.cn', // 分享地址
desc: '跨越认知边界,成就美好未来', // 分享描述
title: '万金科技', // 分享标题
success: function () {}
}
wx.ready(res => {
wx.onMenuShareTimeline(shareData);
wx.onMenuShareAppMessage(shareData);
wx.onMenuShareQQ({});
wx.onMenuShareWeibo({});
wx.onMenuShareQZone({})
})
}
})
},
addRegister: function () {
var name = JSON.parse(window.localStorage.getItem('userInfo')).name;
verifyConfigForShare({
url: location.href.split('#')[0],
}).then(res => {
// console.log(res)
if (res.code == 0) {
wx.config({
debug: false,
appId:appId,
nonceStr: res.data.content.nonceStr,
signature: res.data.content.signature,
timestamp: res.data.content.timestamp,
jsApiList: [
'onMenuShareTimeline', // 分享到朋友圈接口
'onMenuShareAppMessage', // 分享到朋友接口
'onMenuShareQQ', // 分享到QQ接口
'onMenuShareWeibo', // 分享到微博接口
'onMenuShareQZone'
]
});
var shareData = {
imgUrl: 'http://p9s9revyo.bkt.clouddn.com/%E7%BA%AF%E7%B2%B91.png', // 分享显示的缩略图地址
link: 'https://home.vankin.com.cn', // 分享地址
desc: '跨越认知边界,成就美好未来', // 分享描述
title: name, // 分享标题
success: function () {}
}
wx.ready(res => {
wx.onMenuShareTimeline(shareData);
wx.onMenuShareAppMessage(shareData);
wx.onMenuShareQQ({});
wx.onMenuShareWeibo({});
wx.onMenuShareQZone({})
})
}
})
}
}
在main.js中全局引入
import common from '../commonFunction/common.js'
Vue.prototype.common = common;
在你需要的页面直接引入
 mounted() { /
     this.common.addRegister();
    //  this.common.weiconfig();
    },
4vue调取微信sdk支付功能
也是在 mounted中请求接口配置 wx.config
 verifyConfig({
          url: location.href.split('#')[0],
        }).then(res => {
          if (res.code == 0) {
            const shareobj = {
              'appId': appId,
              'timestamp': res.data.content.timestamp,
              'nonceStr': res.data.content.nonceStr,
              'signature': res.data.content.signature,
              'jsApiList': ['chooseWXPay']
            }
            this.shareObj = shareobj;
              wx.config({
              debug: false,
              appId: appId,
              nonceStr: shareobj.nonceStr,
              signature: shareobj.signature,
              timestamp: shareobj.timestamp,
              jsApiList: ['chooseWXPay']
            });
          }
        })
先调取后端接口,获取,再在wx.ready中调 wx.chooseWXPay微信支付
payMoneyForH5(params).then(res => {
            if (res.code == 0) {
              const poas = res.data.content;
              console.log(res)
              wx.ready((res) => {
                wx.chooseWXPay({
                  'appId': appId,
                  'timestamp': poas.timeStamp,
                  'nonceStr': poas.nonceStr,
                  'package': poas.package,
                  'signType': poas.signType,
                  'paySign': poas.paySign,
                  success: function (res) {
                    // alert(res)
                    if (res.errMsg == 'chooseWXPay:ok') {
                      that.$router.push({
                        path: '/pay/wxPaySuccess',
                      })
                    }
                  },
                  cancel: function (err) {
                    that.$router.push({
                      path: '/pay/wxPayFail',
                      query: {
                        courseId: that.content.id,
                        orderNo: that.orderId
                      }
                    })
                  }
                })
              });
              wx.error(function (res) {
                console.log(res)
                alert("wx.error")
              });
            }
          })
5调取微信摄像头并上传到后台服务器
也是在 mounted中请求接口配置 wx.config
 init() {
        weixinSignphoto({
          url: url//你当前页面路径
        }).then(res => {
          if (res.success) {
            const shareobj = {
              'appId': res.data.appId,
              'timestamp': res.data.timestamp,
              'nonceStr': res.data.nonceStr,
              'signature': res.data.signature,
              'jsApiList': ['chooseImage', 'uploadImage']//调取摄像头和上传照片sdk
            }
            this.shareObj = shareobj;
            this.wxInit(this.shareObj);
          }
        })
      },
      wxInit(shareobj) {//微信的config
        wx.config({
          debug: true,
          appId: shareobj.appId,
          nonceStr: shareobj.nonceStr,
          signature: shareobj.signature,
          timestamp: shareobj.timestamp,
          jsApiList: ['chooseImage', 'uploadImage']
        });
      },
      ready() {//微信的ready
        wx.ready((res) => {
          wx.checkJsApi({
            jsApiList: [
              'chooseImage',
              'uploadImage',
            ],
            success: function (res) {
              console.log(JSON.stringify(res));
            }
          });
        })
      },
首先点击调取摄像头或相册,再上传到微信服务器,会返回你mediaId,然后上传到后端,后端

vue微信公众号开发
进行下载去,
photoBtnb() {//点击上传照片
        var that = this;
        wx.chooseImage({//调取摄像头或相册
          count: 1, // 默认9
          sizeType: ['original', 'compressed'], // 可以指定是原图还是压缩图,默认二者都有
          sourceType: ['album', 'camera'], // 可以指定来源是相册还是相机,默认二者都有
          success: function (res) {
              const localIds = res.localIds[0];
              that.src1 = res.localIds[];//可以先相框显示出来你图片,没有上传成功的话在替换回去,我这里没有走downloadImage和getLocalImgData,图省事了;
              wx.uploadImage({//上传到微信服务器,上传图片有效期3天,可用微信多媒体接口下载图片到自己的服务器,此处获得的 serverId 即 media_id。
                localId: localIds, // 需要上传的图片的本地ID,由chooseImage接口获得
                isShowProgressTips: 1, // 默认为1,显示进度提示
                success: function (res) {
                  const mediaId = res.serverId;
                  that.src1Id=mediaId;//id传到后台
                  const params={};
                  params.mediaId=mediaId;
                  savePicture(params).then(res=>{//传给自己的后台,后台根据这段代码上面的图片去拼接
                    if (res.success) {
                   //干你自己想干的事吧
                    }
                  })
                },
                fail: function (error) {
                  that.src1 = 'http://p9s9revyo.bkt.clouddn.com/HumanFace.png'
                }
              });
        });
      },