什么是redis?
Redis是用C语言开发的一个开源的高性能键值对(key-value)数据库。它通过提供多种键值数据类型来适应不同场景下的存储需求,目前为止Redis支持的键值数据类型如
下:
字符串类型
散列类型
列表类型
集合类型
有序集合类型。
redis的应用场景
缓存(数据查询、短连接、新闻内容、商品内容等等)。(最多使用)
分布式集群架构中的session分离。
聊天室的在线好友列表。
任务队列。(秒杀、抢购、12306等等)
应用排行榜。
网站访问统计。
数据过期处理(可以精确到毫秒)
redis是对内存进行操作。
单机版redis有16个数据库,默认使用0号库,库与库之间相互独立,允许出现重复变量名
集群环境只有0号库
------切记------
---我们在开发时使用的是单机版redis,在程序运行时,一定要记得打开装有redis服务的虚拟机,把单
---机版 redis-server打开,进入/usr/local/redis/bin
[root@taotao-redis bin]# ./redis-server redis.conf
---关闭 redis 服务
[root@taotao-redis bin]# ./redis-cli -p 6379 shutdown

当我们使用Junit测试 jedis 的时候,若出现 Class not found...... 不要慌张,这个问题首先看
自己redis服务打开没,在不停的重启taotao-rest这个mavean工程。
一、redis安装
需要安装gcc:yum install gcc-c++
1、下载redis的源码包。
2、把源码包上传到linux服务器
3、解压源码包
tar -zxvf redis-3.0.0.tar.gz
4、Make
5、Make install
[root@bogon redis-3.0.0]# make install PREFIX=/usr/local/redis
启动单机版redis
1、前端启动模式
/usr/local/redis/bin/redis-server
默认是前端启动模式,端口是6379
2、后端启动
1)从redis的源码目录中复制redis.conf到redis的安装目录。
2)修改配置文件
3)
[root@bogon bin]# ./redis-server redis.conf
Redis常用命令
---定义/获取变量
127.0.0.1:6379> set a 10
OK
127.0.0.1:6379> get a
"10"
---设置/查看变量有效时间 永久变量返回-2,失效变量返回-1,暂时有效返回一个整数
127.0.0.1:6379> EXPIRE a 100
(integer) 1
127.0.0.1:6379> ttl a
(integer) 94
127.0.0.1:6379> ttl a
(integer) -2
常用数据类型
String
Hash
List
Set
SortedSet
hash结构的常见操作指令
---学习前先明确一下概念,这里我们把Redis的key称作key(键),把数据结构hash中的key称为field(域)。

**hdel key field[field...]**
  删除hash表中的一个或多个指定域,若key或field不存在则会忽略;例:hdel hk k1 k2。

**hexists key field**
  判断hash表中指定域是否存在,返回1,若key或field不存在则返回0;例:hexists hk k1。

**hget key field**
  获取hash表中指定域的值,key或域不存在时返回nil;例:hget hk k1。

**hgetall key**
  获取hash表中所有域的值;例:hgetall hk,返回结果如:
  1) k1
  2) v1
  3) k2
  4) v2
  5) k3
  6) v3
1和2、3和4、5和6各为一组,代表hash表的field和value。

**hincrby key field increment**
  为hash表中的指定域增加指定的整数值(负数亦可),若域不存在则默认初始化值为0后再进行操纵,若域存在但值不为数值但非64位有符号数时返回错误;例:hincrby hk k1 15。

**hincrbyfloat key field increment**
  和hincrby相似,不同的是hincrbyfloat操作的是浮点数;例:hincrbyfloat hk k1 1.3。

**hkeys key**
  返回hash表中的所有域,若key不存在返回空;例:hkeys hk。

**hvals key**
  返回hash表中的所有val,若key不存在返回空;例:hvals hk。

**hlen key**
  返回hash表中所有域的数量,若key不存在返回0;例:hlen hk。

**hset key field value**
  将field-value设置到hash表中,若key不存在会新建hash表再赋值,若field已存在则会覆盖现有值;例:hset hk k v。

**hsetnx key field value**
  和hset类似,但是hsetnx要求field不存在才能进行此操作,否则会返回0;例:hset hk k v。

**hmget key field[field...]**
  返回hash表中多个指定域的值,若key不存在返回空,若field不存在返回nil;例:hmget hk k1 k2 k3。

**hmset key field1 value1[field value...]**
  将一个或多个field-value设置到hash表中;例:hmset hk k4 v4 k5 v5 k6 v6。

**hscan key cursor[match pattern][count count]**
  采用游标的方式对当前的hash进行迭代(具体描述请参考[scan](http://www.cnblogs.com/krockey/p/6019556.html)),例:hscan hk 0。
二、redis集群构架
1、环境
需要使用官方提供的ruby脚本 需要 ruby 环境
yum install ruby
yum install rubygems
需要使用集群管理工具来管理包 redis-trib.rb
开启单机版redis
方式一:进入redis目录下的bin目录,找到redis-server,开启
[root@taotao-redis bin]# ./redis-server
方式二:后台模式开启,需要修改bin目录下的redis-conf,
[root@taotao-redis bin]# ./redis-server redis.conf
2、集群搭建
第一步:创建6个redis实例,端口号7001~7006
第二步:修改redis的配置文件
1、修改端口号
2、打开cluster-enable前面的注释
第三步:把集群的ruby脚本复制到redis-cluster目录下
第四步:启动6个redis实例
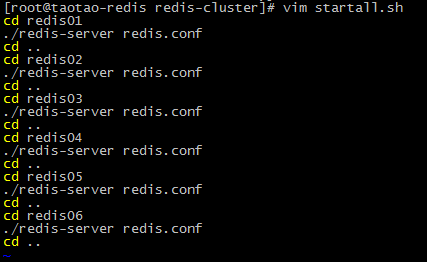
自制shell命令开启redis
[root@taotao-redis redis-cluster]# chmod +x startall.sh
[root@taotao-redis redis-cluster]# ./startall.sh
[root@taotao-redis redis-cluster]# ps aux | grep redis
第五步:创建集群
./redis-trib.rb create --replicas 1 192.168.76.133:7001 192.168.76.133:7002 192.168.76.133:7003 192.168.76.133:7004 192.168.76.133:7005 192.168.76.133:7006
3、测试集群
[root@taotao-redis redis-cluster]# redis01/redis-cli -h 192.168.76.133 -p 7002 -c
192.168.76.133:7002> set a 100
-> Redirected to slot [15495] located at 192.168.76.133:7003
OK
192.168.76.133:7003> get a
"100"
192.168.76.133:7003> ping
PONG
4、关闭redis
1)进入redis关闭
[root@taotao-redis redis]# bin/redis-cli
127.0.0.1:6379> shutdown
not connected> quit
2)根据端口号关闭
[root@taotao-redis redis]# bin/redis-cli -p 7001 shutdown
自制shell关闭redis
[root@taotao-redis redis-cluster]# ps aux | grep redis
[root@taotao-redis redis-cluster]# chmod +x shutdown.sh
[root@taotao-redis redis-cluster]# ./shutdown.sh
[root@taotao-redis redis-cluster]# ps aux | grep redis
5、Jedis客户端测试
(1)单机版
public class JedisTest {

    @Test
    public void testJedisSingle() {
        //创建一个jedis的对象。
        Jedis jedis = new Jedis("192.168.25.153", 6379);
        //调用jedis对象的方法,方法名称和redis的命令一致。
        jedis.set("key1", "jedis test");
        String string = jedis.get("key1");
        System.out.println(string);
        //关闭jedis。
        jedis.close();
    }

    /**
     * 使用连接池
     */
    @Test
    public void testJedisPool() {
        //创建jedis连接池
        JedisPool pool = new JedisPool("192.168.25.153", 6379);
        //从连接池中获得Jedis对象
        Jedis jedis = pool.getResource();
        String string = jedis.get("key1");
        System.out.println(string);
        //关闭jedis对象
        jedis.close();
        pool.close();
    }
}
(2)集群版:不需要开启连接池,JedisCluster自带连接池
@Test
    public void testJedisCluster() {
        HashSet nodes = new HashSet<>();
        nodes.add(new HostAndPort("192.168.25.153", 7001));
        nodes.add(new HostAndPort("192.168.25.153", 7002));
        nodes.add(new HostAndPort("192.168.25.153", 7003));
        nodes.add(new HostAndPort("192.168.25.153", 7004));
        nodes.add(new HostAndPort("192.168.25.153", 7005));
        nodes.add(new HostAndPort("192.168.25.153", 7006));

        JedisCluster cluster = new JedisCluster(nodes);

        cluster.set("key1", "1000");
        String string = cluster.get("key1");
        System.out.println(string);

        cluster.close();
    }
redis安装好后需要开启端口号本机才能访问使用
不管是使用单机版还是集群版,都需要开启端口号(集群的话就全部开启)
---redis 需要开启端口号才能使用
[root@taotao-redis ~]# cd /sbin
[root@taotao-redis sbin]# sudo iptables -I INPUT -p tcp --dport 6379 -j ACCEPT
[root@taotao-redis sbin]# sudo service iptables save
[root@taotao-redis sbin]# sudo service iptables restart
三、业务逻辑添加缓存
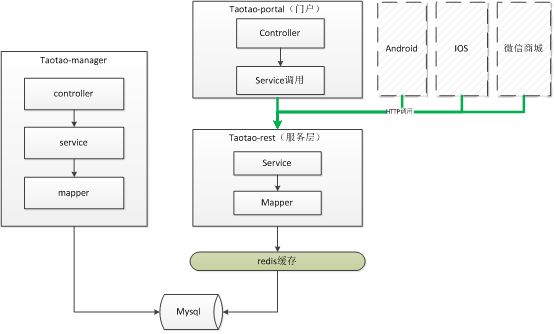
需要在taotao-rest(服务层添加缓存)
1、Jedis整合Spring
1.1 单机版整合
/**
     * Spring单机版测试
     */
    @Test
    public void testSpringJedisSingle() {
        ApplicationContext applicationContext = new ClassPathXmlApplicationContext("classpath:spring/applicationContext-*.xml");
        JedisPool pool = (JedisPool) applicationContext.getBean("redisClient");
        Jedis jedis = pool.getResource();
        String string = jedis.get("key1");
        System.out.println(string);
        jedis.close();
        pool.close();
    }
1.2 集群版整合
/**
     * Spring集群版测试
     */
    @Test
    public void testSpringJedisCluster() {
        ApplicationContext applicationContext = new ClassPathXmlApplicationContext("classpath:spring/applicationContext-*.xml");
        JedisCluster cluster = (JedisCluster) applicationContext.getBean("redisClient");
        String string = cluster.get("keyCluster");
        System.out.println(string);
        cluster.close();
    }
2、把缓存添加到业务逻辑
注意:添加的缓存不能影响业务逻辑。
3、缓存同步
当后台管理系统修改内容之后,需要通知redis把修改内容对应的分类id的key删除。
3.1 解决方案
在taotao-rest工程中发布一个服务。当后台管理系统修改内容后,调用此服务,同步缓存。
3.2 同步缓存服务的调用
需要在后台管理系统中添加一个服务调用的逻辑。当修改内容信息后,需要调用此服务同步缓存。


