版本记录
| 版本号 | 时间 |
|---|---|
| V1.0 | 2017.07.02 |
前言
在app中,我们经常需要点击别人分享发布的图片或者头像,然后放大缩小等,还可以保存到本地相册等。感兴趣的可以看看我写的其他小技巧。
1. 实用小技巧(一):UIScrollView中上下左右滚动方向的判断
2. 实用小技巧(二):屏幕横竖屏的判断和相关逻辑
3.实用小技巧(三):点击手势屏蔽子视图的响应
4.实用小技巧(四):动态的增删标签视图
5.实用小技巧(五):通过相册或者相机更改图标
6.实用小技巧(六):打印ios里所有字体
7. 实用小技巧(七):UITableViewCell自适应行高的计算
8. 实用小技巧(八):数字余额显示的分隔
9.实用小技巧(九):类头条模糊背景的实现
10.实用小技巧(十):晃动手机换后台服务器网络
11.实用小技巧(十一):scrollView及其子类显示的一些异常处理
12.实用小技巧(十二):头像图片缩放以及保存到相册简单功能的实现
功能需求
酷我音乐盒有的页面可以左右用手拖动,当大于一定的角度就可以dismiss或者其他操作,类似的在阿里巴巴的钉钉中也有应用,其实简单来说就是一个pan手势以及锚点和position的应用,下面我们就简单的实现个效果。
功能实现
下面我们就直接看代码吧。
先看一下代码结构。
下面我们就看一下详细代码。
1. AppDelegate.m
- (BOOL)application:(UIApplication *)application didFinishLaunchingWithOptions:(NSDictionary *)launchOptions
{
    self.window = [[UIWindow alloc] initWithFrame:[UIScreen mainScreen].bounds];
    JJMusicVC *musicVC = [[JJMusicVC alloc] init];
    UINavigationController *nav = [[UINavigationController alloc] initWithRootViewController:musicVC];
    self.window.rootViewController = nav;
    [self.window makeKeyAndVisible];
    return YES;
}
2. JJMusicVC.h
#import

@interface JJMusicVC : UIViewController

@end
3.JJMusicVC.m
#import "JJMusicVC.h"
#import "JJMusciPlayVC.h"

@interface JJMusicVC ()

@property (nonatomic, strong) UIButton *playButton;


@end

@implementation JJMusicVC

#pragma mark - Object Private Function

- (void)viewDidLoad
{
    [super viewDidLoad];

    [self setupUI];
}

#pragma mark - Object Private Function

- (void)setupUI
{
    self.view.backgroundColor = [UIColor lightGrayColor];

    UIButton *playButton = [UIButton buttonWithType:UIButtonTypeCustom];
    [playButton setTitle:@"播放音乐" forState:UIControlStateNormal];
    [playButton setTitleColor:[UIColor blueColor] forState:UIControlStateNormal];
    playButton.titleLabel.font = [UIFont boldSystemFontOfSize:20.0];
    playButton.frame = CGRectMake((self.view.bounds.size.width - CGRectGetWidth(playButton.frame)) * 0.5, (self.view.bounds.size.height - CGRectGetHeight(playButton.frame)) * 0.5, 100.0, 30.0);
    [playButton addTarget:self action:@selector(playButtonDidClick) forControlEvents:UIControlEventTouchUpInside];
    [self.view addSubview:playButton];
    self.playButton = playButton;

}

#pragma mark - Action && Notification

- (void)playButtonDidClick
{
    JJMusciPlayVC *playVC = [[JJMusciPlayVC alloc] init];

    [self presentViewController:playVC animated:YES completion:nil];
}

@end
4. JJMusciPlayVC.h
#import

@interface JJMusciPlayVC : UIViewController

@end
5. JJMusciPlayVC.m
#import "JJMusciPlayVC.h"
#import "JJMusicAnimation.h"

@interface JJMusciPlayVC ()

@property (nonatomic, strong) JJMusicAnimation *animation;
@property (nonatomic, strong) UIImageView *playImageView;

@end

@implementation JJMusciPlayVC


- (instancetype)init
{
    self = [super init];
    if (self) {
        self.modalPresentationStyle = UIModalPresentationCustom;

        //这几行不能放在viewDidLoad里面,否则后面就是黑屏的
        JJMusicAnimation *animation = [[JJMusicAnimation alloc] init];
        self.transitioningDelegate = animation;
        self.animation = animation;
    }
    return self;
}


- (void)viewDidLoad
{
    [super viewDidLoad];

    [self setupUI];
}

#pragma mark - Object Private Function

- (void)setupUI
{
    self.view.backgroundColor = [UIColor lightGrayColor];

    UIImageView *playImageView = [[UIImageView alloc] initWithFrame:self.view.frame];
    playImageView.userInteractionEnabled = YES;
    playImageView.image = [UIImage imageNamed:@"music"];
    [self.view addSubview:playImageView];
    self.playImageView = playImageView;

    UIPanGestureRecognizer *pan = [[UIPanGestureRecognizer alloc] initWithTarget:self action:@selector(panAction:)];

    [self.view addGestureRecognizer:pan];
}

#pragma mark - Action && Notification

- (void)panAction:(UIPanGestureRecognizer *)sender
{
    // 1.获取用户的手指拖拽的偏移量
    CGFloat offsetX = [sender translationInView:self.view].x;

    // 2.将获取的偏移量,转为角度
    CGFloat angle = offsetX / self.view.bounds.size.width * M_PI_4;

    switch (sender.state)
    {

        case UIGestureRecognizerStateBegan:

            // 修改锚点,进行轴的偏移;
            self.view.layer.anchorPoint = CGPointMake(0.5, 1.5);
            // 修改position,实现正常显示!
            self.view.layer.position = CGPointMake(self.view.bounds.size.width * 0.5, self.view.bounds.size.height * 1.5);

        case UIGestureRecognizerStateChanged:

            self.view.transform = CGAffineTransformMakeRotation(angle);
            break;

        case UIGestureRecognizerStateEnded:
        {
            // 需要判断,旋转的角度 如果大于了某一值  dimiss  否则,归位!
            if (ABS(angle) > 0.33) {
                [self dismissViewControllerAnimated:YES completion:nil];
                break;
            }
        }
        case UIGestureRecognizerStateCancelled:
        case UIGestureRecognizerStateFailed:
        {
            // 归位!
            [UIView animateWithDuration:.3 animations:^{
                self.view.transform = CGAffineTransformIdentity;
            } completion:^(BOOL finished) {

                // 恢复锚点
                self.view.layer.anchorPoint = CGPointMake(0.5, 0.5);

                //不能使用self.view.center->它的值目前还是之前修改过的position的值!太大!
                self.view.layer.position = CGPointMake(self.view.bounds.size.width * 0.5, self.view.bounds.size.height * 0.5);
            }];
        }
            break;

        default:
            break;
    }
}

@end
6. JJMusicAnimation.h
#import

@interface JJMusicAnimation : NSObject

@end
7. JJMusicAnimation.m
#import "JJMusicAnimation.h"

@interface JJMusicAnimation ()


@end

@implementation JJMusicAnimation

#pragma mark - UIViewControllerTransitioningDelegate

/*
 参数1 presented  被展示出来的控制器对象!      twoController
 参数2 presenting 正在显示别的控制器的那个对象! viewController
 参数3 source     源控制器,一般跟参数2是同一个对象! viewController
 */
- (id)animationControllerForPresentedController:(UIViewController *)presented presentingController:(UIViewController *)presenting sourceController:(UIViewController *)source
{
    NSLog(@"参数1%@ 参数2%@ 参数3%@", presented, presenting, source);

    return self;
}

#pragma mark - UIViewControllerAnimatedTransitioning

- (NSTimeInterval)transitionDuration:(id)transitionContext
{
    return 0.5;
}

// 转场动画的效果!
// transitionContext 转场的上下文
// 相当于是转场动画的舞台! 里面提供了我们做动画需要的所有信息!
- (void)animateTransition:(id )transitionContext {

    // 1.获取容器视图
    UIView *containerV = [transitionContext containerView];

    // 2.获取要显示的控制器
    UIViewController *toVc = [transitionContext viewControllerForKey:UITransitionContextToViewControllerKey];

    toVc.view.frame = containerV.bounds;

    // 3.展示控制器的视图到界面!
    [containerV addSubview:toVc.view];

    // 4.通过动画进行实现旋转的方式显示视图!
        // 1.修改旋转的轴!
    toVc.view.layer.anchorPoint = CGPointMake(0.5, 1.5);
    toVc.view.layer.position = CGPointMake(toVc.view.bounds.size.width * 0.5, toVc.view.bounds.size.height * 1.5);

        // 2.以旋转的方式展示
        // - 转动 -90°
    toVc.view.transform = CGAffineTransformMakeRotation(-M_PI_2);

        // - 动画显示
    [UIView animateWithDuration:[self transitionDuration:transitionContext] animations:^{
        toVc.view.transform = CGAffineTransformIdentity;
    } completion:^(BOOL finished) {
        toVc.view.layer.anchorPoint = CGPointMake(0.5, 0.5);
        toVc.view.layer.position = CGPointMake(toVc.view.bounds.size.width * 0.5, toVc.view.bounds.size.height * 0.5);

        //告诉系统动画执行完了!要不然界面不能点!
        [transitionContext completeTransition:YES];
    }];
}

@end
至此,所有代码就结束了。
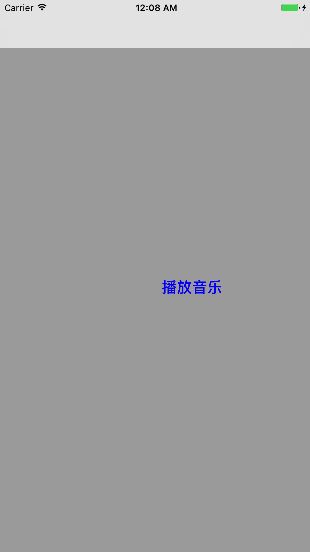
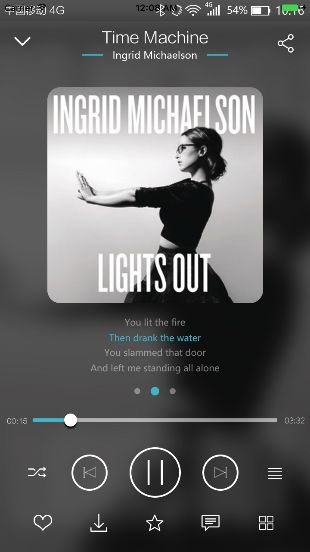
功能效果
下面我们就看一下功能效果。
知识点补充
我们这里用到了两个重要的概念就是anchor point 和 position。
- anchorPoint: 每一个UIView都默认关联着一个CALayer, UIView有frame、bounds和center三个属性,CALayer也有类似的属性,分别为frame、bounds、position、anchorPoint,而anchorPoint会移动layer的位置。下面我们就举例说一下anchorPoint的使用。
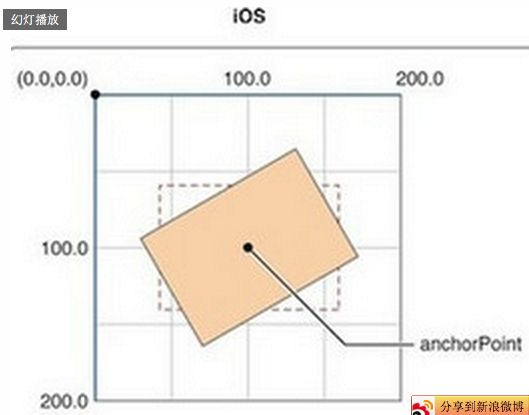
从一个例子开始入手吧,想象一下,把一张A4白纸用图钉订在书桌上,如果订得不是很紧的话,白纸就可以沿顺时针或逆时针方向围绕图钉旋转,这时候图钉就起着支点的作用。我们要解释的anchorPoint就相当于白纸上的图钉,它主要的作用就是用来作为变换的支点,旋转就是一种变换,类似的还有平移、缩放。继续扩展,很明显,白纸的旋转形态随图钉的位置不同而不同,图钉订在白纸的正中间与左上角时分别造就了两种旋转形态,这是由图钉(anchorPoint)的位置决定的。如何衡量图钉(anchorPoint)在白纸中的位置呢?在iOS中,anchorPoint点的值是用一种相对bounds的比例值来确定的,在白纸的左上角、右下角,anchorPoint分为为(0,0), (1, 1),也就是说anchorPoint是在单元坐标空间(同时也是左手坐标系)中定义的。类似地,可以得出在白纸的中心点、左下角和右上角的anchorPoint为(0.5,0.5), (0,1), (1,0)。如下图所示。
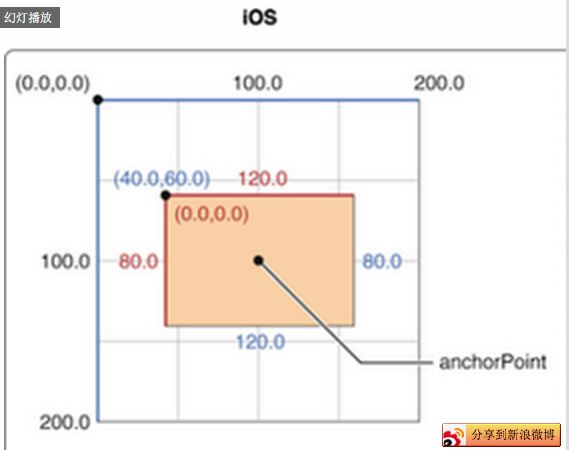
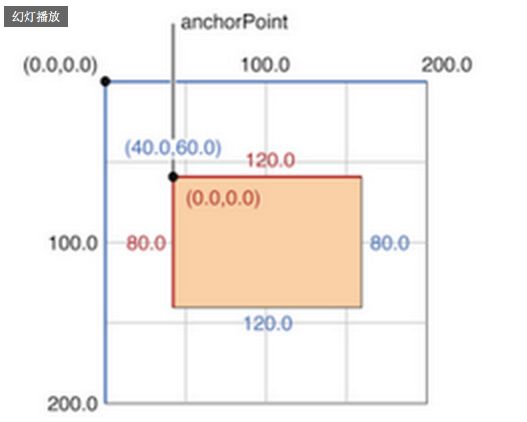
position: 确切地说,position是layer中的anchorPoint点在superLayer中的位置坐标。因此可以说, position点是相对superLayer的,anchorPoint点是相对layer的,两者是相对不同的坐标空间的一个重合点。 再来看看position的原始定义: The layer’s position in its superlayer’s coordinate space。 可以理解成position是layer相对superLayer坐标空间的位置,很显然,这里的位置是根据anchorPoint来确定的.
anchorPoint、position、frame:anchorPoint的默认值为(0.5,0.5),也就是anchorPoint默认在layer的中心点。默认情况下,使用addSublayer函数添加layer时,如果已知layer的frame值,根据上面的结论,那么position的值便可以用下面的公式计算:
position.x = frame.origin.x + 0.5 * bounds.size.width;
position.y = frame.origin.y + 0.5 * bounds.size.height;
里面的0.5是因为anchorPoint取默认值,更通用的公式应该是下面的:
position.x = frame.origin.x + anchorPoint.x *
bounds.size.width;
position.y = frame.origin.y + anchorPoint.y *
bounds.size.height;
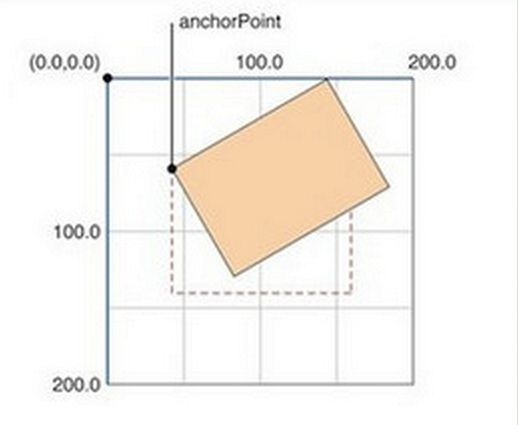
- 特别注意:下面再来看另外两个问题,如果单方面修改layer的position位置,会对anchorPoint有什么影响呢?修改anchorPoint又如何影响position呢?
根据代码测试,两者互不影响,受影响的只会是frame.origin,也就是layer坐标原点相对superLayer会有所改变。换句话说,frame.origin由position和anchorPoint共同决定,上面的公式可以变换成下面这样的:
frame.origin.x = position.x - anchorPoint.x *
bounds.size.width;
frame.origin.y = position.y - anchorPoint.y *
bounds.size.height;
这就解释了为什么修改anchorPoint会移动layer,因为position不受影响,只能是frame.origin做相应的改变,因而会移动layer。
- 总结
- position是layer中的anchorPoint在superLayer中的位置坐标.
- 互不影响原则:单独修改position与anchorPoint中任何一个属性都不影响另一个属性。
- frame、position与anchorPoint有以下关系:
frame.origin.x = position.x - anchorPoint.x *
bounds.size.width;
frame.origin.y = position.y - anchorPoint.y *
bounds.size.height;
后记
未完,待续~~~