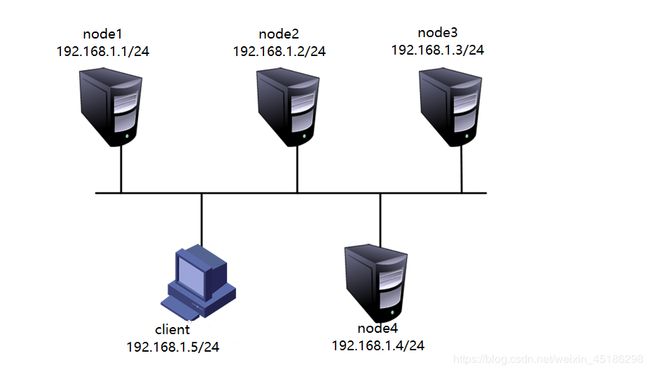
关于GlusterFS分布式文件系统的相关理论知识可以参考博文:GlusterFS分布式文件系统群集理论知识详解
这里就不多说了,实战开始!!!
一、部署群集环境
1.准备环境
在所有节点上执行以下操作:
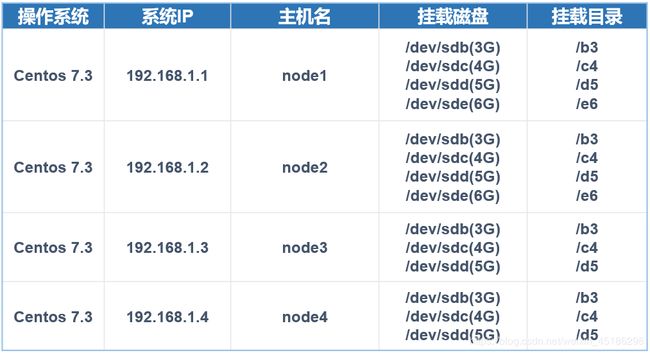
开启4台虚拟机,按照表中添加相应的磁盘,并通过fdisk分区、mkfs格式化,创建相应的挂载目录,并将格式化的磁盘挂载到相应的目录中。最后根据实际情况,可以选择修改/etc/fstab配合文件,使其永久生效。此步骤省略!!!如果有不明白的朋友,可以参考博文:Linux系统磁盘管理(一)
2.关闭防火墙和SELinux
在所有的节点服务器都需要执行同样的以下操作:
[root@localhost ~]# systemctl stop firewalld
[root@localhost ~]# systemctl disable firewalld
Removed symlink /etc/systemd/system/dbus-org.fedoraproject.FirewallD1.service.
Removed symlink /etc/systemd/system/basic.target.wants/firewalld.service.
[root@localhost ~]# setenforce 0
[root@localhost ~]# vim /etc/sysconfig/selinux
          ……………………  //省略部分内容
SELINUX=disable
//如果是实验环境选择临时关闭即可,为了防止实验环境重启机器,建议修改为开机自动关闭
3.配置host配置文件
在所有的节点服务器上修改host配置文件,添加4个节点的解析,其中一个为例:
[root@localhost ~]# vim /etc/hosts

127.0.0.1   localhost localhost.localdomain localhost4 localhost4.localdomain4
::1         localhost localhost.localdomain localhost6 localhost6.localdomain6
192.168.1.1 node1
192.168.1.2 node2
192.168.1.3 node3
192.168.1.4 node4
4.安装软件
所有节点服务器上都需安装gluster软件!
glusterfs相应的rpm包及相应软件网盘链接:https://pan.baidu.com/s/1AuANEM5DZcTFpDqq6B-drA
提取码:1xm1
复制提供的文件包gfsrepo到每个节点上,删除原本的yum仓库配置文件,并创建一个新的yum仓库配置文件指向gfsrepo目录(绝对路径),这个就详细介绍了啊!
[root@localhost ~]# yum -y install glusterfs glusterfs-server glusterfs-fuse glusterfs-rdma
//安装glusterfs相应的软件包
实验环境可以直接访问互联网环境,也可以指向互联网仓库,或者自己下载百度网盘连接获取资源!
5.启动GlusterFS
在所有节点上执行以下操作:
[root@localhost ~]# systemctl start glusterd
[root@localhost ~]# systemctl enable glusterd
Created symlink from /etc/systemd/system/multi-user.target.wants/glusterd.
service to /usr/lib/systemd/system/glusterd.service.
6.添加节点
只需在node1上执行以下操作即可!
[root@localhost ~]# gluster peer probe node2
peer probe: success.
[root@localhost ~]# gluster peer probe node3
peer probe: success.
[root@localhost ~]# gluster peer probe node4
peer probe: success.
//因为是在node1上进行的操作,所以不需要添加node1
7.查看群集状态
使用以下命令在每个节点查看群集状态:
[root@localhost ~]# gluster peer status
Number of Peers: 3

Hostname: node2
Uuid: 254f7760-2350-498d-a76c-3d729d0248b3
State: Peer in Cluster (Connected)

Hostname: node3
Uuid: 4c05ad7a-1ada-431e-90c8-8b1c93391bb7
State: Peer in Cluster (Connected)

Hostname: node4
Uuid: 9fb67f74-7354-46b3-9bbb-b5384418d216
State: Peer in Cluster (Connected)
//不包括本机,Connected属于正常现象,如果非正常将检查host配置文件
这样服务已经安装完毕!剩下的就可以创建各种卷进行测试了!
二、创建卷
以下操作只需在其中一台上操作即可!
创建完成任何卷启动才可使用,不要忘记!
1.创建分布式卷
[root@localhost ~]# gluster volume create dis-volume node1:/e6 node2:/e6 force
//创建分布式卷,卷名为dis-volume,使用node1的e6磁盘和node2的e6磁盘。
//没有指定类型,默认创建的是分布式卷!
//force表示强制的意思,第一次可以省略!
volume create: dis-volume: success: please start the volume to access data
[root@localhost ~]# gluster volume info dis-volume
 //查看dis-volume卷详细信息
Volume Name: dis-volume
Type: Distribute
Volume ID: edad75f6-2a9e-4cc1-96ec-2ead3e87dc55
Status: Created
Snapshot Count: 0
Number of Bricks: 2
Transport-type: tcp
Bricks:
Brick1: node1:/e6
Brick2: node2:/e6
Options Reconfigured:
transport.address-family: inet
nfs.disable: on
[root@localhost ~]# gluster volume status dis-volume
//查看dis-volume的状态
Volume dis-volume is not started
[root@localhost ~]# gluster volume start dis-volume
//启动dis-volume卷
volume start: dis-volume: success
[root@localhost ~]# gluster volume status dis-volume
Status of volume: dis-volume
Gluster process                             TCP Port  RDMA Port  Online  Pid
------------------------------------------------------------------------------
Brick node1:/e6                             49152     0          Y       3438
Brick node2:/e6                             49152     0          Y       3293

Task Status of Volume dis-volume
------------------------------------------------------------------------------
There are no active volume tasks
2.创建条带卷
[root@localhost ~]# gluster volume create stripe-volume stripe 2 node1:/d5 node2:/d5 force
//指定类型为stripe,数值为2,而且后面跟了2个Brick Server,所以创建的是条带卷。
volume create: stripe-volume: success: please start the volume to access data
[root@localhost ~]# gluster volume info stripe-volume

Volume Name: stripe-volume
Type: Stripe
Volume ID: f0aae8c1-4f89-40f7-abd5-a3083e4d588a
Status: Created
Snapshot Count: 0
Number of Bricks: 1 x 2 = 2
Transport-type: tcp
Bricks:
Brick1: node1:/d5
Brick2: node2:/d5
Options Reconfigured:
transport.address-family: inet
nfs.disable: on
[root@localhost ~]# gluster volume start stripe-volume
volume start: stripe-volume: success
3.创建复制卷
[root@localhost ~]# gluster volume create rep-volume replica 2 node3:/d5 node4:/d5 force
//指定类型为replica,数值为2,而且后面跟了2个Brick Server ,所以创建的复制卷
volume create: rep-volume: success: please start the volume to access data
[root@localhost ~]# gluster volume info rep-volume

Volume Name: rep-volume
Type: Replicate
Volume ID: 1a1a979f-5bed-4541-b238-22b4348bd604
Status: Created
Snapshot Count: 0
Number of Bricks: 1 x 2 = 2
Transport-type: tcp
Bricks:
Brick1: node3:/d5
Brick2: node4:/d5
Options Reconfigured:
transport.address-family: inet
nfs.disable: on
[root@localhost ~]# gluster volume start rep-volume
volume start: rep-volume: success
4.创建分布式条带卷
[root@localhost ~]# gluster volume create dis-stripe stripe 2 node1:/b3 node2:/b3 node3:/b3 node4:/b3 force
//指定类型为stripe,数值为2,而且后面跟了4个Brick Server,是2的2倍,所以创建的是分布式条带卷
volume create: dis-stripe: success: please start the volume to access data
[root@localhost ~]# gluster volume info dis-stripe

Volume Name: dis-stripe
Type: Distributed-Stripe
Volume ID: 9d8c3282-271e-421c-a888-02fbf35deaa9
Status: Created
Snapshot Count: 0
Number of Bricks: 2 x 2 = 4
Transport-type: tcp
Bricks:
Brick1: node1:/b3
Brick2: node2:/b3
Brick3: node3:/b3
Brick4: node4:/b3
Options Reconfigured:
transport.address-family: inet
nfs.disable: on
[root@localhost ~]# gluster volume start dis-stripe
volume start: dis-stripe: success
5.创建分布式复制卷
[root@localhost ~]# gluster volume create dis-rep replica 2 node1:/c4 node2:/c4 node3:/c4 node4:/c4 force
//指定类型为replica,数值为2,而且后面跟了4个Brick Server,是2的2倍,所以创建的是分布式复制卷
volume create: dis-rep: success: please start the volume to access data
[root@localhost ~]# gluster volume info dis-rep

Volume Name: dis-rep
Type: Distributed-Replicate
Volume ID: 6536cc9c-a3bd-4276-940d-62eccbed7580
Status: Created
Snapshot Count: 0
Number of Bricks: 2 x 2 = 4
Transport-type: tcp
Bricks:
Brick1: node1:/c4
Brick2: node2:/c4
Brick3: node3:/c4
Brick4: node4:/c4
Options Reconfigured:
transport.address-family: inet
nfs.disable: on
[root@localhost ~]# gluster volume start dis-rep
volume start: dis-rep: success
三、部署Gluster客户端
以下所有操作都是在客户端进行操作的!
1.安装客户端软件
在客户端上也需安装glusterfs软件包,实验环境可使用互联网自行下载,也可指定yum仓库的实际绝对路径。资源在网盘链接中。
[root@localhost ~]# yum -y install glusterfs glusterfs-fuse
//安装客户端所需软件
2.创建挂载目录
[root@localhost ~]# mkdir -p /test/{dis,stripe,rep,dis_and_stripe,dis_and_rep}
[root@localhost ~]# ls /test
dis  dis_and_rep  dis_and_stripe  rep  stripe
3.修改host配置文件
[root@localhost ~]# vim /etc/hosts
127.0.0.1   localhost localhost.localdomain localhost4 localhost4.localdomain4
::1         localhost localhost.localdomain localhost6 localhost6.localdomain6
192.168.1.1 node1
192.168.1.2 node2
192.168.1.3 node3
192.168.1.4 node4
4.挂载Gluster文件系统
[root@localhost ~]# mount -t glusterfs node1:dis-volume /test/dis
[root@localhost ~]# mount -t glusterfs node1:stripe-volume /test/stripe
[root@localhost ~]# mount -t glusterfs node1:rep-volume /test/rep
[root@localhost ~]# mount -t glusterfs node1:dis-stripe /test/dis_and_stripe
[root@localhost ~]# mount -t glusterfs node1:dis-rep /test/dis_and_rep
[root@localhost ~]# df -h
//由于查询结果含有违禁字符,自行查看!
如果挂载过程中出现失败,请检查host配置文件及解析情况!
在挂载时,所指定的node1只是为了从它那里获取到必要的配置信息,在挂载之后,客户机会与不仅仅是node1进行通信,也会直接和逻辑存储卷内其他Brick所在的主机进行通信。
5.修改fstab文件
实验环境也无须编辑fstab文件,实现自动挂载,企业环境中必然要实现自动挂载,方法如下:
[root@localhost ~]# vim /etc/fstab

#
# /etc/fstab
# Created by anaconda on Fri Sep 20 22:23:11 2019
#
# Accessible filesystems, by reference, are maintained under '/dev/disk'
# See man pages fstab(5), findfs(8), mount(8) and/or blkid(8) for more info
#
/dev/mapper/cl-root     /                       xfs     defaults        0 0
UUID=283094e0-2917-47ec-ac36-ada76feb4105 /boot                   xfs     defaults        0 0
/dev/mapper/cl-swap     swap                    swap    defaults        0 0
node1:/dis-volume       /test/dis       glusterfs       defaults,_netdev        0 0
node1:/stripe-volume    /test/stripe    glusterfs       defaults,_netdev        0 0
node1:/rep-volume       /test/rep       glusterfs       defaults,_netdev        0 0
node1:/dis-stripe       /test/dis_and_stripe    glusterfs       defaults,_netdev        0 0
node1:/dis-rep          /test/dis_and_rep       glusterfs       defaults,_netdev        0 0
四、测试Gluster文件系统
1.卷中写入数据
[root@localhost ~]# ll -h demo*
-rw-r--r--. 1 root root 43M 10月  6 11:18 demo1.log
-rw-r--r--. 1 root root 43M 10月  6 11:19 demo2.log
-rw-r--r--. 1 root root 43M 10月  6 11:42 demo3.log
-rw-r--r--. 1 root root 43M 10月  6 11:43 demo4.log
-rw-r--r--. 1 root root 43M 10月  6 11:53 demo5.log
[root@localhost ~]# cp demo* /test/dis/
[root@localhost ~]# cp demo* /test/stripe/
[root@localhost ~]# cp demo* /test/rep/
[root@localhost ~]# cp demo* /test/dis_and_stripe/
[root@localhost ~]# cp demo* /test/dis_and_rep/
//客户端创建测试文件
2.查看文件分布
为了更好的查看效果,节点服务器更名为node1……4
以下是查看分布式卷文件分布情况:
[root@node1 ~]# ll -h /e6
总用量 172M
-rw-r--r--. 2 root root 43M 10月  6 11:55 demo1.log
-rw-r--r--. 2 root root 43M 10月  6 11:55 demo2.log
-rw-r--r--. 2 root root 43M 10月  6 11:55 demo3.log
-rw-r--r--. 2 root root 43M 10月  6 11:55 demo4.log
[root@node2 ~]# ll -h /e6
总用量 43M
-rw-r--r--. 2 root root 43M 10月  6 11:55 demo5.log
//因为分布式卷不分片,所以都是初始大小
以下是查看条带卷的分布情况:
[root@node1 ~]# ll -h /d5
总用量 108M
-rw-r--r--. 2 root root 22M 10月  6 11:55 demo1.log
-rw-r--r--. 2 root root 22M 10月  6 11:55 demo2.log
-rw-r--r--. 2 root root 22M 10月  6 11:55 demo3.log
-rw-r--r--. 2 root root 22M 10月  6 11:55 demo4.log
-rw-r--r--. 2 root root 22M 10月  6 11:55 demo5.log
[root@node2 ~]# ll -h /d5
总用量 108M
-rw-r--r--. 2 root root 22M 10月  6 11:55 demo1.log
-rw-r--r--. 2 root root 22M 10月  6 11:55 demo2.log
-rw-r--r--. 2 root root 22M 10月  6 11:55 demo3.log
-rw-r--r--. 2 root root 22M 10月  6 11:55 demo4.log
-rw-r--r--. 2 root root 22M 10月  6 11:55 demo5.log
//条带卷被分成两份
以下是查看复制卷文件分布情况:
[root@node3 ~]# ll -h /d5
总用量 216M
-rw-r--r--. 2 root root 43M 10月  6 11:56 demo1.log
-rw-r--r--. 2 root root 43M 10月  6 11:56 demo2.log
-rw-r--r--. 2 root root 43M 10月  6 11:56 demo3.log
-rw-r--r--. 2 root root 43M 10月  6 11:56 demo4.log
-rw-r--r--. 2 root root 43M 10月  6 11:56 demo5.log
[root@node4 ~]# ll -h /d5
总用量 216M
-rw-r--r--. 2 root root 43M 10月  6 11:56 demo1.log
-rw-r--r--. 2 root root 43M 10月  6 11:56 demo2.log
-rw-r--r--. 2 root root 43M 10月  6 11:56 demo3.log
-rw-r--r--. 2 root root 43M 10月  6 11:56 demo4.log
-rw-r--r--. 2 root root 43M 10月  6 11:56 demo5.log
//没有分片原始大小,而且是双份
以下是查看分布式条带卷文件分布情况:
[root@node1 ~]# ll -h /b3
总用量 86M
-rw-r--r--. 2 root root 22M 10月  6 11:56 demo1.log
-rw-r--r--. 2 root root 22M 10月  6 11:56 demo2.log
-rw-r--r--. 2 root root 22M 10月  6 11:56 demo3.log
-rw-r--r--. 2 root root 22M 10月  6 11:56 demo4.log
[root@node2 ~]# ll -h /b3
总用量 87M
-rw-r--r--. 2 root root 22M 10月  6 11:56 demo1.log
-rw-r--r--. 2 root root 22M 10月  6 11:56 demo2.log
-rw-r--r--. 2 root root 22M 10月  6 11:56 demo3.log
-rw-r--r--. 2 root root 22M 10月  6 11:56 demo4.log
[root@node3 ~]# ll -h /b3
总用量 22M
-rw-r--r--. 2 root root 22M 10月  6 11:56 demo5.log
[root@node4 ~]# ll -h /b3
总用量 22M
-rw-r--r--. 2 root root 22M 10月  6 11:56 demo5.log
//大小被分片为21M、22M
以下是查看分布式复制卷文件分布情况:
[root@node1 ~]# ll -h /c4
总用量 172M
-rw-r--r--. 2 root root 43M 10月  6 11:57 demo1.log
-rw-r--r--. 2 root root 43M 10月  6 11:57 demo2.log
-rw-r--r--. 2 root root 43M 10月  6 11:57 demo3.log
-rw-r--r--. 2 root root 43M 10月  6 11:57 demo4.log
[root@node2 ~]# ll -h /c4
总用量 173M
-rw-r--r--. 2 root root 43M 10月  6 11:57 demo1.log
-rw-r--r--. 2 root root 43M 10月  6 11:57 demo2.log
-rw-r--r--. 2 root root 43M 10月  6 11:57 demo3.log
-rw-r--r--. 2 root root 43M 10月  6 11:57 demo4.log
[root@node3 ~]# ll -h /c4
总用量 44M
-rw-r--r--. 2 root root 43M 10月  6 11:57 demo5.log
[root@node4 ~]# ll -h /c4
总用量 44M
-rw-r--r--. 2 root root 43M 10月  6 11:57 demo5.log
//没有被分片,原始大小
3.破坏性测试
挂起node2节点,在客户端上测试文件是否可以正常使用。
由于是实验环境,数据是/dev/zero中的数据,查看不到;但是如果不能查看报错的!
查看测试分布式卷数据是否可以访问:
[root@localhost ~]# head -1 /test/dis/demo1.log
[root@localhost ~]# head -1 /test/dis/demo2.log
[root@localhost ~]# head -1 /test/dis/demo3.log
[root@localhost ~]# head -1 /test/dis/demo4.log
[root@localhost ~]# head -1 /test/dis/demo5.log
head: 无法打开"/test/dis/demo5.log" 读取数据: 没有那个文件或目录
//分布在node2节点上的demo5.log无法访问,由此可见,分布式不具备冗余性。
查看测试条带卷数据卷是否可以访问:
[root@localhost ~]# head -1 /test/stripe/demo1.log
head: 读取"/test/stripe/demo1.log" 时出错: 没有那个文件或目录
[root@localhost ~]# head -1 /test/stripe/demo2.log
head: 读取"/test/stripe/demo2.log" 时出错: 没有那个文件或目录
[root@localhost ~]# head -1 /test/stripe/demo3.log
head: 读取"/test/stripe/demo3.log" 时出错: 没有那个文件或目录
[root@localhost ~]# head -1 /test/stripe/demo4.log
head: 读取"/test/stripe/demo4.log" 时出错: 没有那个文件或目录
[root@localhost ~]# head -1 /test/stripe/demo5.log
head: 读取"/test/stripe/demo5.log" 时出错: 没有那个文件或目录
//node2节点挂起后,数据全部丢失
查看测试分布式条带卷数据可以访问:
[root@localhost ~]# head -1 /test/dis_and_stripe/demo1.log
head: 读取"/test/dis_and_stripe/demo1.log" 时出错: 没有那个文件或目录
[root@localhost ~]# head -1 /test/dis_and_stripe/demo2.log
head: 读取"/test/dis_and_stripe/demo2.log" 时出错: 没有那个文件或目录
[root@localhost ~]# head -1 /test/dis_and_stripe/demo3.log
head: 读取"/test/dis_and_stripe/demo3.log" 时出错: 没有那个文件或目录
[root@localhost ~]# head -1 /test/dis_and_stripe/demo4.log
head: 读取"/test/dis_and_stripe/demo4.log" 时出错: 没有那个文件或目录
[root@localhost ~]# head -1 /test/dis_and_stripe/demo5.log
//node2节点挂起后,分布在node1和node2节点的数据全部丢失,而分布在node3和node4节点的数据不丢失
查看测试分布式复制卷数据是否可以访问:
[root@localhost ~]# head -1 /test/dis_and_rep/demo1.log
[root@localhost ~]# head -1 /test/dis_and_rep/demo2.log
[root@localhost ~]# head -1 /test/dis_and_rep/demo3.log
[root@localhost ~]# head -1 /test/dis_and_rep/demo4.log
[root@localhost ~]# head -1 /test/dis_and_rep/demo5.log
//node2节点挂起后,数据不会丢失
继续挂起node4节点,在客户端测试文件是否可以使用。
查看测试复制卷数据是否可以访问:
[root@localhost ~]# head -1 /test/rep/demo1.log
[root@localhost ~]# head -1 /test/rep/demo2.log
[root@localhost ~]# head -1 /test/rep/demo3.log
[root@localhost ~]# head -1 /test/rep/demo4.log
[root@localhost ~]# head -1 /test/rep/demo5.log
//即使node2和node4节点挂起后,复制卷数据不会丢失
查看测试分布式条带卷数据是否可以访问:
[root@localhost ~]# head -1 /test/dis_and_stripe/demo1.log
head: 读取"/test/dis_and_stripe/demo1.log" 时出错: 没有那个文件或目录
[root@localhost ~]# head -1 /test/dis_and_stripe/demo2.log
head: 读取"/test/dis_and_stripe/demo2.log" 时出错: 没有那个文件或目录
[root@localhost ~]# head -1 /test/dis_and_stripe/demo3.log
head: 读取"/test/dis_and_stripe/demo3.log" 时出错: 没有那个文件或目录
[root@localhost ~]# head -1 /test/dis_and_stripe/demo4.log
head: 读取"/test/dis_and_stripe/demo4.log" 时出错: 没有那个文件或目录
[root@localhost ~]# head -1 /test/dis_and_stripe/demo5.log
head: 读取"/test/dis_and_stripe/demo5.log" 时出错: 没有那个文件或目录
//node2和node4节点挂起,分布式条带卷数据不可以访问
查看分布式复制卷数据是否可以访问:
[root@localhost ~]# head -1 /test/dis_and_rep/demo1.log
[root@localhost ~]# head -1 /test/dis_and_rep/demo2.log
[root@localhost ~]# head -1 /test/dis_and_rep/demo3.log
[root@localhost ~]# head -1 /test/dis_and_rep/demo4.log
[root@localhost ~]# head -1 /test/dis_and_rep/demo5.log
//node2和node4节点挂起后,分布式复制卷数据可以正常访问
五、其他的维护命令
1.查看GlusterFS卷
[root@node1 ~]# gluster volume list
//查看卷的列表
dis-rep
dis-stripe
dis-volume
rep-volume
stripe-volume
[root@node1 ~]# gluster volume info
// 查看所有卷的详细信息
Volume Name: dis-rep
Type: Distributed-Replicate
Volume ID: 6536cc9c-a3bd-4276-940d-62eccbed7580
Status: Started
Snapshot Count: 0
Number of Bricks: 2 x 2 = 4
Transport-type: tcp
Bricks:
Brick1: node1:/c4
Brick2: node2:/c4
Brick3: node3:/c4
Brick4: node4:/c4
Options Reconfigured:
transport.address-family: inet
                          ……………………                //省略部分内容
[root@node1 ~]# gluster volume status
//查看所有卷的状态
Status of volume: dis-rep
Gluster process                             TCP Port  RDMA Port  Online  Pid
------------------------------------------------------------------------------
Brick node1:/c4                             49155     0          Y       44187
Brick node3:/c4                             49154     0          Y       43976
Self-heal Daemon on localhost               N/A       N/A        Y       44207
Self-heal Daemon on node3                   N/A       N/A        Y       43996

Task Status of Volume dis-rep
------------------------------------------------------------------------------
There are no active volume tasks

Status of volume: dis-stripe
Gluster process                             TCP Port  RDMA Port  Online  Pid
------------------------------------------------------------------------------
Brick node1:/b3                             49154     0          Y       44113
Brick node3:/b3                             49153     0          Y       43916

Task Status of Volume dis-stripe
------------------------------------------------------------------------------
There are no active volume tasks

Status of volume: dis-volume
Gluster process                             TCP Port  RDMA Port  Online  Pid
------------------------------------------------------------------------------
Brick node1:/e6                             49152     0          Y       3438

Task Status of Volume dis-volume
------------------------------------------------------------------------------
There are no active volume tasks

Status of volume: rep-volume
Gluster process                             TCP Port  RDMA Port  Online  Pid
------------------------------------------------------------------------------
Brick node3:/d5                             49152     0          Y       3455
Self-heal Daemon on localhost               N/A       N/A        Y       44207
Self-heal Daemon on node3                   N/A       N/A        Y       43996

Task Status of Volume rep-volume
------------------------------------------------------------------------------
There are no active volume tasks

Status of volume: stripe-volume
Gluster process                             TCP Port  RDMA Port  Online  Pid
------------------------------------------------------------------------------
Brick node1:/d5                             49153     0          Y       3588

Task Status of Volume stripe-volume
------------------------------------------------------------------------------
There are no active volume tasks
2.停止/删除卷
[root@node1 ~]# gluster volume stop dis-stripe
//停止一个卷
Stopping volume will make its data inaccessible. Do you want to continue? (y/n) y
volume stop: dis-stripe: success
[root@node1 ~]# gluster volume delete dis-stripe
//删除一个卷
Deleting volume will erase all information about the volume. Do you want to continue? (y/n) y
volume delete: dis-stripe: failed: Some of the peers are down
3.设置卷的访问控制
[root@node1 ~]# gluster volume set dis-rep auth.allow 192.168.1.*,10.1.1.*
//设置只允许192.168.1.0网段和10.1.1.0网段的客户端可以访问dis-rep卷
volume set: success
关于GlusterFS分布式文件系统,基本操作今天就介绍这么多,如果有什么常用的操作,以后会更新的!
———————— 本文至此结束,感谢阅读 ————————


