用windows电脑的时候喜欢恶搞,恶搞啥呢?比如我不想让你动我电脑的QQ,那么首先打开记事本(win + R 键入notepad 回车),写一句定时关机的命令(500秒后关机)
shutdown -s -t 500
重启
shutdown -r
保存为 .bat 格式,有时候我也存为 .cmd 格式,名字就叫 腾讯QQ
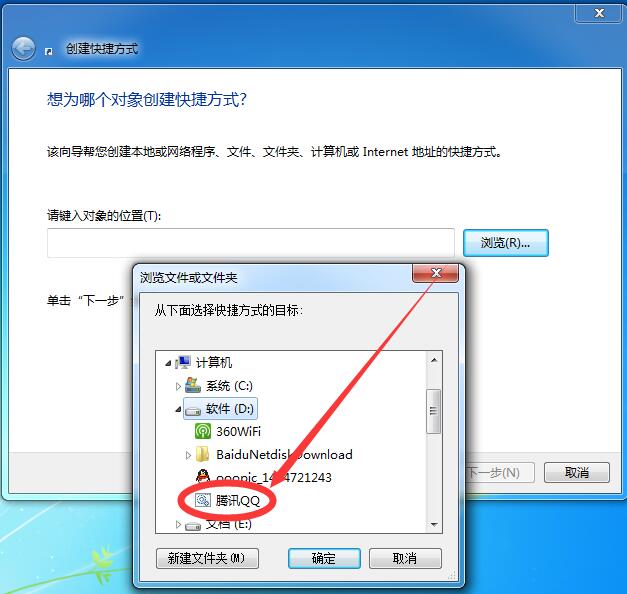
在桌面创建一个快捷方式,指向刚才编写的脚本
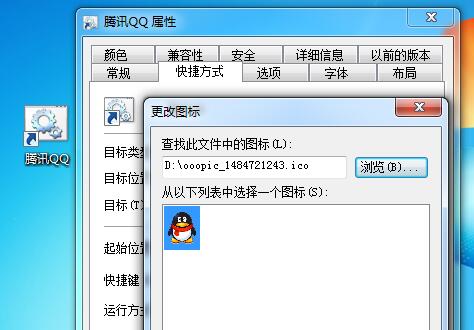
给这个快捷方式换一个QQ图标
伪装成了一个假的QQ
然后不知情的吃瓜群中双击了下,要登录QQ
然后就不知所措了
打开命令行(win + R 键入cmd 回车), 输入
shutdown -a
取消关机
只是一个特别简单的脚本,当然IT干这行了,那就得让脚本为我们服务了,不能再去恶搞了
话不多说,回到开发中解决我们实际的问题
第一篇文章中讲述了我们在打包过程中要更改的一些东西:
- APP桌面图标、启动图以及其他相关的媒体文件
- BundleID、APP名字、APP版本等plist文件中的内容
- 动态引用需要的代码、.a、.framework、.xib、.bundle等等模块相关的资源文件,这个我们都叫给cocoapods处理,脚本要处理的内容就是podFile文件
- 执行打包命令
可能要写很多脚本,这里我们说几个必要的:
| 脚本 | 脚本功能 | 备注 |
|---|---|---|
| 解析服务器下发的配置文件 | 这个会影响到之后所有脚本的操作,其他脚本都依赖于服务器的这个配置 | 同其它脚本一起编写 |
| 更改资源文件脚本 | 替换资源文件 | 比如app_ico |
| 更改plist文件脚本 | 修改一些配置 | 比如app名字,bunldID |
| 更改模块脚本 | 添加必要的模块代码和资源 | 用cocoapods |
| 打包脚本 | 生成IPA文件 | 无 |
最后我们用一个总的脚本就调用下这几个小脚本,帮我们自动配置、打包
我们销售人员在服务器上选了一些配置,配置选完了会执行一个配置脚本,将配置push到我的项目目录下,我pull下来然后开始配置我的文件,打包出ipa文件,再上传生成二维码。
开始逐个编写表格里需要的脚本
更改资源文件脚本
我们就以app_icon为例吧,我们准备两套icon图标,先配置一套,然后来回切换一下看看
Config是执行脚本pull(前一句要reset --hard 一下)操作的时候拉取下来的文件夹,里面会有好多配置,比如项目里我们配置好了一套icon
我们到python文件夹下写一段脚本,用sublime编写,保存为 .py格式
#!/usr/bin/env python
#coding:utf-8
import shutil
import os

print("**********************文件路径**************************")
#脚本存放位置
py_path = os.path.dirname(os.path.abspath(__file__))
print py_path
#脚本的上上级目录(项目的根目录),脚本所在的目录是Python文件夹,再退一级是文件的根目录
py_parent_path = os.path.abspath(os.path.join(os.path.dirname(__file__),".."))
print py_parent_path

print("**********************开始拷贝icon文件**************************")

#原文件夹
source_path = py_parent_path + '/Congfig/AppIcon/Icon_1'

#目标文件夹
target_path = py_parent_path + '/IconLaunchImage/Assets.xcassets/AppIcon.appiconset'

def copyFiles(sourceDir, targetDir):
    for files in os.listdir(sourceDir):
        sourceFile = os.path.join(sourceDir, files) #源文件
        targetFile = os.path.join(targetDir, files) #目标文件
        srcIsExist = os.path.isfile(sourceFile)     #源文件是否存在
        targetIsExist = os.path.isfile(targetFile)  #目标文件是否存在 (如果不存在,对项目也没有影响)
        imgIsPNG = sourceFile.find('.png') > 0      #目标文件是否是png格式

        if srcIsExist and imgIsPNG and targetIsExist:
            print sourceFile
            shutil.copyfile(sourceFile, targetFile)


copyFiles(source_path, target_path)
加了详细的注释,相信很容易就看懂了,这样我们就把icon文件给拷贝过去了,其他资源文件也可以这样操作。
接下来我得执行下看看,目录下有个黑色图标的文件 执行所有脚本,就shell脚本,可以理解为里面的命令都是在命令行里执行的。我们怎么执行这个.py文件呢?Mac自带python解析器,所以我们可以直接执行,在命令行执行
python /路径/xxx.py
我们看下 执行所有脚本里的内容(你问我前两行怎么不是git命令,兄弟别着急,这里是在测试脚本Demo,最后会给一个全的脚本)
baseDirForScriptSelf=$(cd "$(dirname "$0")"; pwd)
echo "current full path is : ${baseDirForScriptSelf}"

cd ${baseDirForScriptSelf}
cd Python

python modifyIcon.py

python modifyInfoPlist.py
首先第一行是获取当前脚本所在的路径,进入到python脚本所在的目录,在这个目录下执行这两个脚本,路径如下图
这里我们就替换了icon
更改info.plist
plist在程序里很好改,可是在外部怎么改?,我们用sublime打卡plist看看结构
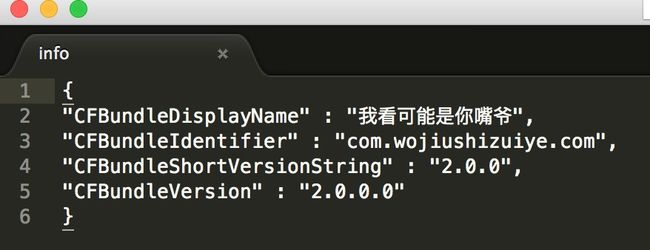
再看看我们拿到的配置文件结构
inof文件里的配置
然后你可能兴奋一下,啊,这不是xml 结构的么,啊,我有一百种方式去修改了,python咋也得支持xml解析吧,那肯定支持,传说 Python是世界上最好的语言啊 然后呢,那就解析呗。说出来不怕大家笑话,我一开始学的是读取文件的行元素来修改的,竟然也能修改成功,当然,我是低级Python工程师,字符串还没玩明白。我曾经觉得那些在代码里 self.button1、self.button2、self.button3…… 简直太low了,后来发现人家也照样实现功能了,使用APP的人并不知道怎么写的,索性我也low一次,接下来高能了,看注释和方法名字相信大家也能猜个大概
#!/usr/bin/env python
#coding:utf-8
import json
import os
print("**********************文件路径**************************")
#脚本存放位置
py_path = os.path.dirname(os.path.abspath(__file__))
print py_path
#脚本的上上级目录(项目的根目录),脚本所在的目录是Python文件夹,再退一级是文件的根目录
py_parent_path = os.path.abspath(os.path.join(os.path.dirname(__file__),".."))
print py_parent_path
print("**********************开始拷贝icon文件**************************")
#源文件(内部是json字符串)<目前修改 CFBundleDisplayName CFBundleIdentifier CFBundleShortVersionString CFBundleVersion>
source_path = py_parent_path + '/Congfig/AppInfo/info'
#工程的infoPlist文件<最终要修改这个文件>
target_path = py_parent_path + '/IconLaunchImage/Info的副本.plist'
#返回字符串'<' 之前的空格
def preSpaceStr(line):
print line.count('<') # 字符串的空格总数
position = 0
for c in line:
if c == '<':
break
position = position + 1
return line[ : position]
#获取节点之间的值 aaaaaa 第一个> 和倒数第一个<
def getValueInLine(line):
start = 0
end = 0
for c in line:
if c == '>':
# print c, start
break
start = start + 1
for c in reversed(line):
if c == '<':
# print c, end
break
end = end + 1
return line[start + 1 : -(end + 1)]
value = getValueInLine(' CFBundleDisplayName ')
print value
def replaceConfig():
with open(source_path, 'r') as sf:
infoMap = eval(sf.read())
target_file = open(target_path)
try:
lines = target_file.readlines() #读取字符串
for line in lines:
print line
finally:
target_file.close()
print 'Plist开始'
for index, line in enumerate(lines):
key = getValueInLine(line)
if str(key).strip() in infoMap.keys():
print index, key
lines[index + 1] = preSpaceStr(line) + '' + infoMap[key] + ' ' + '\n'
print '最后的plist'
for line in lines:
print line
output = open(target_path, 'w')
output.writelines(lines)
output.close()
replaceConfig()
不管怎么说,方法有点low,终归是解决问题了,我们之后再优化。
更改模块脚本
配置文件存放在哪儿就不管了,假定我们最终都能找到,我们要执行如下的操作
Python脚本如下(这里我们先假定他们都在一个文件夹下),Python代码如下
#!/usr/bin/env python
#coding:utf-8
import json
import os

print("**********************打开一个文件**************************")
#脚本存放位置
#py_path = os.path.dirname(os.path.abspath(__file__))
with open(os.path.dirname(os.path.abspath(__file__)) + '/moduleConfig', 'r') as f:
    print(f.read())
print("**********************打开一个文件**************************")

print("**********************文件路径**************************")
#获取当前脚本文件路径
print os.path.dirname(os.path.abspath(__file__))

#获取当前路径的上级目录
print os.path.abspath(os.path.dirname(os.path.dirname(__file__)))
print os.path.abspath(os.path.join(os.path.dirname(__file__),".."))
print("**********************文件路径**************************")


#脚本存放位置
py_path = os.path.dirname(os.path.abspath(__file__))

# *************************函数定义开始*************************
'''
    对podFile 进行操作 将pod 需要执行的代码插入到 end 关键字之前
    podcodeLines 是待插入位置的行字符串数组
'''
def insertPodCodeToPodFile(podcodeLines):
    print("开始插入需要的代码")

    wf = open(py_path + '/codeConfig') # 返回一个文件对象
    try:
        lines = wf.readlines()
    finally:
        wf.close()


    count = 0
    remainList = []
    for index, value in enumerate(lines):
        print index, value
        remainList.append(value)
        if value.find('#***') == 0:  # 只添加分隔符之前的代码
            count = index
            break


    print('currnet line index  ' + str(count))


    print("保留的代码")

    remainList.append('\n\n\n')

    print("添加代码开始=========")
    for index, value in enumerate(podcodeLines):
        remainList.append(value)
        remainList.append('\n')

    remainList.append('\n\n\n')
    print("添加代码结束=========")

    remainList.append('end')
    print("最后的配置文件=======================")
    print(remainList)

    print("最后的配置文件=======================")


    output = open(py_path + '/codeConfig', 'w')
    output.writelines(remainList)
    output.close()


    print("**********")

########################################################################

'''
    对服务器配置文件进行操作 返回模块ID或者模块key数组 数据['NewClass', 'CommentClass']
    返回模块ID或者模块key数组 比如 ['ENewsClass', 'CommentClass', 'ReadClass', 'GameClass']
'''
def getModuleKeys():
    moduleConfig_file = open(py_path + '/moduleConfig')
    try:
         json_text = moduleConfig_file.read( ) #读取字符串
    finally:
         moduleConfig_file.close( )

    dicList = eval(json_text)

    keyList = []
    for  infoDic in dicList:
        keyList.append(infoDic['moduleName'])

    return keyList


########################################################################

'''
    读取映射文件,根据对应的key  取出来podFile 需要的代码
'''

def writePodCodeToPodFile():
    mapfile = open(py_path + '/mapConfig')
    try:
        map_json_text = mapfile.read()
    finally:
        mapfile.close()

    infos = eval(map_json_text)

    keys = getModuleKeys()

    print("当前读取到的模块key")
    print(keys)

    codeList = []

    for key in keys:
        podStr = infos[key]
        print("待添加的代码整理到一个list里")
        print(podStr)
        codeList.append(infos[key])
        codeList.append('\n')
        # insertPodCodeToPodFile(podStr)

    print(codeList)
    insertPodCodeToPodFile(codeList)

writePodCodeToPodFile()
更改模块脚本
这里我们用的cocoapods,所以只需要执行一句:
pud update --no-repo-update
下一篇文章着重讲解。
打包脚本
脚本可参考 手机远程控制Mac实现iOS APP一键打包上传 !
下一篇就是cocoapods了,这个会围绕podspec展开,敬请期待~
写的都有点紧张了,不足的地方肯定不少,欢迎大家指正,欢迎大家打我啊!
感谢您阅读完毕,如有疑问,欢迎添加QQ:714387953(蜗牛上高速)。
github:https://github.com/yhl714387953
如果有错误,欢迎指正,一起切磋,共同进步
如果喜欢可以Follow、Star、Fork,都是给我最大的鼓励


