首先来看一下iOS10的推送的基本的实现,和之前的推送有啥差别。
权限申请
iOS8之前,远程推送和本地推送是区分对待的,用户只要同意远程推送的是否允许就行了。iOS8对远程推送和本地推送权限允许进行了统一,无论是远程推送还是本地推送,在用户看来效果都是一样的,都是打断用户的操作。因此iOS8都需要申请权限。iOS 10 里进一步消除了本地通知和推送通知的区别。向用户申请通知权限非常简单:
首先看一下本地推送的相关的比较
下面是iOS10以下版本的本地推送
1、首先是权限问题
// 申请允许通知的权限
 func application(_ application: UIApplication, didFinishLaunchingWithOptions launchOptions: [UIApplicationLaunchOptionsKey: Any]?) -> Bool {
        // Override point for customization after application launch.

        registerPush(application: application)
        return true
    }

    // 注册推送
    func registerPush(application:UIApplication) {

        let settings = UIUserNotificationSettings.init(types: [.alert, .sound, .badge], categories: nil)
        application.registerUserNotificationSettings(settings)

    }
2、注册本地推送
ViewController中的操作,点击按钮,压入后台,等待4秒就会收到本地的推送
// 测试按钮的点击事件
    func clickBtn1(sender:UIButton) {

        //发送本地推送
        let notification = UILocalNotification()

        var fireDate = Date()
        fireDate = fireDate.addingTimeInterval(TimeInterval.init(4.0))
        notification.fireDate = fireDate
        notification.alertBody = "body"
        notification.userInfo = ["name":"张三","age":"20"]
        notification.timeZone = NSTimeZone.default
        notification.soundName = UILocalNotificationDefaultSoundName;

        //发送通知
        UIApplication.shared.scheduleLocalNotification(notification)
        UIApplication.shared.applicationIconBadgeNumber += 1;

    }
3、接收到本地推送的后续处理
当然了,不处理的话,就是默认进入app中。
// 接收到本地推送
    func application(_ application: UIApplication, didReceive notification: UILocalNotification) {

        print("notification.userInfo = \(notification)  notification.alertBody = \(notification.alertBody)  notification.userInfo = \(notification.userInfo)");
    }
收到本地推送之后,点击推送的条,进入app,获取推送的相关的内容
notification.userInfo = {fire date = 2016年11月28日 星期一 中国标准时间16:42:24, time zone = Asia/Shanghai (GMT+8) offset 28800, repeat interval = 0, repeat count = UILocalNotificationInfiniteRepeatCount, next fire date = (null), user info = {
    age = 20;
    name = "\U5f20\U4e09";
}}  notification.alertBody = Optional("body")  notification.userInfo = Optional([AnyHashable("age"): 20, AnyHashable("name"): 张三])
当然了,以上代码。iOS10系统的机器也是能够收到得到的,上下兼容嘛。
我们看一下,之前的本地推送的实现是这样的。
简单的说就是本地推送通过 App 本地定制,加入到系统的 Schedule 里,然后在指定的时间推送指定文字。
下面是iOS10版本的本地推送
1、首先是权限问题
和iOS10以下的推送不同,iOS10的推送,是基于UserNotifications 框架实现的,所以在实现之前先导入 UserNotifications框架
import UserNotifications
    func application(_ application: UIApplication, didFinishLaunchingWithOptions launchOptions: [UIApplicationLaunchOptionsKey: Any]?) -> Bool {
        // Override point for customization after application launch.

        registerPush(application: application)
        return true
    }

    // 注册推送
    func registerPush(application:UIApplication) {

        // 首先通过系统版本进行判断,进行不同的注册
        let version:NSString = UIDevice.current.systemVersion as NSString;
        let versionFloat = version.floatValue
        if versionFloat < 10{

            let settings = UIUserNotificationSettings.init(types: [.alert, .sound, .badge], categories: nil)
            application.registerUserNotificationSettings(settings)

        }else{

            if #available(iOS 10.0, *) {
                UNUserNotificationCenter.current().requestAuthorization(options: [.alert, .sound, .badge]) {
                    granted, error in
                    if granted {
                        // 用户允许进行通知

                        print("用户允许进行通知了")

                    }else{
                        print("用户不允许进行通知了")
                    }
                }

                // 向 APNs 请求 token:
                UIApplication.shared.registerForRemoteNotifications()

            } else {
                // Fallback on earlier versions
            }
        }
    }
2、接下来是注册相关的本地推送的操作,当然了也得导入头文件
import UserNotifications
    // 测试按钮的点击事件
    func clickBtn2(sender:UIButton) {

        if #available(iOS 10.0, *) {
            // 1、创建推送的内容
            let content = UNMutableNotificationContent()
            content.title = "iOS 10 的推送标题"
            content.body = "iOS 10 的推送主体"
            content.subtitle = "iOS 10 的副标题"
            content.userInfo = ["name":"张三","age":"20"]

            // 2、创建发送触发

            /* 触发器分三种:
             UNTimeIntervalNotificationTrigger : 在一定时间后触发,如果设置重复的话,timeInterval不能小于60
             UNCalendarNotificationTrigger: 在某天某时触发,可重复
             UNLocationNotificationTrigger : 进入或离开某个地理区域时触发 */
            let trigger = UNTimeIntervalNotificationTrigger(timeInterval: 2, repeats: false)

            // 3. 发送请求标识符
            let requestIdentifier = "firstLocationPush"

            // 4、创建一个发送请求
            let request = UNNotificationRequest(identifier: requestIdentifier, content: content, trigger: trigger)

            // 5、将请求添加到发送中心
            UNUserNotificationCenter.current().add(request, withCompletionHandler: { (error) in
                if error == nil{
                    print("Time Interval Notification scheduled: \(requestIdentifier)")
                }
            })
        } else {
            // Fallback on earlier versions
        }
    }
UserNotifications 中对通知进行了统一。我们通过通知的内容 (UNNotificationContent),发送的时机(UNNotificationTrigger) 以及一个发送通知的 String类型的标识符,来生成一个 UNNotificationRequest类型的发送请求。最后,我们将这个请求添加到 UNUserNotificationCenter.current()中,就可以等待通知到达了。
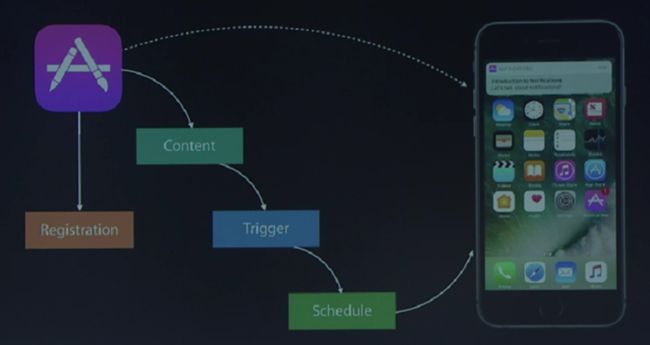
那么本地推送的实现就变成了这样:
图片来自
Local Notifications 通过定义 Content 和 Trigger 向 UNUserNotificationCenter 进行 request 这三部曲来实现。
PS:补充一下
 /* 触发器分三种:
UNTimeIntervalNotificationTrigger : 在一定时间后触发,如果设置重复的话,timeInterval不能小于60
             UNCalendarNotificationTrigger: 在某天某时触发,可重复
             UNLocationNotificationTrigger : 进入或离开某个地理区域时触发 */
let trigger = UNTimeIntervalNotificationTrigger(timeInterval: 2, repeats: true)
这么写崩溃了,原因是这个样子滴。设置时间大于60S就行了
3、iOS10的本地推送在哪里接收
当然了,使用UNNotificationContent创建的本地通知,也是可以通过Appdelegate类中的
func application(_ application: UIApplication, didReceive notification: UILocalNotification)
方法的。
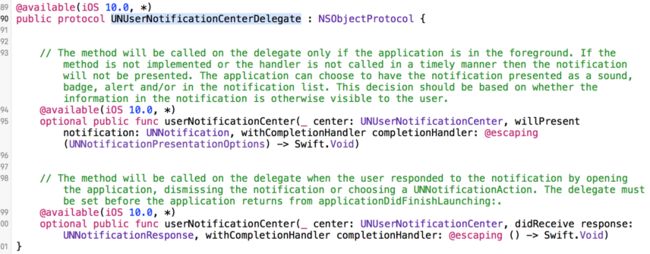
不过,最好是通过UNUserNotificationCenterDelegate的相关的代理方法进行读取,以及相关的后续操作。
我们创建一个新的类
NotificationHandler,来遵守代理,进行相关的操作
class AppDelegate: UIResponder, UIApplicationDelegate {

    var window: UIWindow?

    let notificationHandler = NotificationHandler()

    func application(_ application: UIApplication, didFinishLaunchingWithOptions launchOptions: [UIApplicationLaunchOptionsKey: Any]?) -> Bool {
        // Override point for customization after application launch.


        // 注册推送
        registerPush(application: application)

        // 添加iOS10 推送的相关的代理
        if #available(iOS 10.0, *) {
            UNUserNotificationCenter.current().delegate = notificationHandler
        } else {
            // Fallback on earlier versions
        }

        return true
    }
}
import UIKit
import UserNotifications
class NotificationHandler: NSObject,UNUserNotificationCenterDelegate {

    @available(iOS 10.0, *)
    // 点击推送框的时候,就会走这个方法。不管是本地推送还是远程推送,相比之前更加方便了
    func userNotificationCenter(_ center: UNUserNotificationCenter, didReceive response: UNNotificationResponse, withCompletionHandler completionHandler: @escaping () -> Void) {

    }

    @available(iOS 10.0, *)
    // 展示之前进行的设置
    func userNotificationCenter(_ center: UNUserNotificationCenter, willPresent notification: UNNotification, withCompletionHandler completionHandler: @escaping (UNNotificationPresentationOptions) -> Void) {

    }
}
首先熟悉下func userNotificationCenter(_ center: UNUserNotificationCenter, didReceive response: UNNotificationResponse, withCompletionHandler completionHandler: @escaping () -> Void)
获取一个本地推送的相关的信息
 @available(iOS 10.0, *)
    // 点击推送框的时候,就会走这个方法。不管是本地推送还是远程推送,相比之前更加方便了
    func userNotificationCenter(_ center: UNUserNotificationCenter, didReceive response: UNNotificationResponse, withCompletionHandler completionHandler: @escaping () -> Void) {

        let userInfo = response.notification.request.content.userInfo
        let title = response.notification.request.content.title
        let subTitle = response.notification.request.content.subtitle
        let categoryIdentifier = response.notification.request.content.categoryIdentifier
        let body = response.notification.request.content.body
        let content = response.notification.request.content
        let identifier = response.notification.request.identifier

        print("  userInfo = \(userInfo)\n  title = \(title)\n  subTitle = \(subTitle)\n  categoryIdentifier = \(categoryIdentifier)\n  body = \(body)\n  identifier = \(identifier)  \n  content = \(content)\n  ")

    }
打印结果
 userInfo = [AnyHashable("name"): 张三, AnyHashable("age"): 20]
  title = iOS 10 的推送标题
  subTitle = iOS 10 的副标题
  categoryIdentifier = firstLocationPush
  body = iOS 10 的推送主体
  identifier = firstLocationPush
content = 了解下func userNotificationCenter(_ center: UNUserNotificationCenter, willPresent notification: UNNotification, withCompletionHandler completionHandler: @escaping (UNNotificationPresentationOptions) -> Void)方法
当收到推送,不管是远程的还是本地的,在展示推送之前都会先走这个方法,可以打断点测试。
 @available(iOS 10.0, *)
    // 展示之前进行的设置
    func userNotificationCenter(_ center: UNUserNotificationCenter, willPresent notification: UNNotification, withCompletionHandler completionHandler: @escaping (UNNotificationPresentationOptions) -> Void) {

let identifier = notification.request.identifier
        if identifier == "firstLocationPush"{

            completionHandler([.alert, .sound])

        }else{
            // 如果不想显示某个通知,可以直接用空 options 调用 completionHandler:
            completionHandler([])

        }
    }
之前的推送,当app在前台是不能显示的,iOS10就可以,怎么实现?上面已经实现了。在上面的方法中可以通过不同的标识来进行不同的设置,有的推送收到了可以在前台显示,有的只能在后台显示。
iOS10的推送增加了相关的交互功能。如图所示:
收到推送之后下拉推送即可展示。
上代码:
func application(_ application: UIApplication, didFinishLaunchingWithOptions launchOptions: [UIApplicationLaunchOptionsKey: Any]?) -> Bool {
        // Override point for customization after application launch.


        // 注册推送
        registerPush(application: application)

        registerNotificationCategory()

        // 添加iOS10 推送的相关的代理
        if #available(iOS 10.0, *) {
            UNUserNotificationCenter.current().delegate = notificationHandler
        } else {
            // Fallback on earlier versions
        }

        return true
    }
// 设置特殊标识的通知条的交互
    private func registerNotificationCategory() {
        if #available(iOS 10.0, *) {
            let saySomethingCategory: UNNotificationCategory = {
                // 1
                let inputAction = UNTextInputNotificationAction(
                    identifier: "input",
                    title: "Input",
                    options: [.foreground],
                    textInputButtonTitle: "Send",
                    textInputPlaceholder: "What do you want to say...")

                // 2
                let goodbyeAction = UNNotificationAction(
                    identifier: "goodbye",
                    title: "Goodbye",
                    options: [.foreground])

                let cancelAction = UNNotificationAction(
                    identifier: "cancel",
                    title: "Cancel",
                    options: [.destructive])

                // 3
                return UNNotificationCategory(identifier:"saySomethingCategory", actions: [inputAction, goodbyeAction, cancelAction], intentIdentifiers: [], options: [.customDismissAction])
            }()

            UNUserNotificationCenter.current().setNotificationCategories([saySomethingCategory])

        } else {
            // Fallback on earlier versions
        }
    }
以上代码可以理解为提前注册一个特殊标识的UNNotificationCategory
等收到categoryIdentifier = "设置的categoryIdentifier"的时候就会展示相关设置的交互界面。
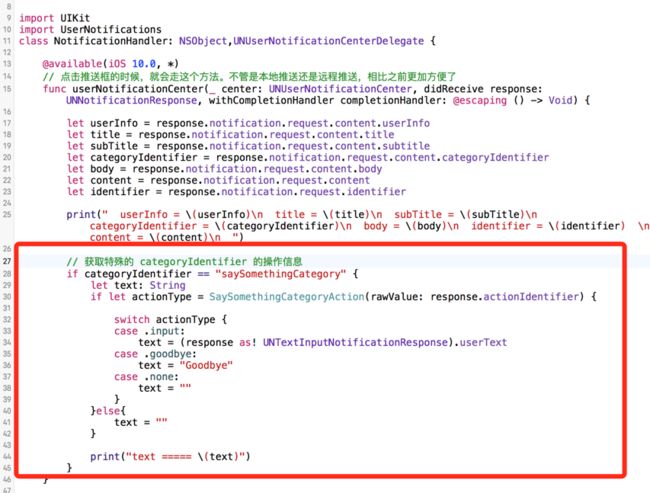
这样的通知在哪里接收,并且做相关的操作呢?一样,还是在UNUserNotificationCenterDelegate的代理中进行接收
主要代码
 // 获取特殊的 categoryIdentifier 的操作信息
        if categoryIdentifier == "saySomethingCategory" {
            let text: String
            if let actionType = SaySomethingCategoryAction(rawValue: response.actionIdentifier) {

                switch actionType {
                case .input:
                    text = (response as! UNTextInputNotificationResponse).userText
                case .goodbye:
                    text = "Goodbye"
                case .none:
                    text = ""
                }
            }else{
                text = ""
            }

            print("text ===== \(text)")
        }
取消和更新
取消
先来看一下取消通知吧
取消已经显示过的通知
// 取消已经显示过的通知,指定相关的 Identifier
UNUserNotificationCenter.current().removeDeliveredNotifications(withIdentifiers: [requestIdentifier])
取消所有已经展示过的所有的通知
UNUserNotificationCenter.current().removeAllDeliveredNotifications()
在之前的推送中上面的这两种功能还是挺常见的。
取消正在等待显示的通知,也就是提交了未显示的通知
UNUserNotificationCenter.current().removePendingNotificationRequests(withIdentifiers: [requestIdentifier])
取消所有正在等待显示的通知,也就是提交了未显示的通知
UNUserNotificationCenter.current().removeAllPendingNotificationRequests()
更新
当我们更新相关的通知,只要将还没有展示的通知,再次添加到UNUserNotificationCenter.current()中就行,记得identifier要保持一致奥,不然创建出来的是一个新的通知。
在通知条中展示多媒体的信息
这个可以说是iOS10通知的一大特色。
直接上代码,其实几句话就搞定了,当然了,苹果支持的文件类型和大小也是有相关限制的,具体请参考:
https://developer.apple.com/reference/usernotifications/unnotificationattachment
主要代码
if let imageURL = Bundle.main.url(forResource: "二哈", withExtension: "jpg"),
                let attachment = try? UNNotificationAttachment(identifier: "imageAttachment", url: imageURL, options: nil)
            {
                content.attachments = [attachment]
            }
实现效果:
图片的
音频的,可以直接播放的
视频的,也是可以直接播放的,但是好像是没有声音的
本地推送的简单的实现,就尝试这么多。
最后,献上参考Demo地址:https://github.com/RunOfTheSnail/PushDemo001
参考资料:
http://www.cocoachina.com/ios/20160628/16833.html
https://onevcat.com/2016/08/notification/
http://www.cnblogs.com/lidongq/p/5968923.html
https://developer.apple.com/reference/usernotifications/unnotificationattachment
图画的不错
http://www.jianshu.com/p/2f3202b5e758
http://www.cocoachina.com/ios/20161021/17820.html


