下载源码
GitHub上的代码已经更新(2017-09-28),请不要copy文中代码,代码有遗漏!!!!
另外,请特别注意,本套类扩展只能在Xcode9以上的版本中使用,在Xcode9以前的开发环境中编译打包都没问题,但 APP在iOS 11中运行会奔溃!!!!
注意:
截止目前(2017-09-28)代码已经发生两次更新,适配解决思路已经发生变化,原来旧文章中的解决方式,会碰到如下问题:
1. iOS 11下,进入一个添加了导航栏按钮的页面起初是正常的,当push到下一个页面再pop回来时,会发现原来设置好的间距又失效了;
2. UIBarButtonItem被添加到UIToolBar时有问题,严重时闪退;
3. 通过initWithBarButtonSystemItem:target:action:方法创建的item不能实现布局适配;
更新记录:
版本1.2(2017-09-28)
- 替换UIBarButtonItem原生实例化方法initWithBarButtonSystemItem:target:action:(最新版本中,stone哥自己用ps抠了一套SystemItem的icon图,不是很精细,毕竟stone哥的强项是敲代码,如有用到该方法创建item,建议要自己家的美工做一套图来替换)
- 替换UIBarButtonItem原生的setTarget: 和 setAction: 方法;
- 解决popBack后,约束失效的问题,添加约束的位置发生变化,新增UIStackView的类扩展,在其layoutSoubviews方法中实现约束条件的设置;
版本1.1(2017-09-26)
- 增加UIBarButtonItem被添加到UIToolbar上的处理;
- 增加对UIBarButtonItem的UIBarButtonItemStyleDone类型的解析;
对实现方式进行的修改做一点解释:
- 在iOS 11中,UINavigationBar上有个contentView,contentView的两边各有个stackView,分别用于渲染左右两边添加的UIBarButtonItem;
- 从一个页面push到另一个页面完成时,前一个页面,contentView上两边的stackView都会被移除并销毁;
- 页面将要pop回去时,会实例化两个新的stackView用于承载前一个页面的Item;
这就是为什么pop回去后,原来添加的约束条件失效了,因为这个时候stackView已经是一个新的对象了,并没有对其添加约束,所以解决思路变成了在stackView 的 layoutSubViews方法里进行约束设置。
想了解整个适配思路的演变,请看以下最初文章初稿,看思路,看知识点,代码有误,请download源码。 (2017-09-22)
最新版Xcode9在20号已经提供下载了,Stone哥哥作为一个凡事喜欢走在前面的人(不要脸了,哈哈哈,不过Stone哥哥的手机系统确实是从iOS 11第一个beta版开始使用的,体验过各种bug煎熬,终于熬到正式版了,内牛满面...),当然第一时间就升级了,下载安装完5个多鸡的安装包,Stone哥哥激动的打开了目前正在开发的项目,Command+B,成功编译!但是当我点击运行,在APP中跳转几个页面后,忽然注意到导航栏...WTF!!!
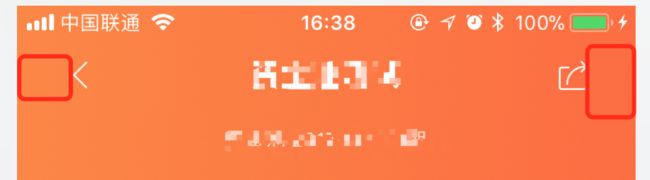
这间距可就大得有点惊人哈,顿时把Stone哥哥脸都吓白了...
于是Stone哥哥赶紧把原来用于调整间距的BarButton的负宽度一口气调到-50,[UIBarButtonItem zg_fixedSpaceWithWidth:-50];
+ (UIBarButtonItem *)zg_fixedSpaceWithWidth:(CGFloat)width {
    UIBarButtonItem *spaceBarButton = [[UIBarButtonItem alloc] initWithBarButtonSystemItem:UIBarButtonSystemItemFixedSpace
                                                                                    target:nil
                                                                                    action:nil];
    spaceBarButton.width = width;
    return spaceBarButton;
}
然鹅...这 并没什么卵用!并没什么卵用!并没什么卵用!
有点意思,就喜欢可以折腾一番的问题,所以我们还是和以往一样,从发现问题开始,冷静滴一步一步来把问题攻破。
一. 找出布局错乱的原因
既然老一套调整间距的方式已经不起作用,那要么iOS 11增加了一种新的用于调整间距的UIBarButtonItem类型,要么就是整个解析发生变更,图层有变化,看图层是否有变化这个最直观又方便,所以我们先对图层来一探究竟
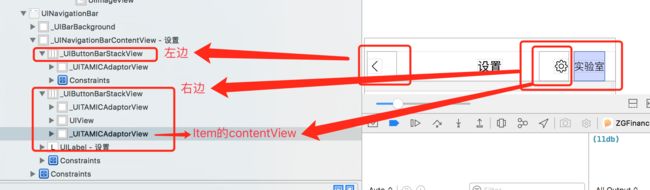
这是最新的iOS 11导航栏的视图层级结构,好复杂的样子,一个小小的item,叠了这么多层级,而且使用了autoLayout来布局,虽然图层很多,但看起来也很合理的样子,而且基本上就可以确定对item间距的调整方向—— 更改layout约束条件。忘了iOS 11以前是什么样子了,但感觉有变化,所以我们再来看看iOS 11以前的视图层级结构
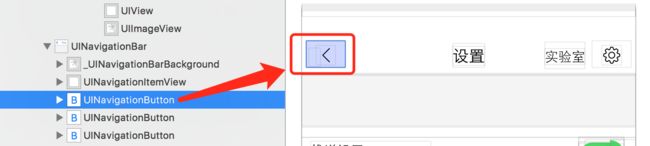
还真是不一样,很显然,iOS 11以前系统导航栏的层级结构好简单很多,而且没有使用autoLayout。所有的视图都堆在UINavigationBar上,对比起来,老版本确实不是很合理的样子,心里默默为这个细小的优化点个赞!
新版本的调整方向已经确定了,那能不能让老版本也统一呢,也给UINavigationButton也加上约束条件,抛弃fixedSpace类型的UIBarButtonItem。然鹅,这种操作是被禁止的,程序会无情的crash

苹果不允许开发者给UINavigationBar添加约束...
唉!没事,坚强的Stone哥并没有哭,那就分开两种不同的适配方式吧,那我们再来对iOS 11以前的老版本的渲染规则好好了解一番,从前面图“iOS 11以前系统导航栏视图层级结构.png”和Stone哥的一番测试,得出了一下一些结论:
- 系统自己创建的UINavigationButton内含的图片和标题水平和垂直方向都是居中对齐;
- UINavigationButton高度上没有撑满整个UINavigationBar的高度,并且没有居中对齐,图中右边的两个item就很明显没在垂直方向对齐;
- 另外经过一点点微调,UINavigationButton左右两边与屏幕边缘的距离都是15,右边的两个item间距大概为5,固定不可调整;
看到这里,你可能跟我一样想吐槽了,原来iOS 11以前的系统导航栏渲染是这么随意,这里辣鸡...哈哈哈,所以Stone哥得好好的拯救他一下。
现在问题的根源了解得差不多了,也基本有了解决思路,所以是时候进入解决问题的第二步了。
二. 解题思路
1. 针对老版本:
看到老版本中,系统从UIBarButtonItem到添加到UINavigationBar上的UINavigationButton的转化如此糟糕,而且想要再对其进行修改极其困难,决定要阻断这一层转换,全都创建自己的CustomView,并对其进行对其设置,即添加到左边则左对齐,右边则右对齐,并且高度撑满整个导航栏,总之就是这个customView要弥补前面提到的老版本的所有不足。
2. 针对新版本:
前面已经提到,新版本通过改变约束来实现调整,但是具体在什么时候,在哪个地方来调整呢,首先我想到在[UINavigationBar layoutSubviews] 方法里遍历subViews来设置约束,但是subViews里最终遍历到UIStackView的时候,并没有position信息,即不知道这个视图是被添加在了左边还是右边,所以很显然也会需要CustomView,并在其中包含位置信息,既然这样,何不将改变约束的方法放在CustomView的layoutSubviews里呢,减少对一个系统类的修改应该是降低风险降低复杂度的操作吧,哈哈,要在CustomView里设置约束的话,那CustomView还需要包含另外一条信息,就是与它相邻的另外一个CustomView,因为要设置两两之间的间距。
- 到这里,我们的主角CustomView类就有了两个必须的属性了,一个描述被添加的位置(左或右)的position,一个指向前一个相邻CustomView的属性prevCustomView;
- 另外要阻断系统对UIBarButtonItem的转换,CustomView还应该增加几个和UIBarButtonItem对应的实例化方法,最终得到了CustomView类的声明如下
#import

typedef NS_ENUM(NSInteger, ZGBarButtonItemPosition) {
    ZGBarButtonItemPositionLeft,
    ZGBarButtonItemPositionRight
};

typedef NS_ENUM(NSInteger, ZGBarButtonItemType) {
    ZGBarButtonItemTypeTitle,
    ZGBarButtonItemTypeImage,
    ZGBarButtonItemTypeCustomView
};

@interface ZGBarButtonItemCustomView : UIView

@property (nonatomic, assign) ZGBarButtonItemPosition position;
@property (nonatomic, weak) ZGBarButtonItemCustomView *prevCustomView;
@property (nonatomic, assign) ZGBarButtonItemType itemType;

- (instancetype)initWithTitle:(NSString *)title target:(id)target action:(SEL)action;
- (instancetype)initWithImage:(UIImage *)image target:(id)target action:(SEL)action;
- (instancetype)initWithCustomView:(UIView *)customView;

@end
- 针对老版本,CustomView 设置对其方式,自适应大小;
- 针对新版本,CustomView要设置约束;
- 因为需要添加响应,所以CustomView上应该添加一个button;
- 另外由于CustomView上的button的图片和文字正常情况下无法随UINavigationBar的tintColor改变,所以还得设置跟随tintColor,图片好说,本身的renderMode渲染模式就支持跟随tintColor改变,但是titleLabel不能,所以还要设置KVO监听UINavigationBar.tintColor的改变,随时更改titleLabel.textColor。
所以得到CustomView的实现代码如下:
#import "ZGBarButtonItemCustomView.h"
#import "UIView+ZGLayoutConstraint.h"
#import "ZGNavBarItemSpceMacro.h"

@interface ZGBarButtonItemCustomView ()

@property (nonatomic, strong) UIButton *button;
@property (nonatomic, assign) BOOL fixed;
@property (nonatomic, assign) BOOL isLastItem;
@property (nonatomic, weak) UINavigationBar *navBar;

@end

@implementation ZGBarButtonItemCustomView

- (instancetype)initWithTitle:(NSString *)title target:(id)target action:(SEL)action {
    if (self = [super init]) {
        [self p_setUpButtonWithTitle:title
                               image:nil
                              target:target
                              action:action];
        [self p_init];
        self.itemType = ZGBarButtonItemTypeTitle;
    }
    return self;
}

- (instancetype)initWithImage:(UIImage *)image target:(id)target action:(SEL)action {
    if (self = [super init]) {
        [self p_setUpButtonWithTitle:nil
                               image:image
                              target:target
                              action:action];
        [self p_init];
        self.itemType = ZGBarButtonItemTypeImage;
    }
    return self;
}

- (instancetype)initWithCustomView:(UIView *)customView {
    if (self = [super init]) {
        [self addSubview:customView];
        [self setFrame:customView.bounds];
        [self setCenter:customView.center];

        [self p_init];
        self.itemType = ZGBarButtonItemTypeCustomView;
    }
    return self;
}

- (void)dealloc {
    [self.navBar removeObserver:self forKeyPath:@"tintColor"];
}

- (void)layoutSubviews {
    [super layoutSubviews];

    if ([[UIDevice currentDevice] systemVersion].floatValue < 11) {
        [self p_setTitleFollowNavBarTintColorFromView:self];
        return;
    }

    if (self.fixed) {
        return;
    }

    UIView *adaptorView = [self p_getAdaptorViewFromView:self];
    UIView *prevAdaptorView = [self p_getAdaptorViewFromView:self.prevCustomView];
    [adaptorView zg_addSizeConstraintWithSize:self.frame.size];
    [adaptorView zg_addCenterYConstraint];
    CGFloat screenBorderGap = ZG_BAR_ITEM_SCREEN_BORDER_GAP;

    if (self.position == ZGBarButtonItemPositionLeft) {
        if (!prevAdaptorView) {
            [adaptorView zg_addLeftBorderGap:0];
        } else {
            [prevAdaptorView zg_addHorizontalGap:ZG_BAR_ITEM_GAP toView:adaptorView];
        }

        if (self.isLastItem) {
            UIStackView *stackView = [self p_getStackViewFromView:adaptorView];
            for (NSLayoutConstraint *constraint in stackView.superview.constraints) {
                if ([constraint.firstItem isKindOfClass:[UILayoutGuide class]] &&
                    constraint.firstAttribute == NSLayoutAttributeLeading) {
                    [stackView.superview removeConstraint:constraint];
                }
            }
            if (self.itemType == ZGBarButtonItemTypeImage) {
                screenBorderGap -= ZG_BAR_ITEM_LEFT_ICON_EDGE_INSETS;
            }
            [stackView zg_addLeftBorderGap:screenBorderGap];
        }

    } else if (self.position == ZGBarButtonItemPositionRight) {
        if (!prevAdaptorView) {
            [adaptorView zg_addRightBorderGap:0];
        } else {
            [adaptorView zg_addHorizontalGap:-ZG_BAR_ITEM_GAP toView:prevAdaptorView];
        }

        if (self.isLastItem) {
            UIStackView *stackView = [self p_getStackViewFromView:adaptorView];
            for (NSLayoutConstraint *constraint in stackView.superview.constraints) {
                if ([constraint.firstItem isKindOfClass:[UILayoutGuide class]] &&
                    constraint.firstAttribute == NSLayoutAttributeTrailing) {
                    [stackView.superview removeConstraint:constraint];
                }
            }
            if (self.itemType == ZGBarButtonItemTypeImage) {
                screenBorderGap -= ZG_BAR_ITEM_RIGHT_ICON_EDGE_INSETS;
            }
            [stackView zg_addRightBorderGap:-screenBorderGap];
        }
    }

    [self p_setTitleFollowNavBarTintColorFromView:adaptorView];
    self.fixed = YES;
}

#pragma mark - KVO
- (void)observeValueForKeyPath:(NSString *)keyPath ofObject:(id)object change:(NSDictionary *)change context:(void *)context {
    [self.button setTitleColor:self.navBar.tintColor forState:UIControlStateNormal];
}

#pragma mark - private
- (void)p_init {
    self.isLastItem = YES;
    self.fixed = NO;
    self.position = ZGBarButtonItemPositionLeft;
}

- (void)p_setUpButtonWithTitle:(NSString *)title image:(UIImage *)image target:(id)target action:(SEL)action {
    [self setButton:[[UIButton alloc] init]];
    [self addSubview:self.button];
    [self.button setTitleColor:[UIColor blueColor] forState:UIControlStateNormal];
    [self.button setTintColor:[UIColor blueColor]];
    [self.button setTitle:title forState:UIControlStateNormal];
    [self.button.titleLabel setFont:ZG_BAR_ITEM_FONT];
    if (image.renderingMode == UIImageRenderingModeAutomatic) {
        image = [image imageWithRenderingMode:UIImageRenderingModeAlwaysTemplate];
    }
    [self.button setImage:image forState:UIControlStateNormal];
    [self.button sizeToFit];
    [self.button setFrame:CGRectMake(0, 0, MAX(self.button.frame.size.width, ZG_BAR_ITEM_MIN_WIDTH), 44)];
    [self.button addTarget:target action:action forControlEvents:UIControlEventTouchUpInside];
    [self setFrame:self.button.bounds];
}

- (UIView *)p_getAdaptorViewFromView:(UIView *)view {
    if (!view) {
        return nil;
    }
    UIView *tempView = view;
    while (![tempView isKindOfClass:NSClassFromString(@"_UITAMICAdaptorView")] && tempView.superview) {
        tempView = tempView.superview;
    }
    return tempView;
}

- (UIStackView *)p_getStackViewFromView:(UIView *)view {
    if (!view) {
        return nil;
    }
    UIView *tempView = view;
    while (![tempView isKindOfClass:UIStackView.class] && tempView.superview) {
        tempView = tempView.superview;
    }
    return (UIStackView *)tempView;
}

- (UINavigationBar *)p_getNavBarViewFromView:(UIView *)view {
    if (!view) {
        return nil;
    }
    UIView *tempView = view;
    while (![tempView isKindOfClass:UINavigationBar.class] && tempView.superview) {
        tempView = tempView.superview;
    }
    return (UINavigationBar *)tempView;
}

- (void)p_setTitleFollowNavBarTintColorFromView:(UIView *)view {
    if (self.itemType == ZGBarButtonItemTypeTitle) {
        self.navBar = [self p_getNavBarViewFromView:view];
        [self.button setTitleColor:self.navBar.tintColor forState:UIControlStateNormal];

        [self.navBar addObserver:self
                      forKeyPath:@"tintColor"
                         options:NSKeyValueObservingOptionNew | NSKeyValueObservingOptionOld
                         context:nil];
    }
}

#pragma mark - setter & getter
- (void)setPosition:(ZGBarButtonItemPosition)position {
    _position = position;

    if (self.position == ZGBarButtonItemPositionLeft) {
        [self.button setContentHorizontalAlignment:UIControlContentHorizontalAlignmentLeft];
    } else {
        [self.button setContentHorizontalAlignment:UIControlContentHorizontalAlignmentRight];
    }
}

- (void)setPrevCustomView:(ZGBarButtonItemCustomView *)prevCustomView {
    _prevCustomView = prevCustomView;
    self.prevCustomView.isLastItem = NO;
}

@end
最后一步就是选择在合适的创建CustomView,和给CustomView设置其他属性了,这个很显然要分别给UIBarButtonItem和UINavigationItem写扩展,切面替换相关方法了,直接上代码:
UIBarButtonItem+ZGFixSpace.h
#import
#import "ZGBarButtonItemCustomView.h"

@interface UIBarButtonItem (ZGFixSpace)

/*
 *  used before iOS 11
 */
+ (UIBarButtonItem *)zg_fixedSpaceWithWidth:(CGFloat)width;

/*
 *  the side the item be added in (left or right)
 *  used after iOS 11
 */
- (void)zg_setPosition:(ZGBarButtonItemPosition)position;

/*
 *  is the first itme at the current side
 *  used after iOS 11
 */
- (void)zg_setPrevCustomView:(ZGBarButtonItemCustomView *)prevCustomView;

@end
UIBarButtonItem+ZGFixSpace.m
#import "UIBarButtonItem+ZGFixSpace.h"
#import "NSObject+ZGRuntime.h"

@implementation UIBarButtonItem (ZGFixSpace)

+ (UIBarButtonItem *)zg_fixedSpaceWithWidth:(CGFloat)width {
    UIBarButtonItem *spaceBarButton = [[UIBarButtonItem alloc] initWithBarButtonSystemItem:UIBarButtonSystemItemFixedSpace
                                                                                    target:nil
                                                                                    action:nil];
    spaceBarButton.width = width;
    return spaceBarButton;
}

+ (void)load {
    [self zg_swizzleInstanceMethodWithOriginSel:@selector(initWithTitle:style:target:action:)
                                    swizzledSel:@selector(zg_initWithTitle:style:target:action:)];

    [self zg_swizzleInstanceMethodWithOriginSel:@selector(initWithImage:style:target:action:)
                                    swizzledSel:@selector(zg_initWithImage:style:target:action:)];

    [self zg_swizzleInstanceMethodWithOriginSel:@selector(initWithCustomView:)
                                    swizzledSel:@selector(zg_initWithCustomView:)];
}

- (void)zg_setPosition:(ZGBarButtonItemPosition)position {
    ZGBarButtonItemCustomView *zgCustomView = (ZGBarButtonItemCustomView *)self.customView;
    zgCustomView.position = position;
}

- (void)zg_setPrevCustomView:(ZGBarButtonItemCustomView *)prevCustomView {
    ZGBarButtonItemCustomView *zgCustomView = (ZGBarButtonItemCustomView *)self.customView;
    zgCustomView.prevCustomView = prevCustomView;
}

- (instancetype)zg_initWithTitle:(NSString *)title style:(UIBarButtonItemStyle)style target:(id)target action:(SEL)action {
    ZGBarButtonItemCustomView *zgCustomView = [[ZGBarButtonItemCustomView alloc] initWithTitle:title
                                                                                        target:target
                                                                                        action:action];
    return [self zg_initWithCustomView:zgCustomView];
}

- (instancetype)zg_initWithImage:(UIImage *)image style:(UIBarButtonItemStyle)style target:(id)target action:(SEL)action {
    ZGBarButtonItemCustomView *zgCustomView = [[ZGBarButtonItemCustomView alloc] initWithImage:image
                                                                                        target:target
                                                                                        action:action];
    return [self zg_initWithCustomView:zgCustomView];
}

- (instancetype)zg_initWithCustomView:(UIView *)customView {
    ZGBarButtonItemCustomView *zgCustomView = [[ZGBarButtonItemCustomView alloc] initWithCustomView:customView];
    return [self zg_initWithCustomView:zgCustomView];
}

@end
这个扩展主要任务是实现前面说的,阻断系统从UIBarButtonItem到UINavigationButton的转换,实现手段为替换掉
UIBarButtonItem的三个实例化方法,在这三个方法中均创建一个CustomView,然后调用原生的initWithCustomView:方法,最终将这个CustomView渲染到UINavigationBar上,这样不会再有UINavigationButton的存在了。
接下来是 UINavigationItem+ZGFixSpace
这个扩展是替换掉在UIViewController中,给viewController.navigationItem添加item的四个方法,给每个item.customView完善前面讲到的position和prevCustomView两个属性,并针对iOS 11以前的版本,在item前添加一个用于调整与屏幕边缘间距的弹簧item,最终就能实现各个版本一样的自适应调整间距的效果。
#import "UINavigationItem+ZGFixSpace.h"
#import "NSObject+ZGRuntime.h"
#import "UIBarButtonItem+ZGFixSpace.h"
#import "ZGNavBarItemSpceMacro.h"

@implementation UINavigationItem (ZGFixSpace)

+ (void)load {
    [self zg_swizzleInstanceMethodWithOriginSel:@selector(setLeftBarButtonItem:)
                                    swizzledSel:@selector(zg_setLeftBarButtonItem:)];
    [self zg_swizzleInstanceMethodWithOriginSel:@selector(setLeftBarButtonItems:)
                                    swizzledSel:@selector(zg_setLeftBarButtonItems:)];

    [self zg_swizzleInstanceMethodWithOriginSel:@selector(setRightBarButtonItem:)
                                    swizzledSel:@selector(zg_setRightBarButtonItem:)];
    [self zg_swizzleInstanceMethodWithOriginSel:@selector(setRightBarButtonItems:)
                                    swizzledSel:@selector(zg_setRightBarButtonItems:)];
}

- (void)zg_setLeftBarButtonItem:(UIBarButtonItem *)leftBarButtonItem {
    if (!leftBarButtonItem || [leftBarButtonItem isKindOfClass:[NSNull class]]) {
        [self zg_setLeftBarButtonItem:nil];
        return;
    }
    if ([[[UIDevice currentDevice] systemVersion] floatValue] >= 11) {
        [leftBarButtonItem zg_setPosition:ZGBarButtonItemPositionLeft];
        [self zg_setLeftBarButtonItem:leftBarButtonItem];
    } else {
        [self setLeftBarButtonItems:@[leftBarButtonItem]];
    }
}

- (void)zg_setLeftBarButtonItems:(NSArray *)leftBarButtonItems {
    if (!leftBarButtonItems || [leftBarButtonItems isKindOfClass:[NSNull class]] || leftBarButtonItems.count == 0) {
        [self zg_setLeftBarButtonItems:nil];
        return;
    }

    NSMutableArray *items = [NSMutableArray array];
    if ([[[UIDevice currentDevice] systemVersion] floatValue] < 11) {
        ZGBarButtonItemCustomView *customView = (ZGBarButtonItemCustomView *)((UIBarButtonItem *)[leftBarButtonItems firstObject]).customView;
        CGFloat gap = ZG_BAR_ITEM_SCREEN_BORDER_GAP;
        if (customView.itemType == ZGBarButtonItemTypeImage) {
            gap -= ZG_BAR_ITEM_LEFT_ICON_EDGE_INSETS;
        }
        [items addObject:[UIBarButtonItem zg_fixedSpaceWithWidth:-(15 - gap)]];
    }
    ZGBarButtonItemCustomView *prevCustomeView = nil;
    for (NSInteger i=0; i= 11) {
        [rightBarButtonItem zg_setPosition:ZGBarButtonItemPositionRight];
        [self zg_setRightBarButtonItem:rightBarButtonItem];
    } else {
        [self setRightBarButtonItems:@[rightBarButtonItem]];
    }
}

- (void)zg_setRightBarButtonItems:(NSArray *)rightBarButtonItems {
    if (!rightBarButtonItems || [rightBarButtonItems isKindOfClass:[NSNull class]] || rightBarButtonItems.count == 0) {
        [self zg_setRightBarButtonItems:nil];
        return;
    }

    NSMutableArray *items = [NSMutableArray array];
    if ([[[UIDevice currentDevice] systemVersion] floatValue] < 11) {
        ZGBarButtonItemCustomView *customView = (ZGBarButtonItemCustomView *)((UIBarButtonItem *)[rightBarButtonItems firstObject]).customView;
        CGFloat gap = ZG_BAR_ITEM_SCREEN_BORDER_GAP;
        if (customView.itemType == ZGBarButtonItemTypeImage) {
            gap -= ZG_BAR_ITEM_RIGHT_ICON_EDGE_INSETS;
        }
        [items addObject:[UIBarButtonItem zg_fixedSpaceWithWidth:-(15 - gap)]];
    }
    ZGBarButtonItemCustomView *prevCustomeView = nil;
    for (NSInteger i=0; i
另外还有两个工具类扩展
第一个 NSObject+ZGRuntime,主要是给实例对象添加了一个交换实例方法的API,前面的两个扩展都是在+ (void)load 方法里调用这个方法来替换掉原生API。
- (void)zg_swizzleInstanceMethodWithOriginSel:(SEL)originSel swizzledSel:(SEL)swizzledSel {
    Method m1 = class_getInstanceMethod([self class], originSel);
    Method m2 = class_getInstanceMethod([self class], swizzledSel);
    method_exchangeImplementations(m1, m2);
}
第二个 UIView+ZGLayoutConstraint,这个扩展主要是提供了给View添加 尺寸(size),Y坐标中心点(centerY),与另一个view的水平间距(horizontalGap),与父视图边缘间距等的约束的API,在CustomView类的layoutSubviews方法里,iOS 11以后的导航栏就是调用这些方法来添加约束。
#import "UIView+ZGLayoutConstraint.h"

@implementation UIView (ZGLayoutConstraint)

- (void)zg_addSizeConstraintWithSize:(CGSize)size {
    [self addConstraint:[NSLayoutConstraint constraintWithItem:self
                                                     attribute:NSLayoutAttributeWidth
                                                     relatedBy:NSLayoutRelationEqual
                                                        toItem:nil
                                                     attribute:NSLayoutAttributeNotAnAttribute
                                                    multiplier:1.0
                                                      constant:size.width]];

    [self addConstraint:[NSLayoutConstraint constraintWithItem:self
                                                     attribute:NSLayoutAttributeHeight
                                                     relatedBy:NSLayoutRelationEqual
                                                        toItem:nil
                                                     attribute:NSLayoutAttributeNotAnAttribute
                                                    multiplier:1.0
                                                      constant:size.height]];

}

- (void)zg_addCenterYConstraint {
    [self.superview addConstraint:[NSLayoutConstraint constraintWithItem:self
                                                               attribute:NSLayoutAttributeCenterY
                                                               relatedBy:NSLayoutRelationEqual
                                                                  toItem:self.superview
                                                               attribute:NSLayoutAttributeCenterY
                                                              multiplier:1.0
                                                                constant:0]];
}

- (void)zg_addHorizontalGap:(CGFloat)gap toView:(UIView *)view {
    [self.superview addConstraint:[NSLayoutConstraint constraintWithItem:self
                                                               attribute:NSLayoutAttributeRight
                                                               relatedBy:NSLayoutRelationEqual
                                                                  toItem:view
                                                               attribute:NSLayoutAttributeLeft
                                                              multiplier:1.0
                                                                constant:gap]];
}

- (void)zg_addLeftBorderGap:(CGFloat)gap {
    [self.superview addConstraint:[NSLayoutConstraint constraintWithItem:self
                                                               attribute:NSLayoutAttributeLeading
                                                               relatedBy:NSLayoutRelationEqual
                                                                  toItem:self.superview
                                                               attribute:NSLayoutAttributeLeading
                                                              multiplier:1.0
                                                                constant:gap]];
}

- (void)zg_addRightBorderGap:(CGFloat)gap {
    [self.superview addConstraint:[NSLayoutConstraint constraintWithItem:self
                                                               attribute:NSLayoutAttributeTrailing
                                                               relatedBy:NSLayoutRelationEqual
                                                                  toItem:self.superview
                                                               attribute:NSLayoutAttributeTrailing
                                                              multiplier:1.0
                                                                constant:gap]];
}

@end
最后,也是最重要的,是便于开发者设置间距的宏文件 ZGNavBarItemSpceMacro
#ifndef ZGNavBarItemSpceMacro_h
#define ZGNavBarItemSpceMacro_h

#define ZG_BAR_ITEM_SCREEN_BORDER_GAP           10  // item到屏幕边缘的距离
#define ZG_BAR_ITEM_GAP                         5   // item之间的距离 ios11以后生效
#define ZG_BAR_ITEM_LEFT_ICON_EDGE_INSETS       6   // 左边item图标图片内边距
#define ZG_BAR_ITEM_RIGHT_ICON_EDGE_INSETS      2   // 右边item图标图片内边距
#define ZG_BAR_ITEM_MIN_WIDTH                   44  // item的最小宽度
#define ZG_BAR_ITEM_FONT                        [UIFont systemFontOfSize:15 weight:UIFontWeightLight] // item字体 ios11以后生效


#endif /* ZGNavBarItemSpceMacro_h */
好啦,全部干活已出,感谢阅读,欢迎去GitHub下载并点星星,爱你哟!!!