Set Up the Initial App
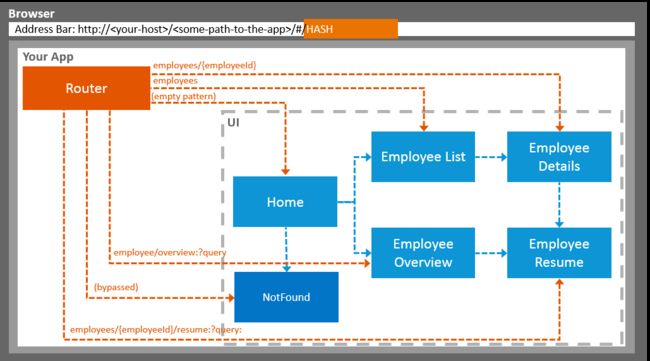
本例中导航架构如下
Enable Routing
在manifest.json中添加routing配置
      "routing": {
         "config": {
            "routerClass": "sap.m.routing.Router",
            "viewType": "XML",
            "viewPath": "sap.ui.demo.nav.view",
            "controlId": "app",
            "controlAggregation": "pages",
            "transition": "slide"
         },
         "routes": [{
            "pattern": "",
            "name": "appHome",
            "target": "home"
         }],
         "targets": {
            "home": {
               "viewName": "Home",
               "viewLevel" : 1
            }
         }
      }
Component.js文件中,init方法中,this.getRouter().initialize();进行初始化,在App view中,添加
Catch Invalid Hashes
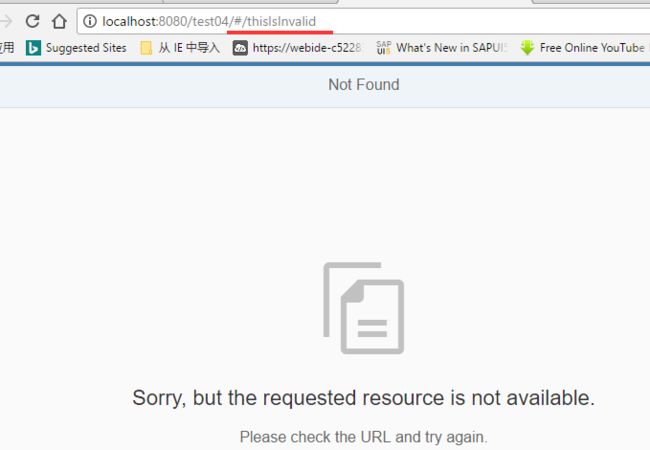
在manifest.json文件的routing config中,添加"bypassed": { "target": "notFound" },在target中,添加"notFound": { "viewName": "NotFound", "transition": "show" }
创建NotFound view,用MessagePage 控件显示错误信息。URL中的无效值,将会被导航到这个页面。
Add a Back Button to Not Found Page
在NotFound view上显示NavButton并添加事件,创建BaseController.js模块,引入Controller及History依赖,实现onNavBack方法。controller定义时都继承自这个模块
sap.ui.define([
    "sap/ui/demo/nav/controller/BaseController"
], function (BaseController) {
    "use strict";
    return BaseController.extend("sap.ui.demo.nav.controller.App", {
        onInit: function () {
        }
    });
});
Display a Target Without Changing the Hash
给Home view的button控件添加press事件,在controller中实现该方法,此处可以this.getRouter()获取router,也可以this.getOwnerComponent().getRouter().getTargets()或者this.getOwnerComponent().getTargets().
onDisplayNotFound : function (oEvent) {
    //display the "notFound" target without changing the hash
    this.getRouter().getTargets().display("notFound");
此时点击按钮可以导航到NotFound。但此处有个Bug,由于Route的机制,当检测到Hash没有发生变化时,系统自动跳过Navigation的操作。由于sPreviousHash为空,系统执行this.getRouter().navTo("appHome", {}, true /*no history*/);由于Hash没变,系统跳过navTo,页面没有发生跳转。可以在display方法第二个参数传一个data对象,里面包含了来源target
this.getRouter().getTargets().display("notFound", {
                fromTarget : "home"
            })
给notFound target的 display事件注册一个监听器,最合适的是放在NotFound controller 的init function中,oTarget.attachDisplay(function (oEvent) {this._oData = oEvent.getParameter("data"); }, this);获取前面传入的data对象,在onNavBack中,如果这个data对象有值,则通过display的方法来显示,并删除对象里面的值。
if (this._oData && this._oData.fromTarget) {
    this.getRouter().getTargets().display(this._oData.fromTarget);
    delete this._oData.fromTarget;
    return;
}
Navigate to Routes with Hard-Coded Patterns
在Home页面中添加Button,导航到employeeList target,在manifest中添加employeeList的route与target,target "viewPath": "sap.ui.demo.nav.view.employee",会在这个目录下寻找。"pattern": "employees",表示hash为/#/employees。创建EmployeeList View。
Navigate to Routes with Mandatory Parameters
添加Route "pattern": "employees/{employeeId}", Target"viewName": "employee.Employee",创建Employee view及controller,在onInit中,oRouter.getRoute("employee").attachMatched(this._onRouteMatched, this);添加url匹配的监听器,调用onRouteMatched方法。在URL中获取employeeId并绑定到Element,ODataModel 将在后台处理数据请求. 当数据加载时, 显示busy的标记,可以在dataRequested及dataReceived事件中处理。在change事件中,判断能否加载binding context的数据。
_onRouteMatched : function (oEvent) {
    var oArgs, oView;
    oArgs = oEvent.getParameter("arguments");
    oView = this.getView();
    oView.bindElement({
        path : "/Employees(" + oArgs.employeeId + ")",
        events : {
            change: this._onBindingChange.bind(this),
            dataRequested: function (oEvent) {
                oView.setBusy(true);
            },
            dataReceived: function (oEvent) {
                oView.setBusy(false);
            }
        }
    });
},
_onBindingChange : function (oEvent) {
    // No data for the binding
    if (!this.getView().getBindingContext()) {
        this.getRouter().getTargets().display("notFound");
    }
}
EmployeeList中给item加上press事件,带参数employeeId导航到employee。
onListItemPressed : function(oEvent){
            var oItem, oCtx;
            oItem = oEvent.getSource();
            oCtx = oItem.getBindingContext();
            this.getRouter().navTo("employee",{
                employeeId : oCtx.getProperty("EmployeeID")
            });
Navigate with Flip Transition
在employee上添加,配置employeeResume "pattern": "employees/{employeeId}/resume",设置employeeResume target "transition": "flip",transition有slide (default),flip,show,fade四种形式。
Allow Bookmarkable Tabs with Optional Query Parameters
修改employeeResume route为"pattern": "employees/{employeeId}/resume:?query:",在Resume View的IconTabBar添加属性select="onTabSelect" selectedKey="{view>/selectedTabKey}",当一个Tab被选中,会调用onTabSelect,除了employeeId外还添加一个query参数。
onTabSelect : function (oEvent){
    var oCtx = this.getView().getBindingContext();
    this.getRouter().navTo("employeeResume", {
        employeeId : oCtx.getProperty("EmployeeID"),
        query: {
            tab : oEvent.getParameter("selectedKey")
        }
    }, true /*without history*/);
}
建立aValidTabKeys数组,其值为IconTabBar中items中的Key,建立oQuery对象存储router中query对象的值,oQuery对象有值并且是一个有效的tab值,设置selectedTabKey为oQuery对象中的tab,否则query为第一个值。URL形式如下webapp/index.html#/employees/3/resume?tab=Info
Implement “Lazy Loading”
Resume.view.xml中,将IconTabFilter中,Hobbies/Notes的内容设为空,通过Lazy Loading加载。新建ResumeHobbies及ResumeNotes view,如果tab为Hobbies及Notes this.getRouter().getTargets().display("resumeTab" + oQuery.tab);,创建target
"resumeTabHobbies": {
    "parent": "employeeResume",
    "viewPath": "sap.ui.demo.nav.view.employee",
    "viewName": "ResumeHobbies",
    "viewId": "thisIsMyCustomIdToBeUsedForResumeHobbies",
    "controlId": "hobbiesTab",
    "controlAggregation": "content"
},
"resumeTabNotes": {
    "parent": "employeeResume",
    "viewPath": "sap.ui.demo.nav.view.employee",
    "viewName": "ResumeNotes",
    "controlId": "notesTab",
    "controlAggregation": "content"
}
Assign Multiple Targets
在Home上新建button导航到employeeOverview,配置route及target,注意配置在employee前面,否则将会匹配"employees/{employeeId}"。
//routes
{
    "pattern": "employees/overview",
    "name": "employeeOverview",
    "target": ["employeeOverviewTop", "employeeOverviewContent"]
},

//Target
"employeeOverview": {
    "viewPath": "sap.ui.demo.nav.view.employee.overview",
    "viewName": "EmployeeOverview",
    "viewLevel" : 2
},
"employeeOverviewTop": {
    "parent": "employeeOverview",
    "viewPath": "sap.ui.demo.nav.view.employee.overview",
    "viewName": "EmployeeOverviewTop",
    "controlId": "EmployeeOverviewParent",
    "controlAggregation": "content"
},
"employeeOverviewContent": {
    "parent": "employeeOverview",
    "viewPath": "sap.ui.demo.nav.view.employee.overview",
    "viewName": "EmployeeOverviewContent",
    "controlId": "EmployeeOverviewParent",
    "controlAggregation": "content"
}
创建EmployeeOverview.view.xml,指定Page id为 "EmployeeOverviewParent",即target中controlId的内容。content将会被router用top 和 content 填充。

