1 前言
上篇 TabLayout系列之简单使用更新也有一段时间了,由于工作任务比较多且遇上国庆出去玩,就很久没做更新了。还有一点关于TabLayout的使用没有介绍完,公司的事忙得差不多了,今天来继续介绍这个系列。再啰嗦下,前两篇文章介绍了TabLayout的 属性 和 简单使用,需要的便宜可以先去熟悉熟悉。这篇文章主要是简单使用的一个补充,以及对自定义TabItem的一个说明。废话不多说,我们直奔主题。
2 TabLayout默认Style
    TypedArray a = context.obtainStyledAttributes(attrs, R.styleable.TabLayout,
    defStyleAttr, R.style.Widget_Design_TabLayout);
上面三段代码片段,可以知道TabLayout默认使用Base.Widget.Design.TabLayout,里面有预设好的一些属性。其中tabTextAppearance在 Android TabLayout系列之简单使用中已经介绍到了,通过继承它来改变默认英文字母大写与字体大小问题,由此我们也可以自定义自己的style来实现自己的需求。
3 带图片的Tab
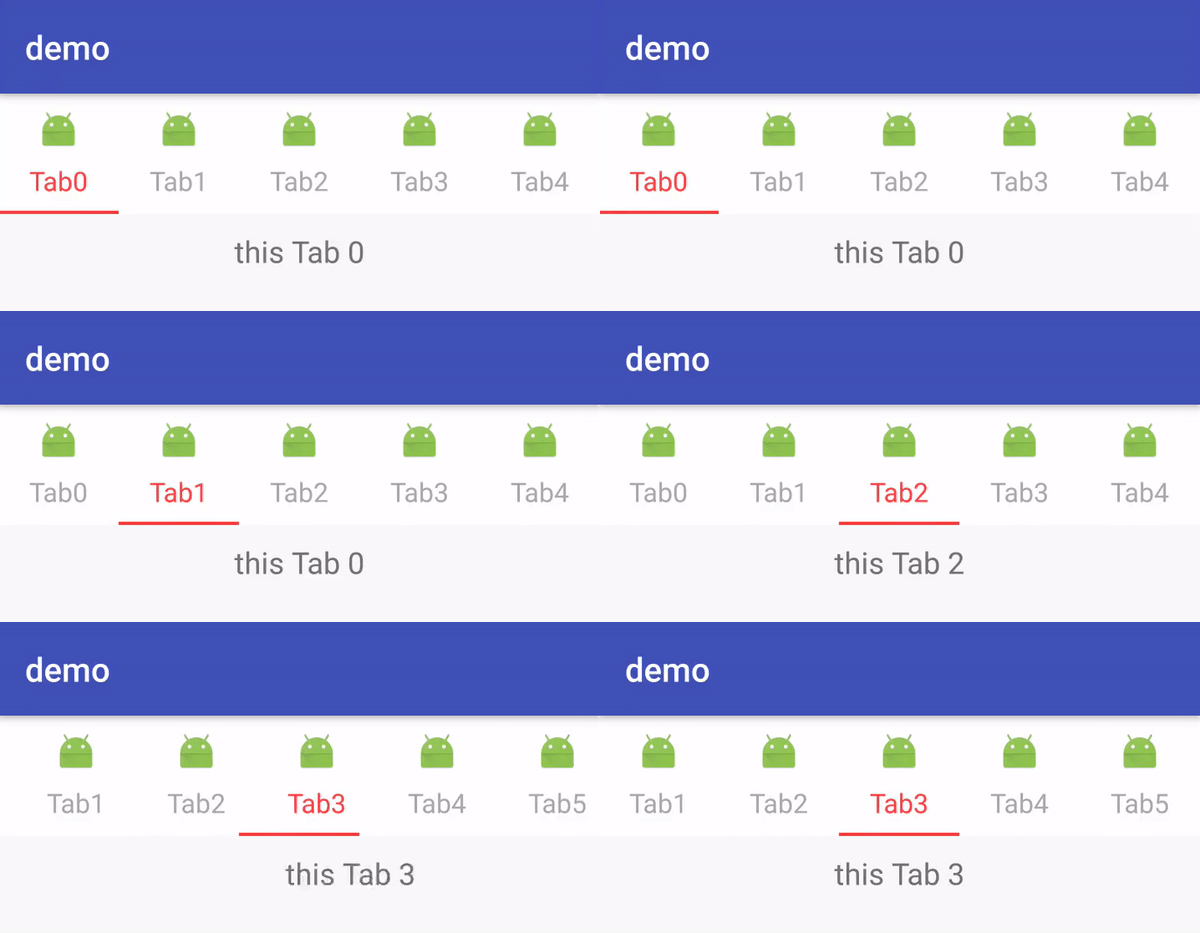
Android TabLayout系列之简单使用中,介绍到了TabLayout的使用,但基本上都是纯文本的TabItem,并没有实现带图片的TabItem。这次就闲来撸一个带图片的TabItem,还是老规矩先上代码(码注释) -> 效果图 -> 分析。
    public class MainActivity extends BaseActivity {

        private TabLayout mTabLayout;
        private ViewPager mViewPager;
        private MainPagerAdapter mAdapter;

        @Override
        protected void onCreate(@Nullable Bundle savedInstanceState) {
            AppStatusTracker.init(getApplication());
            super.onCreate(savedInstanceState);
        }

        @Override
        protected void initContentView() {
            setContentView(R.layout.activity_main);
        }

        @Override
        protected void initView() {
            mTabLayout = findView(R.id.tabLayout);
            mViewPager = findView(R.id.viewPager);
            mAdapter = new MainPagerAdapter(getSupportFragmentManager());
            mViewPager.setAdapter(mAdapter);
            //官方推荐的绑定ViewPager方式
            mTabLayout.setupWithViewPager(mViewPager);
            int tabCount = mTabLayout.getTabCount();
            for (int i = 0; i < tabCount; i++) {
                //这里tab可能为null 根据实际情况处理吧
                mTabLayout.getTabAt(i).setText("Tab" + i);
                //设置图片icon
                mTabLayout.getTabAt(i).setIcon(R.mipmap.ic_launcher);
            }
        }

        @Override
        protected void initData(@Nullable Bundle savedInstanceState) {

        }

        //ViewPager适配器  10个Fragment
        private class MainPagerAdapter extends FragmentPagerAdapter {
            public MainPagerAdapter(FragmentManager fm) {
                super(fm);
            }

            @Override
            public Fragment getItem(int position) {
                return BlankFragment.newInstance(position);
            }

            @Override
            public int getCount() {
                return 10;
            }
        }
    }
这里的demo代码和 Android TabLayout系列之简单使用中的一致,只是增加了 mTabLayout.getTabAt(i).setIcon(R.mipmap.ic_launcher)来设置TabView中Tab的图片。这里显示效果是官方提供的默认实现,TabView继承至Linearlayout且被设置成了竖直方向。这点可以从TabView的构造器中看到:
        public TabView(Context context) {
            super(context);
            ......
            setGravity(Gravity.CENTER);
            setOrientation(VERTICAL);   //设置成竖直方向
            ......
        }
至于为什么显示在第一个,可以从TabView的update方法了解到:
    final void update() {
            final Tab tab = mTab;
            final View custom = tab != null ? tab.getCustomView() : null;
            ......
            ......
            if (mCustomView == null) {
                // If there isn't a custom view, we'll us our own in-built layouts
                if (mIconView == null) {
                    ImageView iconView = (ImageView) LayoutInflater.from(getContext())
                            .inflate(R.layout.design_layout_tab_icon, this, false);
                    addView(iconView, 0);   //将ImageView放在了LinearLayout的0位
                    mIconView = iconView;
                }
                if (mTextView == null) {
                    TextView textView = (TextView) LayoutInflater.from(getContext())
                            .inflate(R.layout.design_layout_tab_text, this, false);
                    addView(textView);  //添加TextView
                    mTextView = textView;
                    mDefaultMaxLines = TextViewCompat.getMaxLines(mTextView);
                }
                TextViewCompat.setTextAppearance(mTextView, mTabTextAppearance);
                if (mTabTextColors != null) {
                    mTextView.setTextColor(mTabTextColors);
                }
                updateTextAndIcon(mTextView, mIconView); //更新文本和icon
            } else {
                // Else, we'll see if there is a TextView or ImageView present and update them
                if (mCustomTextView != null || mCustomIconView != null) {
                    updateTextAndIcon(mCustomTextView, mCustomIconView);
                }
            }

            // Finally update our selected state
            setSelected(tab != null && tab.isSelected());
    }
这里面的TabView是没有get方法的,所以我们取不到,可以通过反射拿到做一些需要的操作,就不验证了,因为我们这里是需要自定义TabView。
4 自定义带图片的Tab
看源码或API的话可以知道Tab有个setCustomView(@Nullable View view)方法,可用于添加自定义的TabItem。
- 首先得来个TabItem的Layout Resource文件:
- 其次在我们的Activity实现我们的效果
    public class MainActivity extends BaseActivity implements TabLayout.OnTabSelectedListener {

        private TabLayout mTabLayout;
        private ViewPager mViewPager;
        private MainPagerAdapter mAdapter;

        @Override
        protected void onCreate(@Nullable Bundle savedInstanceState) {
            AppStatusTracker.init(getApplication());
            super.onCreate(savedInstanceState);
        }

        @Override
        protected void initContentView() {
            setContentView(R.layout.activity_main);
        }

        @Override
        protected void initView() {
            mTabLayout = findView(R.id.tabLayout);
            mViewPager = findView(R.id.viewPager);
            mAdapter = new MainPagerAdapter(getSupportFragmentManager());
            mViewPager.setAdapter(mAdapter);
            //官方推荐的绑定ViewPager方式
            mTabLayout.setupWithViewPager(mViewPager);
            int tabCount = mTabLayout.getTabCount();
            for (int i = 0; i < tabCount; i++) {
                TabLayout.Tab tab = mTabLayout.getTabAt(i);
                if (tab == null) return;
                //设置自定义的View
                tab.setCustomView(mAdapter.getTabView(i));
            }

            //需要自己实现选中监听,来实现自己需要的效果
            mTabLayout.addOnTabSelectedListener(this);
        }

        @Override
        protected void initData(@Nullable Bundle savedInstanceState) {

        }

        @Override
        public void onTabSelected(TabLayout.Tab tab) {
            //Toast.makeText(this, "onTabSelected", Toast.LENGTH_SHORT).show();
            changeTabStatus(tab, true);
        }

        @Override
        public void onTabUnselected(TabLayout.Tab tab) {
            //Toast.makeText(this, "onTabUnselected", Toast.LENGTH_SHORT).show();
            changeTabStatus(tab, false);
        }

        @Override
        public void onTabReselected(TabLayout.Tab tab) {
            //Toast.makeText(this, "onTabReselected", Toast.LENGTH_SHORT).show();
            new AlertDialog.Builder(this)
                    .setMessage("再次选中,显示对话框!")
                    .show();
        }

        private void changeTabStatus(TabLayout.Tab tab, boolean selected) {
            View view = tab.getCustomView();
            TextView txtTitle = (TextView) view.findViewById(R.id.text_title);
            if (selected) {
                txtTitle.setTextColor(Color.parseColor("#03ce97"));
            } else {
                txtTitle.setTextColor(Color.parseColor("#333333"));
            }
        }

        //ViewPager适配器  10个Fragment
        private class MainPagerAdapter extends FragmentPagerAdapter {
            public MainPagerAdapter(FragmentManager fm) {
                super(fm);
            }

            //自定义获取Tab View的方法
            public View getTabView(int position) {
                View view = LayoutInflater.from(MainActivity.this).inflate(R.layout.custom_tab_item, null);
                TextView tv = (TextView) view.findViewById(R.id.text_title);
                tv.setText("Tab " + position);
                return view;
            }

            @Override
            public Fragment getItem(int position) {
                return BlankFragment.newInstance(position);
            }

            @Override
            public int getCount() {
                return 10;
            }
        }
    }
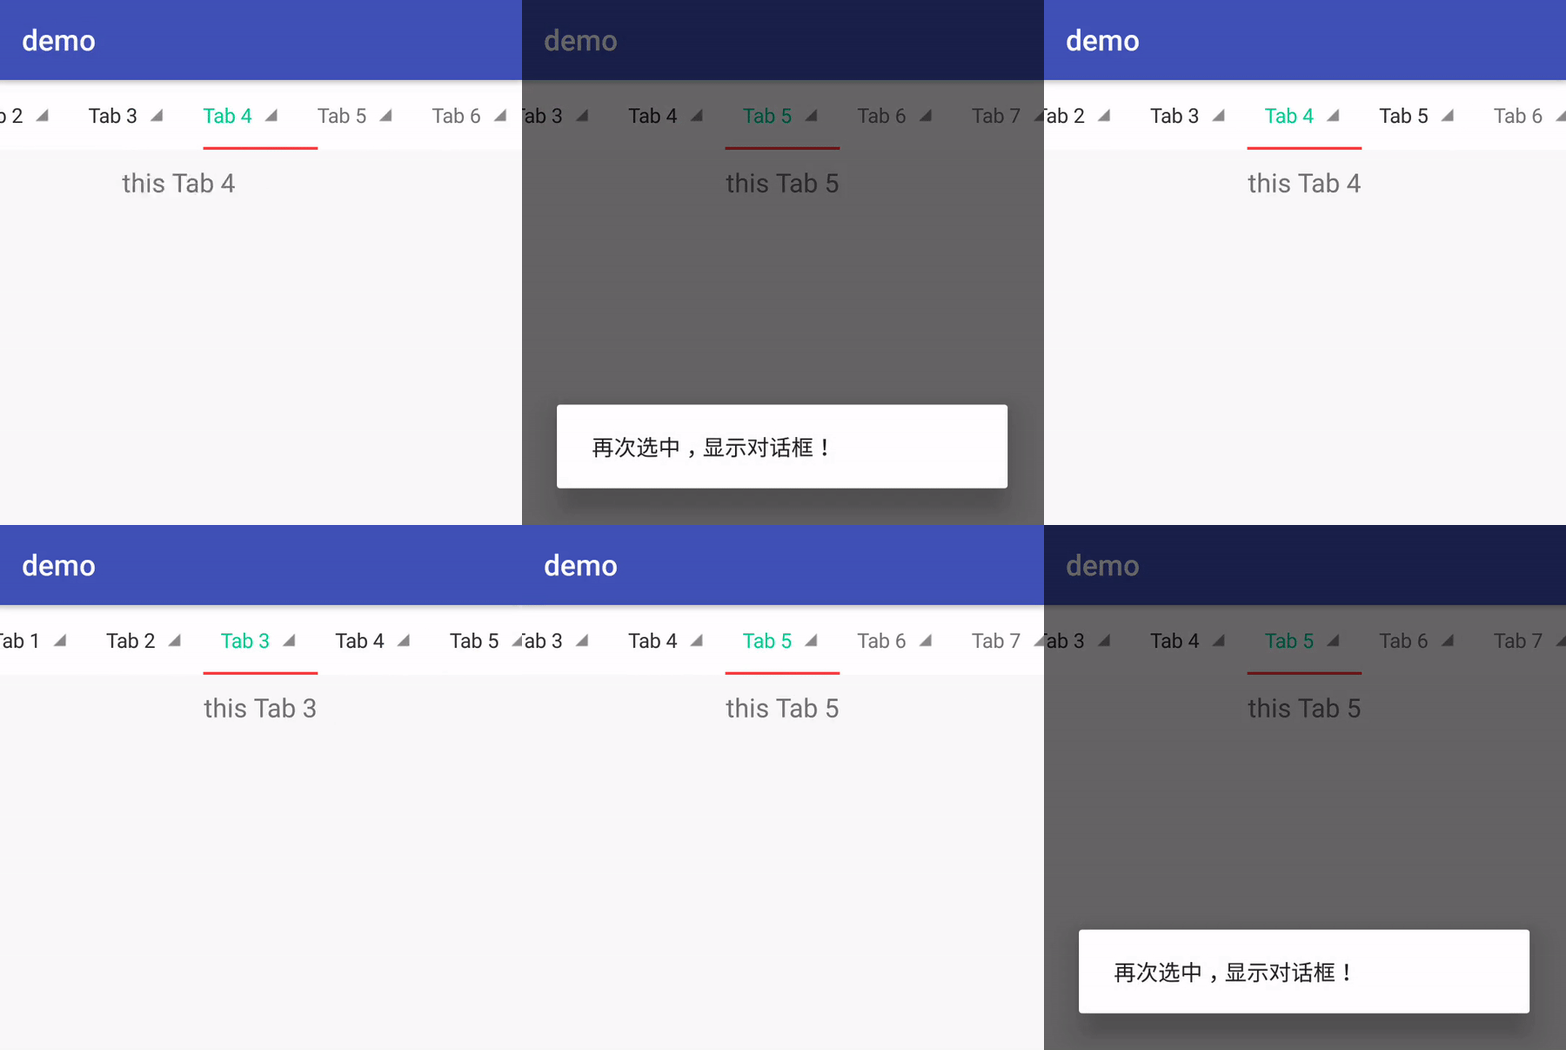
从效果图上看,已经实现了自定义的TabItem,需要注意的是需要根据Tab的选中状态来,实现自己想要的效果,包括Tab字体颜色的改变,图标的旋转效果,选中Tab放大等等...... 我这里只实现了文字颜色的改变,和再次选中弹出对话框。如果我们只是需要图文显示,我们不自定义TabItem也可以实现类似这种效果,直接在getPageTitle中使用ImageSpan让文字和图片一起显示。
        //TabLayout会根据当前page的title自动绑定tab
        @Override
        public CharSequence getPageTitle(int position) {
            Drawable image = ContextCompat.getDrawable(MainActivity.this, R.mipmap.ic_indicator);
            image.setBounds(0, 0, image.getIntrinsicWidth(), image.getIntrinsicHeight());
            ImageSpan imageSpan = new ImageSpan(image, ImageSpan.ALIGN_BOTTOM);
            SpannableString ss = new SpannableString("Tab" + position + " ");
            ss.setSpan(imageSpan, ss.length() - 1, ss.length(), Spannable.SPAN_EXCLUSIVE_EXCLUSIVE);
            return ss;
        }
5 源码分析实现上述效果
不分析波源码都不够装13的,其实也不是我想分析,只是偶然看到,然后使用了一下感觉并不是很灵活,不太明白官方为什么要这样做。网上有很多分析TabLayout,关于这个自定义TabItem源码,但是没有看见分析这一段的。有兴趣的可以跟着看看,直接跟踪Tab的setCustomView,找到TabView的update方法,代码不长60来行:
    final void update() {
        final Tab tab = mTab;
        //获取Tab里面的CustomView
        final View custom = tab != null ? tab.getCustomView() : null;
        //根据获取出来的custom做相应操作,得到最终的CustomView
        if (custom != null) {
            final ViewParent customParent = custom.getParent();
            if (customParent != this) {
                if (customParent != null) {
                    ((ViewGroup) customParent).removeView(custom);
                }
                addView(custom);
            }
            mCustomView = custom;
            //custom不为空,且判断和处理系统本身的mTextView、mIconView
            if (mTextView != null) {
                mTextView.setVisibility(GONE);
            }
            if (mIconView != null) {
                mIconView.setVisibility(GONE);
                mIconView.setImageDrawable(null);
            }
            //注意这里!!!从custom去获取ID为android.R.id.text1
            //我猜想系统是想让我们自定义CustomView的时候使用这个id
            mCustomTextView = (TextView) custom.findViewById(android.R.id.text1);
            if (mCustomTextView != null) {
                mDefaultMaxLines = TextViewCompat.getMaxLines(mCustomTextView);
            }
            //注意这里!!!从custom去获取ID为android.R.id.icon
            //我猜想系统是想让我们自定义CustomView的时候使用这个id
            mCustomIconView = (ImageView) custom.findViewById(android.R.id.icon);
        } else {
            //这里注释很清楚了,就不多说了
            // We do not have a custom view. Remove one if it already exists
            if (mCustomView != null) {
                removeView(mCustomView);
                mCustomView = null;
            }
            mCustomTextView = null;
            mCustomIconView = null;
        }

        //接下来就是判断CustomView做一些操作了
        if (mCustomView == null) {
            //这里的意思是没有自定义的,就创建默认的
            // If there isn't a custom view, we'll us our own in-built layouts
            if (mIconView == null) {
                ImageView iconView = (ImageView) LayoutInflater.from(getContext())
                        .inflate(R.layout.design_layout_tab_icon, this, false);
                addView(iconView, 0);
                mIconView = iconView;
            }
            if (mTextView == null) {
                TextView textView = (TextView) LayoutInflater.from(getContext())
                        .inflate(R.layout.design_layout_tab_text, this, false);
                addView(textView);
                mTextView = textView;
                mDefaultMaxLines = TextViewCompat.getMaxLines(mTextView);
            }
            TextViewCompat.setTextAppearance(mTextView, mTabTextAppearance);
            if (mTabTextColors != null) {
               //设置文本颜色(选中和未选中)
                mTextView.setTextColor(mTabTextColors);
            }
            //更新文本和图标
            updateTextAndIcon(mTextView, mIconView);
        } else {
            // Else, we'll see if there is a TextView or ImageView present and update them
            if (mCustomTextView != null || mCustomIconView != null) {
                //更新文本和图标
                updateTextAndIcon(mCustomTextView, mCustomIconView);
            }
        }

        // Finally update our selected state
        setSelected(tab != null && tab.isSelected());
    }
关于源码的分析都注释在代码里,对应着代码看,更加清晰。通过源码分析,系统好像想让我们使用那两个id(如果只有TextView和ImageView的话),这样的话是不是我们就不用处理一些逻辑了,使用起来更加easy了呢?答案当然是否定的,我测试的效果是文本的颜色不会根据TabLayout里面设置的一样改变,而且图标距底部有一个8dp的margin值。为什么呢?文本颜色不变从上面那段代码可以看出来,当我们有CustomView时,并没有给我们调用相应的setTextColor。底边距就得继续看updateTextAndIcon方法:
    private void updateTextAndIcon(@Nullable final TextView textView,
            @Nullable final ImageView iconView) {
        //下面一段没什么好说的,就是获取Drawable 和CharSequence并设置显示或隐藏
        final Drawable icon = mTab != null ? mTab.getIcon() : null;
        final CharSequence text = mTab != null ? mTab.getText() : null;
        final CharSequence contentDesc = mTab != null ? mTab.getContentDescription() : null;

        if (iconView != null) {
            if (icon != null) {
                iconView.setImageDrawable(icon);
                iconView.setVisibility(VISIBLE);
                setVisibility(VISIBLE);
            } else {
                iconView.setVisibility(GONE);
                iconView.setImageDrawable(null);
            }
            iconView.setContentDescription(contentDesc);
        }

        final boolean hasText = !TextUtils.isEmpty(text);
        if (textView != null) {
            if (hasText) {
                textView.setText(text);
                textView.setVisibility(VISIBLE);
                setVisibility(VISIBLE);
            } else {
                textView.setVisibility(GONE);
                textView.setText(null);
            }
            textView.setContentDescription(contentDesc);
        }

        if (iconView != null) {
            //获取出layout参数
            MarginLayoutParams lp = ((MarginLayoutParams) iconView.getLayoutParams());
            int bottomMargin = 0;
            if (hasText && iconView.getVisibility() == VISIBLE) {
                 /这里说得很清楚,如果两者都显示,就给icon的bottom加一些底边距
                // If we're showing both text and icon, add some margin bottom to the icon
                bottomMargin = dpToPx(DEFAULT_GAP_TEXT_ICON); //8dp
            }
            //判断它加的一些底边距和布局设置的不一致,就使用它加的,并请求重绘
            if (bottomMargin != lp.bottomMargin) {
                lp.bottomMargin = bottomMargin;
                iconView.requestLayout();
            }
        }

        if (!hasText && !TextUtils.isEmpty(contentDesc)) {
            setOnLongClickListener(this);
        } else {
            setOnLongClickListener(null);
            setLongClickable(false);
        }
    }
实际效果就不给出了,还是大家手动测测,关于布局将TextView和ImageView的id改为@android:id/text1和@android:id/icon就OK了。需要注意的是还得手动在代码里设置上文本的颜色和根据需求的MarginLayoutParams,下面直接给出代码。
    public class MainActivity extends BaseActivity implements TabLayout.OnTabSelectedListener {

        private TabLayout mTabLayout;
        private ViewPager mViewPager;
        private MainPagerAdapter mAdapter;

        @Override
        protected void onCreate(@Nullable Bundle savedInstanceState) {
            AppStatusTracker.init(getApplication());
            super.onCreate(savedInstanceState);
        }

        @Override
        protected void initContentView() {
            setContentView(R.layout.activity_main);
        }

        @Override
        protected void initView() {
            mTabLayout = findView(R.id.tabLayout);
            mViewPager = findView(R.id.viewPager);
            mAdapter = new MainPagerAdapter(getSupportFragmentManager());
            mViewPager.setAdapter(mAdapter);
            //官方推荐的绑定ViewPager方式
            mTabLayout.setupWithViewPager(mViewPager);
            int tabCount = mTabLayout.getTabCount();
            for (int i = 0; i < tabCount; i++) {
                TabLayout.Tab tab = mTabLayout.getTabAt(i);
                if (tab == null) return;
                //设置自定义的View
                tab.setCustomView(R.layout.custom_tab_item);
                tab.setText("Tab" + i);
                tab.setIcon(R.mipmap.ic_indicator);
                View customView = tab.getCustomView();
                if (customView == null) return;
                //注意设置了文本颜色和MarginLayoutParams
                ((TextView) customView.findViewById(android.R.id.text1)).setTextColor(mTabLayout.getTabTextColors());
                View icon = customView.findViewById(android.R.id.icon);
                ViewGroup.MarginLayoutParams layoutParams = (ViewGroup.MarginLayoutParams) icon.getLayoutParams();
                layoutParams.bottomMargin = 0;
                icon.setLayoutParams(layoutParams);
            }

            //需要自己实现选中监听,来实现自己需要的效果
            mTabLayout.addOnTabSelectedListener(this);
        }

        @Override
        protected void initData(@Nullable Bundle savedInstanceState) {

        }

        @Override
        public void onTabSelected(TabLayout.Tab tab) {

        }

        @Override
        public void onTabUnselected(TabLayout.Tab tab) {

        }

        @Override
        public void onTabReselected(TabLayout.Tab tab) {
            new AlertDialog.Builder(this)
                    .setMessage("再次选中,显示对话框!")
                    .show();
        }

        //ViewPager适配器  10个Fragment
        private class MainPagerAdapter extends FragmentPagerAdapter {
            public MainPagerAdapter(FragmentManager fm) {
                super(fm);
            }

            @Override
            public Fragment getItem(int position) {
                return BlankFragment.newInstance(position);
            }

            @Override
            public int getCount() {
                return 10;
            }
        }
    }
废话太多了,原生TabLayout使用就这么多,源码中真是变化万千。如果希望实现更多酷炫效果,可以自定义或者GitHub.....
附:
- Android TabLayout系列之属性
- Android TabLayout系列之简单使用
- Android TabLayout系列之进阶使用

