图形绘制在iOS开发中很常见,处于工作的需要和自身爱好,我就把最近自己使用过的图形绘制的简单方式稍微总结了一下 ,最近没怎么写博客了,不足之处大家多多指点
基本绘制
//    UIGraphicsBeginImageContextWithOptions(<#CGSize size#>, <#BOOL opaque#>, <#CGFloat scale#>)方法中各个参数:
     size :bitmap的大小
     opaque : YES:不透明  NO:透明
     scale: 缩放比例
     创建出来的bitmap就对应一个UIImage
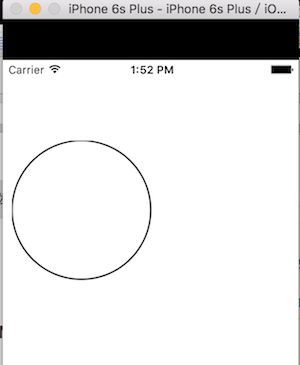
    UIGraphicsBeginImageContextWithOptions(CGSizeMake(200, 200), NO , 0);

    CGContextRef ctx = UIGraphicsGetCurrentContext();
    CGContextAddEllipseInRect(ctx, CGRectMake(0, 0, 100, 100));
    CGContextStrokePath(ctx);
    UIImage *image = UIGraphicsGetImageFromCurrentImageContext();
    self.aImageView.image = image;
往往我们还需要把绘制好的图形保存起来,我们需要先将图片转换为二进制数据, 然后进行保存。
UIImageJPEGRepresentation(<#UIImage * _Nonnull image#>, <#CGFloat compressionQuality#>)
//第一个参数是需要保存的图片对象,第二个参数则可以决定我们需要保存图片的质量 一般取 1

//     NSData *data = UIImageJPEGRepresentation(image, 1)
    NSData *data = UIImagePNGRepresentation(image);
   [data writeToFile:@"/Users/apple/XXXXXX.png" atomically:YES];
水印图片
我们新建一个继承UIImage的类,声明一个实现返回一个带水印图片的类方法
.h
#import
@interface UIImage (LGJImage)
/**
 *  生成水印
 *  @param bgName  背景图片
 *  @param logNmae 水印图片
 *  @return 生成好的图片(带水印的图片)
 */
+ (instancetype)imageWithBackgroundImageName:(NSString *)bgName log:(NSString *)logName;
@end
.m
#import "UIImage+LGJImage.h"

@implementation UIImage (LGJImage)
+ (instancetype)imageWithBackgroundImageName:(NSString *)bgName log:(NSString *)logName
{
    UIImage *image = [UIImage imageNamed:bgName];//需要添加水印的图片
UIGraphicsBeginImageContextWithOptions(image.size, NO, 0);//bitmap上下文
    [image drawAtPoint:CGPointMake(0, 0)];    // 绘制背景图片
    // 绘制水印'
     UIImage *logImage = [UIImage imageNamed:logName];
     CGFloat margin = 10;
     CGFloat logY = margin;
     CGFloat logX = image.size.width - margin - logImage.size.width;
     [logImage drawAtPoint:CGPointMake(logX, logY)];
//    NSString *str = @"我是见哥,我为自己代言";
//    [str drawAtPoint:CGPointMake(150, 50) withAttributes:nil];
    UIImage *newImage =  UIGraphicsGetImageFromCurrentImageContext();
    return newImage;
}
@end
接下来我们在ViewController的viewDidLoad方法中调用LGJImage的类方法来生成水印图片
- (void)viewDidLoad
{
    [super viewDidLoad];
    UIImage *newImage =  [UIImage imageWithBackgroundImageName:@"JJ" log:@"JJlog"];
    NSString *path = [[NSSearchPathForDirectoriesInDomains(NSDocumentDirectory, NSUserDomainMask, YES) lastObject] stringByAppendingPathComponent:@"lgj.png"];
    NSLog(@"%@", path);
    NSData *data = UIImagePNGRepresentation(newImage);
    [data writeToFile:path atomically:YES];
}
水印文字
    // 0. 加载背景图片
    UIImage *image = [UIImage imageNamed:@"LGJJJ"];

    // 1.创建bitmap上下文
    // 执行完这一行在内存中就相遇创建了一个UIImage
UIGraphicsBeginImageContextWithOptions(image.size, NO, 0);
    // 2.绘图图片
    // 2.1绘制背景图片
    [image drawAtPoint:CGPointMake(0, 0)];

    // 2.3绘制文字水印
    NSString *str = @"
";
    [str drawAtPoint:CGPointMake(150, 50) withAttributes:nil];
    // 3.获得bitmap上下文中绘制好的的图片
    UIImage *newImage =  UIGraphicsGetImageFromCurrentImageContext();
    // 4.将图片写到文件中
    NSString *path = [[NSSearchPathForDirectoriesInDomains(NSDocumentDirectory, NSUserDomainMask, YES) lastObject] stringByAppendingPathComponent:@"aaa.png"];
    NSLog(@"%@", path);
    NSData *data = UIImagePNGRepresentation(newImage);
    [data writeToFile:path atomically:YES];
我们打印文件所在的路径,图片效果如下:
图片剪切
我们常常会遇见这样的场景,截取一张图片的一部分上传,作为某个应用的头像。那么这是怎么实现的呢?作为程序员我们最关心什么?代码实现,来吧兄弟们!
在这里我们自定义一个集成UIImage的类以及生成截取之后的头像图片的方法
.h
@interface UIImage (LGJImage)
/**
 *  生成头像
 *  @param icon   头像图片名称
 *  @param border 头像边框大小
 *  @param color  头像边框的颜色
 *  @return 生成好的头像
 */
+ (instancetype)imageWithIcon:(NSString *)icon border:(NSInteger)border color:(UIColor *)color;
@end
.m
#import "UIImage+LGJImage.h"

@implementation UIImage (LGJImage)

+ (instancetype)imageWithIcon:(NSString *)icon border:(NSInteger)border color:(UIColor *)color
{
    UIImage *image = [UIImage imageNamed:icon];// 加载原有图片
    // 上下文
    CGFloat margin = border;
    CGSize size = CGSizeMake(image.size.width + margin, image.size.height + margin);
    // YES 不透明 NO 透明
    UIGraphicsBeginImageContextWithOptions(size, NO, 0);
    // 大圆
    CGContextRef ctx = UIGraphicsGetCurrentContext();
    CGContextAddEllipseInRect(ctx, CGRectMake(0, 0, size.width, size.height));
    [color set];
    CGContextFillPath(ctx);
    // 小圆
    CGFloat smallX = margin * 0.5;
    CGFloat smallY = margin * 0.5;
    CGFloat smallW = image.size.width;
    CGFloat smallH = image.size.height;
    CGContextAddEllipseInRect(ctx, CGRectMake(smallX, smallY, smallW, smallH));
    CGContextClip(ctx);
    [image drawInRect:CGRectMake(smallX, smallY, smallW, smallH)];
    UIImage *newImage = UIGraphicsGetImageFromCurrentImageContext();
    return newImage;
}
@end
这样一来,我们用的时候就会方便很多了,只需要调用此类方法就能达到截取图片的效果了
- (void)viewDidLoad
{
    [super viewDidLoad];
    UIImage *newImage = [UIImage imageWithIcon:@"Jiange" border:50 color:[UIColor greenColor]];
    self.VVVVVV.image = newImage;
}
如果需要保存的话可以将图片保存:例如
    NSString *path = [[NSSearchPathForDirectoriesInDomains(NSDocumentDirectory, NSUserDomainMask, YES) lastObject] stringByAppendingPathComponent:@"aaa.png"];
    NSLog(@"%@", path);
    NSData *data = UIImagePNGRepresentation(newImage);
    [data writeToFile:path atomically:YES];
条纹背景
条纹背景的绘制相比于以上很类似,步骤都差不多,我们来具体看一下其实现过程
    // 1.平铺图片
    CGSize size = CGSizeMake(self.view.frame.size.width, 44);
    UIGraphicsBeginImageContextWithOptions(size , NO, 0);
    // 2.画矩形
    CGContextRef ctx = UIGraphicsGetCurrentContext();
    CGFloat height = 44;
    CGContextAddRect(ctx, CGRectMake(0, 0, self.view.frame.size.width, height));
    [[UIColor redColor] set];
    CGContextFillPath(ctx);
    // 3.画线条
    CGFloat lineWidth = 2;
    CGFloat lineY = height - lineWidth;
    CGFloat lineX = 0;
    CGContextMoveToPoint(ctx, lineX, lineY);
    CGContextAddLineToPoint(ctx, self.view.frame.size.width, lineY);
    [[UIColor blackColor] set];
    CGContextStrokePath(ctx);
//获取到绘制完成后的小图片
    UIImage *image = UIGraphicsGetImageFromCurrentImageContext();
    UIColor *myColor = [UIColor colorWithPatternImage:image];
    self.XXXXXX.backgroundColor = myColor;
是不是很相似?呵呵 其实一样 只需要粘贴复制之前的代码,稍作改动即可。
好了 时候不早了。我要开始干活了!!!


