搭建note
1 --初始环境,启动容器
在服务器家目录拉取mynote代码:
git clone [email protected]:RonnyJiang/mynote.git
切到note分支
git checkout --track origin/note
把leanote-linux-amd64-v2.5.bin.tar.gz 包放到仓库,并提交
然后将包解压,在.gitignore中加上leanote/mongodb_backup,让初始化数据不提交到仓库中,然后提交。
然后运行docker容器,将mynote挂载到容器的/home/ronny/mynote目录上,端口映射为8090,端口已经开放,外网可以访问。
cmd如下:
docker run -it -v /home/ronny/mynote:/home/ronny/mynote -p 8090:8090 --name noteserver ronnyjiang/private:noteserver /bin/bash
2 --测试mongodb安装
在容器创建目录/home/ronny/notedata用于存放mongodb数据:
用以下命令启动mongod:
mongod --dbpath /home/ronny/notedata
这时mongod已经启动,ps -aux 可以看到这个deamon
USER PID %CPU %MEM VSZ RSS TTY STAT START TIME COMMAND
ronny 43 0.9 6.5 361132 66380 ? Sl+ 17:04 0:02 mongod --dbpath /home/ronny/notedata
重新打开一个终端, 键入mongo进入交互程序:
$> mongo
> show dbs
...数据库列表
mongodb安装到此为止, 下面为mongodb导入leanote初始数据。
3. 导入初始数据
leanote初始数据存放在/home/ronny/mynote/leanote/mongodb_backup/leanote_install_data中。
打开终端, 输入以下命令导入数据。
mongorestore -h localhost -d leanote --dir /home/ronny/mynote/leanote/mongodb_backup/leanote_install_data
现在在mongodb中已经新建了leanote数据库, 可用命令查看下leanote有多少张"表":
$> mongo
> show dbs # 查看数据库
leanote 0.203125GB
local 0.078125GB
> use leanote # 切换到leanote
switched to db leanote
> show collections # 查看表
files
has_share_notes
note_content_histories
note_contents
....
ronny@88446028a8c0:~/notedata$ mongo
MongoDB shell version: 3.0.1
connecting to: test
Server has startup warnings:
2017-11-08T17:05:24.732+0800 I CONTROL [initandlisten]
2017-11-08T17:05:24.732+0800 I CONTROL [initandlisten] ** WARNING: /sys/kernel/mm/transparent_hugepage/enabled is 'always'.
2017-11-08T17:05:24.732+0800 I CONTROL [initandlisten] ** We suggest setting it to 'never'
2017-11-08T17:05:24.732+0800 I CONTROL [initandlisten]
2017-11-08T17:05:24.732+0800 I CONTROL [initandlisten] ** WARNING: /sys/kernel/mm/transparent_hugepage/defrag is 'always'.
2017-11-08T17:05:24.732+0800 I CONTROL [initandlisten] ** We suggest setting it to 'never'
2017-11-08T17:05:24.732+0800 I CONTROL [initandlisten]
> show dbs
leanote 0.078GB
local 0.078GB
> use leanote
switched to db leanote
> show collections
albums
attachs
blog_comments
blog_likes
blog_singles
configs
email_logs
files
find_pwds
group_users
groups
has_share_notes
leanote.ShareNotes
leanote.has_share_notes
note_content_histories
note_contents
note_images
note_tags
notebooks
notes
reports
sessions
share_notebooks
share_notes
suggestions
system.indexes
tag_count
tags
themes
tokens
traffics
user_blogs
users
>
初始数据的users表中已有2个用户:
user1 username: admin, password: abc123 (管理员, 只有该用户才有权管理后台, 请及时修改密码)
user2 username: [email protected], password: [email protected] (仅供体验使用)
我们可以直接看数据库
ronny@88446028a8c0:~/notedata$ mongo
MongoDB shell version: 3.0.1
connecting to: test
Server has startup warnings:
2017-11-08T17:05:24.732+0800 I CONTROL [initandlisten]
2017-11-08T17:05:24.732+0800 I CONTROL [initandlisten] ** WARNING: /sys/kernel/mm/transparent_hugepage/enabled is 'always'.
2017-11-08T17:05:24.732+0800 I CONTROL [initandlisten] ** We suggest setting it to 'never'
2017-11-08T17:05:24.732+0800 I CONTROL [initandlisten]
2017-11-08T17:05:24.732+0800 I CONTROL [initandlisten] ** WARNING: /sys/kernel/mm/transparent_hugepage/defrag is 'always'.
2017-11-08T17:05:24.732+0800 I CONTROL [initandlisten] ** We suggest setting it to 'never'
2017-11-08T17:05:24.732+0800 I CONTROL [initandlisten]
> show dbs
leanote 0.078GB
local 0.078GB
> use leanote
switched to db leanote
> show collections
albums
attachs
blog_comments
blog_likes
blog_singles
configs
email_logs
files
find_pwds
group_users
groups
has_share_notes
leanote.ShareNotes
leanote.has_share_notes
note_content_histories
note_contents
note_images
note_tags
notebooks
notes
reports
sessions
share_notebooks
share_notes
suggestions
system.indexes
tag_count
tags
themes
tokens
traffics
user_blogs
users
> db.users.find()
{ "_id" : ObjectId("5368c1aa99c37b029d000001"), "CreatedTime" : ISODate("2014-05-06T11:04:10.658Z"), "Email" : "[email protected]", "LeftIsMin" : false, "NoteListWidth" : 266, "NotebookWidth" : 160, "Pwd" : "e99a18c428cb38d5f260853678922e03", "Theme" : "simple", "ThirdType" : 0, "ThirdUserId" : "", "ThirdUsername" : "", "Username" : "admin", "UsernameRaw" : "admin", "Verified" : false, "mdEditorWidth" : 0, "Usn" : 200044, "Logo" : "" }
{ "_id" : ObjectId("540817e099c37b583c000001"), "CreatedTime" : ISODate("2014-09-04T07:42:24.064Z"), "Email" : "[email protected]", "LeftIsMin" : false, "NoteListWidth" : 0, "NotebookWidth" : 0, "Pwd" : "84e724109bd30a935846e8302be01bd8", "Theme" : "", "ThirdType" : 0, "ThirdUserId" : "", "ThirdUsername" : "", "Username" : "demo", "UsernameRaw" : "demo", "Verified" : false, "Usn" : 200006 }
>
4. 配置leanote
leanote的配置存储在文件conf/app.conf中。
请务必修改app.secret一项, 在若干个随机位置处,将字符修改成一个其他的值, 否则会有安全隐患!
其它的配置可暂时保持不变, 若需要配置数据库信息, 请参照leanote问题汇总。
然后将leanote/conf/app.conf 添加到.gitignore,不让别人看见app.secret
接下来再修改一下leanote/conf/app.conf中的port,改为8090
5. 运行leanote
注意:在此之前请确保mongodb已在运行!
新开一个窗口, 运行:
$> cd /home/ronny/mynote/leanote/bin
$> bash run.sh
最后出现以下信息证明运行成功:
...
TRACE 2013/06/06 15:01:27 watcher.go:72: Watching: /home/life/leanote/bin/src/github.com/leanote/leanote/conf/routes
Go to /@tests to run the tests.
Listening on :8090..
恭喜你, 打开浏览器输入:http://localhost:8090体验leanote吧!
注意!!!!!!!!!!!!!!
按照本教程启动Mongodb是没有权限控制的, 如果你的Leanote服务器暴露在外网, 任何人都可以访问你的Mongodb并修改, 所以这是极其危险的!!!!!!!!!!! 请务必为Mongodb添加用户名和密码并以auth启动, 方法请见:为mongodb数据库添加用户
最下面会创建一个leanote数据库的用户。并以auth方式启动数据库。看最下面:
leanote安装/配置问题汇总
如果运行有问题或想要进一步配置leanote, 请参照leanote问题汇总。
启动的进程是这样的:
ronny@88446028a8c0:~$ ps -aux
USER PID %CPU %MEM VSZ RSS TTY STAT START TIME COMMAND
ronny 1 0.0 0.1 19908 1352 ? Ss 16:58 0:00 /bin/bash
ronny 43 0.3 9.3 533184 94512 ? Sl+ 17:04 0:07 mongod --dbpath /home/ronny/notedata
ronny 54 0.0 0.3 19916 3680 ? Ss 17:07 0:00 /bin/bash
ronny 122 0.0 0.3 19704 3256 ? S+ 17:37 0:00 bash run.sh
ronny 130 0.0 1.4 20772 14632 ? Sl+ 17:37 0:00 /home/ronny/mynote/leanote/bin/leanote-linux-amd64 -importPath github.com/leanote/leanote
ronny 139 0.0 0.3 19904 3660 ? Ss 17:40 0:00 /bin/bash
ronny 152 0.0 0.2 17268 2440 ? R+ 17:40 0:00 ps -aux
接下来就是修改用户,然后定制note style。修该网页的内用了。主要修改图标,logo,主页。
这时运行起来了,但是有个安全隐患,我们需要为mongodb数据库添加用户:
像mysql一样有root用户, mongodb初始是没有用户的, 这样很不安全, 所以要为leanote数据库新建一个用户来连接leanote数据库(注意, 并不是为leanote的表users里新建用户, 而是新建一个连接leanote数据库的用户, 类似mysql的root用户).
mognodb v2与v3创建用户命令有所不同
mongodb v2 创建用户如下:
# 首先切换到leanote数据库下
> use leanote;
# 添加一个用户root, 密码是abc123
> db.addUser("root", "abc123");
{
"_id" : ObjectId("53688d1950cc1813efb9564c"),
"user" : "root",
"readOnly" : false,
"pwd" : "e014bfea4a9c3c27ab34e50bd1ef0955"
}
# 测试下是否正确
> db.auth("root", "abc123");
1 # 返回1表示正确
mongodb v3 创建用户如下:
# 首先切换到leanote数据库下
> use leanote;
# 添加一个用户root, 密码是Cos*14-------
> db.createUser({
user: 'root',
pwd: 'Cos*14------',
roles: [{role: 'dbOwner', db: 'leanote'}]
});
# 测试下是否正确
> db.auth("root", "Cos*14-------");
1 # 返回1表示正确
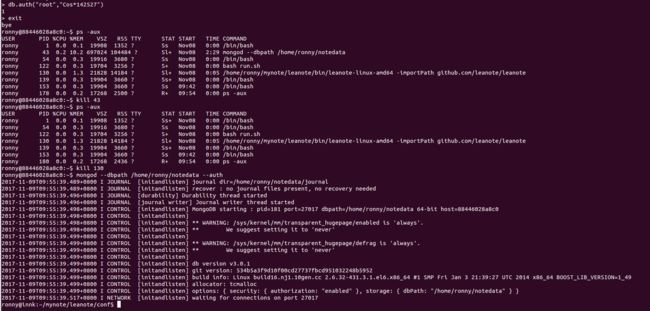
用户添加好后重新运行下mongodb, 并开启权限验证. 在mongod的终端按ctrl+c即可退出mongodb.
启动mongodb:
$> mongod --dbpath /home/ronny/notedata --auth
然后按ctrl+p ctrl+q 退出docker container。
接着再docker exec -it 88446028a8c0 /bin/bash 进入容器,修改leanote的app.conf
还要修改配置文件: 修改 leanote/conf/app.conf:
db.host=localhost
db.port=27017
db.dbname=leanote # required
db.username=root # if not exists, please leave blank
db.password=Cos*14-------- # if not exists, please leave blank
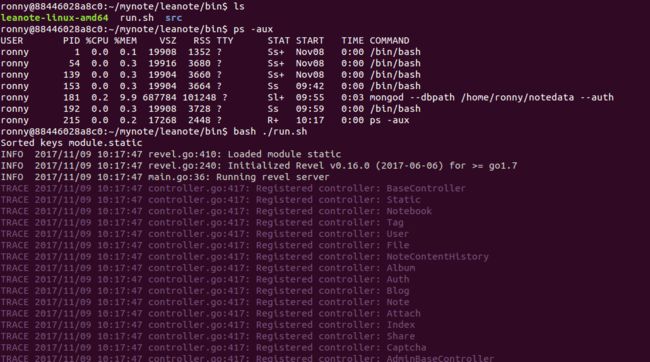
保存后,我们在重启leanote。因为刚刚已经kill掉了leanote和mongod的后台进程。所以现在直接运行就行了
主要是为mongodb创建用户后要响响应修改app.conf中的用户名和密码,需要注意的是启动mongod需要多加一个--auth,而leanote还是仅仅进入bin目录执行bash ./run.sh
可以看到正常启动
为Leanote指定超级管理员帐户(admin用户)
Leanote默认超级管理员为admin, 且一旦不小心修改了username则不能改回. 此时可修改配置文件app.conf, 比如指定用户life为超级管理员, 修改或/添加一行:
adminUsername=life
修改默认语言,打开网页就显示默认的语言,这里设置为中文,修改后需要kill掉leanote进程,重新启动,启动后进程为
ronny@88446028a8c0:~$ ps -aux
USER PID %CPU %MEM VSZ RSS TTY STAT START TIME COMMAND
ronny 1 0.0 0.1 19908 1352 ? Ss+ Nov08 0:00 /bin/bash
ronny 54 0.0 0.3 19916 3680 ? Ss+ Nov08 0:00 /bin/bash
ronny 139 0.0 0.3 19904 3660 ? Ss+ Nov08 0:00 /bin/bash
ronny 153 0.0 0.3 19904 3664 ? Ss 09:42 0:00 /bin/bash
ronny 181 0.2 10.2 693944 103996 ? Sl+ 09:55 0:12 mongod --dbpath /home/ronny/notedata --auth
ronny 192 0.0 0.3 19912 3728 ? Ss+ 09:59 0:00 /bin/bash
ronny 230 0.0 0.3 19908 3740 ? Ss 10:22 0:00 /bin/bash
ronny 270 0.0 0.3 19704 3288 ? S+ 10:51 0:00 bash ./run.sh
ronny 277 0.0 1.3 19716 14092 ? Sl+ 10:51 0:00 /home/ronny/mynote/leanote/bin/leanote-linux-amd64 -importPath github.com/leanote/leanote
ronny 283 0.0 0.3 19908 3636 ? Ss 10:51 0:00 /bin/bash
ronny 299 0.0 0.2 17268 2436 ? R+ 11:18 0:00 ps -aux
不错的免费logo设计网站
http://www.uugai.com/logoa/yulan.php
非常好的截图工具,可以裁剪logo大小并且保持透明度,非常好!
http://www.tuyitu.com/photoshop/


