笔记内容:docker数据卷备份恢复以及网络相关
笔记日期:2018-02-06
- 25.9 数据卷备份恢复
- 25.10 docker网络模式
- 25.11 opration not permitted错误
- 25.12 配置桥接网络
25.9 数据卷备份恢复
备份:
如果数据卷容器的共享目录已经挂载到了本地宿主机的磁盘上,那么就无需进行数据卷备份。没有进行挂载到本地,而是作为共享目录的数据卷容器,就得定期将数据卷进行一个备份,不然如果数据卷被删除的话,数据也会丢失。
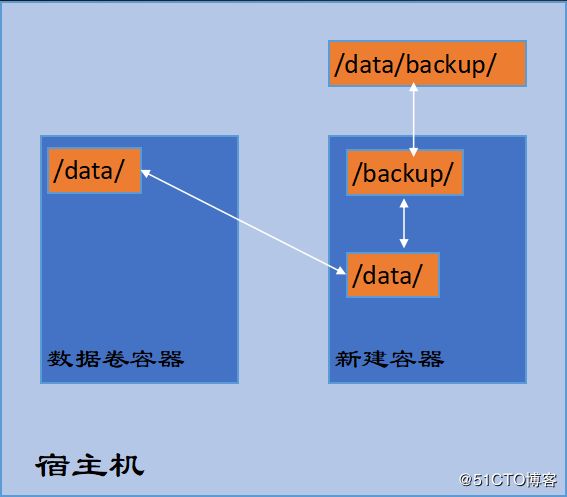
假设数据卷容器共享的目录是data,由于是作为一个共享目录的数据卷容器,那么就会与普通容器进行目录的关联。这样我们可以在本地磁盘上创建一个backup目录,在新建容器的时候,把容器的backup目录映射到本地宿主机的backup目录上,之后需要备份data目录的数据时,只需要把data目录打包到backup目录下即可,这样就会写入到本地磁盘的backup中。
实现如下:
1.在本地磁盘上创建一个backup目录:
mkdir /data/backup2.新建容器,把容器的backup目录映射到本地宿主机的backup目录上,并将data目录打包到backup目录下:
docker run --volumes-from testvol -v /data/backup/:/backup centos tar cvf /backup/data.tar /data/说明:首先我们需要使用testvol数据卷新开一个容器,同时我们还需要把本地的/backup/目录挂载到该容器的/backup下,这样在容器中/backup目录里面新建的文件,我们就可以直接在/data/backup/目录中看到了。 然后再把/data/目录下面的文件打包到成data.tar文件放到/backup目录下面,这样就实现了一个简单的备份。
恢复:
恢复则是反其道而行之,先新建一个数据卷容器,再新建一个新的容器并挂载该数据卷容器,然后再把打包的tar包解包。
1.新建数据卷容器:
docker run -itd -v /data/ --name testvol2 centos bash2.挂载数据卷新建容器,并解包:
docker run --volumes-from testvol2 -v /data/backup/:/backup centos tar xf /backup/data.tar25.10 docker网络模式
我们平时使用的VMware、VirtualBox等虚拟机软件,都有不同的网络模式,例如:NAT模式、桥接模式、仅主机模式等。而docker也是一种虚拟技术,所以自然也有不同的网络模式,docker有四种网络模式。
host模式,使用docker run时使用 --net=host 指定。docker使用的网络实际上和宿主机一样,在容器内看到的网卡ip是宿主机ip。
container模式,使用 --net=container:container_id/container_name 来指定。多个容器使用共同的网络,看到的ip是一样的。例如容器A和容器B使用共同的网络,那么它们两个看到的ip就是一样的。
none模式,使用 --net=none 指定,这种模式下,不会配置任何网络。
bridge模式,使用 --net=bridge 指定默认模式,不用指定默认就是这种网络模式。这种模式会为每个容器分配一个独立的Network Namespace。类似于vmware的nat网络模式。同一个宿主机上的所有容器会在同一个网段下,相互之间是可以通信的。
外部访问容器:
以上简单介绍了几种docker的网络模式,我们也知道docker模式使用的是bridge模式,可以与宿主机以及该宿主机上的其他容器进行通信。但是,如果想要在宿主机外部访问该容器,则是无法访问的。
解决这个问题的方法,就是我们可以将容器端口映射到宿主机上,那么访问宿主机的端口即可,下面我们来用一个小例子进行一个简单的演示:
1.进入到一个运行中的容器,或者从现有的镜像新建一个容器,进入容器后安装nginx,安装完后退出容器:
[root@server ~]# docker exec -it f7774d bash
[root@f7774d6447ca /]# yum -y install epel-release
[root@f7774d6447ca /]# yum -y install nginx
[root@f7774d6447ca /]# exit
2.然后把该容器导成一个新的镜像,接着再使用新镜像创建容器,并指定端口映射:
[root@server ~]# docker commit -m "install nginx" -a "author" f7774d centos_with_nginx  # 导出为镜像
sha256:1c56209c7a2775755af07e6b8f6005aed2936e7922f381ee648582e696196901
[root@server ~]# docker images
REPOSITORY                    TAG                 IMAGE ID            CREATED             SIZE
centos_with_nginx             latest              1c56209c7a27        18 seconds ago      389MB
[root@server ~]# docker run -itd -p 8088:80 centos_with_nginx bash  # 创建容器时指定端口映射
6289ec878420dcd27218334fb7933216e8a04c2eff839ae699ae75e7c7625957
[root@server ~]#
-p 可以指定端口映射,本例中将容器的80端口映射为本地的8088端口。
25.11 opration not permitted错误
以上我们已经完成了nginx的安装以及导出镜像,并且也创建好了容器。但是新建的容器,如果启动nginx或者httpd这类服务的时候会报如下错误:
Failed to get D-Bus connection: Operation not permitted
例如,我进入到刚刚创建的容器下启动nginx服务:
[root@server ~]# docker exec -it 6289ec8 bash
[root@6289ec878420 /]# systemctl start nginx
Failed to get D-Bus connection: Operation not permitted
[root@6289ec878420 /]# exit
如上,可以看到报错了。
这是因为dbus-daemon没有启动,解决该问题的方法如下:
启动容器时,要加上--privileged -e "container=docker" ,并且最后面的命令改为/usr/sbin/init
例如,我们删除之前的容器,重新创建:
[root@server ~]# docker rm -f 6289ec8  # 删除之前的容器
6289ec8
[root@server ~]# docker run -itd --privileged -e "container=docker" -p 8088:80 centos_with_nginx /usr/sbin/init
5814019a5395d165cbf77e1921936698b78a6d62abd94e7b4aa6d718ebecebee
[root@server ~]#
[root@server ~]# docker exec -it 5814019 bash
[root@dea214b5c1c5 /]# systemctl start nginx  # 这时启动nginx就没有报错了
[root@dea214b5c1c5 /]# ps aux |grep nginx
root         93  0.0  0.1 122928  2252 ?        Ss   18:33   0:00 nginx: master process /usr/sbin/nginx
nginx        94  0.0  0.1 123392  3136 ?        S    18:33   0:00 nginx: worker process
nginx        95  0.0  0.1 123392  3136 ?        S    18:33   0:00 nginx: worker process
nginx        96  0.0  0.1 123392  3140 ?        S    18:33   0:00 nginx: worker process
nginx        97  0.0  0.1 123392  3140 ?        S    18:33   0:00 nginx: worker process
root         99  0.0  0.0   9048   664 pts/1    S+   18:33   0:00 grep --color=auto nginx
[root@dea214b5c1c5 /]# netstat -lntp |grep nginx
tcp        0      0 0.0.0.0:80              0.0.0.0:*               LISTEN      93/nginx: master pr
tcp6       0      0 :::80                   :::*                    LISTEN      93/nginx: master pr
[root@dea214b5c1c5 /]# curl localhost
如上,可以看到,容器里的nginx已经启动了,并且也映射了本地宿主机的8088端口,那么我们来从浏览器上访问宿主机的8088端口,看看是否能访问到这个nginx服务:
没问题,从浏览器上访问成功。以上我们就解决了外部网络访问容器服务以及在容器内启动nginx服务报opration not permitted错误的问题。
25.12 配置桥接网络
为了使本地网络中的机器和Docker容器更方便的通信,我们经常会有将Docker容器配置到和主机同一网段的需求。这个需求其实很容易实现,我们只要将Docker容器和宿主机的网卡桥接起来,也就是需要配置一个桥接网络,然后再给Docker容器配上IP就可以了,实现步骤如下:
1.首先在宿主机上进入到网卡配置文件的目录下,并拷贝网卡配置文件:
[root@server ~]# cd /etc/sysconfig/network-scripts/
[root@server /etc/sysconfig/network-scripts]# cp ifcfg-eno16777728 ifcfg-br0
2.然后编辑网卡配置文件:
[root@server /etc/sysconfig/network-scripts]# vim ifcfg-br0
TYPE=Bridge  # 将Ethernet修改为Bridge,并将以下几个字段的值修改为br0
NAME=br0
DEVICE=br0
3.编辑宿主机的网卡配置文件,并重启网卡:
[root@server /etc/sysconfig/network-scripts]# vim ifcfg-eno16777728
# 将 UUID、DNS1、DNS2、IPADDR、PREFIX、GATEWAY 等字段都注释掉
BRIDGE=br0  # 然后在文件末尾加上这一句
[root@server /etc/sysconfig/network-scripts]# systemctl restart network
4.重启网卡成功后,使用ifconfig查看网卡信息如下:
[root@server ~]# ifconfig
br0: flags=4163  mtu 1500
        inet 192.168.77.130  netmask 255.255.255.0  broadcast 192.168.77.255
        inet6 fe80::20c:29ff:fef1:912c  prefixlen 64  scopeid 0x20
        ether 00:0c:29:f1:91:2c  txqueuelen 0  (Ethernet)
        RX packets 661  bytes 111914 (109.2 KiB)
        RX errors 0  dropped 0  overruns 0  frame 0
        TX packets 177  bytes 26544 (25.9 KiB)
        TX errors 0  dropped 0 overruns 0  carrier 0  collisions 0

eno16777728: flags=4163  mtu 1500
        ether 00:0c:29:f1:91:2c  txqueuelen 1000  (Ethernet)
        RX packets 833  bytes 173138 (169.0 KiB)
        RX errors 0  dropped 0  overruns 0  frame 0
        TX packets 179  bytes 29840 (29.1 KiB)
        TX errors 0  dropped 0 overruns 0  carrier 0  collisions 0

lo: flags=73  mtu 65536
        inet 127.0.0.1  netmask 255.0.0.0
        inet6 ::1  prefixlen 128  scopeid 0x10
        loop  txqueuelen 0  (Local Loopback)
        RX packets 5241  bytes 2612196 (2.4 MiB)
        RX errors 0  dropped 0  overruns 0  frame 0
        TX packets 5241  bytes 2612196 (2.4 MiB)
        TX errors 0  dropped 0 overruns 0  carrier 0  collisions 0

[root@server ~]#
如上,可以看到,br0已经被识别了,并且将原本是eno16777728网卡的ip分给了br0网卡,而且正常的情况下eno16777728是没有ip的。
5.安装pipwork工具:
[root@server ~]# git clone https://github.com/jpetazzo/pipework
[root@server ~]# cd pipework/
[root@server ~/pipework]# ls
docker-compose.yml  doctoc  LICENSE  pipework  pipework.spec  README.md
[root@server ~/pipework]# cp pipework /usr/local/bin/
6.开启一个容器,并进入到该容器中:
[root@server ~]# docker run -itd --net=none --name test_bridge_centos centos_with_nginx bash
9724781ac393a3c3caf0b92145aa442aac0009249dbf21619a9a40c4008ff6ab
[root@server ~]# docker exec -it 9724781 bash
[root@9724781ac393 /]# ifconfig  # 可以看到该容器中只有一个本地网卡
lo: flags=73  mtu 65536
        inet 127.0.0.1  netmask 255.0.0.0
        loop  txqueuelen 0  (Local Loopback)
        RX packets 0  bytes 0 (0.0 B)
        RX errors 0  dropped 0  overruns 0  frame 0
        TX packets 0  bytes 0 (0.0 B)
        TX errors 0  dropped 0 overruns 0  carrier 0  collisions 0

[root@9724781ac393 /]# exit
7.使用pipework工具给这个容器分配ip:
# 192.168.77.125为容器的ip,@后面的ip为虚拟机的网关ip
[root@server ~]# pipework br0 test_bridge_centos 192.168.77.125/[email protected]
[root@server ~]# docker exec -it 9724781 bash
[root@9724781ac393 /]# ifconfig
eth1: flags=4163  mtu 1500
        inet 192.168.77.125  netmask 255.255.255.0  broadcast 192.168.77.255
        ether 5a:f0:c6:49:d4:27  txqueuelen 1000  (Ethernet)
        RX packets 36  bytes 7473 (7.2 KiB)
        RX errors 0  dropped 0  overruns 0  frame 0
        TX packets 1  bytes 42 (42.0 B)
        TX errors 0  dropped 0 overruns 0  carrier 0  collisions 0

lo: flags=73  mtu 65536
        inet 127.0.0.1  netmask 255.0.0.0
        loop  txqueuelen 0  (Local Loopback)
        RX packets 0  bytes 0 (0.0 B)
        RX errors 0  dropped 0  overruns 0  frame 0
        TX packets 0  bytes 0 (0.0 B)
        TX errors 0  dropped 0 overruns 0  carrier 0  collisions 0

[root@9724781ac393 /]# ping www.baidu.com  # 测试能否ping通外网
PING www.a.shifen.com (14.215.177.38) 56(84) bytes of data.
64 bytes from 14.215.177.38 (14.215.177.38): icmp_seq=1 ttl=128 time=13.9 ms
64 bytes from 14.215.177.38 (14.215.177.38): icmp_seq=2 ttl=128 time=10.2 ms
64 bytes from 14.215.177.38 (14.215.177.38): icmp_seq=3 ttl=128 time=10.3 ms
64 bytes from 14.215.177.38 (14.215.177.38): icmp_seq=4 ttl=128 time=10.2 ms
^C
--- www.a.shifen.com ping statistics ---
4 packets transmitted, 4 received, 0% packet loss, time 3004ms
rtt min/avg/max/mdev = 10.267/11.192/13.921/1.580 ms
[root@9724781ac393 /]# exit
如上,可以看到该容器已经被成功分配了我们指定的ip,并且也能正常ping通外网。
接着就是测试在外部能否ping通这个容器的ip,打开windows的cmd,执行以下命令:
C:\Users\zero>ping 192.168.77.125

正在 Ping 192.168.77.125 具有 32 字节的数据:
来自 192.168.77.125 的回复: 字节=32 时间<1ms TTL=64
来自 192.168.77.125 的回复: 字节=32 时间<1ms TTL=64
来自 192.168.77.125 的回复: 字节=32 时间<1ms TTL=64
来自 192.168.77.125 的回复: 字节=32 时间<1ms TTL=64

192.168.77.125 的 Ping 统计信息:
    数据包: 已发送 = 4,已接收 = 4,丢失 = 0 (0% 丢失),
往返行程的估计时间(以毫秒为单位):
    最短 = 0ms,最长 = 0ms,平均 = 0ms

C:\Users\zero>
输出结果如上,可以正常ping通。
小结:以上我们通过第三方的pipework工具实现了容器网络与宿主机网络的桥接,这种方式配置起来虽然稍微有些麻烦,但是方便于本地网络中的机器和Docker容器的通信。而docker自带的bridge模式,虽然在字面上是桥接,但是实际上更类似于nat模式,或者说就是nat模式,所以我们才需要使用pipework来实现桥接。
