一、 测试脚本编写
脚本可参考git项目: https://github.com/aland-1415/dubbo-interface-test.git
1、 pom依赖
(注意添加的jmeter版本要与运行时使用的版本一致,这里使用的是3.1版本)
    <properties>
        <project.build.sourceEncoding>UTF-8project.build.sourceEncoding>
        <maven.compiler.source>1.7maven.compiler.source>
        <maven.compiler.target>1.7maven.compiler.target>
        <spring.version>4.3.5.RELEASEspring.version>
    properties>

    <dependencies>
        <dependency>
            <groupId>org.apache.jmetergroupId>
            <artifactId>ApacheJMeter_coreartifactId>
            <version>3.1version>
            <exclusions>
                <exclusion>
                    <groupId>org.codehaus.groovygroupId>
                    <artifactId>groovy-allartifactId>
                exclusion>
                <exclusion>
                    <groupId>commons-math3groupId>
                    <artifactId>commons-math3artifactId>
                exclusion>
                <exclusion>
                    <groupId>commons-pool2groupId>
                    <artifactId>commons-pool2artifactId>
                exclusion>
            exclusions>
        dependency>
        <dependency>
            <groupId>org.apache.jmetergroupId>
            <artifactId>ApacheJMeter_javaartifactId>
            <version>3.1version>
            <exclusions>
                <exclusion>
                    <groupId>commons-math3groupId>
                    <artifactId>commons-math3artifactId>
                exclusion>
                <exclusion>
                    <groupId>commons-pool2groupId>
                    <artifactId>commons-pool2artifactId>
                exclusion>
            exclusions>
        dependency>
        <dependency>
            <groupId>com.alibabagroupId>
            <artifactId>dubboartifactId>
            <version>2.5.3version>
            <exclusions>
                <exclusion>
                    <artifactId>springartifactId>
                    <groupId>org.springframeworkgroupId>
                exclusion>
            exclusions>
        dependency>

        <dependency>
            <groupId>com.101tecgroupId>
            <artifactId>zkclientartifactId>
            <version>0.3version>
        dependency>

        <dependency>
            <groupId>org.springframeworkgroupId>
            <artifactId>spring-beansartifactId>
            <version>${spring.version}version>
        dependency>
        <dependency>
            <groupId>org.springframeworkgroupId>
            <artifactId>spring-coreartifactId>
            <version>${spring.version}version>
        dependency>
        <dependency>
            <groupId>org.springframeworkgroupId>
            <artifactId>spring-contextartifactId>
            <version>${spring.version}version>
        dependency>
        <dependency>
            <groupId>org.springframeworkgroupId>
            <artifactId>spring-context-supportartifactId>
            <version>${spring.version}version>
        dependency>


        <dependency>
            <groupId>com.dmallgroupId>
            <artifactId>rcs-apiartifactId>
            <version>1.0-SNAPSHOTversion>
        dependency>
    dependencies>

    <build>
            <plugins>

                <plugin>
                    <groupId>org.apache.maven.pluginsgroupId>
                    <artifactId>maven-dependency-pluginartifactId>
                    <executions>
                        <execution>
                            <id>copy-dependenciesid>
                            <phase>packagephase>
                            <goals>
                                <goal>copy-dependenciesgoal>
                            goals>
                            <configuration>
                                <outputDirectory>target/liboutputDirectory>
                                <overWriteReleases>falseoverWriteReleases>
                                <overWriteSnapshots>falseoverWriteSnapshots>
                                <overWriteIfNewer>trueoverWriteIfNewer>
                            configuration>
                        execution>
                    executions>
                plugin>

                <plugin>
                    <groupId>org.codehaus.mojogroupId>
                    <artifactId>build-helper-maven-pluginartifactId>
                    <version>1.8version>
                    <executions>
                        <execution>
                            <id>add-resourceid>
                            <phase>generate-resourcesphase>
                            <goals>
                                <goal>add-resourcegoal>
                            goals>
                            <configuration>
                                <resources>
                                    <resource>
                                        <directory>src/main/resourcesdirectory>
                                        <includes>
                                            <include>*include>
                                        includes>
                                    resource>
                                resources>
                            configuration>
                        execution>
                    executions>
                plugin>
            plugins>

        <resources>
            <resource>
                <directory>src/main/resourcesdirectory>
                <includes>
                    <include>**/*include>
                includes>
                <filtering>truefiltering>
            resource>

        resources>

    build>
2、 dubbo服务配置(dubbo-config.xml)
xml version="1.0" encoding="UTF-8"?>
<beans xmlns="http://www.springframework.org/schema/beans"
       xmlns:xsi="http://www.w3.org/2001/XMLSchema-instance"
       xmlns:dubbo="http://code.alibabatech.com/schema/dubbo"
       xsi:schemaLocation="http://www.springframework.org/schema/beans
        http://www.springframework.org/schema/beans/spring-beans.xsd
        http://code.alibabatech.com/schema/dubbo
        http://code.alibabatech.com/schema/dubbo/dubbo.xsd
        ">

    <dubbo:application name="dmall-performance-test " owner="dmalltest"  />


    <dubbo:registry address="zookeeper://devzk1.dmall.com:2181?backup=devzk2.dmall.com:2181,devzk3.dmall.com:2181"/>


    <dubbo:reference id="recServer" interface="com.dmall.rcs.api.RcsServer" timeout="10000" check="false"/>

beans>
3、 接口测试代码
 1 public class RcsServerTest implements JavaSamplerClient {//也可继承 AbstractJavaSamplerClient
 2
 3     ApplicationContext context = new ClassPathXmlApplicationContext("dubbo-config.xml");
 4     RcsServer recServer=(RcsServer) context.getBean("recServer");
 5     long start = 0, end = 0;
 6
 7     //运行runTest方法前会调用此方法
 8     @Override
 9     public void setupTest(JavaSamplerContext argv0) {
10         start = System.currentTimeMillis();
11     }
12
13     //Jmeter界面手工输入的参数,可以在此方法中获取
14     @Override
15     public Arguments getDefaultParameters() {
16           Arguments args = new Arguments();
17           args.addArgument("primaryKey", "165987729026");
18           args.addArgument("useType", "post_order");
19           args.addArgument("businessDate", "2019-10-14 00:00:05");
20           args.addArgument("userId", "96322526");
21           args.addArgument("clientIp", "183.228.99.149");
22           return args;
23     }
24
25     //接口测试代码
26     @Override
27     public SampleResult runTest(JavaSamplerContext arg0) {
28         String sys = arg0.getParameter("sys", "test");//arg0是运行jmeter时传的参数
29         String primaryKey = arg0.getParameter("primaryKey");
30         String useType = arg0.getParameter("useType");
31         String businessDateStr = arg0.getParameter("businessDate");
32         String userId = arg0.getParameter("userId");
33         String clientIp = arg0.getParameter("clientIp");
34         String exParameterStr = arg0.getParameter("exParameter");
35         RcsRequest rcsRequest = new RcsRequest(sys, primaryKey, useType, businessDate, userId, clientIp, exParameter);
36
37         SampleResult sr = new SampleResult();
38         sr.setSamplerData("系统RecServer测试");
39         //jmeter开始计响应时间标记
40         sr.sampleStart();
41
42         //调用被测试接口
43         RcsResponse response = recServer.discern(rcsRequest);
44
45         try {
46             sr.setSuccessful(true);
47             //jmeter最后显示的响应结果
48             sr.setResponseData("风险系数:" + response.getRiskScore());
49             sr.sampleEnd();
50         } catch (Exception e) {
51             sr.setSuccessful(false);
52             e.printStackTrace();
53         }
54
55         //结束计响应时间标记
56         sr.sampleEnd();
57         return sr;
58     }
59
60     //运行runTest方法后会调用此方法
61     @Override
62     public void teardownTest(JavaSamplerContext context) {
63         end = System.currentTimeMillis();
64         System.out.println("cost time: " + (end - start));
65     }
66
67     //用于开发时直接运行调试用
68     public static void main(String[] args){
69         RcsServerTest test = new RcsServerTest();
70         Arguments params = test.getDefaultParameters();
71         JavaSamplerContext arg0 = new JavaSamplerContext(params);
72         test.setupTest(arg0);
73         test.runTest(arg0);
74     }
75 }
注意:最终输出jar包时,要确保取样周期内,没有不相干的输出操作。否则,会影响【响应时间】统计数据的准确性
4、打包
(注意是打jar包,这个需要在pom文件里配置
项目结构:
dubbo.xsd 文件下载地址: https://github.com/alibaba/dubbo
方法一:mvn clean -Ptest install
将 “项目路径/target” 下生成的jar包拷贝到 “jmeter安装目录/lib/ext”
将 “项目路径/target/lib” 下所有的依赖jar包拷贝到 “jmeter安装目录/lib”
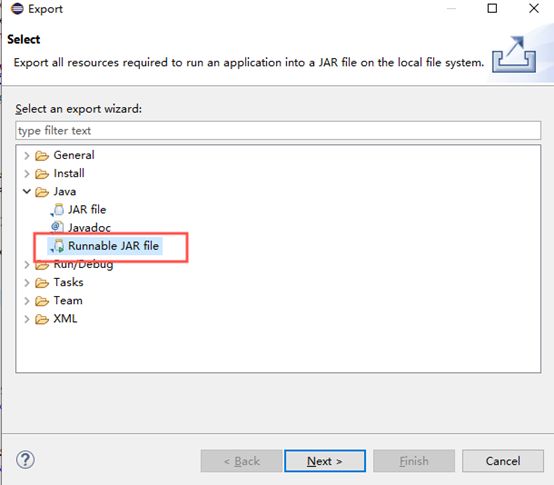
方法二:用Eclipse的export导出可执行的jar包文件
将生成的jar包及同名文件夹一起拷贝到 “jmeter安装目录/lib/ext”
二、 在jmeter上运行脚本
1、 编写jmeter脚本
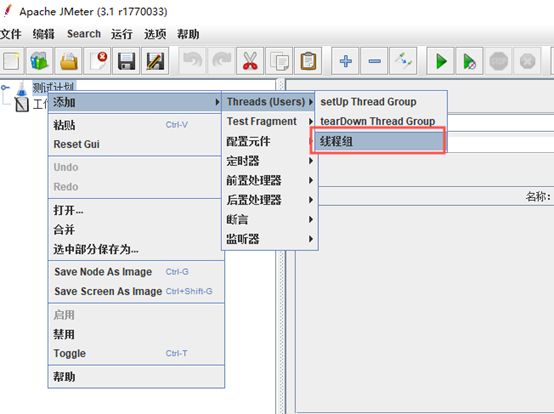
(1) 添加线程组
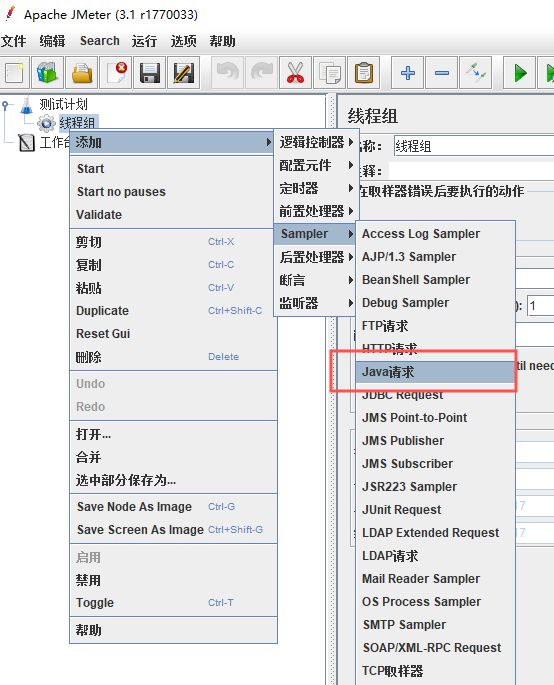
(2) 添加java请求
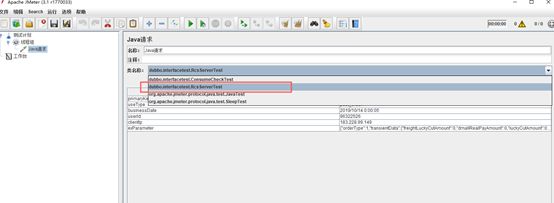
(3) 选择测试接口
(4) 保存
2、 非GUI运行脚本命令
sudo sh jmeter安装目录/bin/jmeter.sh -n -t test.jmx -l result.jtl
test.jmx是jmeter脚本
result.jtl 是最后存放测试结果的文件
注:linux上测试时可使用dstat 命令,可实时监控服务器CPU、磁盘、网络等基本情况
三、 压测报告生成
./jmeter安装目录/bin/jmeter.sh -g result.jtl -e -o resultReport
最后生成的报告是html存放于resultReport文件中,打开index.html即可
也可以在运行测试命令时同时加报告生成命令:
sudo sh jmeter安装目录/bin/jmeter.sh -n -t test.jmx -l result.jtl -e -o resultReport
附:
#coding=utf-8

import os

def mergeJTL(filedir):
    filenames=os.listdir(filedir)
    f=open('result.jtl','w',encoding='utf-8')
    #文件计数器
    num=0
    for filename in filenames:
        if filename=="result.jtl" or filename[-3:]!="jtl":
            pass
        else:
            print("将要开始合并的文件是:"+filename)
            filepath = filedir+'/'+filename
            for line in open(filepath,encoding='utf-8'):
                lineList=line.split(",")
                #去除自第二个并入的文件开始的首行文字内容
                if num!=0 and "timeStamp" in line:
                    pass
                #去除数据不为16列或17列的
                elif len(lineList)!=16 and len(lineList)!=17:
                    pass
                #去除每行第一列不为13位时间戳的数据
                elif num!=0 and len(lineList[0])!=13:
                    pass
                else:
                    f.writelines(line)
            num=num+1
    f.close()
    print(str(num)+"个文件合并成功!")
四、 常见问题处理
1、 注意所有的路径不要包含中文;
2、 许多打开jmeter就报错可能是因为引用的jar包与jmeter已有的jar冲突了且版本不一致,可删除其中重复的jar包或者把两边jar包的版本号修改为相同的
3、 导出的jar包放到jmeter的lib/ext目录下,创建测试计划->创建线程组->创建java请求,找不到编写的方法;
问题原因:编写java脚本时,jdk的版本使用的是1.8,而本机jmeter使用的是1.7
解决办法:2边jdk版本修改一致
4、 从jmeter读取中文显示问号的问题
解决办法:脚本中对要输出的对象进行强制转换


