
本文主要介绍Fastlane的扩展功能,基于UI Testing使用
snapshot与frameit进行自动截屏、加壳。如果你还对Fastlane不了解,请先阅读我上一篇文章《iOS开发fastlane从入门到入土(一):自动打包》
UI Testing
snapshot是基于UI Testing来实现的。UI Testing是苹果在Xcode7上推出的一个自动化测试模块。
1. 集成 UI Testing
新建一个UI Testing 的 target(如果项目中已经存在,这一步可以略过)
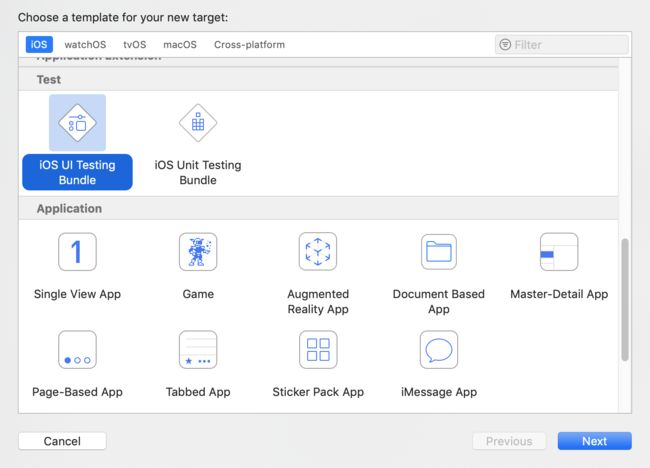
点击左上角的Scheme,选择New Scheme,选择新建的UITests

选择新建的Scheme,选择Edit Scheme,选择Build,勾选Shared和Run

2. UI 行为录制
首先,不要太担心自己不会写测试用例,UI Testing有个牛逼的功能就是可以录制你的操作,你完全可以通过在录制好的操作的恰当点去生成截图。当然,如果你的app里需要更复杂的操作的话还是需要学习一下相关语法的。
一个新建的UITesting文件的基本结构如下:
#import

@interface XXXUITests : XCTestCase

@end

@implementation XXXUITests

- (void)setUp {
    // Put setup code here. This method is called before the invocation of each test method in the class.

    // In UI tests it is usually best to stop immediately when a failure occurs.
    self.continueAfterFailure = NO;

    // UI tests must launch the application that they test. Doing this in setup will make sure it happens for each test method.
    [[[XCUIApplication alloc] init] launch];

    // In UI tests it’s important to set the initial state - such as interface orientation - required for your tests before they run. The setUp method is a good place to do this.
}

- (void)tearDown {
    // Put teardown code here. This method is called after the invocation of each test method in the class.
}

- (void)testExample {
    // Use recording to get started writing UI tests.
    // Use XCTAssert and related functions to verify your tests produce the correct results.
}

@end
选择项目的Scheme,注意不要选择UITests的Scheme,否则以下操作会报错Please select a scheme where “xxx” is the executable

*注意:光标一定要放在方法体内,不然红色的圆点会变灰不可点击
记录一个简单的
录制完成后你可能会发现有报错,例如以下这样
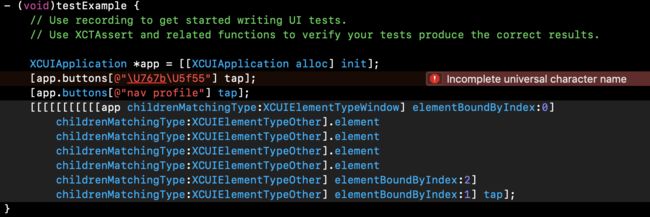
这是Xcode的一个bug,只需要全局替换
\U替换为
\u即可。
你会发现上面获取UI元素都是通过级联查找到的,写出来肯定会不美观,如果你想更具可读性,可以通过给控件设置
accessibilityIdentifier属性来访问。
使用command + U运行UITests类中 每一个以test开头的方法,或者直接点击方法前面的播放按钮运行自动化测试

如果你运行自动测试出现Pods库头文件找不到的错,如下:

请前往以下的配置里将UITests在Debug和Release下改成Pod-xx.debug和Pod-xx.release(默认都为None)

测试成功后方法前会出现✅
关于UITesting更详细的使用,可以阅读onevcat的这篇博客
Snapshot
1. 配置 snapshot
进入项目目录,输入以下命令,会在fastlane目录下生成两个文件:Snapfile和SnapshotHelper.swift
$ fastlane snapshot init
[✔]
✅  Successfully created SnapshotHelper.swift './fastlane/SnapshotHelper.swift'
✅  Successfully created new Snapfile at './fastlane/Snapfile'
Snapfile文件:
# Uncomment the lines below you want to change by removing the # in the beginning
# 需要截图的设备型号
 devices([
   #"iPhone 6",
   #"iPhone 6 Plus",
   #"iPhone 5",
   #"iPhone 4s"
   #"iPhone 8",
   "iPhone 8 Plus",
   #"iPhone SE",
   "iPhone X"
 ])

 languages([
   "zh-Hans"
#   "en-US",
#   "de-DE",
#   "it-IT",
#   ["pt", "pt_BR"] # Portuguese with Brazilian locale
 ])

# The name of the scheme which contains the UI Tests
# scheme("SchemeName")

# Where should the resulting screenshots be stored?
# 截图输出目录
# output_directory("./screenshots")

# remove the '#' to clear all previously generated screenshots before creating new ones
# 生成前清除所有截图
 clear_previous_screenshots(true)

# Arguments to pass to the app on launch. See https://docs.fastlane.tools/actions/snapshot/#launch-arguments
# launch_arguments(["-favColor red"])

# For more information about all available options run
# fastlane action snapshot
2. 导入SnapshotHelper
将SnapshotHelper.swift文件拖入到xxxUITests文件夹下,选择加入哪个target的时候, 选择加入到xxxUITests的target下
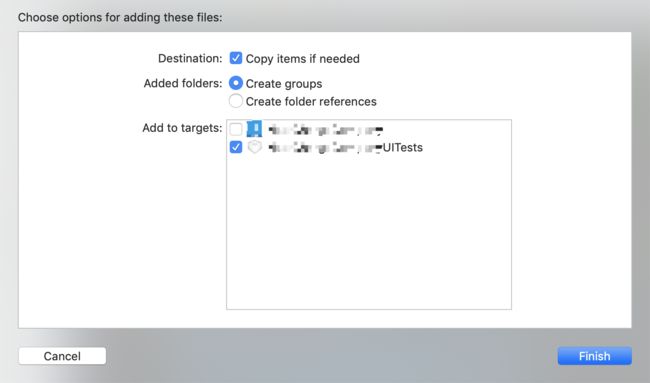
选择加入的
target, 点击 [确定] 以后,如果是OC项目会询问你是否创建桥接文件(只有第一次拖入swift文件的时候才会提示, 你如果删除了swift文件之后,再次向工程中拖入就不会提示让你创建桥接文件了),文件名类似
TargetName-Bridging-Header.h。

其实如果你是OC项目,不存在Swift文件里调用OC类,完全可以不创建这个文件,这个文件主要是用来import OC头文件给Swift类调用的
3. 使用Snapshot自动截图
在xxxUITests.m文件里#import "xxxUITests-Swift.h"引入头文件,头文件的名字是 “TargetName-Swift.h”(这个头文件是系统默认生成的,用来在OC里调用Swift类,不用我们手动创建,没有智能提示,保证导入正确就可以了。)
// 引入这个类就引入了所有的Swift类
#import "xxxUITests-Swift.h"
在- (void)setUp方法中初始化Snapshot对象
- (void)setUp {
    // In UI tests it is usually best to stop immediately when a failure occurs.
    self.continueAfterFailure = NO;

    // UI tests must launch the application that they test. Doing this in setup will make sure it happens for each test method.
    XCUIApplication *app = [[XCUIApplication alloc] init];
    [Snapshot setupSnapshot:app];
    [app launch];
}
在测试用例方法适当位置放入截图代码:
- (void)testExample {
    XCUIApplication *app = [[XCUIApplication alloc] init];
    [app.buttons[@"\u767b\u5f55"] tap];
    // 截图
    [Snapshot snapshot:@"01Login" timeWaitingForIdle:10];
    [app.buttons[@"nav profile"] tap];
}
运行fastlane snapshot即可自动截图
更多关于Screenshots的用法请参照官方文档Screenshots Doc
Frameit
1. 安装
使用frameit需要安装依赖库ImageMagick,官方推荐安装方式:
brew install libpng jpeg imagemagick
如果你已经安装了imagemagick但是看到以下错误信息:
mogrify: no decode delegate for this image format `PNG'
你可能需要重新安装并从源代码构建。运行以下命令:
brew uninstall imagemagick; brew install libpng jpeg; brew install imagemagick --build-from-source
通过命令fastlane frameit setup或者fastlane frameit download_frames更新最近的设备外壳。
2. 使用
- 简单使用
# 默认为黑色外壳 支持颜色有white、silver、rose_gold、gold
frame_screenshots(white: true) #外壳为白色
- 进阶使用
如果你需要弄些背景和文字描述,那么你需要通过配置Framefile.json文件去定制化需求。
首先需要你在screenshots文件目录下创建Framefile.json,cd到screenshots目录输入touch Framefile.json
然后进入你的截图多语言zh-Hans目录下,新建title.strings和keyword.strings文件,这两个文件是放标题和关键字的。
注意:这两个.strings文件一定要是UTF-8或者UTF-16 BE with BOM编码,或者直接由Xcode生成,第一行必须是空行。
将背景图放在screenshots目录下,新建一个fonts文件夹,里面放你需要用到的字体文件,这里是官方的一个sample。
完成后你的目录结构应该是这样的:

Framefile.json文件:
{
  "default": {
    "keyword": {
      "fonts": [
        {
          "font": "./fonts/PingFang.ttc",
          "supported": ["en-US"]
        },
        {
          "font": "./fonts/PingFang.ttc",
          "supported": ["zh-Hans"]
        }
      ]
    },
    "title": {
      "fonts": [
        {
          "font": "./fonts/PingFang.ttc",
          "supported": ["en-US"]
        },
        {
          "font": "./fonts/PingFang.ttc",
          "supported": ["zh-Hans"]
        }
      ],
      "color": "#545454" // 标题颜色
    },
    // 自定义背景图片
    "background": "./background.jpg",
    // 图的内边距
    "padding": 60,
    // 是否完全显示手机框 false 为底部会被隐藏部分视图
    "show_complete_frame": false,
    // 关键字是否在标题上面 false表示关键字与标题在同一行
    "stack_title" : true,
    // 标题在屏幕下方还是上方 false 为上方
    "title_below_image": false,
    // 外壳颜色 优先级更高 (Valid values are BLACK,WHITE,GOLDandROSE_GOLD`)
    "frame": "GOLD"
  },


  "data": [
    {
      "filter": "1",  // 这是图片名
      "keyword": {
        "color": "#d21559"  // 关键字颜色
      }
    },
    {
      "filter": "2",
      "keyword": {
        "color": "#feb909"
      }
    },
    {
      "filter": "3",
      "keyword": {
        "color": "#aa4dbc"
      }
    },
    {
      "filter": "4",
      "keyword": {
        "color": "#31bb48"
      }
    }
  ]
}
title.strings文件:
"1" = "第一张图标题";

"2" = "第二张图标题";

"3" = "第三张图标题";

"4" = "第四张图标题";
keyword.strings文件:
"1" = "自动";

"2" = "打包";

"3" = "截图";

"4" = "证书";
在Fastfile文件里写个任务:
desc "给截图套壳"
  lane :framePic do
    frameit(
      # 白色
      white: true,
      # 使用iPhone 5s替代iPhone SE框架
      use_legacy_iphone5s: true,
      # 使用iPhone 6s替代iPhone 7框架
      use_legacy_iphone6s: true,
      # 使用iPhone X 替代iPhone XS框架
      use_legacy_iphonex: true,
      # 截图所在路径
      path: "./fastlane/screenshots"
    )
  end
运行fastlane framePic

当当当当大功告成~
更多关于Frameit的用法请参照官方文档Frameit Doc