前提环境,安装和配置好java1.8+环境,maven,IDEA
1.下载Tomcat源代码:https://tomcat.apache.org/download-80.cgi#8.5.35

2.创建pom.xml
需要通过Maven组织文件,因此需要在apache-tomcat-8.5.35-src根目录下创建目录中新建catalina-home目录和pom.xml文件,如下,
xml version="1.0" encoding="UTF-8"?>
<project xmlns="http://maven.apache.org/POM/4.0.0"
         xmlns:xsi="http://www.w3.org/2001/XMLSchema-instance"
         xsi:schemaLocation="http://maven.apache.org/POM/4.0.0 http://maven.apache.org/xsd/maven-4.0.0.xsd">

    <modelVersion>4.0.0modelVersion>
    <groupId>org.apache.tomcatgroupId>
    <artifactId>Tomcat8.5artifactId>
    <name>Tomcat8.5name>
    <version>8.5version>

    <build>
        <finalName>Tomcat8.5finalName>
        <sourceDirectory>javasourceDirectory>
        <testSourceDirectory>testtestSourceDirectory>
        <resources>
            <resource>
                <directory>javadirectory>
            resource>
        resources>
        <testResources>
           <testResource>
                <directory>testdirectory>
           testResource>
        testResources>
        <plugins>
            <plugin>
                <groupId>org.apache.maven.pluginsgroupId>
                <artifactId>maven-compiler-pluginartifactId>
                <version>2.3version>
                <configuration>
                    <encoding>UTF-8encoding>
                    <source>1.8source>
                    <target>1.8target>
                configuration>
            plugin>
        plugins>
    build>

    <dependencies>
        <dependency>
            <groupId>junitgroupId>
            <artifactId>junitartifactId>
            <version>4.12version>
            <scope>testscope>
        dependency>
        <dependency>
            <groupId>org.easymockgroupId>
            <artifactId>easymockartifactId>
            <version>3.4version>
        dependency>
        <dependency>
            <groupId>antgroupId>
            <artifactId>antartifactId>
            <version>1.7.0version>
        dependency>
        <dependency>
            <groupId>wsdl4jgroupId>
            <artifactId>wsdl4jartifactId>
            <version>1.6.2version>
        dependency>
        <dependency>
            <groupId>javax.xmlgroupId>
            <artifactId>jaxrpcartifactId>
            <version>1.1version>
        dependency>
        <dependency>
            <groupId>org.eclipse.jdt.core.compilergroupId>
            <artifactId>ecjartifactId>
            <version>4.5.1version>
        dependency>

    dependencies>
project>

apache-tomcat-8.0.53-src目录中的conf和webapps文件夹复制到catalina-home目录中
三、配置IDEA运行项目
Main class设置为org.apache.catalina.startup.Bootstrap
添加VM options
-Dcatalina.home=catalina-home
-Dcatalina.base=catalina-home
-Djava.endorsed.dirs=catalina-home/endorsed
-Djava.io.tmpdir=catalina-home/temp
-Djava.util.logging.manager=org.apache.juli.ClassLoaderLogManager
-Djava.util.logging.config.file=catalina-home/conf/logging.properties

说明:如果编译build的时候出现Test测试代码报错,注释该代码即可。本文中的Tomcat源码util.TestCookieFilter类会报错,将其注释即可
运行项目,访问http://localhost:8080,得到结果:
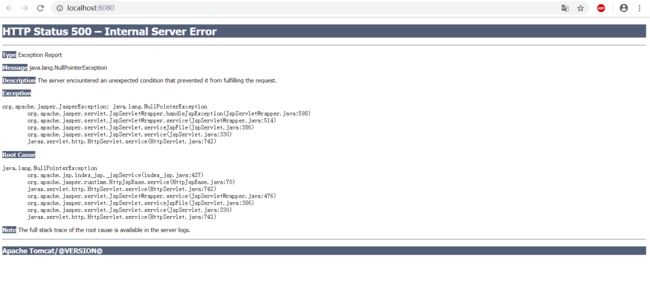
原因是我们直接启动org.apache.catalina.startup.Bootstrap的时候没有加载org.apache.jasper.servlet.JasperInitializer,从而无法编译JSP。解决办法是在tomcat的源码org.apache.catalina.startup.ContextConfig中的configureStart函数中手动将JSP解析器初始化:
protected synchronized void configureStart() {
        // Called from StandardContext.start()

        if (log.isDebugEnabled()) {
            log.debug(sm.getString("contextConfig.start"));
        }

        if (log.isDebugEnabled()) {
            log.debug(sm.getString("contextConfig.xmlSettings",
                    context.getName(),
                    Boolean.valueOf(context.getXmlValidation()),
                    Boolean.valueOf(context.getXmlNamespaceAware())));
        }

        webConfig();

        context.addServletContainerInitializer(new JasperInitializer(), null);

        if (!context.getIgnoreAnnotations()) {
            applicationAnnotationsConfig();
        }
        if (ok) {
            validateSecurityRoles();
        }

        // Configure an authenticator if we need one
        if (ok) {
            authenticatorConfig();
        }

        // Dump the contents of this pipeline if requested
        if (log.isDebugEnabled()) {
            log.debug("Pipeline Configuration:");
            Pipeline pipeline = context.getPipeline();
            Valve valves[] = null;
            if (pipeline != null) {
                valves = pipeline.getValves();
            }
            if (valves != null) {
                for (int i = 0; i < valves.length; i++) {
                    log.debug("  " + valves[i].getClass().getName());
                }
            }
            log.debug("======================");
        }

        // Make our application available if no problems were encountered
        if (ok) {
            context.setConfigured(true);
        } else {
            log.error(sm.getString("contextConfig.unavailable"));
            context.setConfigured(false);
        }

    }
修改完后,项目再启动,我们再在浏览器访问http://localhost:8080/ ,就可以看到我们所熟悉的经典欢迎页面了
