这一章要来练习使用JWT来保护API Enpoint
流程大致为:
- 安装套件
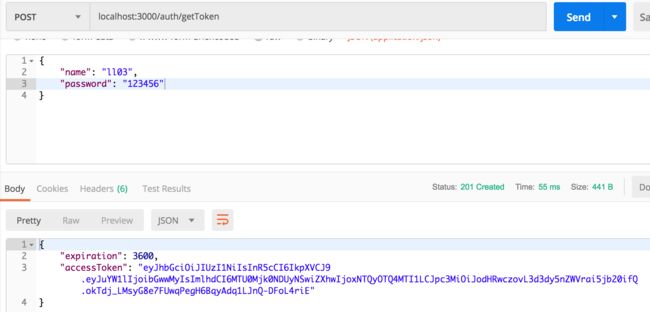
- 取得token
- 新增jwtStrategy
- 设定defaultStrategy
- 测试
安装套件
yarn add @nestjs/jwt passport-jwt @types/passport-jwt
其中@nestjs/jwt是个工具套件,结合nestjs Module设定概念和jsonwebtoken套件,可以少一点coding(但不是太多)
如何产生token
我们需要建立auth controller,
import { Controller, Post, Body } from '@nestjs/common';
import { AuthService } from './auth.service';

@Controller('auth')
export class AuthController {
    constructor(private readonly authService: AuthService){}
    // 传入name及password取得jwt token
    @Post('getToken')
    getTokenByUserId(
            @Body('name') name: string,
            @Body('password') password: string,
    ){
      return this.authService.createToken(name, password);
    }
}
改写auth service
import { Injectable, UnauthorizedException } from '@nestjs/common';
import { UserService } from 'feature/user/user.service';
import { JwtService} from '@nestjs/jwt';

@Injectable()
export class AuthService {
  constructor(
      // 注入UsersService,所以需要import UsersModule
      // 底下的provider才能被注入
            private readonly usersService: UserService,
            private readonly jwtService: JwtService,
  ) {}

    async createToken(name: string, password: string) {

        // 验证使用者,用最简单举例
        if (name !== password) {
            throw new UnauthorizedException();
        }

        const user = { name };
        const expiration = 60 * 60;
        // 将使用者资讯加密
        const accessToken = this.jwtService.sign(user, {
            // 关于建立token时相关参数
            // 过期时间
            expiresIn: expiration,
            // issuer:'http://iron-nest.org',
            // algorithm:'RS256', // default是HMAC SHA256,也可以指定別的
        });

        return {
            expiration,
            accessToken,
        };

    }

  async validateUser(payload) {
    // jwt decoded后会得到上面的user object
    return await this.usersService.findOneByName(payload.name);
  }
}
新增findOneByName在user service
async findOneByName(name) {
    return await this.em.createQueryBuilder(User, 'u')
        .leftJoinAndSelect('u.roles', 'r')
        .where('u.name = :name', {name})
        .getOne();
}
如何验证token
验证token需要用到passport-jwt套件,里面已经帮我们写好如何验证,我们只要知道怎么用就可以了
jwtStrategy,大致跟http-bearer一样,不同的是super()要传入
- token
- 相关资讯,key、issuer等
import { ExtractJwt, Strategy } from 'passport-jwt';

import { AuthService } from './auth.service';
import { Injectable, UnauthorizedException, Logger } from '@nestjs/common';
import { PassportStrategy } from '@nestjs/passport';

@Injectable()
export class JwtStrategy extends PassportStrategy(Strategy) {
    constructor(private readonly authService: AuthService) {
        super({
            // 这里没有intellisense可以用,下面这一段是说
            // 要从header取得bearer token
            jwtFromRequest: ExtractJwt.fromAuthHeaderAsBearerToken(),
            // 这里的key就是要跟create token时的key一样
            secretOrKey: 'geekjc-demo',
            issuer: 'https://www.geekjc.com',
        });
    }

    // Passport会自动verify jwt,如果key不正确,或是相关信息
    // 不正确,如issuer
    async validate(payload){
        const user = await this.authService.validateUser(payload);
        if (!user) throw new UnauthorizedException();
        return user;
    }

}
接着到auth module更新imports、controllers、providers
import { Module } from '@nestjs/common';
import { JwtModule } from '@nestjs/jwt';
import { UserModule } from 'feature/user/user.module';
import { AuthService } from './auth.service';
import { HttpStrategy } from './http.strategy';
import { AuthController } from './auth.controller';
import { JwtStrategy } from './jwt.strategy';

@Module({
    imports: [
        // 建立jsonwebtoken时的相关信息
        JwtModule.register({
            secretOrPrivateKey: 'geekjc-demo',
            // signOption可以在JwtModule设定
            // 或是在createToken时候设定
            signOptions: {
                // expiresIn: 3600,
                issuer: 'https://www.geekj.com',
            },
        }),
        UserModule],
    providers: [AuthService, HttpStrategy, JwtStrategy],
    controllers: [AuthController],
})
export class AuthModule {}
设定defaultStrategy
上一章用@AuthGuard()要传入Strategy名称,通过PassportModule.register可以设定defaultStrategy,
在该module下就不用每次都要指定Strategy,除非是例外
@Module({
  imports: [
        // PassportModule.register({defaultStrategy: 'bearer'})
        // 指定strategy, 不用再AuthGuard里特别指定
        PassportModule.register({defaultStrategy: 'jwt'}),
        TypeOrmModule.forFeature([User, Platform, Role]),
    ],
  providers: [UserService, PlatformService, RoleService],
    controllers: [UserController],
    exports: [UserService],
})
export class UserModule {}
修改Users Controller把AuthGuard参数拿掉
@UseGuards(AuthGuard())
@Controller('users')
export class UsersController {
...
}
测试
错误token
取得Token
指定Authorization token
推荐一下我的公众号: 【 geekjc 】,微信号: 【 c8706288 】一起学习交流编程知识,分享经验,各种有趣的事。


