引言
前面博主写了一篇文章去介绍opentsdb的http接口的使用方法,但是某一些接口的使用还是比较复杂,这篇文章会通过example来详细讲述opentsdb的一些特性。
本文的举的例子有这些:
- 基本的写入和查询
- 数据的注释和说明
- 子查询
- 查询中的filters使用
- 查询数据的rate(增长率)
- 直方图中百分位数(percentiles)的查询
- Downsampling(下采样)
- query/exp 的使用(查询中使用表达式)
- trees详解
一、基本的写入和查询
这个功能是最基本,也是最常用的。
写数据:写入数据post接口为 /api/put?details,details表示会将写入的详细结果返回回来:
#请求体
[
    {
        "metric": "sys.cpu.nice",
        "timestamp": 1346846402,
        "value": 18,
        "tags": {
           "host": "web01",
           "dc": "lga"
        }
    }
]
#写入成功返回的内容
{
    "success": 1,
    "failed": 0,
    "errors": []
}
查数据:写入成功之后,当然可以去查询。查询post接口为 /api/query:
#请求体
{
    "start": 1346846402,
    "end": 1346846403,
    #返回数据对应的tsUID
    "showTSUIDs":"true",
    "queries": [
        {
            "aggregator": "avg",
            "metric": "sys.cpu.nice",
            "tags": {
                 "host": "web01",
                 "dc": "lga"
             }
        }
    ]
}
#返回数据
[
    {
        "metric": "sys.cpu.nice",
        "tags": {
            "host": "web01",
            "dc": "lga"
        },
        "aggregateTags": [],
        "tsuids": [
            "000001000001000001000002000002"  #数据对应的tsUID
        ],
        "dps": {
            "1346846402": 18
        }
    }
]
这里需要对tsUID进行说明一下,opentsdb是由metric+tags来区分数据的,当metric和tags相同时,其tsUID就会相同,代表着同一系列的数据。那么,假如我们想对这一系列数据进行标注和说明呢?见下一个example。
二、数据的注释和说明
数据的注释和说明是用到了 /api/annotation 接口,post方式是写入annotation数据,get是查询annotation数据。
#post接口的请求body
{
  "startTime":"1346846402",
  #和返回前面一个example返回tsUID相同,这样时间序列数据就和annotation数据关联了起来,可作为时间序列数据的注释和说明
  "tsuid":"000001000001000001000002000002",
  "description": "Testing Annotations",
  "notes": "These would be details about the event, the description is just a summary",
  "custom": {
      "owner": "jdoe",
      "dept": "ops"
  }
}
当写入成功时间,再次运行查询example1中的 /api/query 请求,即可得到:
[
    {
        "metric": "sys.cpu.nice",
        "tags": {
            "host": "web01",
            "dc": "lga"
        },
        "aggregateTags": [],
        "tsuids": [
            "000001000001000001000002000002"
        ],
        "annotations": [
            {
                "tsuid": "000001000001000001000002000002",
                "description": "Testing Annotations",
                "notes": "These would be details about the event, the description is just a summary",
                "custom": {
                    "owner": "jdoe",
                    "dept": "ops"
                },
                "startTime": 1346846402,
                "endTime": 0
            }
        ],
        "dps": {
            "1346846402": 18
        }
    }
]
可见,此次在返回数据的清楚上,把相关联的注释(annotation数据)也一起返回回来,注释一般可以用来解释和说明数据。
三、子查询
在 /api/query 接口中,body中有一个参数是queries,它表示可以含有多个子查询,所谓子查询就是只要数据满足其中的一个子查询,数据就会返回回来。注意每次查询至少需要一个子查询。
在example1中写入一条数据的前提下,这里再向tsdb中写入一条数据:
[
    {
        "metric": "sys.cpu.nice",
        "timestamp": 1346846402,
        "value": 9,
        "tags": {
           "host": "web02",
           "dc": "lga"
        }
    }
]
# 通过 /api/query 接口我们可以查得该条数据的tsUID为000001000001000003000002000002
下面查询body就表示有两个子查询:
//请求体
{
    "start": 1346846401,
    "end": 1346846403,
    "showTSUIDs":"true",
    "queries": [
        {   //第一个子查询,查询的是example1中写入的数据
            "aggregator": "avg",
            "metric": "sys.cpu.nice",
            "tags": {
                 "host": "web01",
                 "dc": "lga"
             }
        },
        {   //第二个子查询,查询的是刚刚写入的数据
            "aggregator": "avg",
            "tsuids":["000001000001000003000002000002"]
        }
    ]
}

//返回结果
[
    {    //第一个子查询对应的数据
        "metric": "sys.cpu.nice",
        "tags": {
            "host": "web01",
            "dc": "lga"
        },
        "aggregateTags": [],
        "tsuids": [
            "000001000001000001000002000002"
        ],
        "annotations": [
            {
                "tsuid": "000001000001000001000002000002",
                "description": "Testing Annotations",
                "notes": "These would be details about the event, the description is just a summary",
                "custom": {
                    "owner": "jdoe",
                    "dept": "ops"
                },
                "startTime": 1346846402,
                "endTime": 0
            }
        ],
        "dps": {
            "1346846402": 18
        }
    },
    {     //第二个子查询对应的数据
        "metric": "sys.cpu.nice",
        "tags": {
            "host": "web02",
            "dc": "lga"
        },
        "aggregateTags": [],
        "tsuids": [
            "000001000001000003000002000002"
        ],
        "dps": {
            "1346846402": 9
        }
    }
]
在平常使用过程中我们可以使用单个或者多个子查询,还有需要注意对于每个子查询而言,主要有两种类型:
- metric查询方式:子查询指定metric和tags(optional)进行查询,本次查询中的第一个子查询就是采用这种方式。
- TSUID查询方式:需要给出一个或者多个tsuid,对应本次查询中的第二个子查询。
四、查询中的filters使用
从opentsdb2.2版本便支持filter,它其实是用于过滤tags的,可以作为tags查询的替代者,并且比tags更加灵活。请求body如下:
{
    "start": 1346846401,
    "end": 1346846403,
    "showTSUIDs":"true",
    "queries": [
        {
            "aggregator": "avg",
            "metric": "sys.cpu.nice",
            "filters": [
                {
                   "type":"literal_or",
                   "tagk":"host",
                   "filter":"web01|web02",
                   "groupBy":true
                }
            ]
        }
    ]
}
| 参数 | 意义 |
|---|---|
| type | 过滤器的类型,可以访问 /api/config/filters 接口查看支持的所有类型,这里 literal_or 表示value是一个枚举 |
| tagk | 指定过滤的key |
| filter | 和相type对应,这里表示对web01和web02都进行匹配 |
| groupBy | 是否对匹配到的数据进行分组 |
这里使用literal_or,filter里面的多个tagV以竖线相隔,这个过滤器的意思是对tagK为host进行匹配,并且value为web01和web02都数据都会匹配成功。
返回结果:
[
    {
        "metric": "sys.cpu.nice",
        "tags": {
            "host": "web01",
            "dc": "lga"
        },
        "aggregateTags": [],
        "tsuids": [
            "000001000001000001000002000002"
        ],
        "annotations": [
            {
                "tsuid": "000001000001000001000002000002",
                "description": "Testing Annotations",
                "notes": "These would be details about the event, the description is just a summary",
                "custom": {
                    "owner": "jdoe",
                    "dept": "ops"
                },
                "startTime": 1346846402,
                "endTime": 0
            }
        ],
        "dps": {
            "1346846402": 18
        }
    },
    {
        "metric": "sys.cpu.nice",
        "tags": {
            "host": "web02",
            "dc": "lga"
        },
        "aggregateTags": [],
        "tsuids": [
            "000001000001000003000002000002"
        ],
        "dps": {
            "1346846402": 9
        }
    }
]
可见本次filter查询用一个子查询的结果和example3中用了两个子查询的效果是一样的。
五、查询数据的rate(增长率)
在某些情况下,我们查询的可能并不是数据的本身,而是它的增长率。恰巧opentsdb有帮我们提供这个功能:子查询中的rate参数。
首先我们先写入3条数据,时间分别间隔两秒,数据分别为0、64000和1000。
[
    {
        "metric": "sys.cpu.nice",
        "timestamp": 1346846410,
        "value": 0,
        "tags": {
           "host": "web03",
           "dc": "lga"
        }
    },
    {
        "metric": "sys.cpu.nice",
        "timestamp": 1346846412,
        "value": 64000,
        "tags": {
           "host": "web03",
           "dc": "lga"
        }
    },
    {
        "metric": "sys.cpu.nice",
        "timestamp": 1346846414,
        "value": 1000,
        "tags": {
           "host": "web03",
           "dc": "lga"
        }
    }
]
查询增长率的请求body如下:
{
    "start": 1346846409,
    "end": 1346846414,
    "showTSUIDs":"true",
    "queries": [
        {
            "aggregator": "avg",
            "metric": "sys.cpu.nice",
            "rate":true,  # 查询增长率
            "rateOptions":{
                "counter":false
            },
            "tags": {
                 "host": "web03",
                 "dc": "lga"
             }
        }
    ]
}

# 响应结果
[
    {
        "metric": "sys.cpu.nice",
        "tags": {
            "host": "web03",
            "dc": "lga"
        },
        "aggregateTags": [],
        "tsuids": [
            "000001000001000007000002000002"
        ],
        "dps": {
            "1346846412": 32000,
            "1346846414": -31500
        }
    }
]
3200=(6400-0)/2,-31500=(1000-6400)/2,可见增长率是以秒为单位。
六、直方图中百分位数(percentiles)的查询
opentsdb在2.4版本对直方图(histogram进行了支持),本个example中首先写入直方图数据,然后根据数据对百分位数(percentile)进行查询。
写入数据的body如下:buckets是直方图数据,意思为0到1.75区间的数值为12,1.75到3.5区间的数值为16.
{
    "metric": "sys.cpu.nice",
    "timestamp": 1356998400,
    "overflow": 1,
    "underflow": 0,
    "buckets": {
        "0,1.75": 12,
        "1.75,3.5": 16
    },
    "tags": {
        "host": "web01",
        "dc": "lga"
    }
}
关于百分位的定义可以自行查资料进行详细认识,本次查询中percentiles列表里面就是需要查询的百分位,需要注意的是列表里面的数字的取值区间是[0,100],并且可以不按照顺序排列。查询body如下:
{
    "start": 1356998400,
    "end": 1356998401,
    "showTSUIDs":"true",
    "queries": [
        {
            "aggregator": "sum",
            "percentiles":  [100,99,43,42,1],
            "metric": "sys.cpu.nice",
            "tags": {
                 "host": "web01",
                 "dc": "lga"
             }
        }
    ]
}
请求的结果如下:
[
    {
        "metric": "sys.cpu.nice_pct_1.0",
        "tags": {
            "host": "web01",
            "dc": "lga"
        },
        "aggregateTags": [],
        "tsuids": [
            "000001000001000001000002000002"
        ],
        "dps": {
            "1356998400": 0.875
        }
    },
    {
        "metric": "sys.cpu.nice_pct_42.0",
         ···
        "dps": {
            "1356998400": 0.875
        }
    },
    {
        "metric": "sys.cpu.nice_pct_43.0",
         ···
        "dps": {
            "1356998400": 2.625
        }
    },
    {
        "metric": "sys.cpu.nice_pct_99.0",
        ···
        "dps": {
            "1356998400": 2.625
        }
    },
    {
        "metric": "sys.cpu.nice_pct_100.0",
        ···
        "dps": {
            "1356998400": 2.625
        }
    }
]
返回内容如上:其中相同部分已经省略,返回的metric由 原始metric_pct_number 组成,下面讲述它们的计算方式:
第一个区间的数值为12,第二个区间的数值为16,12/(12+16)=0.428。
- 我们看到1和42的百分位的取值都是0.875,0.875=1.75/2,取的第一个区间的中点坐标,可以得到在0.428之前的百分位的数值都为0.875。
- 43、99、100百分位对应的数值都为2.625,2.625=1.75+(3.5-1.75)/2,2.625的物理意义就是第二个区间中点的横坐标,因此43到100之间的百分位取值都为2.525。
七、Downsampling(下采样)
下采样即让浓密数据变稀疏的过程,首先写入10条数据,数值分别为0到9,相邻数据的时间间隔为1s:
[
    {
        "timestamp": 1562068000,
        "value": 0,
        "metric": "sys.cpu.nice",
        "tags": {
           "host": "web01",
           "dc": "lga"
        }
    },
    ······
    {
        "metric": "sys.cpu.nice",
        "timestamp": 1562068009,
        "value": 9,
        "tags": {
           "host": "web01",
           "dc": "lga"
        }
    }
]
下采样查询如下,downsample字段是一个字符串,该字段由 interval-aggregate-fill policy 组成,分别表示时间间隔、聚合方法、缺少的值补齐的方法。本次查询下采样间隔为2s,聚合方法是取聚合区间的最小值,并且缺少的值用0补齐:
{
    "start": 1562068000,
    "end": 1562068009,
    "queries": [
        {
            "aggregator": "avg",
            "metric": "sys.cpu.nice",
            "downsample":"2s-min-zero",
            "tags": {
                 "host": "web01",
                 "dc": "lga"
             }
        }
    ]
}
返回结果如下,可见原本每秒一个数据在结果中是每两秒返回一个数据,并且在每个间隔中,都是取的最小值。
[
    {
        "metric": "sys.cpu.nice",
        "tags": {
            "host": "web01",
            "dc": "lga"
        },
        "aggregateTags": [],
        "dps": {
            "1562068000": 0,
            "1562068002": 2,
            "1562068004": 4,
            "1562068006": 6,
            "1562068008": 8
        }
    }
]
八、query/exp 的使用(查询中使用表达式)
这个接口允许使用表达式进行查询,可以对查询的多个结果进行操作。
在example7写入数据的基础上,再写入如下数据,相比example7的数据而言仅仅是metric发生了变化:
[
    {
        "timestamp": 1562068000,
        "value": 0,
        "metric": "sys.cpu.nice1",
        "tags": {
           "host": "web01",
           "dc": "lga"
        }
    },
    ······
    {
        "metric": "sys.cpu.nice1",
        "timestamp": 1562068009,
        "value": 9,
        "tags": {
           "host": "web01",
           "dc": "lga"
        }
    }
]
紧接着使用表达式进行查询,查询body如下,
- time 定义了查询的时间区间和聚合方式
- filters 定义了一个过滤器f1
- metric 中指定了对sys.cpu.nice和sys.cpu.nice1两个metric进行查询,并且两个metric都使用同一个filter:f1
- expressions 中是语法表达式,e就等于结果a加上结果b,e2就等于e乘以2
- outputs 指定需要输出的表达式计算结果
{
   "time": {"start": "1562068000","end":"1562068009","aggregator":"sum"},
   "filters": [{ "tags": [{"type": "wildcard","tagk": "host","filter": "web*","groupBy": true}],
           "id": "f1"}],
   "metrics": [{"id": "a","metric": "sys.cpu.nice","filter": "f1","fillPolicy":{"policy":"nan"}},
               {"id": "b", "metric": "sys.cpu.nice1","filter": "f1","fillPolicy":{"policy":"nan"}}],
   "expressions": [{"id": "e","expr": "a + b"},
                   {"id":"e2","expr": "e * 2"}],
    "outputs":[{"id":"e", "alias":"e"},{"id":"e2", "alias":"e2"}]
 }
查询结果如下,query是里面是关于查询请求body的信息,为了节约空间这里省略。可以得知表达式计算是对同一个时间点进行计算的。
- outputs中的e,时间点1562068001000对应的值为2,sys.cpu.nice和sys.cpu.nice1在1562068001000对应的数值都为1,便可和表达式中 e=a+b 对应起来。
- e2中时间点1562068001000对应的值为4,便可和表达式中 e2=ex2 对应起来。
{
    "outputs": [
        {
            "id": "e",
            "alias": "e",
            "dps": [ [1562068000000,0],[1562068001000,2],[1562068002000,4],[ 1562068003000, 6],[1562068004000,8],[1562068005000,10],[1562068006000,12],[1562068007000,14],[1562068008000,16],[1562068009000,18] ],
            "dpsMeta": { "firstTimestamp": 1562068000000,"lastTimestamp": 1562068009000, "setCount": 10,"series": 1
            },
            "meta": [{"index":0,"metrics":["timestamp"]},{"index":1,"metrics":["sys.cpu.nice","sys.cpu.nice1"],"commonTags":{"host":"web01","dc":"lga"},"aggregatedTags":[]}]
        },
        {
            "id": "e2",
            "alias": "e2",
            "dps": [[1562068000000,0],[1562068001000,4],[1562068002000,8],[1562068003000,12],[1562068004000,16],[1562068005000,20],[1562068006000,24],[1562068007000,28],[1562068008000,32],[1562068009000,36]],
            "dpsMeta": { "firstTimestamp": 1562068000000,"lastTimestamp": 1562068009000,"setCount": 10,"series": 1},
            "meta": [{"index":0,"metrics":["timestamp"]},{"index":1,"metrics":["sys.cpu.nice","sys.cpu.nice1"],"commonTags":{"host":"web01","dc":"lga"},"aggregatedTags":[]}]
        }
    ],
    "query": {
       ······
    }
}
九、trees详解
opentsdb2.0版本引入了tree的概念,tree可以将一些时间序列组织起来使其具有层次结构,和文件系统一样,tree中的叶子类比于文件系统的文件,tree中的branch类比于文件系统的文件夹,还可以继续在里面创建新的文件夹。其相关定义可参考官网。
在tsdb中创建一棵树步骤如下:
- 首先创建一棵树,此时数的enable属性为false。
- 为这棵树定义一些规则,数的形状和数据是由这些规则确定。
- 可以通过/api/tree/test接口对这棵树进行测试,看其接口是否满足要求。
- 将树的enable设为true。
- 运行./tsdb uid treesync扫描TSMeta中的全部对象,将符合条件的时间序列加入到树中。注意:若需要每创建一个TSMeta对象时,都试图将对象加入到enable tree中,那么在启动tsdb时需要加上 tsd.core.tree.enable_processing=true 配置。
现在按照上面的流程进行操作实际一遍,首先对时间序列、数的规则进行说明。
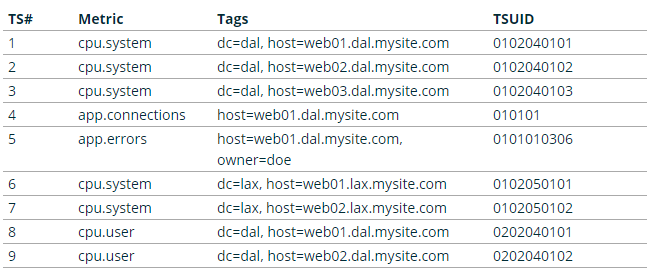
现在我们有如下的时间序列数据:
这些时间序列需要满足如下规则(rules),level表示数的第几层,order表示同一level的不同rule有不同的优先级。level 0 有两个rule,当满足order为0的rule时,会跳过order为1的rule;反之order为1的rule就会生效。
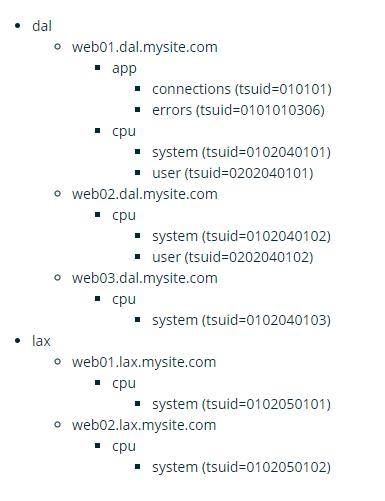
基于上面的时间序列和tree的规则,可以得到下面的tree:
下面按照步步骤对这棵树进行生成:
- 写入图一中的输入,请求body此处略。
- 创建一棵树,post接口为 /api/tree,请求body如下:
{"name":"Network","description":"","notes":"","rules":null,"created":1368964815,"strictMatch":false,"storeFailures":false,"enabled":false}
创建成功后 可以用 get方式请求 /api/tree 接口查询tree的相关信息,并可以获得新创建tree的id,treeId下面也会用到。
- 利用接口 /api/tree/rule接口,依次创建图2中的4个rule,请求body分别如下:
{"type":"tagk","field":"dc","description":"a tagk named data center","level":0,"order":0,"treeId":1}

{"type":"tagk","field":"host","description":"a tagk named host","regex":".*\\.(.*)\\.mysite\\.com","level":0,"order":1,"treeId":1}

{"type":"tagk","field":"host","description":"a tagk named host","separator":"\\.","level":1,"order":0,"treeId":1}

{"type":"metric","description":"metric","separator":"\\.","level":2,"order":0,"treeId":1}
- 利用/api/tree/test 接口测试我们新创建的tree,get请求有两个参数:
| 参数名 | 意义 |
|---|---|
| treeId | 用于指定测试的tree |
| tsuids | 指定时间序列,试图将这些时间序列放入这颗树中进行测试,多个tsuid以 ","相隔 |
这里的tsuids当然是指图1中时间序列对应的tsuid,可以用 /api/query接口进行查询。
/api/tree/test会返回这些时间序列基于这棵树的层次关系,若这个层次结构不满足需求则需要对rule进行修改,若满则需求则可进行下一步。
- 在tsdb的build文件夹运行 ./tsdb uid treesync 命令,它会扫描全部的 tsdb-uid,将符合条件的序列加入到tree的结构中。
至此这棵树的定义就已经完成,可以用 /api/tree/branch 接口对tree的分支进行查询,查询的参数有两个:
| 参数名 | 意义 |
|---|---|
| treeid | tree的id |
| branch | branch的id |
两个参数只需要一个,当传递treeid时,就会返回root branch的信息。当只传递branch时,就会返回对应branch的信息。当两个参数都传递时,参数treeid就会被忽略。


