1. 概述
The Path class encapsulates compound (multiple contour) geometric paths consisting of straight line segments, quadratic curves, and cubic curves. It can be drawn with canvas.drawPath(path, paint), either filled or stroked (based on the paint's Style), or it can be used for clipping or to draw text on a path.
上面Google官方给出的定义,大概意思如下:
Path封装了由直线和曲线(二次、三次贝塞尔曲线)构成的几何路径,可以通过canvas.drawPath(path, paint)方法将Path绘制出来(可以通过paint设置绘制模式),也可以用来裁剪和在Path上绘制文本。
2. Path中的FillType
在二维的计算机图形学中,通过Nonzero Winding Number Rule(非零环绕数规则)和Odd-even Rule(奇-偶规则)来确定给定点是否落在封闭曲线内。
非零环绕数规则:
与下面说到的奇-偶规则不同,它需要知道曲线的绘制方向。对于给定的曲线C和给定的点P,从P点沿任意方向作一条射线,找到与该射线和C的所有交点,对于每个顺时针交叉点(从P点的角度看,曲线从左到右穿过射线),减1,对于每个逆时针交叉点(从P点的角度看,曲线从右到左穿过射线)加1,如果总数为零,P在C外,否则,P在C内。
奇-偶规则:对于给定的曲线C和给定的点P,从P点沿任意方向作一条射线,找到与该射线和C的所有交点,如果这个数字是奇怪的,P在C内,否则,P在C外。
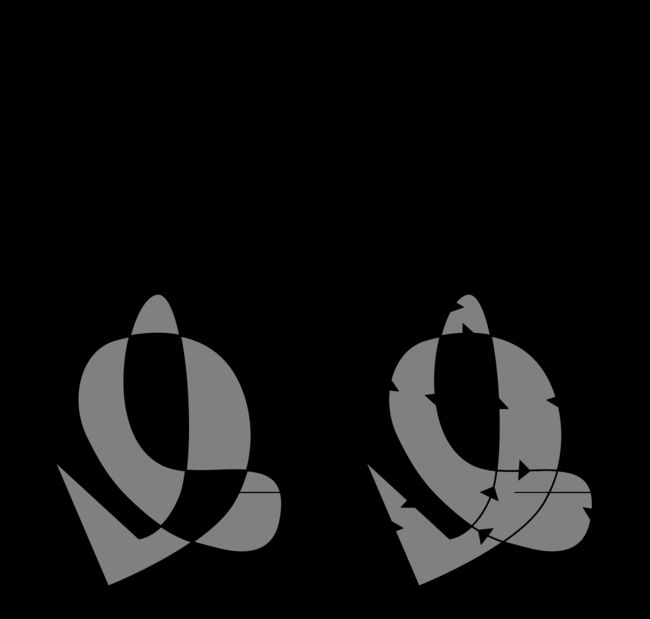
注意:非零绕数规则和奇偶规则也会有出现矛盾的情况,如下图所示,左侧用奇-偶规则计数为2 ,偶数表示在曲线外,所以没有填充。右侧图用非零绕环规则计数为-2,非0表示在曲线内,所以填充。
在绘制Path的时候,先通过上面两种规则计算出平面中Path的内部区域和外部区域,然后对Path的内部区域或者外部区域进行填充来实现Path的填充效果;这样的话就会得到4种填充类型,FillType类就是用来枚举这4种填充类型:
/**
 * Enum for the ways a path may be filled.
 */
public enum FillType {
    // these must match the values in SkPath.h
    /**
     * Specifies that "inside" is computed by a non-zero sum of signed
     * edge crossings.
     */
    WINDING         (0),
    /**
     * Specifies that "inside" is computed by an odd number of edge
     * crossings.
     */
    EVEN_ODD        (1),
    /**
     * Same as {@link #WINDING}, but draws outside of the path, rather than inside.
     */
    INVERSE_WINDING (2),
    /**
     * Same as {@link #EVEN_ODD}, but draws outside of the path, rather than inside.
     */
    INVERSE_EVEN_ODD(3);

    FillType(int ni) {
        nativeInt = ni;
    }

    final int nativeInt;
}
WINDING和INVERSE_WINDING对应于非零环绕数规则的两种填充类型。
INVERSE_EVEN_ODD对应于奇-偶规则的两种填充类型。
下面就通过ApiDemo中的例子直观的看一下FillType中的四种填充类型:
public class PathFillTypes extends AppCompatActivity {

    @Override
    protected void onCreate(Bundle savedInstanceState) {
        super.onCreate(savedInstanceState);
        setContentView(new SampleView(this));
    }

    private static class SampleView extends View {
        private Paint mPaint = new Paint(Paint.ANTI_ALIAS_FLAG);
        private Path mPath;

        public SampleView(Context context) {
            super(context);
            setLayerType(LAYER_TYPE_SOFTWARE, null);
            setFocusable(true);
            setFocusableInTouchMode(true);

            mPaint.setColor(Color.GREEN);
            mPath = new Path();
            mPath.addCircle(40, 40, 45, Path.Direction.CCW);
            mPath.addCircle(80, 80, 45, Path.Direction.CCW);
            mPath.addCircle(120, 120, 45, Path.Direction.CCW);
        }

        private void showPath(Canvas canvas, int x, int y, Path.FillType ft,
                              Paint paint) {
            canvas.save();
            canvas.translate(x, y);
            canvas.clipRect(0, 0, 160, 160);
            canvas.drawColor(Color.WHITE);
            mPath.setFillType(ft);
            canvas.drawPath(mPath, paint);
            canvas.restore();
        }

        @Override protected void onDraw(Canvas canvas) {
            Paint paint = mPaint;

            canvas.drawColor(0xFFCCCCCC);

            canvas.translate(300, 200);

            paint.setAntiAlias(true);

            showPath(canvas, 0, 0, Path.FillType.WINDING, paint);
            showPath(canvas, 160 * 2, 0, Path.FillType.EVEN_ODD, paint);
            showPath(canvas, 0, 160 * 2, Path.FillType.INVERSE_WINDING, paint);
            showPath(canvas, 160 * 2, 160 * 2, Path.FillType.INVERSE_EVEN_ODD, paint);
        }
    }
}
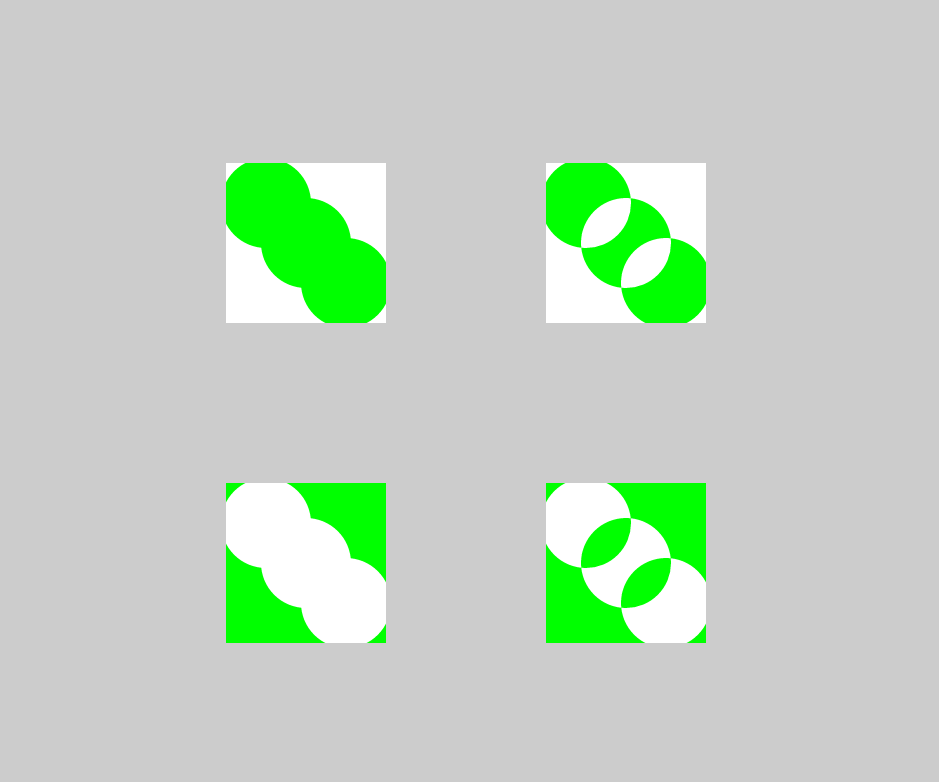
上面的代码中通过setFillType方法设置Path的填充类型,运行截图如下:
上面演示了setFillType方法的使用方式和运行效果,和Path的填充类型相关的方法还有如下三个:
public FillType getFillType();
// 用来获取Path的填充类型

public boolean isInverseFillType() {
    final int ft = native_getFillType(mNativePath);
    return (ft & FillType.INVERSE_WINDING.nativeInt) != 0;
}
// 上面的方法很巧妙的利用了位与运算来判断Path的填充类型是否是INVERSE_***类型,
// 是的话返回true,否则返回false。

public void toggleInverseFillType() {
    int ft = native_getFillType(mNativePath);
    ft ^= FillType.INVERSE_WINDING.nativeInt;
    native_setFillType(mNativePath, ft);
}
// 上面的方法巧妙的利用了位异或运算将Path的填充类型切换到对应的相反的类型。
// 比如Path的类型是INVERSE_WINDING,那么Path调用这个方法后得到的类型是WINDING。
3. 清除Path中的任何直线和曲线
public void reset();
// 从Path中清除任何直线和曲线,但是Path的FillType保持不变。
public void rewind();
// 从Path中清除任何直线和曲线,但保留内部数据结构以便更快地复用,这个方法也会将Path的FillType清除。
public boolean isEmpty()
// 如果Path中不包含直线和曲线,返回true,否则返回false。
下面将上面的例子中的showPath方法稍微修改一下:
private void showPath(Canvas canvas, int x, int y, Path.FillType ft,
                      Paint paint) {
    canvas.save();
    canvas.translate(x, y);
    canvas.clipRect(0, 0, 160, 160);
    canvas.drawColor(Color.WHITE);
    mPath.setFillType(ft);
    mPath.reset(); // 仅仅添加这一句代码
    canvas.drawPath(mPath, paint);
    canvas.restore();
}
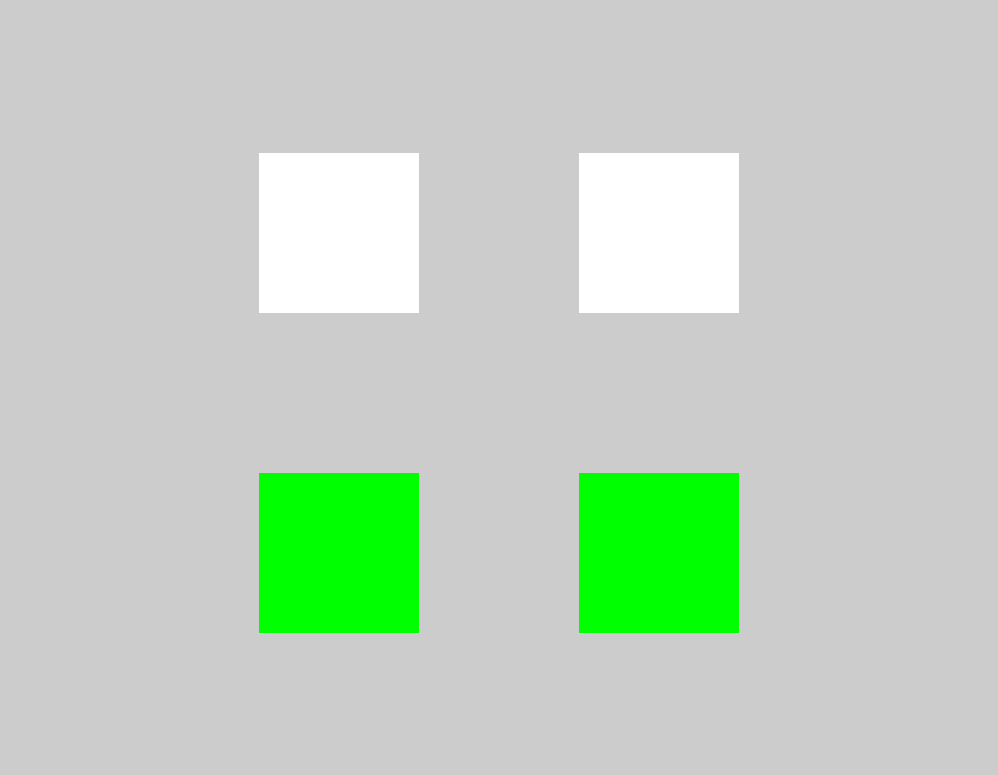
运行截图如下:
由上图可知:
1> 当Path是WINDING或者EVEN_ODD填充类型时,由于reset方法只会清除3个圆圈路径而不会清除填充类型,那么Path的内部区域就不存在了,继而第一行的两个正方形区域什么都不会绘制。
2> 当Path是INVERSE_WINDING或者INVERSE_EVEN_ODD填充类型时,由于reset方法只会清除3个圆圈路径而不会清除填充类型,那么Path的外部区域就是整个正方形区域,继而第二行的正方形区域被绘制成绿色。
现在将上面代码中添加的mPath.reset()修改为mPath.rewind(),运行截图如下:
由于rewind方法会将FillType移除,因此上面四个正方形区域什么都不会绘制。
4. Path中的add***方法
public void addRect(RectF rect, Direction dir);
public void addRect(float left, float top, float right, float bottom, Direction dir);
// 用来向Path中添加矩形

public void addOval(RectF oval, Direction dir);
public void addOval(float left, float top, float right, float bottom, Direction dir);
// 用来向Path中添加椭圆形

public void addCircle(float x, float y, float radius, Direction dir);
// 用来向Path中添加圆形

public void addArc(RectF oval, float startAngle, float sweepAngle);
public void addArc(float left, float top, float right, float bottom, float startAngle, float sweepAngle) ;
// 用来向Path中添加圆弧

public void addRoundRect(RectF rect, float rx, float ry, Direction dir);
public void addRoundRect(float left, float top, float right, float bottom, float rx, float ry, Direction dir);
public void addRoundRect(RectF rect, float[] radii, Direction dir);
public void addRoundRect(float left, float top, float right, float bottom, float[] radii, Direction dir);
// 用来向Path中添加圆角矩形

public void addPath(Path src, float dx, float dy);
public void addPath(Path src);
public void addPath(Path src, Matrix matrix);
// 用来向Path中添加Path
上面列举了Path中所有的add方法及其作用,参数很容易理解就没有做注释;下面通过一个例子演示一下上面的方法如何使用:
public class TestPathAddActivity extends AppCompatActivity {
    @Override
    protected void onCreate(@Nullable Bundle savedInstanceState) {
        super.onCreate(savedInstanceState);
        setContentView(new SampleView(this));
    }

    private static class SampleView extends View {
        private Paint mPaint = new Paint(Paint.ANTI_ALIAS_FLAG);
        private Path mPath;

        public SampleView(Context context) {
            super(context);
            setLayerType(LAYER_TYPE_SOFTWARE, null);
            setFocusable(true);
            setFocusableInTouchMode(true);

            mPaint.setColor(Color.GREEN);
            mPaint.setStyle(Paint.Style.STROKE);
            mPaint.setStrokeWidth(50f);
            mPath = new Path();
            mPath.addRect(0, 0, 200, 200, Path.Direction.CCW);
            mPath.addOval(new RectF(400, 0, 600, 200), Path.Direction.CCW);
            mPath.addCircle(500, 100, 100, Path.Direction.CCW);
            mPath.addArc(new RectF(0, 400, 200, 600), 0f, 180f);
            mPath.addRoundRect(new RectF(400, 400, 600, 600), 5f, 5f, Path.Direction.CCW);
            Path temp = new Path();
            temp.moveTo(0, 800);
            temp.lineTo(200, 1000);
            mPath.addPath(temp);
        }

        private void showPath(Canvas canvas, int x, int y, Paint paint) {
            canvas.save();
            canvas.translate(x, y);
            canvas.clipRect(-50, -50, 650, 1050);
            canvas.drawColor(Color.WHITE);
            canvas.drawPath(mPath, paint);
            canvas.restore();
        }

        @Override
        protected void onDraw(Canvas canvas) {
            canvas.drawColor(0xFFCCCCCC);
            canvas.translate(300, 200);
            showPath(canvas, 0, 0, mPaint);
        }
    }
}
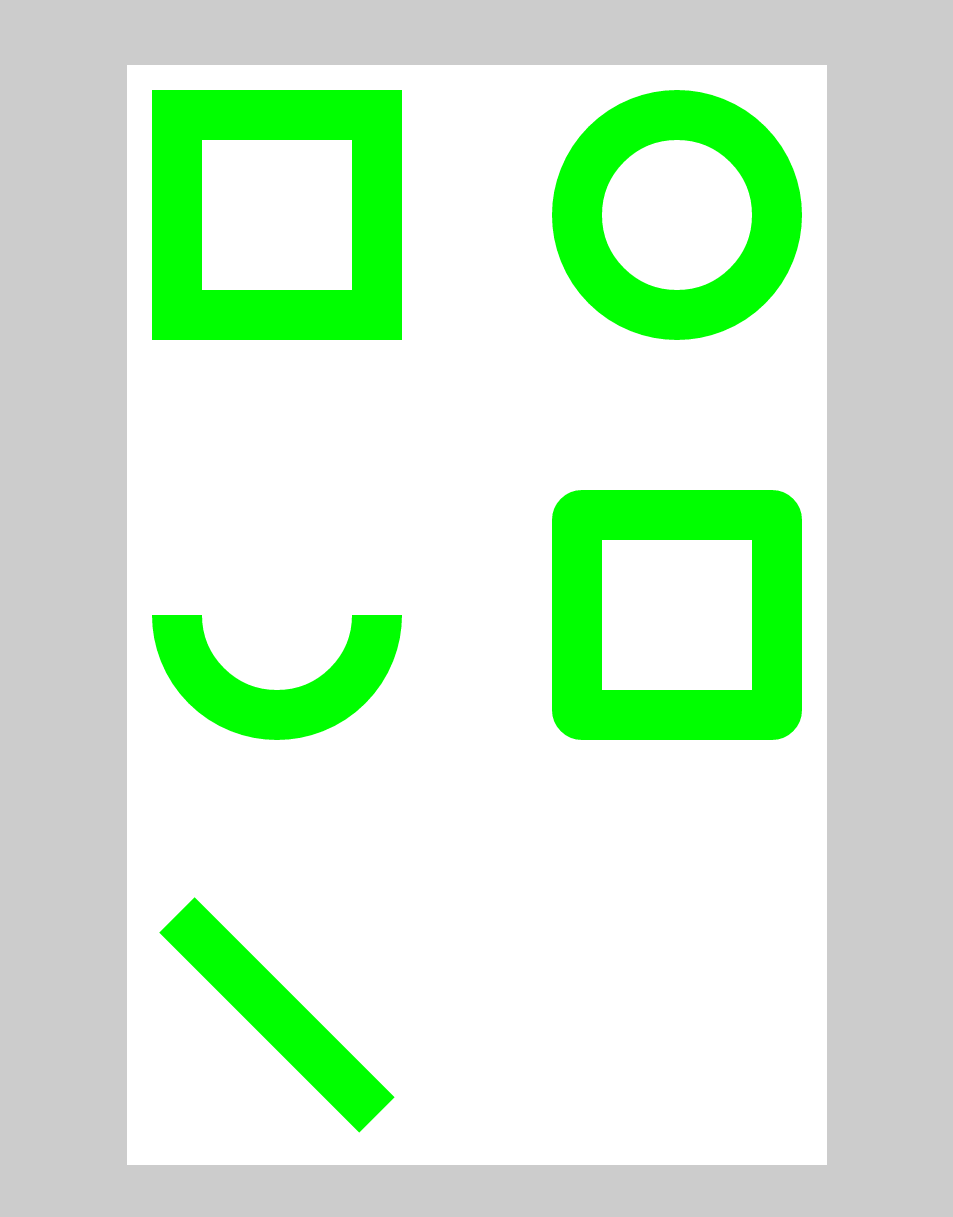
代码很简单,就不在解释了,运行截图如下:
5. Path中的***To方法
// 下面注解中,点(cx, cy)表示执行下面方法之前Path的最后一个点,
// 如果执行下面的方法之前Path是空的并且没有调用过moveTo方法,那么(cx, cy)就是(0,0)。

public void moveTo(float x, float y);
// 设置Path中下一条曲线的起始点为(x, y)。
public void lineTo(float x, float y);
// 向Path中添加一条从点(cx, cy)到点(x, y)的直线段。
public void quadTo(float x1, float y1, float x2, float y2);
// 向Path中添加一条由(cx, cy)、(x1, y1)和(x2, y2)控制的二阶贝塞尔曲线。
public void cubicTo(float x1, float y1, float x2, float y2, float x3, float y3);
// 向Path中添加一条由(cx, cy)、(x1, y1)、(x2, y2)和(x3, y3)控制的三阶贝塞尔曲线。
public void arcTo(RectF oval, float startAngle, float sweepAngle, boolean forceMoveTo);
public void arcTo(RectF oval, float startAngle, float sweepAngle);
public void arcTo(float left, float top, float right, float bottom, float startAngle, float sweepAngle, boolean forceMoveTo);
// 这三个方法都是用来向Path中添加一条圆弧。
// 当圆弧的起点与点(cx, cy)不同时,如果forceMoveTo为false时,就会通过lineTo方法连接(cx, cy)和圆弧的起点;
// 否则,就以该圆弧开始一条新的曲线。
public void close();
// 在Android中Path是由多条直线和曲线构成的,如果Path中当前的曲线的起始点不同,就用一条直线段连接Path中当前的曲线的起始点。

public void rMoveTo(float dx, float dy);
// 设置Path中下一条曲线的起始点为(cx+dx, cy+dy)。
public void rLineTo(float dx, float dy);
// 向Path中添加一条从点(cx, cy)到点(cx+dx, cy+dy)的直线段。
public void rQuadTo(float dx1, float dy1, float dx2, float dy2);
// 向Path中添加一条由(cx, cy)、(cx+dx1, cy+dy1)和(cx+dx2, cy+dy2)控制的二阶贝塞尔曲线。
public void rCubicTo(float x1, float y1, float x2, float y2, float x3, float y3);
// 向Path中添加一条由(cx, cy)、(cx+x1, cy+y1)、(cx+x2, cy+y2)和(cx+x3, cy+y3)控制的三阶贝塞尔曲线。
上面提到了贝塞尔曲线,贝塞尔曲线扫盲详细的讲解了贝塞尔曲线的实现原理,贝塞尔曲线开发的艺术讲解了贝塞尔曲线在Android上的应用,这两篇文章挺不错的,大家可以看看。
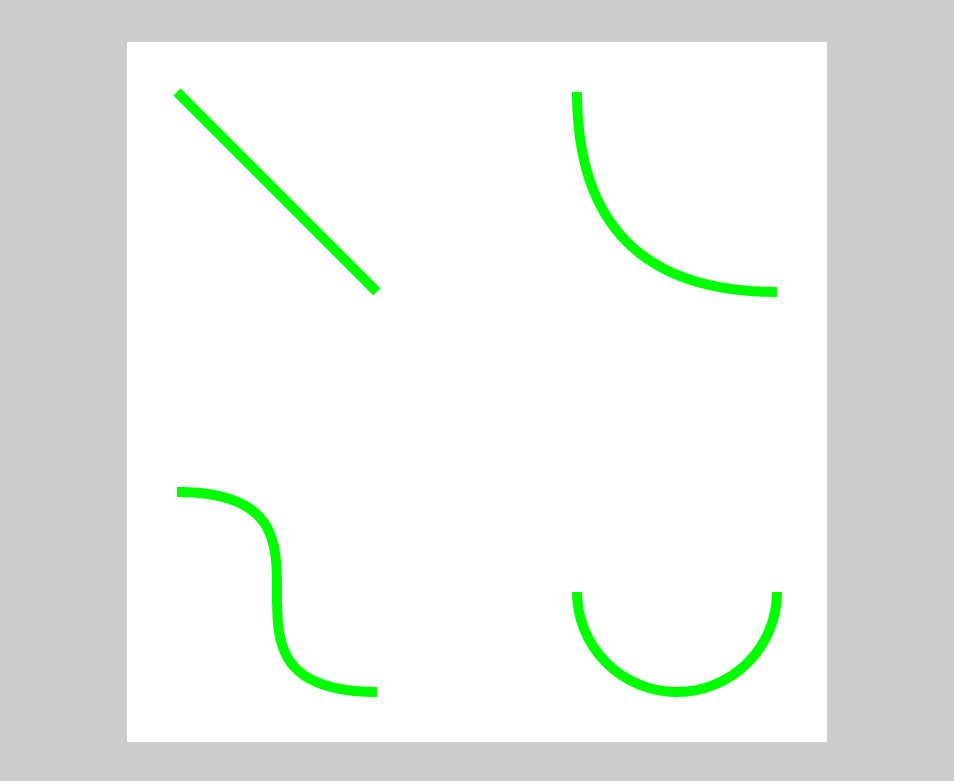
举个例子演示一下上面的方法:
public class TestPathToActivity extends AppCompatActivity {
    @Override
    protected void onCreate(@Nullable Bundle savedInstanceState) {
        super.onCreate(savedInstanceState);
        setContentView(new SampleView(this));
    }

    private static class SampleView extends View {
        private Paint mPaint = new Paint(Paint.ANTI_ALIAS_FLAG);
        private Path mPath;

        public SampleView(Context context) {
            super(context);
            setLayerType(LAYER_TYPE_SOFTWARE, null);
            setFocusable(true);
            setFocusableInTouchMode(true);

            mPaint.setColor(Color.GREEN);
            mPaint.setStyle(Paint.Style.STROKE);
            mPaint.setStrokeWidth(10f);
            mPath = new Path();
            mPath.lineTo(200, 200);
            mPath.moveTo(400, 0);
            mPath.quadTo(400, 200, 600, 200);
            mPath.moveTo(0, 400);
            mPath.cubicTo(200, 400, 0, 600, 200, 600);
            mPath.moveTo(600, 500);
            mPath.arcTo(new RectF(400, 400, 600, 600), 0, 180);
        }

        private void showPath(Canvas canvas, int x, int y, Paint paint) {
            canvas.save();
            canvas.translate(x, y);
            canvas.clipRect(-50, -50, 650, 650);
            canvas.drawColor(Color.WHITE);
            canvas.drawPath(mPath, paint);
            canvas.restore();
        }

        @Override
        protected void onDraw(Canvas canvas) {
            canvas.drawColor(0xFFCCCCCC);
            canvas.translate(300, 200);
            showPath(canvas, 0, 0, mPaint);
        }
    }
}
运行截图如下:
6. Path的偏移
public void offset(float dx, float dy, @Nullable Path dst);
// 将执行该方法的Path对象按照向量(dx, dy)进行偏移,如果dst不为null,就将偏移得到的路径保存到dst中,
// 否则和执行下面方法的效果相同。
public void offset(float dx, float dy);
// 将执行该方法的Path对象按照向量(dx, dy)进行偏移
// 并用将偏移得到的的路径保存到执行该方法的Path对象中。
举个例子:
public class TestPathOffsetActivity extends AppCompatActivity {
    @Override
    protected void onCreate(@Nullable Bundle savedInstanceState) {
        super.onCreate(savedInstanceState);
        setContentView(new SampleView(this));
    }

    private static class SampleView extends View {
        private Paint mPaint = new Paint(Paint.ANTI_ALIAS_FLAG);
        private Path mPath;
        private Path offsetPath;

        public SampleView(Context context) {
            super(context);
            setLayerType(LAYER_TYPE_SOFTWARE, null);
            setFocusable(true);
            setFocusableInTouchMode(true);

            mPaint.setColor(Color.GREEN);
            mPaint.setStyle(Paint.Style.STROKE);
            mPaint.setStrokeWidth(10f);
            mPath = new Path();
            mPath.cubicTo(200, 0, 0, 200, 200, 200);

            offsetPath = new Path();
            mPath.offset(400, 400, offsetPath);
        }

        private void showPath(Canvas canvas, Paint paint) {
            canvas.clipRect(-50, -50, 650, 650);
            canvas.drawColor(Color.WHITE);
            canvas.drawPath(mPath, paint);
            canvas.drawPath(offsetPath, paint);
        }

        @Override
        protected void onDraw(Canvas canvas) {
            canvas.drawColor(0xFFCCCCCC);
            canvas.translate(300, 200);
            showPath(canvas, mPaint);
        }
    }
}
代码很简单,就不在解释了,运行截图如下:
左上角是原始的Path,右下角是移动后的Path。
7. Path的矩阵变化
大家可以参考我的博客Drawable绘制过程源码分析和自定义Drawable实现动画中的2.3节。
8. 设置Path的最后一个点的坐标
public void setLastPoint(float dx, float dy);
// 修改Path中最后一个点的坐标为(dx, dy)。
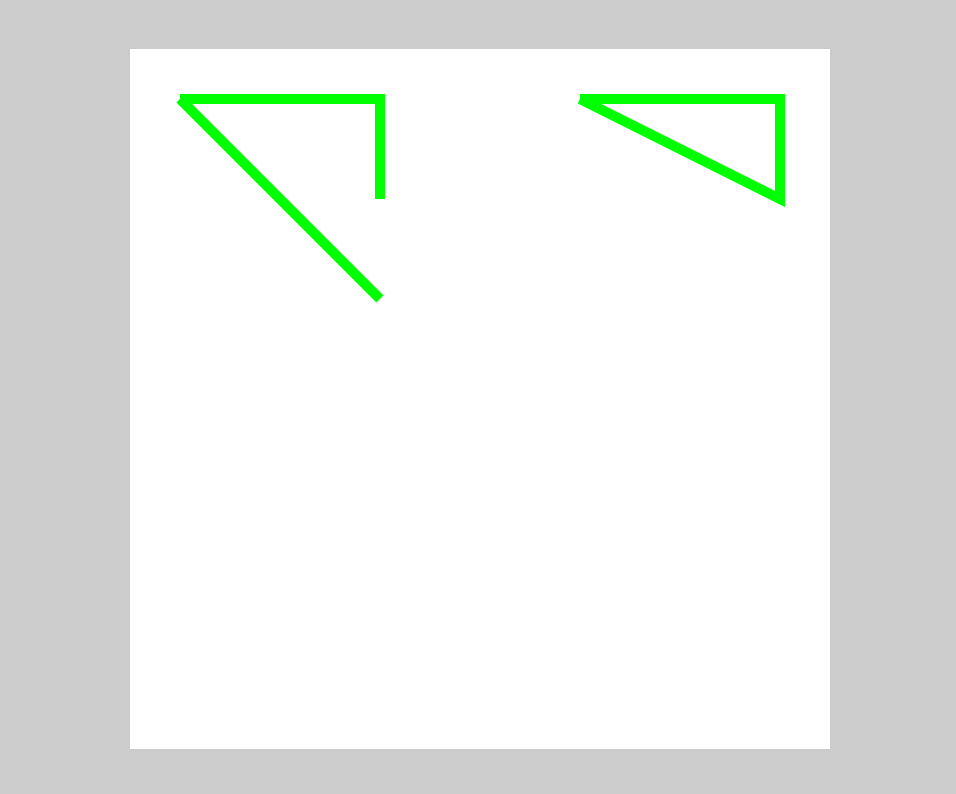
举个例子:
public class TestPathSetLastPointActivity extends AppCompatActivity {
    @Override
    protected void onCreate(@Nullable Bundle savedInstanceState) {
        super.onCreate(savedInstanceState);
        setContentView(new SampleView(this));
    }

    private static class SampleView extends View {
        private Paint mPaint = new Paint(Paint.ANTI_ALIAS_FLAG);
        private Path mPath;

        public SampleView(Context context) {
            super(context);
            setLayerType(LAYER_TYPE_SOFTWARE, null);
            setFocusable(true);
            setFocusableInTouchMode(true);

            mPaint.setColor(Color.GREEN);
            mPaint.setStyle(Paint.Style.STROKE);
            mPaint.setStrokeWidth(10f);
            mPath = new Path();
            mPath.lineTo(200, 200);
            mPath.moveTo(200, 100);
            mPath.lineTo(200, 0);
            mPath.lineTo(0, 0);

            mPath.moveTo(400, 0);
            mPath.lineTo(600, 200);
            mPath.setLastPoint(600, 100);
            mPath.lineTo(600, 0);
            mPath.lineTo(400, 0);
        }

        private void showPath(Canvas canvas, int x, int y, Paint paint) {
            canvas.save();
            canvas.translate(x, y);
            canvas.clipRect(-50, -50, 650, 650);
            canvas.drawColor(Color.WHITE);
            canvas.drawPath(mPath, paint);
            canvas.restore();
        }

        @Override
        protected void onDraw(Canvas canvas) {
            canvas.drawColor(0xFFCCCCCC);
            canvas.translate(300, 200);
            showPath(canvas, 0, 0, mPaint);
        }
    }
}
运行截图如下:
9. Path的Op运算
public boolean op(Path path, Op op);
// 执行改方法的Path对象与第一个参数path进行op运算,得到的结果保存到执行改方法的Path对象中。
public boolean op(Path path1, Path path2, Op op);
// path1和path2进行op运算,得到的结果保存到执行改方法的Path对象中。
下面就来看看Op类的源码:
/**
 * The logical operations that can be performed when combining two paths.
 *
 * @see #op(Path, android.graphics.Path.Op)
 * @see #op(Path, Path, android.graphics.Path.Op)
 */
public enum Op {
    /**
     * Subtract the second path from the first path.
     */
    DIFFERENCE,
    /**
     * Intersect the two paths.
     */
    INTERSECT,
    /**
     * Union (inclusive-or) the two paths.
     */
    UNION,
    /**
     * Exclusive-or the two paths.
     */
    XOR,
    /**
     * Subtract the first path from the second path.
     */
    REVERSE_DIFFERENCE
}
从注释中可以知道Op是一种组合两个路径时执行的逻辑操作,Op一共提供了五种逻辑操作,这五种逻辑操作是模仿集合运算中的交、并、补和异或运算设计的,对应关系如下:
DIFFERENCE:第一条path相对与第二条path的补运算。
REVERSE_DIFFERENCE:第二条path相对与第一条path的补运算。
INTERSECT:两条path的交运算。
UNION:两条path的并运算。
XOR:两条path的异或运算。
举个例子:
public class TestPathOpActivity extends AppCompatActivity {
    @Override
    protected void onCreate(@Nullable Bundle savedInstanceState) {
        super.onCreate(savedInstanceState);
        setContentView(new SampleView(this));
    }

    private static class SampleView extends View {
        private Paint mPaint = new Paint(Paint.ANTI_ALIAS_FLAG);
        private Path resultPath;
        private Path firstPath;
        private Path secondPath;

        public SampleView(Context context) {
            super(context);
            setLayerType(LAYER_TYPE_SOFTWARE, null);
            setFocusable(true);
            setFocusableInTouchMode(true);

            mPaint.setColor(Color.GREEN);
            firstPath = new Path();
            firstPath.addCircle(90, 90, 90, Path.Direction.CCW);
            secondPath = new Path();
            secondPath.addCircle(180, 180, 90, Path.Direction.CCW);
            resultPath = new Path();
        }

        private void showPath(Canvas canvas, int x, int y, Path.Op op, Paint paint) {
            canvas.save();
            canvas.translate(x, y);
            canvas.clipRect(0, 0, 300, 300);
            canvas.drawColor(Color.WHITE);
            resultPath.op(firstPath, secondPath, op);
            canvas.drawPath(resultPath, paint);
            canvas.restore();
        }

        @Override
        protected void onDraw(Canvas canvas) {

            canvas.drawColor(0xFFCCCCCC);
            canvas.translate(200, 200);
            showPath(canvas, 0, 0, Path.Op.DIFFERENCE, mPaint);
            showPath(canvas, 300 + 100, 0, Path.Op.REVERSE_DIFFERENCE, mPaint);
            showPath(canvas, 0, 300 + 100, Path.Op.INTERSECT, mPaint);
            showPath(canvas, 300 + 100, 300 + 100, Path.Op.UNION, mPaint);
            showPath(canvas, 0, 600 + 200, Path.Op.XOR, mPaint);
        }
    }
}
代码很简单,就不在解释了,运行截图如下:
