@Author Jack Wang
转载请注明出处,http://www.jianshu.com/p/8138ccd0d900
Spring Boot 集成MyBatis有两种方式,一种简单的方式就是使用MyBatis官方提供的:mybatis-spring-boot-starter
另外一种方式就是仍然用类似mybatis-spring的配置方式,这种方式需要自己写一些代码,但是可以很方便的控制MyBatis的各项配置。
2018.09.10 , 第一次更新
一:mybatis-spring-boot-starter方式【推荐】
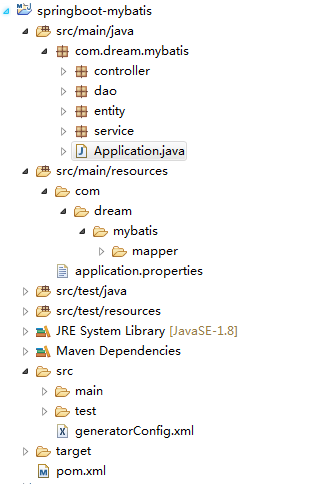
1.1 创建Maven工程,搭建包结构
或者使用springboot initializer自动创建工程, http://start.spring.io/
1.2 构建环境,使用mybatis generatorConfig插件自动生成entity及mapper
generatorConfig.xml :


注意mysql的jar包及数据库连接属性以及表格要与实际情况一一对应。
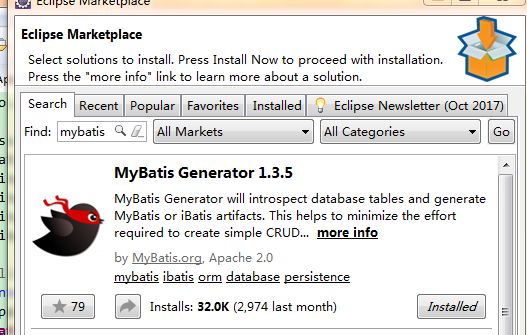
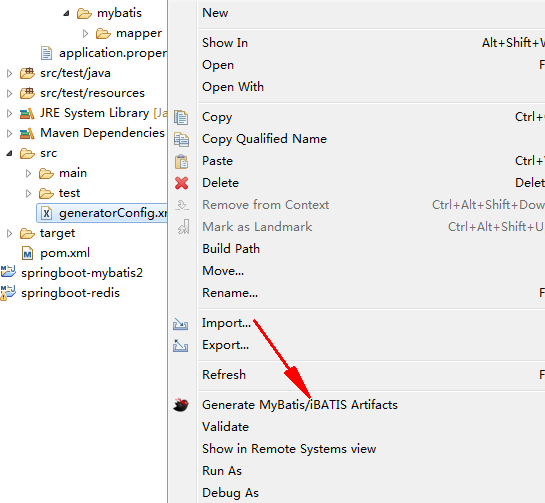
mybatis-generator插件在eclipse market商店搜索插件下载即可。右键generatorConfig.xml运行插件就可以自动生成。
1.3 pom添加Maven依赖,properties中添加配置
pom :

        org.springframework.boot
        spring-boot-starter-parent
        1.5.8.RELEASE


        UTF-8
        UTF-8
        1.8


            org.springframework.boot
            spring-boot-starter-web


            org.mybatis.spring.boot
            mybatis-spring-boot-starter
            1.1.1


            mysql
            mysql-connector-java
            runtime


            org.springframework.boot
            spring-boot-devtools
            true


                org.springframework.boot
                spring-boot-maven-plugin

                    true


================================================================================

application.properties :
    spring.datasource.url=jdbc:mysql://localhost:3306/license_system
    spring.datasource.username=root
    spring.datasource.password=jacky
    spring.datasource.driver-class-name=com.mysql.jdbc.Driver

    mybatis.mapperLocations=classpath*:com/dream/mybatis/mapper/*.xml

***注意:这里mybatis.mapperLocations=classpath*:com/dream/mybatis/mapper/*.xml是配置mapper.xml的路径的。
确保路径正确,并且xml中namespace对应的Mapper接口无误,否则可能会报异常:
org.apache.ibatis.binding.BindingException: Invalid bound statement (not found): com.dream.mybatis.dao.WarehouseMapper.insert
1.4 Springboot启动入口Application
@SpringBootApplication
@MapperScan("com.dream.mybatis.dao")
public class Application {

    public static void main(String[] args) {
        SpringApplication.run(Application.class, args);
    }
}

注意:这里配置的@MapperScan("xx.xx.xx")是配置Mapper接口的位置,确保位置对应正确
到这里springboot集成mybatis就已经结束了,真正需要我们进行配置的只有几点:
1. 添加maven依赖。mybatis-spring-boot-starter及mysql驱动
2. 配置application.properties中mapper.xml的位置。mybatis.mapperLocations=classpath*:com/dream/mybatis/mapper/*.xml
3. Application.java中Mapper接口的位置。@MapperScan("com.dream.mybatis.dao")
事务的支持还和平常使用一样,在Service上添加@Transactional注解即可。

@Service
@Transactional
public class WarehouseServiceImpl implements WarehouseService {

    @Autowired
    private WarehouseMapper warehouseMapper;

    @Override
    public void insert() {
        Warehouse record = new Warehouse();
        record.setId(888L);
        record.setName("测试回滚");
        warehouseMapper.insert(record);
        int i = 1/0;
    }
}
二、mybatis-spring方式
2.1 创建Maven工程,搭建包结构
包结构与方式一一样
2.2 构建环境,使用mybatis generatorConfig插件自动生成entiry及mapper(略)
2.3 pom添加Maven依赖,properties中添加配置
1. pom中添加的依赖与方式一不同,这里是使用mybatis-spring依赖进行集成


    org.springframework.boot
    spring-boot-starter-parent
    1.5.8.RELEASE


    UTF-8
    UTF-8
    1.8


        org.springframework.boot
        spring-boot-starter-web


        org.springframework.boot
        spring-boot-starter-jdbc


        org.mybatis
        mybatis
        3.2.1


        org.mybatis
        mybatis-spring
        1.3.1


        mysql
        mysql-connector-java


        org.springframework.boot
        spring-boot-devtools
        true


            org.springframework.boot
            spring-boot-maven-plugin

                true


-------------------------------------------------------------------------------------------------

2. application.properties只需要添加springboot数据库连接的配置即可

    spring.datasource.url=jdbc:mysql://localhost:3306/license_system
    spring.datasource.username=root
    spring.datasource.password=jacky
    spring.datasource.driver-class-name=com.mysql.jdbc.Driver
2.4 MyBatis配置类
import java.util.Properties;

import javax.sql.DataSource;

import org.apache.ibatis.plugin.Interceptor;
import org.apache.ibatis.session.SqlSessionFactory;
import org.mybatis.spring.SqlSessionFactoryBean;
import org.mybatis.spring.annotation.MapperScan;
import org.springframework.beans.factory.annotation.Autowired;
import org.springframework.boot.SpringBootConfiguration;
import org.springframework.boot.autoconfigure.AutoConfigureAfter;
import org.springframework.context.annotation.Bean;
import org.springframework.core.io.support.PathMatchingResourcePatternResolver;
import org.springframework.jdbc.datasource.DataSourceTransactionManager;
import org.springframework.transaction.PlatformTransactionManager;
import org.springframework.transaction.annotation.TransactionManagementConfigurer;

import com.github.pagehelper.PageHelper;

@SpringBootConfiguration
@MapperScan({"invengo.cn.base.mapper"})
@AutoConfigureAfter(DBConfiguration.class)
public class MyBatisConfig implements TransactionManagementConfigurer {

    // Springboot根据properties自动完成配置的DataSource
    @Autowired
    private DataSource dataSource;


    @Bean
    public SqlSessionFactory sqlSessionFactoryBean(PageHelper pageHelper) throws Exception {

        SqlSessionFactoryBean sqlSessionFactoryBean = new SqlSessionFactoryBean();
        sqlSessionFactoryBean.setDataSource(dataSource);

        PathMatchingResourcePatternResolver resolver = new PathMatchingResourcePatternResolver();

        sqlSessionFactoryBean.setMapperLocations(resolver.getResources("classpath*:mybatis/*.xml"));
        // sqlSessionFactoryBean.setPlugins(new Interceptor[] { pageHelper });
        return sqlSessionFactoryBean.getObject();
    }

    @Bean
    @Override
    public PlatformTransactionManager annotationDrivenTransactionManager() {
        return new DataSourceTransactionManager(dataSource);
    }

    // 分页支持
    /*@Bean
    public PageHelper pageHelper() {
        PageHelper pageHelper = new PageHelper();
        Properties properties = new Properties();
        properties.setProperty("offsetAsPageNum", "true");
        properties.setProperty("rowBoundsWithCount", "true");
        properties.setProperty("reasonable", "true");
        properties.setProperty("dialect", "mysql"); // 配置mysql数据库的方言
        pageHelper.setProperties(properties);
        return pageHelper;
    }*/
}

注意:
1. @MapperScan("com.dream.mybatis.dao")用于扫描Mapper接口,注意路径
2. sqlSessionFactoryBean.setMapperLocations(resolver.getResources("classpath*:mybatis/*.xml"));用于配置mapper.xml的路径
3. 注释的部分为使用该方式时对PageHelper插件的支持,后面章节会使用到PageHelper插件

事务的支持还和平常使用一样,在Service上添加@Transactional注解即可。
2.5 Application启动类
@SpringBootApplication
public class PayApplication {
    private static Logger logger = Logger.getLogger(PayApplication.class);

    public static void main(String[] args) {
        SpringApplication.run(PayApplication.class, args);
        logger.info("SpringBoot Start Success");
    }
}


