spring boot 2.1学习笔记【五】SpringBootTest单元测试及日志
springboot系列学习笔记全部文章请移步值博主专栏**: spring boot 2.X/spring cloud Greenwich。
由于是一系列文章,所以后面的文章可能会使用到前面文章的项目。springboot系列代码全部上传至GitHub:https://github.com/liubenlong/springboot2_demo
本系列环境:Java11;springboot 2.1.1.RELEASE;springcloud Greenwich.RELEASE;MySQL 8.0.5;
文章目录
- 日志
- springboot中提供的日志的配置参数
- @Slf4j
- 单元测试
- 简单实例
- @TestConfiguration
- @TestConfiguration 应用实例
- 使用mock方式对controller进行单元测试(无需运行web服务)
- 使用mock方式对controller进行单元测试(无需运行web服务)
- 使用mock方式对controller进行单元测试(需运行web服务且 ==使用webflux==)
- @MockBean 对bean进行mock测试
- 测试json @JsonTest
- @TestPropertySource 对属性配置进行mock
- 使用spring提供的@PropertySource
- 对springboot提供的类型安全的属性配置进行mock
- 为单元测试单独提供测试配置
- 对AOP进行测试
- 参考资料
单元测试和日志比较简单,放到一起讲一下。本篇文章需要使用到Junit、TestNg、Mockito、Spring Testing,本文不会对其使用进行特别详细的说明,请自行检索
日志
springboot官方文档中指出,如果我们使用Starters,那么默认使用Logback作为日志输出组件。当然还支持Commons Logging, Log4J等组件。
简单日志配置(包含了指定文件目录, 格式,以及level):
logging:
  level:
    root: info
    com.example.controller: info
    com.example.service: warn
  file: d://a.log
  pattern:
    console: "%d - %msg%n"
springboot中提供的日志的配置参数
# ----------------------------------------
# CORE PROPERTIES
# ----------------------------------------
debug=false # Enable debug logs.
trace=false # Enable trace logs.

# LOGGING
logging.config= # Location of the logging configuration file. For instance, `classpath:logback.xml` for Logback.
logging.exception-conversion-word=%wEx # Conversion word used when logging exceptions.
logging.file= # Log file name (for instance, `myapp.log`). Names can be an exact location or relative to the current directory.
logging.file.max-history=0 # Maximum of archive log files to keep. Only supported with the default logback setup.
logging.file.max-size=10MB # Maximum log file size. Only supported with the default logback setup.
logging.group.*= # Log groups to quickly change multiple loggers at the same time. For instance, `logging.level.db=org.hibernate,org.springframework.jdbc`.
logging.level.*= # Log levels severity mapping. For instance, `logging.level.org.springframework=DEBUG`.
logging.path= # Location of the log file. For instance, `/var/log`.
logging.pattern.console= # Appender pattern for output to the console. Supported only with the default Logback setup.
logging.pattern.dateformat=yyyy-MM-dd HH:mm:ss.SSS # Appender pattern for log date format. Supported only with the default Logback setup.
logging.pattern.file= # Appender pattern for output to a file. Supported only with the default Logback setup.
logging.pattern.level=%5p # Appender pattern for log level. Supported only with the default Logback setup.
logging.register-shutdown-hook=false # Register a shutdown hook for the logging system when it is initialized.
通常只需要在applicatiom.yml中配置即可,但是如果想要对日志进行更加复杂纤细的配置,可能就需要使用到对应日志系统的配置文件了。如果使用logbak,我们只需要在resource中添加logback.xml文件即可(当然下面只是简单实例,详细的logbak的xml配置请读者自行配置):
<configuration debug="false">
    <appender name="CONSOLE"
              class="ch.qos.logback.core.ConsoleAppender">
        <encoder>
            <charset>UTF-8charset>
            <pattern>
                %d %-4relative [%thread] %-5level %logger{36} [T:%X{trans}]  - %msg%n
            pattern>
        encoder>
    appender>
    <appender name="FILE" class="ch.qos.logback.core.rolling.RollingFileAppender">
        <file>logs/demo.logfile>
        <rollingPolicy class="ch.qos.logback.core.rolling.SizeAndTimeBasedRollingPolicy">
            <fileNamePattern>logs/demo.log.%d{yyyy-MM-dd}.%ifileNamePattern>
            <maxHistory>10maxHistory>
            <maxFileSize>200MBmaxFileSize>
            <totalSizeCap>10GBtotalSizeCap>
        rollingPolicy>
        <encoder>
            <pattern>[%d{yyyy-MM-dd HH:mm:ss}] [%thread] %level %logger{35} [T:%X{trans}] %msg%npattern>
        encoder>
    appender>

    <root level="INFO">
        <appender-ref ref="FILE"/>
        <appender-ref ref="CONSOLE"/>
    root>
configuration>
@Slf4j
为了方便的使用日志,可以借助spring的@slf4j注解,可以自动注入log,代码中可以直接使用,比较方便:
@RestController
@Slf4j
public class HelloController {
    @Autowired
    private Stu stu;
    @Autowired
    private Person person;

    @GetMapping("/properties1")
    public String properties1() {
        log.debug("com.example.controller.HelloController.properties1 执行");
        log.info("stu={}", stu);
        log.info("person={}", person);

        return "Welcome to springboot2 world ~";
    }
    //省略代码
单元测试
一个Spring Boot application 是Spring ApplicationContext, 在单元测试时没有什么特殊的。
当你使用SpringApplication 时,外部属性,日志等其他功能会被默认装配
springboot提供了@SpringBootTest注解来辅助我们进行测试。
需要注意:如果我们使用的是JUnit 4 ,那么需要添加
@RunWith(SpringRunner.class)否则所有注解将会被忽略。
如果你使用的是JUnit5 ,那么在SpringBootTest上没有必要添加@ExtendWith,因为@…Test已经添加了ExtendWith
If you are using JUnit 4, don’t forget to also add @RunWith(SpringRunner.class) to your test, otherwise the annotations will be
ignored. If you are using JUnit 5, there’s no need to add the equivalent @ExtendWith(SpringExtension) as @SpringBootTest and the
other @…Test annotations are already annotated with it.
简单实例
引入test的starter依赖
<dependency>
    <groupId>org.springframework.bootgroupId>
    <artifactId>spring-boot-starter-testartifactId>
    <scope>testscope>
dependency>
在src/test/java目录下创建MyTest.java:
@RunWith(SpringRunner.class)
@SpringBootTest(classes = {Application.class})// 指定启动类
@Slf4j
public class MyTests {
    @Autowired
    private Person person;
    @Autowired
    private HelloService helloService;

    /**
     * 使用断言
     */
    @Test
    public void test2() {
        log.info("test hello 2");
        TestCase.assertEquals(1, 1);
    }


    /**
     * 测试注入
     */
    @Test
    public void test3() {
        log.info("person={}", person);
        log.info("helloService.getVal()={}", helloService.getVal());
    }

    @Before
    public void testBefore() {
        System.out.println("before");
    }

    @After
    public void testAfter() {
        System.out.println("after");
    }
}
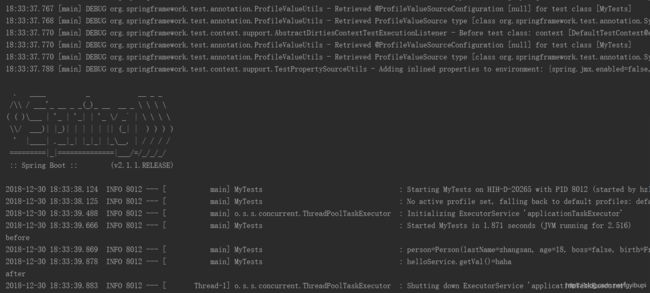
我们这里单独执行test3,他会向正常启动springboot服务一样,注入相关的bean,输出如下:

@TestConfiguration
@TestConfiguration是Spring Boot Test提供的一种工具,用它我们可以在一般的@Configuration之外补充测试专门用的Bean或者自定义的配置。
我们看@TestConfiguration的定义
@Target(ElementType.TYPE)
@Retention(RetentionPolicy.RUNTIME)
@Documented
@Configuration
@TestComponent
public @interface TestConfiguration {
//省略
可见真正起作用的是@TestComponent:
@Target(ElementType.TYPE)
@Retention(RetentionPolicy.RUNTIME)
@Documented
@Component
public @interface TestComponent {
//省略
@TestComponent 用于声明专门用于测试的bean , 他不应该被自动扫描到。也就是说如果你使用@ComponentScan来扫描bean,那么需要将其排除在外:
@ComponentScan(excludeFilters = {
  @Filter(type = FilterType.CUSTOM, classes = TypeExcludeFilter.class),
  ...})
由于@SpringBootApplication已经添加有排除TypeExcludeFilter的功能,固使用@SpringBootApplication时不会加载@TestComponent声明的bean:
@Target(ElementType.TYPE)
@Retention(RetentionPolicy.RUNTIME)
@Documented
@Inherited
@SpringBootConfiguration
@EnableAutoConfiguration
@ComponentScan(excludeFilters = {
		@Filter(type = FilterType.CUSTOM, classes = TypeExcludeFilter.class),
		@Filter(type = FilterType.CUSTOM, classes = AutoConfigurationExcludeFilter.class) })
public @interface SpringBootApplication {
@TestConfiguration 应用实例
编写一个bean的创建类:
package config;

import com.example.pojo.Foo;
import org.springframework.boot.test.context.TestConfiguration;
import org.springframework.context.annotation.Bean;

@TestConfiguration
public class Config {

    @Bean
    public Foo foo() {
        return new Foo("from config");
    }
}
Foo.java:
@Data
@AllArgsConstructor
@NoArgsConstructor
public class Foo {
    private String name;
}
编写测试类(IDEA 可能会在foo属性上标红提示错误,不用管,IDE还没有那么智能,识别不了这里的自动注入):
@RunWith(SpringRunner.class)
@SpringBootTest(classes = {Application.class})// 指定启动类
@Import(Config.class)
@Slf4j
public class TestConfiguration1 {

    @Autowired
    private Foo foo;

    @Test
    public void testPlusCount() {
        log.info("TestConfiguration1");
        Assert.assertEquals(foo.getName(), "from config");
    }
}
执行这里的testPlusCount方法,测试通过。
当然上面Config中的注解@TestConfiguration可以换成@Configuration效果也是一样的,@TestConfiguration是专门用于测试的。
使用mock方式对controller进行单元测试(无需运行web服务)
默认情况下,使用@SpringBootTest不会真正启动web服务,当我们测试controller时,spring测试提供了MockMvc供我们方便的测试controller,就像从浏览器发起请求一样。
在HelloController中有这么一个方法:
@GetMapping("/hello")
public String hello() {
    return "Welcome to springboot2 world ~";
}
关闭tomcat服务,我们看如何进行单元测试。
import com.example.Application;
import org.junit.Test;
import org.junit.runner.RunWith;
import org.springframework.beans.factory.annotation.Autowired;
import org.springframework.boot.test.autoconfigure.web.servlet.AutoConfigureMockMvc;
import org.springframework.boot.test.context.SpringBootTest;
import org.springframework.test.context.junit4.SpringRunner;
import org.springframework.test.web.servlet.MockMvc;

import static org.springframework.test.web.servlet.request.MockMvcRequestBuilders.get;
import static org.springframework.test.web.servlet.result.MockMvcResultMatchers.content;
import static org.springframework.test.web.servlet.result.MockMvcResultMatchers.status;

@RunWith(SpringRunner.class)
@SpringBootTest(classes = {Application.class})// 指定启动类
@AutoConfigureMockMvc
public class MockMvcExampleTests {
	@Autowired
	private MockMvc mvc;

	@Test
	public void exampleTest() throws Exception {
		this.mvc.perform(get("/hello")).andExpect(status().isOk())
				.andExpect(content().string("Welcome to springboot2 world ~"))
                .andDo(MockMvcResultHandlers.print());
	}
}
tomcat服务已经关闭,执行单元测试,输出结果:
2018-12-30 19:29:29.971  INFO 15100 --- [           main] MockMvcExampleTests                      : Starting MockMvcExampleTests on HIH-D-20265 with PID 15100 (started by hzliubenlong in D:\workspace-wy\springboot2demo)
2018-12-30 19:29:29.973  INFO 15100 --- [           main] MockMvcExampleTests                      : No active profile set, falling back to default profiles: default
2018-12-30 19:29:31.419  INFO 15100 --- [           main] o.s.s.concurrent.ThreadPoolTaskExecutor  : Initializing ExecutorService 'applicationTaskExecutor'
2018-12-30 19:29:31.620  INFO 15100 --- [           main] o.s.b.t.m.w.SpringBootMockServletContext : Initializing Spring TestDispatcherServlet ''
2018-12-30 19:29:31.624  INFO 15100 --- [           main] o.s.t.web.servlet.TestDispatcherServlet  : Initializing Servlet ''
2018-12-30 19:29:31.633  INFO 15100 --- [           main] o.s.t.web.servlet.TestDispatcherServlet  : Completed initialization in 9 ms
2018-12-30 19:29:31.651  INFO 15100 --- [           main] MockMvcExampleTests                      : Started MockMvcExampleTests in 2.201 seconds (JVM running for 2.974)

MockHttpServletRequest:
      HTTP Method = GET
      Request URI = /hello
       Parameters = {}
          Headers = {}
             Body = null
    Session Attrs = {}

Handler:
             Type = com.example.controller.HelloController
           Method = public java.lang.String com.example.controller.HelloController.hello()

Async:
    Async started = false
     Async result = null

Resolved Exception:
             Type = null

ModelAndView:
        View name = null
             View = null
            Model = null

FlashMap:
       Attributes = null

MockHttpServletResponse:
           Status = 200
    Error message = null
          Headers = {Content-Type=[text/plain;charset=UTF-8], Content-Length=[30]}
     Content type = text/plain;charset=UTF-8
             Body = Welcome to springboot2 world ~
    Forwarded URL = null
   Redirected URL = null
          Cookies = []
2018-12-30 19:29:31.916  INFO 15100 --- [       Thread-2] o.s.s.concurrent.ThreadPoolTaskExecutor  : Shutting down ExecutorService 'applicationTaskExecutor'
其中中间的内容为打印的请求详细信息,该测试通过。
使用mock方式对controller进行单元测试(无需运行web服务)
如果您需要启动运行web服务,我们建议您使用随机端口。 如果您使用的是@SpringBootTest(webEnvironment = WebEnvironment.RANDOM_PORT),则可以随机进行测试运行。
这里允许自动注入TestRestTemplate:
import com.example.Application;
import org.junit.Test;
import org.junit.runner.RunWith;
import org.springframework.beans.factory.annotation.Autowired;
import org.springframework.boot.test.context.SpringBootTest;
import org.springframework.boot.test.context.SpringBootTest.WebEnvironment;
import org.springframework.boot.test.web.client.TestRestTemplate;
import org.springframework.test.context.junit4.SpringRunner;

import static org.assertj.core.api.Assertions.assertThat;

/**
 * 测试基于普通springmvc的运行的controller服务
 */
@RunWith(SpringRunner.class)
//使用随机端口
@SpringBootTest(classes = Application.class, webEnvironment = WebEnvironment.RANDOM_PORT)
public class RandomPortTestRestTemplateExampleTests {

    @Autowired
    private TestRestTemplate restTemplate;

    @Test
    public void exampleTest() {
        String body = this.restTemplate.getForObject("/hello", String.class);
        assertThat(body).isEqualTo("Welcome to springboot2 world ~");
    }
}
首先启动该springboot应用,然后执行这个单元测试。
使用mock方式对controller进行单元测试(需运行web服务且 使用webflux)
具体的webflux相关的内容后续会讲。这里只需要知道这个springboot提供的是基于reactor的响应式编程(异步非阻塞)架构就行了。而我们之前使用的基于Tomcat的servlet3.1之前的springmvc是同步阻塞的。
要想使用webflux,需要更换spring-boot-starter-web为spring-boot-starter-webflux
<dependency>
    <groupId>org.springframework.bootgroupId>
    <artifactId>spring-boot-starter-webfluxartifactId>
dependency>
编写测试代码
import com.example.Application;
import org.junit.Test;
import org.junit.runner.RunWith;
import org.springframework.beans.factory.annotation.Autowired;
import org.springframework.boot.test.context.SpringBootTest;
import org.springframework.boot.test.context.SpringBootTest.WebEnvironment;
import org.springframework.test.context.junit4.SpringRunner;
import org.springframework.test.web.reactive.server.WebTestClient;

@RunWith(SpringRunner.class)
//指定使用随机端口(官网推荐的,原因待验证)
@SpringBootTest(classes = Application.class, webEnvironment = WebEnvironment.RANDOM_PORT)
public class RandomPortWebTestClientExampleTests {
    /**
     *WebTestClient 是用于测试web服务器的非阻塞的响应式客户端
     */
	@Autowired
	private WebTestClient webClient;

	@Test
	public void exampleTest() {
		this.webClient.get().uri("/hello").exchange().expectStatus().isOk()
				.expectBody(String.class).isEqualTo("Welcome to springboot2 world ~");
	}
}
首先启动该springboot应用,然后执行这个单元测试。
改为webflux的starter以后,观察启动日志,可以发现不再是基于Tomcat,而是基于netty了
Netty started on port(s): 8080
@MockBean 对bean进行mock测试
在实际项目中,有一些bean可能会调用第三方,依赖外部组件或项目。但是我们单元测试不需要真正调用。那么我们可以使用@MockBean进行mock结果。
假设HelloService中有调用外部服务的方法:
public interface HelloService {

    String getVal();

    //模拟远程调用,或者其他服务调用
    String getRemoteVal();
}

@Component
@Slf4j
public class HelloServiceImpl implements HelloService{

    public String getVal(){
        return "haha";
    }

    //模拟远程调用,或者其他服务调用
    public String getRemoteVal(){
        log.info("真正发起外部请求");
        return "remote Val";
    }
}
编写单元测试代码:
import com.example.Application;
import com.example.service.HelloService;
import org.junit.Test;
import org.junit.runner.RunWith;
import org.springframework.boot.test.context.SpringBootTest;
import org.springframework.boot.test.mock.mockito.MockBean;
import org.springframework.test.context.junit4.SpringRunner;

import static org.assertj.core.api.Assertions.assertThat;
import static org.mockito.BDDMockito.given;

/**
 * 测试bean结果的mock
 */
@RunWith(SpringRunner.class)
@SpringBootTest(classes = {Application.class})// 指定启动类
public class MockBeanTest {
    @MockBean  //这里使用 @SpyBean 是同样效果
    private HelloService helloService;
    @Test
    public void exampleTest() {
        //这句的意思是当调用helloService的getRemoteVal方法时,返回mock的结果:"远程调用结果"
        given(this.helloService.getRemoteVal()).willReturn("远程调用结果");

        //进行调用测试
        String reverse = helloService.getRemoteVal();
        assertThat(reverse).isEqualTo("远程调用结果");
    }
}
执行单元测试,可以发现并没有真正发起请求。
更多测试相关内容请参见官网 Testing
测试json @JsonTest
import static org.assertj.core.api.Assertions.assertThat;

@RunWith(SpringRunner.class)
//这里不能使用@SpringBootTest否则报错:Configuration error: found multiple declarations of @BootstrapWith for test class [MyJsonTests]
@ContextConfiguration(classes = {Application.class})
@JsonTest
public class MyJsonTests extends AbstractTestNGSpringContextTests {

    @Autowired
    private JacksonTester<Stu> json;

    @Test
    public void testSerialize() throws Exception {
        Stu details = new Stu("马云", 51);
        // Assert against a `.json` file in the same package as the test
        assertThat(this.json.write(details)).isEqualToJson("expected.json");
        // 或者使用基于JSON path的校验
        assertThat(this.json.write(details)).hasJsonPathStringValue("@.name");
        assertThat(this.json.write(details)).extractingJsonPathStringValue("@.name").isEqualTo("马云");
    }

    @Test
    public void testDeserialize() throws Exception {
        String content = "{\"name\":\"2\",\"age\":\"11\"}";
        assertThat(this.json.parse(content)).isEqualTo(new Stu("2", 11));
        assertThat(this.json.parseObject(content).getName()).isEqualTo("2");
    }

}
这里不能使用@SpringBootTest否则报错:Configuration error: found multiple declarations of @BootstrapWith for test class [MyJsonTests]
有时候我们会自定义序列化风格,这里对@JsonComponent进行测试:
@JsonComponent
public class FooJsonComponent {

    public static class Serializer extends JsonSerializer<Stu> {
        @Override
        public void serialize(Stu value, JsonGenerator gen, SerializerProvider serializers)
                throws IOException, JsonProcessingException {
            gen.writeString("name=" + value.getName() + ",age=" + value.getAge());
        }

    }

    public static class Deserializer extends JsonDeserializer<Stu> {

        @Override
        public Stu deserialize(JsonParser p, DeserializationContext ctxt) throws IOException, JsonProcessingException {
            JsonToken t = p.getCurrentToken();

            if (t == JsonToken.VALUE_STRING) {
                String trim = p.getText().trim();

                String[] split = trim.split(",");
                Stu stu = new Stu();
                stu.setName(split[0].split("=")[1]);
                stu.setAge(Integer.parseInt(split[1].split("=")[1]));
                return stu;
            }

            return (Stu) ctxt.handleUnexpectedToken(handledType(), p);

        }
    }
}


/**
 * 测试自定义的@JsonComponent
 */
@ContextConfiguration(classes = {JsonComponentJacksonTest.class, FooJsonComponent.class})
@JsonTest
public class JsonComponentJacksonTest extends AbstractTestNGSpringContextTests {

    @Autowired
    private JacksonTester<Stu> json;

    @Test
    public void testSerialize() throws Exception {
        Stu details = new Stu("zhangsan", 12);
        assertThat(this.json.write(details).getJson()).isEqualTo("\"name=zhangsan,age=12\"");
    }

    @Test
    public void testDeserialize() throws Exception {
        String content = "\"name=zhangsan,age=13\"";
        Stu actual = this.json.parseObject(content);
        assertThat(actual).isEqualTo(new Stu("zhangsan", 13));
        assertThat(actual.getName()).isEqualTo("zhangsan");
        assertThat(actual.getAge()).isEqualTo(13);
    }
}
@TestPropertySource 对属性配置进行mock
使用springboot我们通常会将配置设置在application.yml中,但是在测试的时候,可能会对某些配置的值进行修改,接下来我们使用@TestPropertySource来实现这个功能。
使用spring提供的@PropertySource
springboot提供的@ConfigurationProperties可以加载application.yml中的配置,如果你的配置放到其他目录或者叫其他名称,可以使用@PropertySource来进行加载。
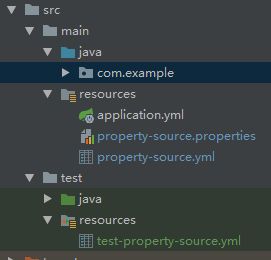
我们在resources目录下创建两个配置文件:

property-source.properties文件内容是lastName=wanganshi。property-source.yml内容是lastName: libai。@PropertySource可以支持properties和yml两种格式。
编写类PropertySourceConfig.java来加载配置文件中的内容
import org.springframework.context.annotation.Configuration;
import org.springframework.context.annotation.PropertySource;

@Configuration
//支持properties和yml
//@PropertySource("classpath:property-source.properties")
@PropertySource("classpath:property-source.yml")
public class PropertySourceConfig {
}
编写测试类:
import lombok.extern.slf4j.Slf4j;
import org.junit.Assert;
import org.junit.Test;
import org.junit.runner.RunWith;
import org.springframework.boot.test.context.SpringBootTest;
import org.springframework.context.EnvironmentAware;
import org.springframework.core.env.ConfigurableEnvironment;
import org.springframework.core.env.Environment;
import org.springframework.test.context.ContextConfiguration;
import org.springframework.test.context.TestPropertySource;
import org.springframework.test.context.junit4.SpringRunner;

import java.util.Map;

import static java.util.stream.Collectors.toList;

@RunWith(SpringRunner.class)
@SpringBootTest
@Slf4j
@ContextConfiguration(classes = PropertySourceConfig.class) //加载属性配置
@TestPropertySource( // 对属性进行设置
        properties = {"lastName=abc", "bar=uvw"}
)
public class PropertySourceTest1 implements EnvironmentAware {

    private Environment environment;

    @Test
    public void test1() {
        Assert.assertEquals(environment.getProperty("lastName"), "abc");
    }


    @Override
    public void setEnvironment(Environment environment) {
        this.environment = environment;
        Map<String, Object> systemEnvironment = ((ConfigurableEnvironment) environment).getSystemEnvironment();
        System.out.println("=== System Environment ===");
        System.out.println(getMapString(systemEnvironment));
        System.out.println();

        System.out.println("=== Java System Properties ===");
        Map<String, Object> systemProperties = ((ConfigurableEnvironment) environment).getSystemProperties();
        System.out.println(getMapString(systemProperties));
    }

    private String getMapString(Map<String, Object> map) {
        return String.join("\n",
                map.keySet().stream().map(k -> k + "=" + map.get(k)).collect(toList())
        );
    }
}
测试通过。大家可以将@TestPropertySource注解去掉来观察输出结果。
对springboot提供的类型安全的属性配置进行mock
前面已经讲过如何进行类型安全的属性配置。这种情况依然可以使用@TestPropertySource对属性进行mock:
我们使用spring boot 2.1学习笔记【四】属性配置的Person类进行测试。
直接编写测试类:
import com.example.Application;
import com.example.pojo.Person;
import lombok.extern.slf4j.Slf4j;
import org.junit.Assert;
import org.junit.Test;
import org.junit.runner.RunWith;
import org.springframework.beans.factory.annotation.Autowired;
import org.springframework.boot.test.context.SpringBootTest;
import org.springframework.test.context.TestPropertySource;
import org.springframework.test.context.junit4.SpringRunner;

@RunWith(SpringRunner.class)
@SpringBootTest(classes = {Application.class})// 指定启动类
@Slf4j
@TestPropertySource(
        properties = {"person.lastName=张飞", "person.age=49"}
)
public class PropertySourceTest {
    @Autowired
    private Person person;

    @Test
    public void test1() {
        log.info(person.getLastName());
        Assert.assertEquals(person.getLastName(), "张飞");
    }
}
测试结果通过,大家可以将@TestPropertySource注解去电观察运行结果。
为单元测试单独提供测试配置
就像上图中那样,我们在src/test/resources目录下创建一个单元测试专用的属性配置文件。就可以在@TestPropertySource指定加载这个配置即可。
test-property-source.yml文件内容:
testp: 123456789
person:
  lastName: abc
对PropertySourceTest1进行改造:
@RunWith(SpringRunner.class)
@SpringBootTest
@Slf4j
@ContextConfiguration(classes = PropertySourceConfig.class) //加载属性配置
@TestPropertySource( // 对属性进行设置
        properties = {"bar=uvw"},
        locations = "classpath:test-property-source.yml"
)
public class PropertySourceTest1 implements EnvironmentAware {

    private Environment environment;

    @Value("${testp}")
    String testp;

    @Test
    public void test1() {
        Assert.assertEquals(environment.getProperty("lastName"), "abc");
        Assert.assertEquals(testp, "123456789");
    }
    //省略部分代码
}
对AOP进行测试
我们这里对HelloService使用AspectJ进行AOP代理:
/**
 * AOP
 */
@Component
@Aspect
public class HelloAspect {
  @Pointcut("execution(* com.example.service.HelloService.getVal())")
  public void pointcut() {
  }
  @Around("pointcut()")
  public String changeGetVal(ProceedingJoinPoint pjp) {
    return "aopResult";//简单起见,这里直接模拟一个返回值了
  }
}
使用springboot进行配置,启用AOP
@Configuration
@EnableAspectJAutoProxy(proxyTargetClass = true)//启用aop
@ComponentScan("com.example.service")
public class AopConfig {
}
我们队MockMvcExampleTests添加一个测试方法,验证一下结果:
@Test
public void exampleTest1() throws Exception {
   this.mvc.perform(get("/hello1")).andExpect(status().isOk())
           .andExpect(content().string("aopResult"))
           .andDo(MockMvcResultHandlers.print());
}
测试通过,说明代理成功。接下来我们通过另一种方式直接对AOP进行测试,注释已经在代码中写清楚了:
//省略部分import
import static org.mockito.Matchers.any;
import static org.mockito.Mockito.times;
import static org.mockito.Mockito.verify;
import static org.testng.Assert.*;

/**
 * AOP测试
 */
@RunWith(SpringRunner.class)
@SpringBootTest(classes = {Application.class})// 指定启动类
@TestExecutionListeners(listeners = MockitoTestExecutionListener.class)//开启Mockito的支持
@Slf4j
public class SpringBootAopTest extends AbstractTestNGSpringContextTests {

    //声明一个被Mockito.spy过的Bean
    @SpyBean
    private HelloAspect helloAspect;

    @Autowired
    private HelloService helloService;

    @Test
    public void testFooService() {
        //判断helloService对象是不是HelloServiceImpl
        assertNotEquals(helloService.getClass(), HelloServiceImpl.class);

        //接下来通过AopUtils、AopProxyUtils、AopTestUtils来判断helloService是否是代理的对象
        assertTrue(AopUtils.isAopProxy(helloService));
        assertTrue(AopUtils.isCglibProxy(helloService));

        assertEquals(AopProxyUtils.ultimateTargetClass(helloService), HelloServiceImpl.class);

        assertEquals(AopTestUtils.getTargetObject(helloService).getClass(), HelloServiceImpl.class);
        assertEquals(AopTestUtils.getUltimateTargetObject(helloService).getClass(), HelloServiceImpl.class);

        /**
         * 但是证明HelloServiceImpl Bean被代理并不意味着HelloAspect生效了(假设此时有多个@Aspect),
         * 那么我们还需要验证HelloServiceImpl.getVal的行为。
         * 这里调用两次:
         */
        assertEquals(helloService.getVal(), "aopResult");
        assertEquals(helloService.getVal(), "aopResult");

        //通过MockitoTestExecutionListener来监听是否是调用了两次helloService.getVal()方法
        //注意这一行代码测试的是helloAspect的行为,而不是helloService的行为
        verify(helloAspect, times(2)).changeGetVal(any());
    }
}
测试结果是通过。
springboot系列学习笔记全部文章请移步值博主专栏**: spring boot 2.X/spring cloud Greenwich。
由于是一系列文章,所以后面的文章可能会使用到前面文章的项目。springboot系列代码全部上传至GitHub:https://github.com/liubenlong/springboot2_demo
本系列环境:Java11;springboot 2.1.1.RELEASE;springcloud Greenwich.RELEASE;MySQL 8.0.5;
参考资料
官方文档
spring-test-examples
springboot(16)Spring Boot使用单元测试
