spring boot 2.1学习笔记【九】SpringBoot 2 集成redis
springboot系列学习笔记全部文章请移步值博主专栏**: spring boot 2.X/spring cloud Greenwich。
由于是一系列文章,所以后面的文章可能会使用到前面文章的项目。springboot系列代码全部上传至GitHub:https://github.com/liubenlong/springboot2_demo
本系列环境:Java11;springboot 2.1.1.RELEASE;springcloud Greenwich.RELEASE;MySQL 8.0.5;
文章目录
- 添加redis步骤
- 序列化源码简析
- 切换序列化方式
springboot2.X 集成redis非常简单,只需要引入依赖包,配置数据源连接池,就可以直接使用redisTemplate了。
注意:springboot 2.X 版本使用
lettuce连接池来替换jedis。Lettuce和Jedis都是连接Redis Server的客户端程序,Jedis在实现上是直连redis server,多线程环境下非线程安全,除非使用连接池,为每个Jedis势力增加物理连接。Lettuce基于Netty的势力连接,可以再多个线程间并发访问,且线程安全,满足多线程环境下的并发访问,同时它是可伸缩的设计,一个连接实例不够的情况也可以按需增加连接实例。
添加redis步骤
添加依赖:
<dependency>
    <groupId>org.springframework.bootgroupId>
    <artifactId>spring-boot-starter-data-redisartifactId>
dependency>

<dependency>
    <groupId>org.apache.commonsgroupId>
    <artifactId>commons-pool2artifactId>
dependency>
application.yml添加redis的配置,我这里使用的是jedis连接池:
spring:
  redis:
    host: 127.0.0.1
    port: 6379
    timeout: 3000 # 超时时间
    lettuce:
      pool:
        max-active: 200 #连接池最大连接数(使用负值表示没有限制)
        max-idle: 20 # 连接池中的最大空闲连接
        min-idle: 5 #连接池中的最小空闲连接
        max-wait: -1 # 连接池最大阻塞等待时间(使用负值表示没有限制)
编写测试controller:
@RestController
@Slf4j
public class RedisController {
    @Autowired
    private StringRedisTemplate redisTemplate;

    @GetMapping("/testRedis")
    public String testRedis() {
        redisTemplate.opsForValue().set("a","aa");
        String a = redisTemplate.opsForValue().get("a");
        return a;
    }
}
不需要额外的配置,可以直接使用redisTemplate。
启动服务,可以看到控制台打印结果是使用的lettuce连接池
[nio-8080-exec-1] o.a.c.c.C.[Tomcat].[localhost].[/]       : Initializing Spring DispatcherServlet 'dispatcherServlet'
[nio-8080-exec-1] o.s.web.servlet.DispatcherServlet        : Initializing Servlet 'dispatcherServlet'
[nio-8080-exec-1] o.s.web.servlet.DispatcherServlet        : Completed initialization in 4 ms
[nio-8080-exec-1] io.lettuce.core.EpollProvider            : Starting without optional epoll library
[nio-8080-exec-1] io.lettuce.core.KqueueProvider           : Starting without optional kqueue library
不过官方提供的StringRedisTemplate只支持string,如果想要传入对象就需要先手动将其转换为字符串然后再存储。取出数据也要手动转为对象。
@GetMapping("/testRedis1")
public Stu testRedis1() {
    Stu stu = Stu.builder().name("张三").age(10).build();
    redisTemplate.opsForValue().set("a",JSONObject.toJSONString(stu));
    Stu stu1 = JSONObject.parseObject(redisTemplate.opsForValue().get("a"), Stu.class);
    return stu1;
}
也可以使用RedisTemplate,它支持任何格式的数据:
@Autowired
private RedisTemplate<Object, Object> redisTemplate;

@GetMapping("/testRedis1")
public void testRedis1(int age) {
    Stu stu = Stu.builder().name("李四").age(age).build();
    redisTemplate.opsForValue().set("b", stu);
}

@GetMapping("/getVal")
public Stu getVal() {
    Stu stu1 = (Stu) redisTemplate.opsForValue().get("b");
    return stu1;
}
序列化源码简析
上面说到序列化的问题,接下来看一下RedisTemplate和StringRedisTemplate使用的是什么序列化。
public class StringRedisTemplate extends RedisTemplate<String, String> {

	/**
	 * 这里设置了key,value的编码方式,都是
	 */
	public StringRedisTemplate() {
		setKeySerializer(RedisSerializer.string());
		setValueSerializer(RedisSerializer.string());
		setHashKeySerializer(RedisSerializer.string());
		setHashValueSerializer(RedisSerializer.string());
	}
	public StringRedisTemplate(RedisConnectionFactory connectionFactory) {
		this();
		setConnectionFactory(connectionFactory);
		afterPropertiesSet();
	}
	protected RedisConnection preProcessConnection(RedisConnection connection, boolean existingConnection) {
		return new DefaultStringRedisConnection(connection);
	}
}
可以看到StringRedisTemplate是继承的RedisTemplate。然后设置使用string序列化方式StringRedisSerializer。
RedisSerializer.string()源码:
static RedisSerializer<String> string() {
		return StringRedisSerializer.UTF_8;
	}
UTF_8定义:
public static final StringRedisSerializer UTF_8 = new StringRedisSerializer(StandardCharsets.UTF_8);
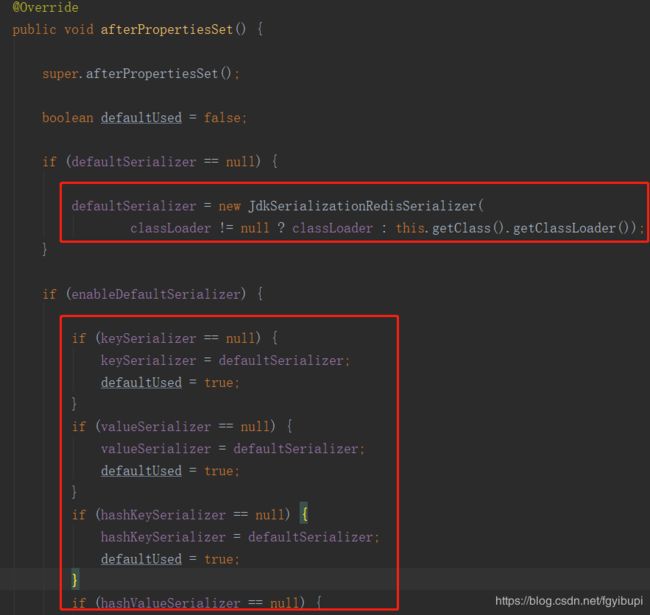
接下来看一下RedisTemplate的序列化代码,可以看到默认是使用JDK序列化方式JdkSerializationRedisSerializer:

另外需要注意: 两者的数据是不共通的;也就是说StringRedisTemplate只能管理StringRedisTemplate里面的数据,RedisTemplate只能管理RedisTemplate中的数据。
@RestController
@Slf4j
public class RedisController {


    @Autowired
    private RedisTemplate<Object, Object> redisTemplate;
    @Autowired
    private StringRedisTemplate stringRedisTemplate;

    @GetMapping("/deleteVal")
    public void deleteVal() {
        stringRedisTemplate.delete("a");
        stringRedisTemplate.delete("b");
        redisTemplate.delete("a");
        redisTemplate.delete("b");
    }

    @GetMapping("/testRedis")
    public Object testRedis() {
        Stu stu = Stu.builder().name("张三").age(20).build();
        stringRedisTemplate.opsForValue().set("a", JSONObject.toJSONString(stu));
        Object a = stringRedisTemplate.opsForValue().get("a");
        return a;
    }

    @GetMapping("/testRedis1")
    public Stu testRedis1(int age) {
        Stu stu = Stu.builder().name("李四").age(age).build();
        redisTemplate.opsForValue().set("b", stu);
        Stu stu1 = (Stu) redisTemplate.opsForValue().get("b");
        return stu1;
    }

    @GetMapping("/readVal")
    public void readVal() {
        Object a = redisTemplate.opsForValue().get("a");
        log.info(a.toString());
        String b = stringRedisTemplate.opsForValue().get("b");
        log.info(b);
    }
}
先清空缓存a和b, 然后执行testRedis,testRedis1赋值,最后执行readVal,可以发现都是null。无法读取对方的数据。
切换序列化方式
如果不想使用默认的序列化方式,假如我们使用fastjson,则需要自定义RedisTemplate的bean,替换springboot原有注入的bean:
@Configuration
public class SpringBootConfig {
    //@Bean表示如果这里自定义了bean,则不加载springboot starter中提供的默认bean。
    @Bean
    public RedisTemplate<String, String> redisTemplate(
            RedisConnectionFactory factory) {
        StringRedisTemplate template = new StringRedisTemplate(factory);
        template.setKeySerializer(RedisSerializer.string());
        template.setValueSerializer(new FastJsonRedisSerializer<>(Object.class));
        template.setHashKeySerializer(RedisSerializer.string());
        template.setHashValueSerializer(new FastJsonRedisSerializer<>(Object.class));
        template.afterPropertiesSet();
        return template;
    }
}
测试代码:
@Autowired
private RedisTemplate redisTemplate;

/**
 * 测试使用自定义的序列化方式
 * @param age
 * @return
 */
@GetMapping("/testRedis1")
public Object testRedis1(int age) {
    redisTemplate.opsForValue().set("c", "c");
    Object c = redisTemplate.opsForValue().get("c");
    log.info(c.getClass().getName());
    log.info(c.toString());

    Stu stu = Stu.builder().name("李四").age(age).b(BigDecimal.TEN).d(Duration.ofSeconds(10000)).date(new Date()).build();
    redisTemplate.opsForValue().set("b", stu);
    JSONObject b = (JSONObject)redisTemplate.opsForValue().get("b");
    log.info(b.getClass().getName());//这里可以看到输出 com.alibaba.fastjson.JSONObject
    Stu s = JSON.toJavaObject(b, Stu.class);
    log.info(s.toString());
    return s;
}
springboot系列学习笔记全部文章请移步值博主专栏**: spring boot 2.X/spring cloud Greenwich。
由于是一系列文章,所以后面的文章可能会使用到前面文章的项目。springboot系列代码全部上传至GitHub:https://github.com/liubenlong/springboot2_demo
本系列环境:Java11;springboot 2.1.1.RELEASE;springcloud Greenwich.RELEASE;MySQL 8.0.5;
另: redis专栏

