ElasticSearch学习笔记Ⅰ - 安装
目前公司的项目中使用到了ElasticSearch,而自己之前虽然久闻ES大名,但也只是看了一些相关的杂乱的东西,所以很有必要系统地学习并梳理一下ElasticSearch的整个知识架构。
推荐ES官方的QuickStart。
一. 简介
ElasticSearch是一个分布式、可扩展、实时的搜索与数据分析引擎,它能从项目一开始就赋予你的数据以搜索、分析和探索的能力。它基于Apache Lucene构建,并且是开源的。Lucene被认为是迄今为止性能最好的开源搜索引擎,但相对复杂,很难集成到日常应用中。而ElasticSearch是基于Java编写的,并且提供简单的RESTful API,可以轻松实现搜索功能。同时它可以进行轻松的横向扩展,支持PB级的结构化和非结构化数据处理,也就是当存储容量不足时,可以不断地加节点来解决。它有以下的应用场景:
- 海量数据分析引擎:例如海量日志数据,可以利用ES的聚合搜索功能来统计分析一些指标数据
- 站内搜索引擎:简单的继承、封装即可实现站内搜索引擎
- 数据仓库:强大的分布式存储能力,可以直接作为数据仓库产品使用
BAT、GitHub、Google都在使用ElasticSearch。
二.ES安装
2.1 版本问题
版本历史:1.x -> 2.x -> 5.x,版本号之所以不连续,是因为ES属于ELK(ElasticSearch、Logstash、Kibana)技术栈中的一个,当时各个中间件的版本迭代更新速度不同,导致版本号混乱。为了统一,ES出了5.0版本,统一了整个系列的版本号。
2.2 单实例安装
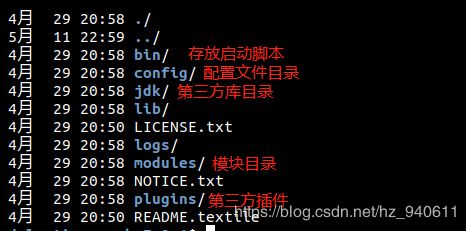
打开ES官网,点击右上角Downloads,在弹出的产品中选择ES,我选择下载linux版本,可以直接复制下载链接,虚拟机里wget下载,但是网速太慢。我还是在windows里面迅雷下载之后把tar.gz文件在我的虚拟机(linux 4.15.0-29-generic、ubuntu 7.3.0)中解压缩。看一下解压之后的核心目录:
启动ES命令: ./bin/elasticsearch
报错1:can not run elasticsearch as root,默认情况下ES不建议使用root用户启动,所以需要使用普通用户启动
报错2:Exception in thread "main" java.nio.file.AccessDeniedException: /usr/es/elasticsearch-7.0.1/config/jvm.options,上面切换了普通用户之后,权限不足,需要授权给我的普通用户haozz:sudo chown -R haozz elasticsearch-7.0.1/
再次启动正常,启动日志如下:
[2019-05-12T00:38:11,845][INFO ][o.e.e.NodeEnvironment    ] [haozz-virtual-machine] using [1] data paths, mounts [[/ (/dev/sda1)]], net usable_space [9.2gb], net total_space [19.5gb], types [ext4]
[2019-05-12T00:38:11,853][INFO ][o.e.e.NodeEnvironment    ] [haozz-virtual-machine] heap size [990.7mb], compressed ordinary object pointers [true]
[2019-05-12T00:38:11,856][INFO ][o.e.n.Node               ] [haozz-virtual-machine] node name [haozz-virtual-machine], node ID [Baijs2IgSieVJdTmxY9t3g]
[2019-05-12T00:38:11,859][INFO ][o.e.n.Node               ] [haozz-virtual-machine] version[7.0.1], pid[2662], build[default/tar/e4efcb5/2019-04-29T12:56:03.145736Z], OS[Linux/4.15.0-29-generic/amd64], JVM[Oracle Corporation/Java HotSpot(TM) 64-Bit Server VM/1.8.0_131/25.131-b11]
[2019-05-12T00:38:11,864][INFO ][o.e.n.Node               ] [haozz-virtual-machine] JVM home [/usr/java/jdk1.8.0_131/jre]
[2019-05-12T00:38:11,866][INFO ][o.e.n.Node               ] [haozz-virtual-machine] JVM arguments [-Xms1g, -Xmx1g, -XX:+UseConcMarkSweepGC, -XX:CMSInitiatingOccupancyFraction=75, -XX:+UseCMSInitiatingOccupancyOnly, -Des.networkaddress.cache.ttl=60, -Des.networkaddress.cache.negative.ttl=10, -XX:+AlwaysPreTouch, -Xss1m, -Djava.awt.headless=true, -Dfile.encoding=UTF-8, -Djna.nosys=true, -XX:-OmitStackTraceInFastThrow, -Dio.netty.noUnsafe=true, -Dio.netty.noKeySetOptimization=true, -Dio.netty.recycler.maxCapacityPerThread=0, -Dlog4j.shutdownHookEnabled=false, -Dlog4j2.disable.jmx=true, -Djava.io.tmpdir=/tmp/elasticsearch-4098322096872642371, -XX:+HeapDumpOnOutOfMemoryError, -XX:HeapDumpPath=data, -XX:ErrorFile=logs/hs_err_pid%p.log, -XX:+PrintGCDetails, -XX:+PrintGCDateStamps, -XX:+PrintTenuringDistribution, -XX:+PrintGCApplicationStoppedTime, -Xloggc:logs/gc.log, -XX:+UseGCLogFileRotation, -XX:NumberOfGCLogFiles=32, -XX:GCLogFileSize=64m, -Dio.netty.allocator.type=unpooled, -Des.path.home=/usr/es/elasticsearch-7.0.1, -Des.path.conf=/usr/es/elasticsearch-7.0.1/config, -Des.distribution.flavor=default, -Des.distribution.type=tar, -Des.bundled_jdk=true]
[2019-05-12T00:38:14,015][INFO ][o.e.p.PluginsService     ] [haozz-virtual-machine] loaded module [aggs-matrix-stats]
[2019-05-12T00:38:14,016][INFO ][o.e.p.PluginsService     ] [haozz-virtual-machine] loaded module [analysis-common]
[2019-05-12T00:38:14,016][INFO ][o.e.p.PluginsService     ] [haozz-virtual-machine] loaded module [ingest-common]
[2019-05-12T00:38:14,016][INFO ][o.e.p.PluginsService     ] [haozz-virtual-machine] loaded module [ingest-geoip]
[2019-05-12T00:38:14,016][INFO ][o.e.p.PluginsService     ] [haozz-virtual-machine] loaded module [ingest-user-agent]
[2019-05-12T00:38:14,016][INFO ][o.e.p.PluginsService     ] [haozz-virtual-machine] loaded module [lang-expression]
[2019-05-12T00:38:14,017][INFO ][o.e.p.PluginsService     ] [haozz-virtual-machine] loaded module [lang-mustache]
[2019-05-12T00:38:14,017][INFO ][o.e.p.PluginsService     ] [haozz-virtual-machine] loaded module [lang-painless]
[2019-05-12T00:38:14,018][INFO ][o.e.p.PluginsService     ] [haozz-virtual-machine] loaded module [mapper-extras]
[2019-05-12T00:38:14,018][INFO ][o.e.p.PluginsService     ] [haozz-virtual-machine] loaded module [parent-join]
[2019-05-12T00:38:14,018][INFO ][o.e.p.PluginsService     ] [haozz-virtual-machine] loaded module [percolator]
[2019-05-12T00:38:14,018][INFO ][o.e.p.PluginsService     ] [haozz-virtual-machine] loaded module [rank-eval]
[2019-05-12T00:38:14,018][INFO ][o.e.p.PluginsService     ] [haozz-virtual-machine] loaded module [reindex]
[2019-05-12T00:38:14,019][INFO ][o.e.p.PluginsService     ] [haozz-virtual-machine] loaded module [repository-url]
[2019-05-12T00:38:14,019][INFO ][o.e.p.PluginsService     ] [haozz-virtual-machine] loaded module [transport-netty4]
[2019-05-12T00:38:14,019][INFO ][o.e.p.PluginsService     ] [haozz-virtual-machine] loaded module [x-pack-ccr]
[2019-05-12T00:38:14,019][INFO ][o.e.p.PluginsService     ] [haozz-virtual-machine] loaded module [x-pack-core]
[2019-05-12T00:38:14,020][INFO ][o.e.p.PluginsService     ] [haozz-virtual-machine] loaded module [x-pack-deprecation]
[2019-05-12T00:38:14,020][INFO ][o.e.p.PluginsService     ] [haozz-virtual-machine] loaded module [x-pack-graph]
[2019-05-12T00:38:14,020][INFO ][o.e.p.PluginsService     ] [haozz-virtual-machine] loaded module [x-pack-ilm]
[2019-05-12T00:38:14,020][INFO ][o.e.p.PluginsService     ] [haozz-virtual-machine] loaded module [x-pack-logstash]
[2019-05-12T00:38:14,021][INFO ][o.e.p.PluginsService     ] [haozz-virtual-machine] loaded module [x-pack-ml]
[2019-05-12T00:38:14,021][INFO ][o.e.p.PluginsService     ] [haozz-virtual-machine] loaded module [x-pack-monitoring]
[2019-05-12T00:38:14,022][INFO ][o.e.p.PluginsService     ] [haozz-virtual-machine] loaded module [x-pack-rollup]
[2019-05-12T00:38:14,023][INFO ][o.e.p.PluginsService     ] [haozz-virtual-machine] loaded module [x-pack-security]
[2019-05-12T00:38:14,024][INFO ][o.e.p.PluginsService     ] [haozz-virtual-machine] loaded module [x-pack-sql]
[2019-05-12T00:38:14,024][INFO ][o.e.p.PluginsService     ] [haozz-virtual-machine] loaded module [x-pack-watcher]
[2019-05-12T00:38:14,027][INFO ][o.e.p.PluginsService     ] [haozz-virtual-machine] no plugins loaded
[2019-05-12T00:38:18,453][INFO ][o.e.x.s.a.s.FileRolesStore] [haozz-virtual-machine] parsed [0] roles from file [/usr/es/elasticsearch-7.0.1/config/roles.yml]
[2019-05-12T00:38:19,254][INFO ][o.e.x.m.p.l.CppLogMessageHandler] [haozz-virtual-machine] [controller/2736] [Main.cc@109] controller (64 bit): Version 7.0.1 (Build 6a88928693d862) Copyright (c) 2019 Elasticsearch BV
[2019-05-12T00:38:19,743][DEBUG][o.e.a.ActionModule       ] [haozz-virtual-machine] Using REST wrapper from plugin org.elasticsearch.xpack.security.Security
[2019-05-12T00:38:20,057][INFO ][o.e.d.DiscoveryModule    ] [haozz-virtual-machine] using discovery type [zen] and seed hosts providers [settings]
[2019-05-12T00:38:20,873][INFO ][o.e.n.Node               ] [haozz-virtual-machine] initialized
[2019-05-12T00:38:20,873][INFO ][o.e.n.Node               ] [haozz-virtual-machine] starting ...
[2019-05-12T00:38:21,115][INFO ][o.e.t.TransportService   ] [haozz-virtual-machine] publish_address {127.0.0.1:9300}, bound_addresses {[::1]:9300}, {127.0.0.1:9300}
[2019-05-12T00:38:21,174][WARN ][o.e.b.BootstrapChecks    ] [haozz-virtual-machine] max virtual memory areas vm.max_map_count [65530] is too low, increase to at least [262144]
[2019-05-12T00:38:21,175][WARN ][o.e.b.BootstrapChecks    ] [haozz-virtual-machine] the default discovery settings are unsuitable for production use; at least one of [discovery.seed_hosts, discovery.seed_providers, cluster.initial_master_nodes] must be configured
[2019-05-12T00:38:21,204][INFO ][o.e.c.c.ClusterBootstrapService] [haozz-virtual-machine] no discovery configuration found, will perform best-effort cluster bootstrapping after [3s] unless existing master is discovered
[2019-05-12T00:38:21,442][INFO ][o.e.c.s.MasterService    ] [haozz-virtual-machine] elected-as-master ([1] nodes joined)[{haozz-virtual-machine}{Baijs2IgSieVJdTmxY9t3g}{Q6djfmXyTM-BVQjx9uGNwg}{127.0.0.1}{127.0.0.1:9300}{ml.machine_memory=2065743872, xpack.installed=true, ml.max_open_jobs=20} elect leader, _BECOME_MASTER_TASK_, _FINISH_ELECTION_], term: 4, version: 22, reason: master node changed {previous [], current [{haozz-virtual-machine}{Baijs2IgSieVJdTmxY9t3g}{Q6djfmXyTM-BVQjx9uGNwg}{127.0.0.1}{127.0.0.1:9300}{ml.machine_memory=2065743872, xpack.installed=true, ml.max_open_jobs=20}]}
[2019-05-12T00:38:21,554][INFO ][o.e.c.s.ClusterApplierService] [haozz-virtual-machine] master node changed {previous [], current [{haozz-virtual-machine}{Baijs2IgSieVJdTmxY9t3g}{Q6djfmXyTM-BVQjx9uGNwg}{127.0.0.1}{127.0.0.1:9300}{ml.machine_memory=2065743872, xpack.installed=true, ml.max_open_jobs=20}]}, term: 4, version: 22, reason: Publication{term=4, version=22}
[2019-05-12T00:38:21,635][INFO ][o.e.h.AbstractHttpServerTransport] [haozz-virtual-machine] publish_address {127.0.0.1:9200}, bound_addresses {[::1]:9200}, {127.0.0.1:9200}
[2019-05-12T00:38:21,635][INFO ][o.e.n.Node               ] [haozz-virtual-machine] started
[2019-05-12T00:38:21,853][WARN ][o.e.x.s.a.s.m.NativeRoleMappingStore] [haozz-virtual-machine] Failed to clear cache for realms [[]]
[2019-05-12T00:38:21,906][INFO ][o.e.l.LicenseService     ] [haozz-virtual-machine] license [fcb0fc52-ae76-472a-8112-a7e459fc4b49] mode [basic] - valid
[2019-05-12T00:38:21,923][INFO ][o.e.g.GatewayService     ] [haozz-virtual-machine] recovered [0] indices into cluster_state
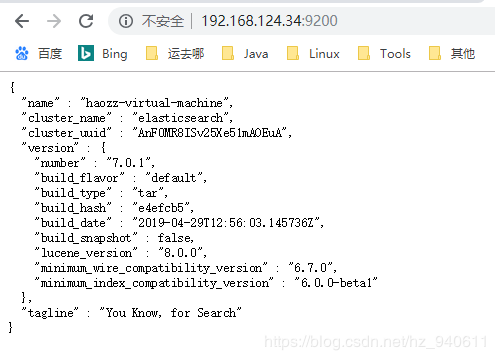
可以看到starting和started关键字,就说明启动成功了。并且默认监听了9200端口。
有以下几个要注意的点:
1.以上的启动日志打出来后,可以在vm中访问localhost:9200,看到es启动的提示。但是如果在启动终端中Ctrl+C或Ctrl+Z停止掉,Es的服务也会停掉。
2.只有vm可以访问到es启动页,我的Windows机器上访问不到,需要vim /config/elasticsearch.yml,添加network.host: 0.0.0.0;
3.报错:
ERROR: [2] bootstrap checks failed
[1]: max virtual memory areas vm.max_map_count [65530] is too low, increase to at least [262144]
[2]: the default discovery settings are unsuitable for production use; at least one of [discovery.seed_hosts, discovery.seed_providers, cluster.initial_master_nodes] must be configured
对于错误[1]:sudo vim /etc/sysctl.conf,添加配置vm.max_map_count=655360,并执行:sysctl -p,我之前就是最后一句忘了root权限执行,结果没生效,排查了好久。
对于错误[2]:是说“默认的发现设置不适合生产使用;至少有一个[发现]。seed_hosts,发现。seed_providers,集群。必须配置initial_master_nodes”。继续编辑elasticsearch.yml文件,将 #cluster.initial_master_nodes:["node-1","node-2"] 改为cluster.initial_master_nodes:["node-1"],保存退出。
再次启动,一切ok。
这篇帖子总结了以上我启动时遇到的问题:https://www.cnblogs.com/mm163/p/10720759.html。
2.3 Head插件安装
ES服务返回的信息是Json结构,Head插件就是提供了友好的web界面,还可以实现基本信息的查看,rest请求的模拟和数据的基本检索。这里直接提供Chrome-Head插件下载地址,下载之后Chrome中扩展程序直接拖入即可,不再赘述。
下面是服务端安装head插件的方法:
GitHub上搜elasticsearch-head,选择mobz/elasticsearch-head,复制zip链接,直接在服务器上wget下载。unzip解压缩master.zip,之后会有一个elasticsearch-head-master的目录。
这时需要检查node环境,参考https://blog.csdn.net/wangtaoking1/article/details/78005038这篇帖子进行安装。
npm install一下,下载完毕后cd到elasticsearch-head-master,执行npm run start,启动es-head,日志如下:
> elasticsearch-head@0.0.0 start /usr/es/elasticsearch-head-master
> grunt server

Running "connect:server" (connect) task
Waiting forever...
Started connect web server on http://localhost:9100
端口为9100,浏览器查看:
若此时集群健康值显示未连接,是因为es和es-head是属于两个进程的,他们之间的通信是有跨域问题的,需要修改一些配置。
vim config/elasticsearch.yml,在最后加上如下配置:
http.cors.enabled: true
http.cors.allow-origin: "*"
保存退出。重启,可以选择后台启动: ./bin/elasticsearch -d。再启动es-head插件。这里有一个问题,es-head插件中的localhost:9200其实仍然是windows本机的路径,所以这里要和9100的端口一样,输入虚拟机的ip。
2.3 分布式安装
建立一个集群,包含三个节点。一个master,两个slave,之前安装的会当作master。cd到之前ES的安装目录下,vim config/elasticsearch.yml,添加如下配置:
cluster.name: haozz
node.name: haozz_master
node.master: true
discovery.zen.ping.unicast.hosts: ["127.0.0.1"]
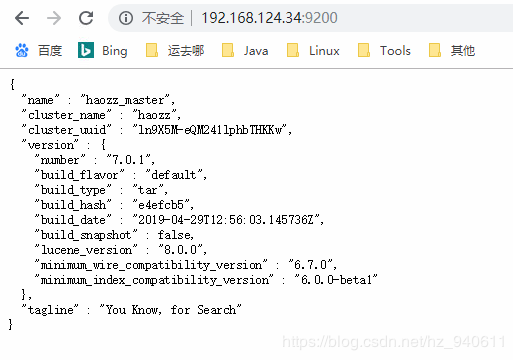
然后重启ES服务。再次访问9100端口,会发现节点名称不再是虚拟机名,而是master。接下来创建slave节点服务,首先创建es_slave1和es_slave2目录,分别安装ES服务并修改配置如下:
slave1:
cluster.name: haozz
node.name: slave1
http.port: 9201
discovery.zen.ping.unicast.hosts: ["127.0.0.1"]
slave2:
cluster.name: haozz
node.name: slave2
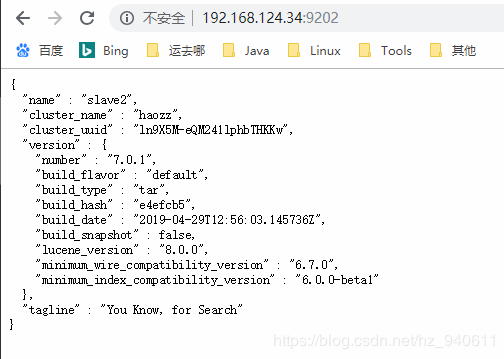
http.port: 9202
discovery.zen.ping.unicast.hosts: ["127.0.0.1"]
由于ES服务端口默认9200,因此需要修改。最后一项配置是寻找master服务的地址,也就是虚拟机本地,像Eureka的注册中心一样。分别启动slave1、slave2。
haozz_master:
slave1:
slave2:
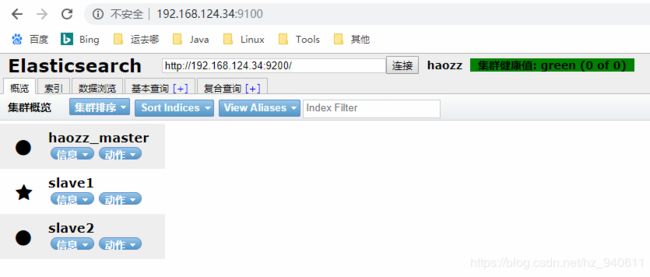
es-head:
上面这个图里,应该是haozz_master的图标是五角星,代表master节点,可是这里不知道为什么显示不对。但是看节点信息确实是master节点:
有一点,当master已经启动,两个slave还没有启动的时候,会报一个错:
[haozz_master] master not discovered or elected yet, an election requires at least 2 nodes with ids from我的理解大意是说,master没有被发现或被选举,至少要有两个slave选举它。这个在两个slave启动后就正常了。
另外,启动的时候可能会报错:
master not discovered yet, this node has not previously joined a bootstrapped (v7+) cluster这个时候需要在elasticsearch.yml中修改配置:
cluster.initial_master_nodes: ["haozz_master"]你可以通过为cluster.initial_master_nodes参数设置一系列符合主节点条件的节点的主机名或IP地址来引导启动集群。你可以在命令行或elasticsearch.yml中提供这些信息。你还需要配置发现子系统,这样节点就知道如何找到彼此。
如果未设置initial_master_nodes,那么在启动新节点时会尝试发现已有的集群。如果节点找不到可以加入的集群,将定期记录警告消息。
我之前一直是在这个数组配置里面把master和两个slave都加上,结果启动还是报错,后来去掉两个slave,只留master就好了。这个应该是v7.0+的性能特性,网上不太好找解决办法,困扰了比较久,可以参考:https://discuss.elastic.co/t/master-not-discovered-yet-this-node-has-not-previously-joined-a-bootstrapped-v7-cluster/176304。
