Android窗口和视图
Android窗口和视图
Android 窗口类型
Android 窗口与视图的关系
Android 窗口视图与 Activity/Service 的关系
Android 窗口视图的创建过程
Android 窗口视图销毁流程
前置文章
- 《Android M App Permissions 》
- 《Android系统之System Server大纲 》
前言
在 Android 设备中,我们经常会看到各种各样的窗口或者说视图。例如,我们打开一个应用,会打开主 Activity,我们可以在多个 Activity 中来回切换;我们可以从菜单键打开一个菜单的小窗口;我们经常使用 Dialog 或者 PopupWindow;又或者我们直接通过 WindowManager 的 addView() 添加一个视图。我们也会经常看到,很多不同的视图重叠在一起,一前一后,一亮一暗等等。所有的这些窗口(视图)都是如何去显示,与生成显示这些窗口(视图)的 Activity、Service 又存在怎样的关系?本文将会论述各种类型的 Android 窗口,以及它们和创建者(Activity、Service)的关系。
窗口类型介绍
什么是窗口类型
在 Android 系统显示架构中,每一个要显示的 View 所依托的窗口有一个类型(type)区分,不同的 type 的窗口的 View 显示的层次不同,位置不同,显示/销毁的过程不同等等。那么,呈现给用户的第一感受,就是各种各样的视图,对用户的视觉冲击就会非常强烈。
在代码中,每个窗口由 WindowManager.LayoutParams 的变量 type确定。如下:
public interface WindowManager extends ViewManager {
    public static class LayoutParams extends ViewGroup.LayoutParams implements Parcelable {
        public int type;
    }
}
(代码片段1)变量定义在文件 frameworks/base/core/java/android/view/WindowManager.java 中。
Android 窗口分三大类型,它们分别是:应用窗口、子窗口和系统窗口,每个大类型下又分各种不同的小类型窗口。
应用窗口(Application Windows)
应用窗口,别名基本窗口,type 的取值范围 1 ~ 99。默认情况下,所有的应用窗口和 Activity 共用相同的 AppToken,如果 Activity 销毁,所有的应用窗口同时也会销毁。Token 是什么?简单阐述,Token 是所有持有该 Token 的持有者的身份标识。如果读者对 Android 系统中 Token 不了解的,可以查阅相关材料。
目前系统已经定义的应用窗口有三种类型:
| Name | Value | Purpose |
|---|---|---|
| FIRST_APPLICATION_WINDOW | 1 | 定义 type 开始值 |
| TYPE_BASE_APPLICATION | 1 | 定义“基”窗口,Activity 的窗口为这种类型 |
| TYPE_APPLICATION | 2 | 显示在 Activity 上的窗口,如默认类型的 Dialog、PopupWindow |
| TYPE_APPLICATION_STARTING | 3 | 启动应用时的过度窗口,一般用于在目的窗口显示开始到显示这段时间内的一个过度窗口,一般会携带有动画。只有系统所使用,在 PhoneWindowManager.addFastStartingWindow() 方法中添加此窗口视图 |
| LAST_APPLICATION_WINDOW | 99 | 定义 type 结束值 |
子窗口(Sub-windows)
子窗口,依附在某个窗口上面的的窗口,type 取值范围 1000 ~ 1999。子窗口的 Token 必须是和它依附的窗口的 Token 一致。如果依附窗口被销毁,子窗口也会同时销毁。
| Name | Value | Purpose |
|---|---|---|
| FIRST_SUB_WINDOW | 1000 | 定义 type 开始值 |
| TYPE_APPLICATION_PANEL | 1000 | 定义子窗口的“基”窗口 |
| TYPE_APPLICATION_MEDIA | 1001 | 显示多媒体窗口,displayed behind their attached window |
| TYPE_APPLICATION_SUB_PANEL | 1002 | A sub-panel on top of an application window. These windows are displayed on top their attached window |
| TYPE_APPLICATION_ATTACHED_DIALOG | 1003 | Like TYPE_APPLICATION_PANEL, but layout of the window happens as that of a top-level window, not as a child of its container |
| TYPE_APPLICATION_MEDIA_OVERLAY | 1004 | Window for showing overlays on top of media windows.These windows are displayed between TYPE_APPLICATION_MEDIA and the application window. They should be translucent to be useful |
| TYPE_APPLICATION_ABOVE_SUB_PANEL | 1005 | a above sub-panel on top of an application window and it’s sub-panel windows |
| LAST_SUB_WINDOW | 1999 | 定义 type 结束值 |
系统窗口(System Windows)
系统窗口,type 取值范围 2000 ~ 2999,是一种优先级比较高的窗口,一般会显示在所有应用的上面,而且不会自动销毁。它们的 Token 为 null,不依赖任何父窗口,在Actiivty、Service 中都可以显示系统窗口。第三方应用默认情况下只允许使用 TYPE_TOAST 类型的系统窗口,设备用户打开权限可以使用更多的系统窗口,但是依然有一部分系统窗口是不允许第三方应用去使用的。
| Name | Value | Purpose |
|---|---|---|
| FIRST_SYSTEM_WINDOW | 2000 | 定义 type 开始值 |
| TYPE_STATUS_BAR | 2000 | 状态栏窗口视图 |
| TYPE_SEARCH_BAR | 2001 | 搜索条 |
| TYPE_PHONE | 2002 | These are non-application windows providing user interaction with the phone (in particular incoming calls). These windows are normally placed above all applications, but behind the status bar. |
| TYPE_SYSTEM_ALERT | 2003 | System window, such as low power alert. These windows are always on top of application windows |
| TYPE_KEYGUARD | 2004 | Keyguard window |
| TYPE_TOAST | 2005 | Transient notifications |
| TYPE_SYSTEM_OVERLAY | 2006 | System overlay windows, which need to be displayed on top of everything else. These windows must not take input focus, or they will interfere with the keyguard. |
| TYPE_PRIORITY_PHONE | 2007 | Priority phone UI, which needs to be displayed even if the keyguard is active. These windows must not take input focus, or they will interfere with the keyguard. |
| TYPE_SYSTEM_DIALOG | 2008 | Panel that slides out from the status bar |
| TYPE_KEYGUARD_DIALOG | 2009 | Dialogs that the keyguard shows |
| TYPE_SYSTEM_ERROR | 2010 | Internal system error windows, appear on top of everything they can. |
| TYPE_INPUT_METHOD | 2011 | Internal input methods windows, which appear above the normal UI. Application windows may be resized or panned to keep the input focus visible while this window is displayed. |
| TYPE_INPUT_METHOD_DIALOG | 2012 | Internal input methods dialog windows |
| TYPE_WALLPAPER | 2013 | Wallpaper window, placed behind any window that wants to sit on top of the wallpaper. |
| TYPE_STATUS_BAR_PANEL | 2014 | Panel that slides out from over the status bar |
| TYPE_SECURE_SYSTEM_OVERLAY | 2015 | Secure system overlay windows, which need to be displayed on top of everything else. |
| TYPE_DRAG | 2016 | the drag-and-drop pseudowindow. There is only one drag layer (at most), and it is placed on top of all other windows. |
| TYPE_STATUS_BAR_SUB_PANEL | 2017 | Panel that slides out from under the status bar |
| TYPE_POINTER | 2018 | (mouse) pointer |
| TYPE_NAVIGATION_BAR | 2019 | Navigation bar (when distinct from status bar) |
| TYPE_VOLUME_OVERLAY | 2020 | The volume level overlay/dialog shown when the user changes the system volume. |
| TYPE_BOOT_PROGRESS | 2021 | The boot progress dialog, goes on top of everything in the world. |
| TYPE_INPUT_CONSUMER | 2022 | Window type to consume input events when the systemUI bars are hidden. |
| TYPE_DREAM | 2023 | Dreams (screen saver) window, just above keyguard. |
| TYPE_NAVIGATION_BAR_PANEL | 2024 | Navigation bar panel (when navigation bar is distinct from status bar) |
| TYPE_DISPLAY_OVERLAY | 2026 | Display overlay window. Used to simulate secondary display devices. |
| TYPE_MAGNIFICATION_OVERLAY | 2027 | Magnification overlay window. Used to highlight the magnified portion of a display when accessibility magnification is enabled |
| TYPE_KEYGUARD_SCRIM | 2029 | keyguard scrim window. Shows if keyguard needs to be restarted. |
| TYPE_PRIVATE_PRESENTATION | 2030 | Window for Presentation on top of private |
| TYPE_VOICE_INTERACTION | 2031 | Windows in the voice interaction layer. |
| TYPE_ACCESSIBILITY_OVERLAY | 2032 | Windows that are overlaid only by a connected AccessibilityService |
| TYPE_VOICE_INTERACTION_STARTING | 2033 | Starting window for voice interaction layer. |
| TYPE_DOCK_DIVIDER | 2034 | Window for displaying a handle used for resizing docked stacks. This window is owned by the system process. |
| TYPE_QS_DIALOG | 2035 | Like TYPE_APPLICATION_ATTACHED_DIALOG, but used by Quick Settings Tiles. |
| TYPE_SCREENSHOT | 2036 | Shares similar characteristics with {@link #TYPE_DREAM}. The layer is reserved for screenshot region selection. |
| TYPE_TOP_MOST | 2037 | Top most |
| LAST_SYSTEM_WINDOW | 2999 | 定义 type 结束值 |
Android 定义的系统窗口类型有点多,满满的一表格。对于第三方应用而言,能够使用那些系统窗口类型呢?我们看看权限检测过程。
switch (type) {
    case TYPE_TOAST:
        // XXX right now the app process has complete control over
        // this...  should introduce a token to let the system
        // monitor/control what they are doing.
        outAppOp[0] = AppOpsManager.OP_TOAST_WINDOW;
        break;
    case TYPE_DREAM:
    case TYPE_INPUT_METHOD:
    case TYPE_WALLPAPER:
    case TYPE_PRIVATE_PRESENTATION:
    case TYPE_VOICE_INTERACTION:
    case TYPE_ACCESSIBILITY_OVERLAY:
    case TYPE_QS_DIALOG:
    /// M: Support IPO window.
    case TYPE_TOP_MOST:
        // The window manager will check these.
        break;
    case TYPE_PHONE:
    case TYPE_PRIORITY_PHONE:
    case TYPE_SYSTEM_ALERT:
    case TYPE_SYSTEM_ERROR:
    case TYPE_SYSTEM_OVERLAY:
        permission = android.Manifest.permission.SYSTEM_ALERT_WINDOW;
        break;
    default:
        permission = android.Manifest.permission.INTERNAL_SYSTEM_WINDOW;
}
(代码片段2)代码定义在文件 frameworks/base/services/core/java/com/android/server/policy/PhoneWindowManager.java 中。
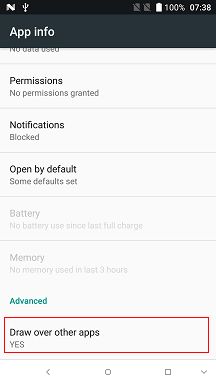
如上面的代码,如果 type 是 TYPE_TOAST 的,不需要单独其它任何权限,如果是 TYPE_DREAM TYPE_INPUT_METHOD … TYPE_TOP_MOST 这些类型的窗口,第三方应用不能申请,也需要 app token;TYPE_PHONE … TYPE_SYSTEM_OVERLAY 需要声明权限 android.permission.SYSTEM_ALERT_WINDOW,且设别用户需要在 Settings –> AppInfo 中打开该权限(如下图)。
在实际 App 开发过程中,如果应用检测没有该权限,可以通过如下代码引导用户直接跳到 AppInfo。
Intent intent = new Intent(Settings.ACTION_MANAGE_OVERLAY_PERMISSION, Uri.parse("package:" + packageName));
startActivityForResult(intent, requstCode);
(代码片段3)
回到代码片段2,其它类型的系统窗口则需要 android.permission.INTERNAL_SYSTEM_WINDOW 权限,这个权限只有系统签名的应用才能使用这些类型的系统窗口,第三方应用无法使用。
Activity显示View的过程
当系统启动 Activity 时,会先调用 Activity 的 attach() 方法
final void attach(Context context, ActivityThread aThread,
        Instrumentation instr, IBinder token, ....., Window window) {
    .....
    mWindow = new PhoneWindow(this, window);
    mWindow.setWindowControllerCallback(this);
    mWindow.setCallback(this);
    .....
    mToken = token;
    mIdent = ident;
    mApplication = application;
    mIntent = intent;
    .....
    // 设置 WindowMananger 和 AppToken 到 Window 对象
    mWindow.setWindowManager(
            (WindowManager)context.getSystemService(Context.WINDOW_SERVICE),
            mToken, mComponent.flattenToString(),
            (info.flags & ActivityInfo.FLAG_HARDWARE_ACCELERATED) != 0);
    .....
}
(代码片段4)这个方法定义在文件 frameworks/base/core/java/android/app/Activity.java 中。
如上面的代码,生成一个 PhoneWindow 对象,注意这里的 mWindow.setWindowManager() 方法,该方法会创建一个包含 parentWindow指向 PhoneWindow 的对象的 WindowManagerImpl 实例。
执行完 attach() 方法后,会执行 ActivityThread 的 handleResumeActivity() 方法,如下:
final void handleResumeActivity(IBinder token,
            boolean clearHide, boolean isForward, boolean reallyResume, int seq, String reason) {
    ActivityClientRecord r = mActivities.get(token);
    .....
    r = performResumeActivity(token, clearHide, reason);

    .....
        if (r.window == null && !a.mFinished && willBeVisible) {
            r.window = r.activity.getWindow();
            View decor = r.window.getDecorView();
            decor.setVisibility(View.INVISIBLE);
            ViewManager wm = a.getWindowManager();
            WindowManager.LayoutParams l = r.window.getAttributes();
            a.mDecor = decor;
            l.type = WindowManager.LayoutParams.TYPE_BASE_APPLICATION;
            l.softInputMode |= forwardBit;
            .....
            if (a.mVisibleFromClient && !a.mWindowAdded) {
                a.mWindowAdded = true;
                wm.addView(decor, l);
            }
    .....
}
(代码片段5)这个方法定义在文件 frameworks/base/core/java/android/app/ActivityThread.java 中。
上面的方法中,先调用 performResumeActivity() 会回调 Activity 的 onResume() 方法,然后设置 Activity 的窗口类型为 TYPE_BASE_APPLICATION,然后把 decor View add 到屏幕显示。我们先来看看 WindowManager.addView() 的过程。
WindowManager addView过程
我们通过 getSystemService() 获取到得 WindowManager 对象,实质是 WindowManagerImpl 的实例,读者可以参考文章《Android System Server大纲之VibratorService 》。在 Activity 中调用 getSystemService(Context.WINDOW_SERVICE) 中获取到 WindowManagerImpl 对象是 Activity 创建时的 attach() 方法中生成的对象实例,持有 parentWindow(Activity 的 PhoneWindow) 对象,在 Service 中通过 getSystemService(Context.WINDOW_SERVICE) 则获取到的是不持有 parentWindow 对象的 WindowManagerImpl 实例。
我们看看 addView() 的过程
public void addView(@NonNull View view, @NonNull ViewGroup.LayoutParams params) {
    applyDefaultToken(params);
    mGlobal.addView(view, params, mContext.getDisplay(), mParentWindow);
}
(代码片段6)这个方法定义在文件 frameworks/base/core/java/android/view/WindowManagerImpl.java 中。
直接调用了 mGlobal 的 addView() 方法
public void addView(View view, ViewGroup.LayoutParams params,
        Display display, Window parentWindow) {
    .....
    final WindowManager.LayoutParams wparams = (WindowManager.LayoutParams) params;
    if (parentWindow != null) {
        parentWindow.adjustLayoutParamsForSubWindow(wparams);
    } else {
        .....
    }

    ViewRootImpl root;
    View panelParentView = null;
    .....
        int index = findViewLocked(view, false);
        ......
        root = new ViewRootImpl(view.getContext(), display);

        view.setLayoutParams(wparams);
        // 所有的根View保存到mViews中
        mViews.add(view);
        // View对应的ViewRootImpl保存到mRoots中
        mRoots.add(root);
        // View对应的WindowManager.LayoutParams保存到mParams
        mParams.add(wparams);
        /// M: Add log for tracking mViews.
        Log.d("WindowClient", "Add to mViews: " + view + ", this = " + this);
    }

    // do this last because it fires off messages to start doing things
    try {
        // 设置 View 的显示到屏幕,这里三个参数中,没有 Window 对象,因此,Window对象在图形显示中没有直接的关系。
        root.setView(view, wparams, panelParentView);
    } catch (RuntimeException e) {
    }
}
(代码片段7)这个方法定义在文件 frameworks/base/core/java/android/view/WindowManagerGlobal.java 中。
在上面的方法中,由于 WindowManagerGlobal 是静态单例模式,因此,mViews、mRoots 和 mParams 会保存了应用所有的 View 和 View 相关的 ViewRootImpl 和 WindowManager.LayoutParams。如果是 add Activity 的 View,或者在 Activity 中获取的 WindowManagerImpl 对象,parentWindow 为 Activity 的 PhoneWindow 对象实例,因此会调用 Window.adjustLayoutParamsForSubWindow() 方法
void adjustLayoutParamsForSubWindow(WindowManager.LayoutParams wp) {
    CharSequence curTitle = wp.getTitle();
    if (wp.type >= WindowManager.LayoutParams.FIRST_SUB_WINDOW &&
            wp.type <= WindowManager.LayoutParams.LAST_SUB_WINDOW) {
        if (wp.token == null) {
            View decor = peekDecorView();
            if (decor != null) {
                // ViewRootImpl 的 IWindow binder
                wp.token = decor.getWindowToken();
            }
        }
        .....
    } else if (wp.type >= WindowManager.LayoutParams.FIRST_SYSTEM_WINDOW &&
            wp.type <= WindowManager.LayoutParams.LAST_SYSTEM_WINDOW) {
        if (curTitle == null || curTitle.length() == 0) {
            final StringBuilder title = new StringBuilder(32);
            title.append("Sys").append(wp.type);
            if (mAppName != null) {
                title.append(":").append(mAppName);
            }
            wp.setTitle(title);
        }
    } else {
        // 设置 App token
        if (wp.token == null) {
            wp.token = mContainer == null ? mAppToken : mContainer.mAppToken;
        }
        if ((curTitle == null || curTitle.length() == 0)
                && mAppName != null) {
            wp.setTitle(mAppName);
        }
    }
    .....
}
(代码片段8)这个方法定义在文件 frameworks/base/core/java/android/view/Window.java 中。
这个方法中,如果窗口的类型是 System Windows,则不设置 WindowManager.LayoutParams.token,即 token = null, 如果是非 Application Windows,非 Sub-Windows,则设置 WindowManager.LayoutParams.token 为 AppToken,mAppToken 在代码片段4中 attach() 方法中调用 setWindowManager() 的时候初始化。如果窗口的类型是 Sub-Windows,则是设置 WindowManager.LayoutParams.token 为 decor.getWindowToken(),decor.getWindowToken() 获取到 token 实例到底是谁呢?
public IBinder getWindowToken() {
    // 返回 AttachInfo 的对象 mAttachInfo 持有的 mWindowToken 对象
    return mAttachInfo != null ? mAttachInfo.mWindowToken : null;
}
(代码片段9)这个方法定义在文件 frameworks/base/core/java/android/view/View.java 中。
继续看 mAttachInfo 的初始化过程
// 设置时间处理机制
AttachInfo(IWindowSession session, IWindow window, Display display,
        ViewRootImpl viewRootImpl, Handler handler, Callbacks effectPlayer) {
    mSession = session;
    mWindow = window;
    // 初始化 mWindowToken
    mWindowToken = window.asBinder();
    mDisplay = display;
    mViewRootImpl = viewRootImpl;
    mHandler = handler;
    mRootCallbacks = effectPlayer;
}
(代码片段10)这个方法定义在文件 frameworks/base/core/java/android/view/View.java 中。
mWindowToken 通过 window.asBinder() 初始化,window 是传过来的参数,继续看 AttachInfo 实例化的地方
public ViewRootImpl(Context context, Display display) {
    mContext = context;
    mWindowSession = WindowManagerGlobal.getWindowSession();
    // 初始化 mWindow
    mWindow = new W(this);
    .....
    // 初始化 View 的 AttachInfo,传入 mWindow 对象
    mAttachInfo = new View.AttachInfo(mWindowSession, mWindow, display, this, mHandler, this);
    .....
}
(代码片段11)这个方法定义在文件 frameworks/base/core/java/android/view/ViewRootImpl.java 中。
AttachInfo 的初始化是在 ViewRootImpl 初始化的时候完成,ViewRootImpl 的实例化的地方在代码片段7中。mWindow 是 W 的实例,W 的定义如下:
static class W extends IWindow.Stub {}(代码片段12)这个方法定义在文件 frameworks/base/core/java/android/view/ViewRootImpl.java 中。
回到代码片段8,当窗口类型是 Sub-Windows 时,WindowManager.LayoutParams.token 实际指向 ViewRootImpl 持有的对象 mWindow 的 Binder 句柄 IBinder。
因此,当窗口类型是 Application Windows 时,token = AppToken,当窗口类型是 Sub-Windows 时,token = mWindowToken,当窗口类型是 System Windows 时,token = null。因为 token 的值不同,确定了不同类型的窗口不同的显示规则和销毁过程。单从这点出发,在 Service 中不能创建类型为非 System Windows 的窗口,所以 Service 中不能随意添加视图。
接着代码片段7,继续往下看 ViewRootImpl.setView() 方法
public void setView(View view, WindowManager.LayoutParams attrs, View panelParentView) {
    synchronized (this) {
        if (mView == null) {
            mView = view;
            .....
            attrs = mWindowAttributes;
            setTag();
            .....
            requestLayout();
            .....
            try {
                mOrigWindowType = mWindowAttributes.type;
                mAttachInfo.mRecomputeGlobalAttributes = true;
                collectViewAttributes();
                res = mWindowSession.addToDisplay(mWindow, mSeq, mWindowAttributes,
                        getHostVisibility(), mDisplay.getDisplayId(),
                        mAttachInfo.mContentInsets, mAttachInfo.mStableInsets,
                        mAttachInfo.mOutsets, mInputChannel);
            } catch (RemoteException e) {}
            .....
            // 事件处理
            if (mInputChannel != null) {
                if (mInputQueueCallback != null) {
                    mInputQueue = new InputQueue();
                    mInputQueueCallback.onInputQueueCreated(mInputQueue);
                }
                mInputEventReceiver = new WindowInputEventReceiver(mInputChannel,
                        Looper.myLooper());
            }
            .....
        }
    }
}
(代码片段13)这个方法定义在文件 frameworks/base/core/java/android/view/ViewRootImpl.java 中。
首先调用 requestLayout() 对 View 进行绘制,这个过程就会调用 View 的三大著名方法, measure()、layout() 和 draw(), 如下:
private void performTraversals() {
    .....
    // 计算 View 大小
    performMeasure(childWidthMeasureSpec, childHeightMeasureSpec);
    int width = host.getMeasuredWidth();
    int height = host.getMeasuredHeight();
    .....
    // 定位 View 位置
    performLayout(lp, mWidth, mHeight);
    .....
    // 在画布上绘制 View
    performDraw();
    .....
}
(代码片段14)这个方法定义在文件 frameworks/base/core/java/android/view/ViewRootImpl.java 中。
回到代码片段13,View 绘制完成后,调用 IWindowSession.addToDisplay() 方法,最终会调用到 WindowManagerService 的 addWindow() 方法
public int addWindow(Session session, IWindow client, int seq,
        WindowManager.LayoutParams attrs, int viewVisibility, int displayId,
        Rect outContentInsets, Rect outStableInsets, Rect outOutsets,
        InputChannel outInputChannel) {
    WindowToken token = mTokenMap.get(attrs.token);
    AppWindowToken atoken = null;
    // 实例化 WindowState, WindowState 可以对不同类型的窗口的显示位置进行控制
    WindowState win = new WindowState(this, session, client, token,
        attachedWindow, appOp[0], seq, attrs, viewVisibility, displayContent);
    mPolicy.adjustWindowParamsLw(win.mAttrs);
    win.setShowToOwnerOnlyLocked(mPolicy.checkShowToOwnerOnly(attrs));
    res = mPolicy.prepareAddWindowLw(win, attrs);
    // 计算窗口的层次关系
    addWindowToListInOrderLocked(win, true);
    .....
}
(代码片段15)这个方法定义在文件 frameworks/base/services/core/java/com/android/server/wm/WindowManagerService.java 中。
在 WindowState 中持有两个变量 mSubLayer 和 mBaseLayer,这两个变量在 addWindowToListInOrderLocked() 方法中计算出具体的值,者两个值对应 Android 系统中 View 渲染框架 SurfaceFlinger 中的 Layer。在 View 的位置确认中,有水平面的 x/y 轴以外,还有立体的 z轴,z 轴对应 SurfaceFlinger 中的 Layer,也就是 mSubLayer 和 mBaseLayer,从而确定了不同窗口类型显示的层次不同。
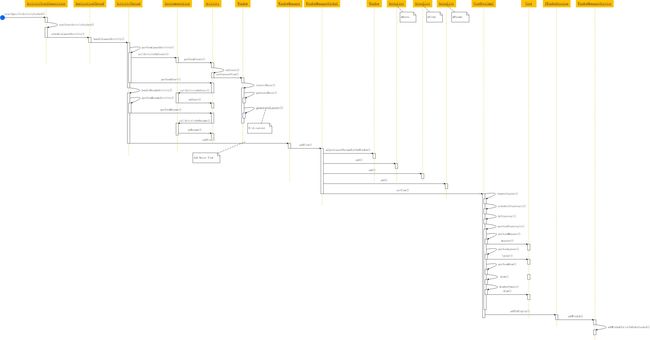
Add View时序图
窗口视图的销毁
当我们推出 Activity 的时候,针对 Applicaton Windows、Sub-Windows 和 System Windows 如何销毁?我们来看一下这个处理过程。Activity 销毁时,AMS 先调用了 ActivityThread 的 handleDestroyActivity() 方法
private void handleDestroyActivity(IBinder token, boolean finishing,
        int configChanges, boolean getNonConfigInstance) {
    ActivityClientRecord r = performDestroyActivity(token, finishing,
            configChanges, getNonConfigInstance);
    WindowManager wm = r.activity.getWindowManager();
    // Docor View
    View v = r.activity.mDecor;
    if (v != null) {
        .....、
        // ViewRootImpl 的 mWindow 的 Binder 句柄
        IBinder wtoken = v.getWindowToken();
        if (r.activity.mWindowAdded) {
            if (r.mPreserveWindow) {
                .....
            } else {
                // 移除 Decor View
                wm.removeViewImmediate(v);
            }
        }
        if (wtoken != null && r.mPendingRemoveWindow == null) {
            // 移除依附在 ViewRootImpl 的 mWindow 的 Binder 句柄 mWindowToken 的 View
            WindowManagerGlobal.getInstance().closeAll(wtoken,
                    r.activity.getClass().getName(), "Activity");
        } else if (r.mPendingRemoveWindow != null) {
            WindowManagerGlobal.getInstance().closeAllExceptView(token, v,
                    r.activity.getClass().getName(), "Activity");
        }
        r.activity.mDecor = null;
    }
    if (r.mPendingRemoveWindow == null) {
        // 移除依附在 AppToken 的 View
        WindowManagerGlobal.getInstance().closeAll(token,
                r.activity.getClass().getName(), "Activity");
    }
}
(代码片段16)这个方法定义在文件 frameworks/base/core/java/android/app/ActivityThread.java 中。
如上面的代码,v.getWindowToken() 获取到 ViewRootImpl 的持有的变量 mWindow 的 Binder 句柄 mWindowToken,窗口类型为 Sub-Windows 的使用该 token。然后先调用 wm.removeViewImmediate(v) 移除 Decor View,等于 Activity 的 View 被移除了,然后移除 Sub-Windows 类型的 View,接着移除使用 AppToken 类型为 Application Windows 的 View,我们往下看 closeAll() 的过程
public void closeAll(IBinder token, String who, String what) {
    // 直接调用了 closeAllExceptView()
    closeAllExceptView(token, null /* view */, who, what);
}

public void closeAllExceptView(IBinder token, View view, String who, String what) {
    synchronized (mLock) {
        int count = mViews.size();
        for (int i = 0; i < count; i++) {
            // 在closeAll()中传递过来的 view 就是 null, 所以(view == null || mViews.get(i) != view) = true,
            // 第一次传递过来的是 mWindowToken, 第二次传递过来的是 AppToken,
            // 所以 token == null = false,所以这里只看 mParams.get(i).token == token,
            // 对于 Application Windows 和 Sub-Windows,mParams.get(i).token == token = true,
            // 对于 System Windows, mParams.get(i).token == token = false,
            // 所以,Activity 推出时,System Windows 不会销毁,非 System Windows 被销毁
            if ((view == null || mViews.get(i) != view)
                    && (token == null || mParams.get(i).token == token)) {
                ViewRootImpl root = mRoots.get(i);

                if (who != null) {
                    WindowLeaked leak = new WindowLeaked(
                            what + " " + who + " has leaked window "
                            + root.getView() + " that was originally added here");
                    leak.setStackTrace(root.getLocation().getStackTrace());
                    Log.e(TAG, "", leak);
                }

                removeViewLocked(i, false);
            }
        }
    }
}
(代码片段16)这个方法定义在文件 frameworks/base/core/java/android/view/WindowManagerGlobal.java 中。
上面的方法中,首先获取到应用所有的 View(根View) 的数量,然后一个逐一遍历,通过一个条件判断,如果成立,调用 removeViewLocked() 移除 View。具体逻辑判断看代码中的注释。
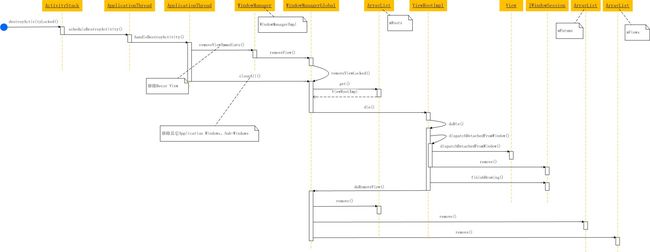
View移除时序图
升级Dialog窗口类型
我们看 Dialog 初始化是的窗口类型
// 实例化 WindowManager.LayoutParams
private final WindowManager.LayoutParams mWindowAttributes =
    new WindowManager.LayoutParams();
(代码片段17)这个变量定义在文件 frameworks/base/core/java/android/view/Window.java 中。
public LayoutParams() {
    super(LayoutParams.MATCH_PARENT, LayoutParams.MATCH_PARENT);
    // 默认窗口类型 type 为 TYPE_APPLICATION
    type = TYPE_APPLICATION;
    format = PixelFormat.OPAQUE;
}
(代码片段18)这个方法定义在文件 frameworks/base/core/java/android/view/WindowManager.java 中。
我们可以通过如下方法,把 Dialog 的窗口类型升级,如下:
Dialog.getWindow().setType(WindowManager.LayoutParams.TYPE_SYSTEM_ALERT);(代码片段19)这个方法定义在文件 frameworks/base/core/java/android/app/Dialog.java 中。
升级 Dialog 的窗口类型为 System Windows,当 Activity 销毁时,Dialog 就不会被销毁。
升级PopupWindow窗口类型
先看看默认情况下 PopupWindow 的窗口类型
// 默认使用 TYPE_APPLICATION_PANEL 的 Sub-Windows,
// 默认使用调用显示是传递进来的 View 的 mWindowToken
private int mWindowLayoutType = WindowManager.LayoutParams.TYPE_APPLICATION_PANEL;
(代码片段20)这个变量定义在文件 frameworks/base/core/java/android/widget/PopupWindow.java 中。
private WindowManager.LayoutParams createPopupLayoutParams(IBinder token) {
    final WindowManager.LayoutParams p = new WindowManager.LayoutParams();
    .....
    p.flags = computeFlags(p.flags);
    // 设置窗口类型
    p.type = mWindowLayoutType;
    p.token = token;
    .....
    return p;
}
(代码片段21)这个方法定义在文件 frameworks/base/core/java/android/widget/PopupWindow.java 中。
可以通过调用 PopupWindow 的 setWindowLayoutType() 方法改变窗口类型
// API 23 才添加的方法
public void setWindowLayoutType(int layoutType) {
    mWindowLayoutType = layoutType;
}
(代码片段22)这个方法定义在文件 frameworks/base/core/java/android/widget/PopupWindow.java 中。
升级 Activity 窗口类型
是否可以升级 Activity 的窗口类型?不能,就算你调用了 getWindow().setType() 方法,改变了窗口类型,也不会生效。因为在 handleResumeActivity() 方法中显示 Decor View 时,强制改变了窗口类型
final void handleResumeActivity(IBinder token,
        boolean clearHide, boolean isForward, boolean reallyResume, int seq, String reason) {
    ActivityClientRecord r = mActivities.get(token);
            .....
            ViewManager wm = a.getWindowManager();
            WindowManager.LayoutParams l = r.window.getAttributes();
            a.mDecor = decor;
            // 强制转换类型为 TYPE_BASE_APPLICATION
            l.type = WindowManager.LayoutParams.TYPE_BASE_APPLICATION;
            .....
            if (a.mVisibleFromClient && !a.mWindowAdded) {
                a.mWindowAdded = true;
                wm.addView(decor, l);
            }
(代码片段23)这个方法定义在文件 frameworks/base/core/java/android/app/ActivityThread.java 中。
总结
在本文中,我们认识了 Android 定义的 Application Windows、Sub-windows 和 System Windows 三大类型的窗口类型,不同的窗口类型在界面的显示框架 SurfaceFlinger 中,对应不同的 Layer,从而有一个 Z 轴的定义。Activity 的 DecorView 所对应的窗口类型为 WindowManager.LayoutParams.TYPE_BASE_APPLICATION,不能改变。Dialog 默认的窗口类型则是 WindowManager.LayoutParams.TYPE_APPLICATION,可以通过 Dialog.getWindow().setType() 改变;PopupWindow 默认定义的窗口类型为 WindowManager.LayoutParams.TYPE_APPLICATION_PANEL,可以通过 PopupWindow.setWindowLayoutType() 改变窗口类型,但是这是 Android API 23 才添加的方法。
不同的窗口类型的销毁过程不同,和一个 View 共用相同的 mWindowToken 的窗口,当这个 View 被销毁时,对应的窗口也会被销毁;当 Activity 销毁时,和 Activity 共用 AppToken 和 mWindowToken 的窗口也会同时被销毁。在 Service 中,只能显示系统类型的窗口,而且是某些不用指定 Token 的系统窗口。在显示框架中,没有 Window 的概念,只有 View 的概念,所以 Window 只是 View 的呈现的一个抽象,确定 View 呈现样式的一个通道。


