一、接口说明文档

环境准备:
安装火狐
安装插件: httprequester
https://addons.mozilla.org/en-US/firefox/addon/httprequester/
接口返回码:
接口返回code说明:
'00' : 成功
'01':用户已存在
'02':参数不合法
'03':参数错误(1、用户信息错误 2、参数错误,数据库中不存在相应数据)
'999':未知错误,看后台日志
请求接口例子:
Md5计算网站:
http://md5jiami.51240.com/
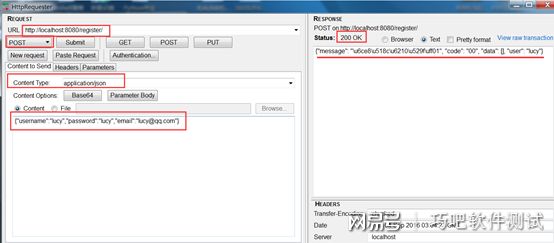
1、注册:post方法
请求地址:http:// 127.0.0.1:8080/register/
请求内容: {"username":"wulaoshi","password":"a12345678","email":"[email protected]"}
返回内容:
{"code": "00", "userid": 5}
2、登录:post方法
请求地址:http://127.0.0.1:8080/login/
请求内容:{"username":"wulaoshi","password":"e9bc0e13a8a16cbb07b175d92a113126"}
返回内容:{"token": "94beb86afbf126a345b0cdf30e5e5202", "code": "00", "userid": 5, "login_time": "2016-10-13 22:50:24"}
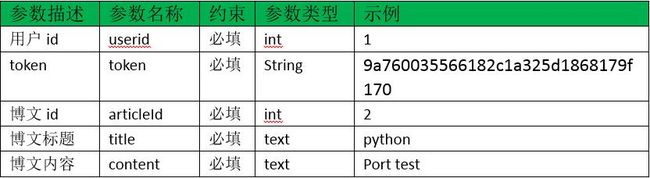
3、新增博文:post方法
请求地址:http://127.0.0.1:8080/create/
请求内容:{"userid":5, "token": "94beb86afbf126a345b0cdf30e5e5202","title":"python", "content":"python port test"}
返回内容:{"data": [{"content": "python port test", "title": "python"}], "code": "00", "userid": 5}
4、修改博文:使用put方法
请求地址:http://127.0.0.1:8080/update/
请求内容:{"userid":5, "token": "94beb86afbf126a345b0cdf30e5e5202","articleId":11, "title":"gloryroad", "content":"test test!!!!!!!!!!!!!"}
返回内容:
{"articleId": 11, "update_time": "2016-10-13 23:11:36", "code": "00", "userid": 5}
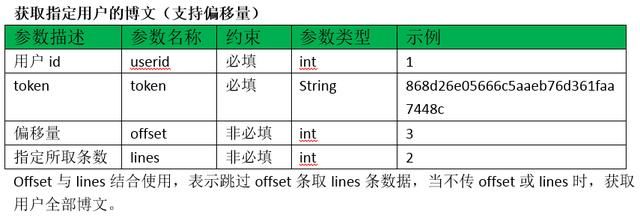
5、查询用户博文:post方法
请求地址:http://127.0.0.1:8080/getBlogsOfUser/
请求内容:{"userid":5, "token": "94beb86afbf126a345b0cdf30e5e5202"}
返回内容:
{"data": [{"update_time": null, "title": "python", "content": "python port test", "articleId": 11, "owner": 5, "posted_on": "2016-10-13 22:56:49"}], "code": "00", "userid": 5}/
6、查询博文内容:get方法
请求地址:http://127.0.0.1:8080/getBlogContent/11
请求内容:空
返回内容:{"code": "00", "data": [{"update_time": "2016-10-13 23:11:36", "title": "gloryroad", "content": "test test!!!!!!!!!!!!!", "articleId": 11, "owner": 5, "posted_on": "2016-10-13 22:56:49"}]}/
7、批量查询博文内容:
请求地址:http://127.0.0.1:8080/getBlogsContent/articleIds=11,12
请求内容:空
返回内容:{"code": "00", "data": [{"update_time": "2016-10-13 23:11:36", "title": "gloryroad", "content": "test test!!!!!!!!!!!!!", "articleId": 11, "owner": 5, "posted_on": "2016-10-13 22:56:49"}, {"update_time": null, "title": "mysql0", "content": "mysql learn 0", "articleId": 12, "owner": 1, "posted_on": "2016-10-13 23:04:35"}]}/
8、删除博文:
请求地址:http://127.0.0.1:8080/delete/
请求内容:{"userid":5, "token": "94beb86afbf126a345b0cdf30e5e5202","articleId":[11]}
返回内容{"articleId": [11], "code": "00", "userid": 5}
Python2.7 代码实例
一、登录模块
1、用户注册
register
POST /register
Parameters:

参数规则说明:
username:
1、字母、数字组成
2、长度2~20位
3、字母不区分大小写
password:
1、长度8~20位
2、必须含有字母和数字
email:标准的email规则
Json串格式参数,示例:{"username":"lily","password":"lily","email":"[email protected]"}
Response:
{"code": "00", "userid": 2}
example
importrequests
importjson
print"register------"
data = json.dumps({'username':'lily','password':'wcx123wac','email':'[email protected]'}) #
r = requests.post('http://localhost:8080/register/', data= data)
print r.status_code
print r.text
print type(r.json())
print str(r.json())
2、用户登录
login
POST /login

Json串格式参数,示例:
{"username":"lily", "password":"0550876efca0820e30e7398c177fd30b"}
Response:
{"token": "a1c0738a6cf054606b055a419c3390f3", "code": "00", "userid": 3, "login_time": "2016-09-06 12:02:14"}
example
importhashlib
m5 = hashlib.md5()
m5.update('wcx123wacs')
pwd = m5.hexdigest()
print pwd
print"login------"
data = json.dumps({'username':'lily','password': pwd}) #
r = requests.post('http://localhost:8080/login/', data = data)
二、博文编辑模块
1、新增博文
create
POST /create

{"userid":3, "token": "a1c0738a6cf054606b055a419c3390f3", "title":"python", "content":"python port test"}
Response:
{"data": [{"content": "python port test", "title": "python"}], "code": "00", "userid": 3}
example
m5.update('lily')
print pwd
print"create post------"
data = json.dumps({'userid': 1, token:"a1c0738a6cf054606b055a419c3390f3"s,'title':"mysql",'content':'mysql learn'})
r = requests.post('http://localhost:8080/create/', data = data)
2、修改博文
update
POST /update
{"userid":3, "token": "a1c0738a6cf054606b055a419c3390f3", "articleId":11, "title":"python", "content":"test test"}
Response:
example
import requests
import json
print "query posts of user------"
data = json.dumps({'userid':3, "token": "a1c0738a6cf054606b055a419c3390f3", 'offset':2, 'lines':3})
r = requests.post('http://localhost:8080/getBlogsOfUser/', data = data)
3、查询用户的博文
getBlogsOfUser
POST /getBlogsOfUser
{"userid":3, "token": "a1c0738a6cf054606b055a419c3390f3"}
{"userid":3,"token": "a1c0738a6cf054606b055a419c3390f3", "offset":2, "lines":3}
Response:
{"data": [{"update_time": null, "title": "oracle", "content": "oracle test", "articleId": 5, "owner": 2, "posted_on": "2016-09-02 14:24:58"}, {"update_time": null, "title": "C", "content": "C test", "articleId": 4, "owner": 2, "posted_on": "2016-09-02 14:24:49"}], "code": "00", "userid": 2}
example:
print"query posts of user------"
data = json.dumps({'userid':3,"token":"a1c0738a6cf054606b055a419c3390f3",'offset':2,'lines':3})
4、查询博文内容
getBlogContent
POST /getBlogContent

请求地址,示例:
http://localhost:8080/getBlogContent/1
Response:
{"code": "00", "data": [{"update_time": null, "title": "python", "content": "python port test", "articleId": 1, "owner": 2, "posted_on": "2016-09-02 14:24:24"}]}
example:
print"query post------"
articleId = 2
r = requests.get('http://localhost:8080/getBlogContent/'+ str(articleId))
5、批量查询博文
getBlogsContent
POST /getBlogsContent

请求地址,示例:
http://localhost:8080/getBlogsContent/articleIds=1,2,3
Response:
{"code": "00", "data": [{"update_time": null, "title": "python", "content": "python port test", "articleId": 1, "owner": 2, "posted_on": "2016-09-02 14:24:24"}, {"update_time": null, "title": "java", "content": "java port test", "articleId": 2, "owner": 2, "posted_on": "2016-09-02 14:24:32"}, {"update_time": null, "title": "C++", "content": "C++ test", "articleId": 3, "owner": 2, "posted_on": "2016-09-02 14:24:42"}]}
example:
print"query posts by blogId------"
r = requests.get('http://localhost:8080/getBlogsContent/'+ str("articleIds=1,2,3"))
6、删除博文
delete
POST /delete

{"userid":1, "token": "868d26e05666c5aaeb76d361faa7448c", "articleId":[1,2,3]}
Response:
{"articleId": [1, 2, 3], "code": "00", "userid": 1}
example:
print pwd
print"delete post------"
data = json.dumps({"userid":1,"token":"868d26e05666c5aaeb76d361faa7448c","articleId":[3,4,5]}) #
r = requests.delete('http://localhost:8080/delete/', data = data)
说明
如果在一些接口请求插件(比如httprequester)中请求这些接口时,传参时,键值对间不能存在空格,并且字符串必须用双引号引起来,跟使用Python程序请求有区别。