在 Spring Boot 使用 Swagger2
在 Spring Boot 使用 Swagger2
世界上最流行的API工具
Swagger是世界上最大的OpenAPI规范(OAS)API开发工具框架,
在整个API生命周期中实现开发,从设计和文档到测试和部署。
1.什么是 Swagger2
Swagger 是一个功能强大且易于使用的API开发人员工具套件,适用于团队和个人,支持从整个API生命周期(从设计和文档到测试和部署)的开发。Swagger 用于更好地实现和可视化规范中定义的API。
2.为什么使用 Swagger2
- 设计是API开发的基础。Swagger2 使API设计变得轻而易举,为开发人员,架构师和产品所有者提供了易于使用的工具。
- Swagger2 提供了快速原型设计和构建API功能的工具。
- Swagger2 提供了一系列用于生成、可视化和维护API文档的解决方案。
- Swagger2 工具使您可以轻松快速地创建,管理和执行API测试。
3.如何使用 Swagger2
3.1配置 Swagger2
- 向 pom.xml 添加 Swagger2 依赖
        <!-- swagger2依赖 -->
        <dependency>
            <groupId>io.springfox</groupId>
            <artifactId>springfox-swagger2</artifactId>
            <version>2.5.0</version>
        </dependency>
        <dependency>
            <groupId>io.springfox</groupId>
            <artifactId>springfox-swagger-ui</artifactId>
            <version>2.7.0</version>
        </dependency>
- 创建 Swagger2 的配置类
@Configuration
@EnableSwagger2
public class SwaggerConfig {
    @Bean
    public Docket createRestApi() {
        return new Docket(DocumentationType.SWAGGER_2)
                .enable(true)	// enable(true)表示开启Swagger
                .pathMapping("/")
                .select()
                .apis(RequestHandlerSelectors.basePackage("com.example.demo.controller"))
                .paths(PathSelectors.any())
                .build().apiInfo(new ApiInfoBuilder()
                        .title("开发框架 Demo")
                        .description("用户、商户信息表的增、删、改、查接口。")
                        .version("1.0")
                        .contact("lxiao")
                        .build());
    }
}
@Configuration注解用于使spring加载配置类。@EnableSwagger2用于开启 Swagger2.
在 Swagger2 的配置类中,通过创建createRestApi()函数创建 Docket的Bean。
enable()用来开启和禁用 Swagger 。 若参数为 true 则开启 Swagger ,参数为 false 则禁用 Swagger 。可以在 application 配置来控制本地开发环境开启 Swagger,测试环境和生产环境禁用 Swagger。
select()函数返回一个ApiSelectorBuilder实例用来控制哪些接口暴露给 Swagger 来展现
apis()选择那些接口用于 Swagger。示例中将com.example.demo.controller包下的接口用于 Swagger。
apiInfo()函数用来创建 API 的基本信息。
配置完成 SwaggerConfig后启动项目,访问 http://localhost:8080/swagger-ui.html 。

这就是 swagger-ui 的界面,在 swagger-ui 可以看到刚才配置的 API 信息。
3.2 Swagger2 注解介绍
- Swagger2 常用注解,添加文档内容。
@Api(value="用户controller",tags={"用户操作接口"})
@RestController
@RequestMapping("api/user")
public class UserController {

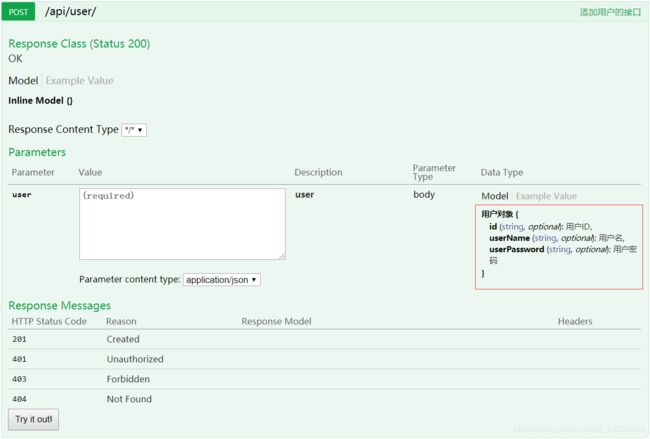
    @RequestMapping(value = "/" , method = RequestMethod.POST)
    @ApiOperation(value = "添加用户的接口")
    public Object add(@RequestBody User user){
        //...具体接口实现
    }
}
@Api(value = "message" , tags = {"message"})用于类,表示标识这个类是swagger的资源。
@ApiOperation(value = "message")用于方法,表示一个http请求的操作。
@ApiModel(value="用户对象",description="用户对象user")
public class User {

    @ApiModelProperty(value = "用户ID")
    private String id;

    @ApiModelProperty(value = "用户名")
    private String userName;

    @ApiModelProperty(value = "用户密码")
    private String userPassword;
}
@ApiModel(value = "message" , description = "message")用于类表示对类进行说明,用于参数用实体类接收
@ApiModelProperty(value = "message")用于方法,字段。表示对model属性的说明或者数据操作更改。
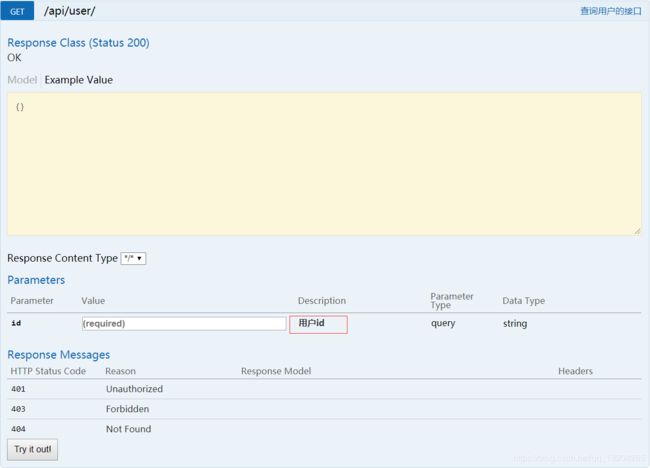
    @RequestMapping(value = "/" , method = RequestMethod.GET)
    @ApiOperation(value = "查询用户的接口")
    public Object query(@ApiParam(name="id",value="用户id",required=true) String id){
        //...具体接口实现
    }
@ApiParam(name = "message" , value = "message" , required = true)用于方法,参数,字段说明,表示对参数的添加元数据(说明或是否必填等)
启动项目查看效果:

还有很多其他的 Swagger 注解,可以自己尝试和学习。
4.关注我的微信公众号,查看更多文章,第一时间收到我的文章。
在 Spring Boot 使用 Swagger2,你学会了吗?


