Python练习题
知乎上推荐GitHub上的Python练习题,算是用于巩固基础知识的加深熟悉python语言的良好方案,现将题目和答案做个总结。
习题链接:每天一个Python练习
第0题:
将你的 QQ 头像(或者微博头像)右上角加上红色的数字,类似于微信未读信息数量那种提示效果。 类似于图中效果
答案:
代码:
#!/usr/bin/env python
# -*- coding: utf-8 -*-
# @Time    : 17/2/8 上午11:46

__author__ = 'SingleDog'

from PIL import Image, ImageDraw, ImageFont

import random

im = Image.open(u'兔子.jpg')  # 同路径下的图片文件
w, h = im.size  # 获取图片宽高
str = str(random.randint(1, 100))  # 生成要写的数字

font = ImageFont.truetype('Arial.ttf', int(w * 0.2 - 5))  # 传入字体和大小返回字体
draw = ImageDraw.Draw(im)
circle_size = (0.7 * w, 0.1 * w, 0.9 * w, 0.3 * w)  # 矩形内切椭圆,矩形的左上和右下坐标
draw.ellipse(circle_size, fill=(255, 0, 0))  # 传入大小,和填充颜色
draw.text((0.7 * w, 0.1 * w), str, fill='black', font=font)  # 左上角坐标,文字,填充颜色,字体
im.thumbnail((w // 2, h // 2)) # 缩放操作,缩小2倍
im.save(u'兔子.jpg')
im.show()
结果:
总结:
1.Pillow的官方指南:点击此处,里面有很多图片处理的方法。
2.字体资源找不到可直接写入绝对路径,windows系统可command+R然后输入fonts,即可到字体资源文件夹,mac系统在/Library/Fonts目录下
3.画图的效果不是很好,有锯齿,可能PIL不支持太精细的画图方法,没太深研究。
4.导入第三方库(如题中的Pillow库),如果下载速度过慢,会导致超时错误,可输入:
pip --default-timeout=100 install -U Pillow
来延长时间,还可直接用国内的一些镜像,例如豆瓣的镜像
pip install pillow -i https://pypi.douban.io.com/simple
第1题:
做为 Apple Store App 独立开发者,你要搞限时促销,为你的应用生成激活码(或者优惠券),使用 Python 如何生成 200 个激活码(或者优惠券)?
答案:
代码:
#!/usr/bin/env python
# -*- coding: utf-8 -*-
# @Time    : 17/2/9 上午10:33

__author__ = 'SingleDog'

import random, string


def gencode(length):
    result = ''  # 创建空字符串
    s = string.ascii_letters+ string.digits  # 获取所有字母(大小写)和数字需导入string
    for n in range(length):
        str = s[random.randint(0, len(s) - 1)]  # 随机索引获得随机的字符
        result += str  # 字符拼接
    return result


def loop(length=10, count=200):
    for x in range(count):
        print (gencode(length))


loop(11, 5)  # 传入验证码长度和个数
结果:
HXegTAhCbZN
KR603guyVvR
w0epfBe7aAf
j0ZX3oR3wPz
PsuPlygtQWB
看其他人的答案,还有这样的方法更简单
代码:(更换gencode函数)
def gencode(length):
    s = string.letters + string.digits
return "".join(random.sample(s, length))random.sample()随机取字符,达到给定的长度后,返回该列表
s.join()将字符s,插入到一个可迭代对象每两个元素中,返回字符串
即上述代码中最后返回的是随机的字符串
总结:
字符串有很多巧妙的方法可以直接使用,如上述代码中的string.ascii_letters和''.join(),以后要多留意,注意总结。
第2题:
将第2题生成的 200 个激活码(或者优惠券)保存到 MySQL 关系型数据库中。
需要先安装MySQL之后还需要python库来驱动MySQL
pip install mysql-connector
答案:
代码:
#!/usr/bin/env python
# -*- coding:utf-8 -*-
# @Time    : 2017/2/11 0011 12:29

__author__ = 'SingleDog'

import random, string, mysql.connector
from mysql.connector import errorcode


# 建表语句
create_table = """create table if not exists user (
        id int primary key,
        code varchar(20)
)
"""

# 插入语句,注意占位符是%s,sqlite3中是?
insert_user = 'insert into user (id,code) values (%s,%s)'


# 生成验证码
def gencode(length):
    s = string.ascii_letters + string.digits
    return "".join(random.sample(s, length))


# 循环生成验证码
def loop(length=10, count=200):
    for x in range(count):
        save(gencode(length), x + 1)

# 存储到数据库中
def save(code, id):
    try:
        # 密码和用户名是自己安装的mysql设置的,mydb需要提前创建好
        conn = mysql.connector.connect(user='root', password='password', database='mydb')
        cursor = conn.cursor()
        cursor.execute(create_table)
        cursor.execute(insert_user, (id, code))
        conn.commit()
        cursor.close()
        conn.close()
    except mysql.connector.Error as err:
        if err.errno == errorcode.ER_ACCESS_DENIED_ERROR:
            print('用户名或者密码错误')
        elif err.errno == errorcode.ER_BAD_DB_ERROR:
            print('数据库不存在')
        else:
            print(err)


loop(10, 7)  # 传入验证码长度和个数
结果:
第3题:
将第2题生成的 200 个激活码(或者优惠券)保存到 Redis 非关系型数据库中。
跳过(⊙o⊙)…先
第4题:
任一个英文的纯文本文件,统计其中的单词出现的个数。
答案:
代码:(遍历某个文件夹下文件)
#!/usr/bin/env python
# -*- coding:utf-8 -*-
# @Time    : 2017/2/12 0010 11:59

__author__ = 'SingleDog'

import os, os.path

rootdir = r'E:\Study\python3\python_work\test\review\英文版世界名著'  # 要查询的目录


def getcount(path):
    if os.path.basename(path).endswith('.txt'): # 或者用if os.path.splitext(path)[1] == '.txt':
        with open(path, 'r') as myfile:
            content = myfile.read()
            return content.split()  # split将字符串按照传入的字符分隔成列表中的元素,默认是空格


# 第一种遍历方法
def getfiles1(dir):
    list = os.listdir(dir)  # 遍历目录总所有文件(包括文件夹)
    for i in range(len(list)):
        path = os.path.join(dir, list[i])  # 将文件的相对路径转换成绝对路径(转换成和传入参数相同格式的路径)
        if os.path.isdir(path):  # 如果是文件夹,递归遍历
            getfiles1(path)
        if os.path.isfile(path):
            print("文件:%s 字数:%s 文件所在绝对路径:%s " % (os.path.basename(path), len(getcount(path)), path))


# getfiles(rootdir)

# 第二种遍历方法
def getfiles2(dir):
    for parent, dirnames, filenames in os.walk(dir):  # 父目录,所有文件夹名字(不含路径),所有文件名字
        for dirname in dirnames:  # 文件夹
            print("文件夹:" + dirname)

        for filename in filenames:  # 文件
            print("文件:%s 字数:%s \n文件所在绝对路径:%s " % (
                filename, len(getcount(os.path.join(parent, filename))), os.path.join(parent, filename)))


getfiles2(rootdir)
结果:
文件夹:悲惨世界
文件:傲慢与偏见.txt 字数:123372
文件所在绝对路径:E:\Study\python3\python_work\test\review\英文版世界名著\傲慢与偏见.txt
文件:呼啸山庄.txt 字数:115393
文件所在绝对路径:E:\Study\python3\python_work\test\review\英文版世界名著\呼啸山庄.txt
文件:安娜卡列尼娜.txt 字数:353304
文件所在绝对路径:E:\Study\python3\python_work\test\review\英文版世界名著\安娜卡列尼娜.txt
总结:
复习了遍历文件夹的操作,主要是os.path的运用
第5题:
你有一个目录,装了很多照片,把它们的尺寸变成都不大于 iPhone5 分辨率的大小。
答案:
代码:
#!/usr/bin/env python
# -*- coding: utf-8 -*-
# @Time    : 17/2/13 上午10:41

__author__ = 'SingleDog'

# iPhone5 分辨率 1136*640


from PIL import Image
import os

dirpath = r'/Users/xxx/PycharmProjects/MyTest/images'


def change(dirpath):
    for picpath in os.listdir(dirpath):
        picname = os.path.join(dirpath, picpath)  # 获取绝对路径
        if picname.endswith('.jpeg') or picname.endswith('.jpg'):
            with Image.open(picname) as img:
                w, h = img.size
                if w > 1136 or h > 640:
                    # 要注意python2 和python3 的除法区别
                    multiple = w / 1136.0 if (w / 1136.0) >= (h / 640.0) else h / 640.0
                    # 也可以使用img.resize(),但是该函数只接收整数,可放大缩小,thumbnail可以接收百分比,只能缩小
                    img.thumbnail((w / multiple, h / multiple), Image.ANTIALIAS)
                    img.save(picname.split('.')[0] + '_changed.jpg')
                else:
                    print ('该图片不需要更改大小')

    print ('所有图片更改完成')


if __name__ == '__main__':
    change(dirpath)
总结:
在Python 3中,/ 可以小数运算,Python2中,是整除运算(可在除数或被除数改为float即可)
注意简化if-else语句为在一行内的写法
第6题:
你又有一个目录,放了你一个月的日记,都是 txt,为了避免分词的问题,假设内容都是英文,请统计出你认为每篇日记最重要的词。
分析:最重要的词,简单理解为出现次数最多的,实现此功能,然后将次数从大到小排序即可。
答案:
代码:
#!/usr/bin/env python
# -*- coding: utf-8 -*-
# @Time    : 17/2/14 下午12:10

__author__ = 'SingleDog'

import string
import glob

dirpath = r'/Users/xxx/PycharmProjects/MyTest/diaries/'


def getkey():
    fileList = glob.glob(dirpath + '*.txt')  # 返回文件的绝对路径
    for n in fileList:
        with open(n, 'r') as myfile:
            result = {}
            wordlist = []  # 存放前十个出现次数最多的单词
            content = myfile.read().translate(None, string.punctuation)  # 剔除标点符号
            words = content.split()  # 单词存入列表中
            for word in words:
                # 对每个单词判断,如果出现过,就字典值加1,没有的话就加入字典,并赋值1
                result[word] = result[word] + 1 if word in result else 1

        # 将字典按照值反排序,从大到小
        result = sorted(result.items(), lambda x, y: cmp(x[1], y[1]), reverse=True)
        # 取前十个
        for x in range(10):
            wordlist.append(result[x])
        print (n + ' 的前10个重要单词及出现的次数是:')
        print (wordlist)


if __name__ == '__main__':
    getkey()
结果:
/Users/xxx/PycharmProjects/MyTest/diaries/abc.txt 的前10个重要单词及出现的次数是:
[('ef', 2), ('as', 2), ('dg', 2), ('a', 2), ('e', 2), ('f', 2), ('gs', 1), ('af', 1), ('eg', 1), ('lK', 1)]
/Users/xxx/PycharmProjects/MyTest/diaries/傲慢与偏见.txt 的前10个重要单词及出现的次数是:
[('to', 4103), ('the', 4085), ('of', 3635), ('and', 3453), ('her', 2148), ('I', 2072), ('a', 1895), ('was', 1849), ('in', 1797), ('that', 1540)]
/Users/xxx/PycharmProjects/MyTest/diaries/呼啸山庄.txt 的前10个重要单词及出现的次数是:
[('and', 4413), ('the', 4263), ('I', 3461), ('to', 3403), ('a', 2242), ('of', 2191), ('he', 1561), ('you', 1519), ('her', 1487), ('in', 1408)]
/Users/xxx/PycharmProjects/MyTest/diaries/安娜卡列尼娜.txt 的前10个重要单词及出现的次数是:
[('the', 16412), ('and', 11781), ('to', 10033), ('of', 8608), ('he', 6266), ('a', 6014), ('in', 5629), ('was', 5271), ('his', 5134), ('her', 5023)]
/Users/xxx/PycharmProjects/MyTest/diaries/尤利西斯.txt 的前10个重要单词及出现的次数是:
[('the', 15060), ('of', 8938), ('and', 7526), ('a', 6683), ('to', 5303), ('in', 5222), ('his', 3526), ('I', 3088), ('he', 2992), ('with', 2810)]
还可以在words = content.split()之后直接
wordlist = Counter(words).most_common(10)
需要导入from collections import Counter,直接就可得出列表中,出现次数最多的前十个
总结:
1.完整的解析需要做的工作还有很多,比如标点符号的剔除,上述代码中只是简单的删除了string.punctuation包含的字符,但实际上并不准确,例如He's可以解读为He has也可以解读为He is,类似的还有很多。而且重复次数最多的,大都是the,and,I,you,he这些,此代码只是实现查找单词次数的功能而已
2.glob.glob也可以获得遍历文件夹
3.根据字典键排序,可直接sorted(dict.items())
for key,value in sorted(dict.items()):
根据字典值排序,可利用lambda表达式(x[0]是键,x[1]是值,x和y互换,然后排序,即按照value来排序)
sorted(dict.items(), lambda x, y: cmp(x[1], y[1]))
第7题:
你还有个目录,里面是你自己写过的程序,统计一下你写过多少行代码。包括空行和注释,但是要分别列出来。
答案:
代码:
#!/usr/bin/env python
# -*- coding: utf-8 -*-
# @Time    : 17/2/15 下午10:28

__author__ = 'SingleDog'

import glob

dirpath = r'/Users/xxx/PycharmProjects/MyTest/'


def getlines(path):
    files = glob.glob(path + '*.py')
    print (files)
    flag = False
    filedict = {}
    for file in files:
        number = {}
        blank = row = 0
        with open(file, 'r') as myfile:
            for line in myfile.readlines():
                line = line.strip()  # 注意会取消\n,所以不能用\n来判断是否空行
                if line.startswith('"""') and line.endswith('"""'):
                    blank += 1
                elif line.startswith('"""'):
                    flag = not flag
                if flag:
                    blank += 1
                else:
                    if line == '' or line.startswith('#'):
                        blank += 1
                    else:
                        row += 1

        number['blank'] = blank
        number['row'] = row
        filedict[file] = number

    show(filedict)


def show(dict):
    for info in dict.items():
        print (info)


if __name__ == '__main__':
    getlines(dirpath)
结果:
['/Users/xxx/PycharmProjects/MyTest/dog.py', '/Users/xxx/PycharmProjects/MyTest/like.py', '/Users/xxx/PycharmProjects/MyTest/test.py']
('/Users/xxx/PycharmProjects/MyTest/dog.py', {'row': 20, 'blank': 16})
('/Users/xxx/PycharmProjects/MyTest/test.py', {'row': 33, 'blank': 14})
('/Users/xxx/PycharmProjects/MyTest/like.py', {'row': 28, 'blank': 20})
总结:
要注意python的注释的写法,对于类似解析功能,最好还是用正则表达式更简洁,等之后熟悉了再来修改。
第8题,第9题:
一个HTML文件,找出里面的正文和链接。
提示:可结合第14题一起看
答案:
代码:
#!/usr/bin/env python
# -*- coding: utf-8 -*-
# @Time    : 17/2/16 上午10:21

__author__ = 'SingleDog'

import urllib2
from bs4 import BeautifulSoup  # 使用BeautifulSoup解析网页

root_url = "http://www.baidu.com"
page = urllib2.urlopen(root_url)

soup = BeautifulSoup(page, 'html.parser')
print (soup.body.text)

links = soup.findAll('a')  # 找到所有a节点
for link in links:
    print(link['href'])  # 打印他的href属性
总结:
Python2和Python3使用urlopen()方法需要导入的模块不同,python3中使用urllib.request ,
python2直接导入urllib2
BeautifulSoup可查看官网更详细资料,直接安装,报没有权限加上sudo
sudo pip install beautifulsoup4
第10题:
使用 Python 生成类似于下图中的字母验证码图片
答案:
#!/usr/bin/env python
# -*- coding: utf-8 -*-
# @Time    : 17/2/16 下午1:40
import random
import string

from PIL import Image
from PIL import ImageDraw
from PIL import ImageFilter
from PIL import ImageFont

__author__ = 'SingleDog'


# 随机每个像素的颜色
def random_color():
    return (random.randint(0, 255), random.randint(0, 255), random.randint(0, 255))


# 随机文字的颜色
def word_random_color():
    return (random.randint(32, 127), random.randint(32, 127), random.randint(32, 127))


# 随机文字内容
def random_str():
    return random.choice(string.ascii_letters)


size = (4 * 50, 50)
image = Image.new('RGB', size, color='white')  # 创建一个image
font = ImageFont.truetype('Arial.ttf', 40)  # 设置字体
draw = ImageDraw.Draw(image)  # 创建draw对象

# 绘制每个像素不同颜色
for x in range(size[0]):
    for y in range(size[1]):
        draw.point((x, y), fill=random_color())

# 可用列表解析,更快更简单
# [draw.point((x, y), fill=random_color()) for x in range(size[0]) for y in range(size[1])]

# 绘制文字
for word in range(4):
    draw.text((50 * word + 5, 5), random_str(), font=font, fill=word_random_color())

# 模糊处理
image = image.filter(ImageFilter.BLUR)
image.show()
结果:
总结:
还是熟悉PIL的相关函数方法的运用
第11题,第12题:
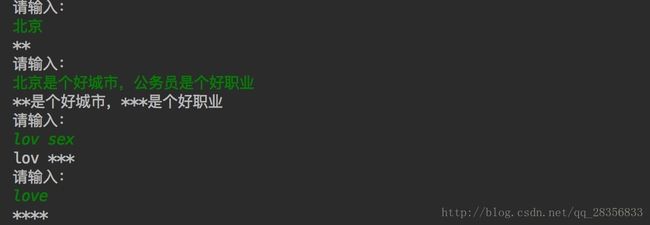
敏感词文本文件 filtered_words.txt,当用户输入敏感词语,则用 星号 * 替换,例如当用户输入「北京是个好城市」,则变成「**是个好城市」。
只做了13题,其实都一个样
filtered_words.txt
北京
程序员
公务员
领导
牛比
牛逼
你娘
你妈
love
sex
jiangge
答案:
代码:
#!/usr/bin/env python
# -*- coding: utf-8 -*-
# @Time    : 17/2/17 上午10:22
import re

__author__ = 'SingleDog'


def judge(input_words):
    with open('filtered_words.txt', 'r') as myfile:
        words = myfile.readlines()
        for word in words:
            re_str = word.strip().decode('utf-8')
            if re.search(re_str, input_words):  # 注意用search,不要用match,否则只能匹配一个
                input_words = input_words.replace(re_str, '*' * len(re_str))

    return input_words


if __name__ == '__main__':
    while True:
        input_words = input('请输入:\n')
        print (judge(input_words.decode('utf-8')))
总结:
1.注意Python版本输入语句不同,python2是raw_input()而python3是直接input()
2.需要注意中文转码,Python中默认的编码格式是 ASCII 格式,中文会出现乱码,即使文件头声明了# -*- coding: utf-8 -*-,在存储列表或者字符串的时候,一个中文仍旧会当做3个字符来存储,所以正则表达式匹配的时候可能不会正确的匹配,可以在字符串使用前将编码格式更改str.decode('utf-8')
3.注意正则表达式的运用,match()只检查字符串的开始位置,但是速度快,如果只是简单的开头的匹配用match()即可,search()会检查整个字符串
结果:
第13题:
用 Python 写一个爬图片的程序,爬 这个链接里的日本妹子图片 :-)
习题的链接里是百度贴吧的一个帖子,只有一页,我换了个别的帖子,总共有20多页,练习基础的爬虫逻辑。链接是图片吧的一个图片帖子,简单的爬虫逻辑是看慕课网上的Python开发简单爬虫学习的,很好的入门指导,当然,这都是最初级的爬虫。
使用BeautifulSoup解析网页,不用自己写正则那么费劲
答案:
代码:
spiderman.py
#!/usr/bin/env python
# -*- coding:utf-8 -*-
# @Time    : 2017/2/15 0015 21:20
import re

from practice_pic_spider import html_downloader
from practice_pic_spider import html_parser
from practice_pic_spider import url_manager

__author__ = 'SingleDog'

traget_url = r'http://tieba.baidu.com/p/4747771459'


class SpiderMan(object):
    def __init__(self):
        self.url_manager = url_manager.UrlManager()  # URL管理器
        self.html_downloader = html_downloader.HtmlDownLoader()  # html下载器
        self.html_parser = html_parser.HtmlParser()  # html解析器

    def crew(self, traget_url):
        self.url_manager.add_new_url(traget_url)  # 添加根url
        while self.url_manager.has_new_url():  # 如果管理器有url就执行循环
            try:
                new_url = self.url_manager.get_new_url()
                m = re.search(r'(pn=)(\d{1,10})$', new_url)
                page = m.group(2) if m else 1
                html_content = self.html_downloader.download(new_url)
                html_new_url = self.html_parser.parser(new_url, html_content, page)
                self.url_manager.add_new_url(html_new_url)
            except Exception as e:
                print(e)


if __name__ == '__main__':
    spiderman = SpiderMan()
    spiderman.crew(traget_url)
url_manager.py
#!/usr/bin/env python
# -*- coding:utf-8 -*-
# @Time    : 2017/2/15 0015 21:32

__author__ = 'SingleDog'


class UrlManager(object):
    def __init__(self):
        self.new_urls = set()
        self.ole_urls = set()

    def add_new_url(self, traget_url):
        if traget_url is None:
            return
        if traget_url not in self.new_urls and traget_url not in self.ole_urls:
            self.new_urls.add(traget_url)

    def has_new_url(self):
        return len(self.new_urls) != 0

    def get_new_url(self):
        pop_url = self.new_urls.pop()
        self.ole_urls.add(pop_url)
        return pop_url
html_downloader.py
#!/usr/bin/env python
# -*- coding:utf-8 -*-
# @Time    : 2017/2/15 0015 21:32

import urllib.request

__author__ = 'SingleDog'


class HtmlDownLoader(object):
    def download(self, new_url):
        if new_url is None:
            return
        response = urllib.request.urlopen(new_url)
        if response.getcode() == 200:
            return response.read()
        else:
            return None
html_parser.py
#!/usr/bin/env python
# -*- coding:utf-8 -*-
# @Time    : 2017/2/15 0015 21:32
import urllib.request
from urllib.parse import urljoin

from bs4 import BeautifulSoup

__author__ = 'SingleDog'

count = 0


class HtmlParser(object):
    def parser(self, new_url, html_content, page):
        if new_url is None or html_content is None:
            return
        soup = BeautifulSoup(html_content, 'html.parser')
        self.download_pics(soup, page, new_url)  # 下载当前页的图片,要在解析下一页之前
        html_new_url = self.get_new_url(new_url, soup)
        return html_new_url

    def get_new_url(self, new_url, soup):
        link = soup.find('a', text='下一页')
        final_url = urljoin(new_url, link['href'])
        return final_url

    def download_pics(self, soup, page, new_url):
        global count
        pics = soup.findAll('img', class_='BDE_Image')
        for pic in pics:
            count += 1
            pic_url = pic['src']
            urllib.request.urlretrieve(pic_url,
                                       r'E:\Study\python3\python_work\spider_pic\%s.jpg' % count)
            print('爬取第%s页ing...   网址是:%s   是第%s张图片' % (page, new_url, count))
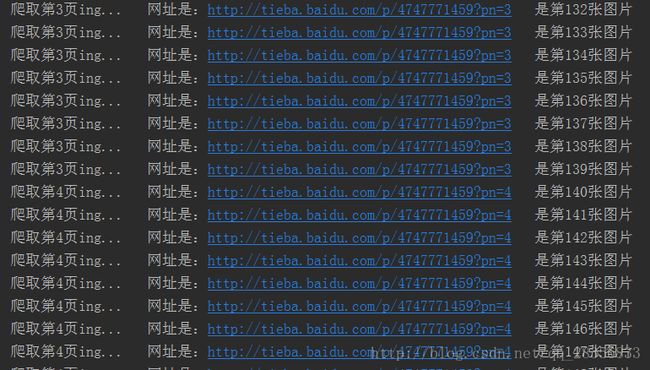
结果:
第14题,第15题,第16题:
纯文本文件 student.txt为学生信息, 里面的内容(包括花括号)如下所示:
{
"1":["张三",150,120,100],
"2":["李四",90,99,95],
"3":["王五",60,66,68]
}

{
"1" : "上海",
"2" : "北京",
"3" : "成都"
}

[
[1, 82, 65535],
[20, 90, 13],
[26, 809, 1024]
]
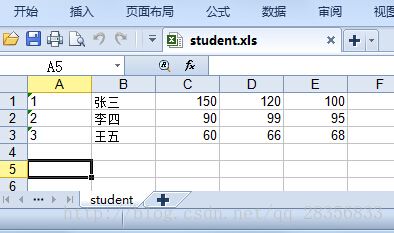
请将上述内容写到 student.xls 文件中,如下图所示:
阅读资料 腾讯游戏开发 XML 和 Excel 内容相互转换
答案:
代码:
#!/usr/bin/env python
# -*- coding:utf-8 -*-
# @Time    : 2017/2/18 0018 12:45
import os

__author__ = 'SingleDog'

import xlrd
import xlwt
import json


# 设置单元格式
def set_style(name, height, bold=False):
    style = xlwt.XFStyle()  # 初始化样式

    font = xlwt.Font()  # 样式创建字体
    font.name = name
    font.bold = bold
    font.colour_index = 0
    font.height = height

    style.font = font

    return style


# 写入excel
def write_excel(content):
    f = xlwt.Workbook()  # 创建工作簿

    # 创建第一个sheet
    sheet1 = f.add_sheet(u'sheet1', cell_overwrite_ok=True)  # 创建sheet

    for j in range(len(content)):  # 行
        for i in range(len(content[j])):  # 列
            sheet1.write(j, i, content[j][i], set_style('Times New Roman', 220, False))

    f.save('demo.xls')


def read_text(path):
    with open(path, 'r', encoding='utf-8') as myfile:
        mlist = []
        content = ''
        try:
            content = json.load(myfile)
        except Exception:
            print('错误的格式')
        if isinstance(content, dict):  # 如果是花括号
            for key, value in sorted(content.items()):
                if isinstance(value, list):
                    value.insert(0, key)
                    mlist.append(value)
                elif isinstance(value, str):
                    mlist.append([key, value])
        elif isinstance(content, list):  # 如果是方括号
            mlist = content

        print(mlist)
        write_excel(mlist)


if __name__ == '__main__':
    read_text('student.txt')
总结:
python中写入xsl文件和读取xsl文件需要用到的模块是xlwt和xlrd,更多功能可查看文档,题目只是做个小例子练习。
第23题:
使用 Python 的 Web 框架,做一个 Web 版本留言簿应用。如下图

答案:
我使用的是Python的Django框架
官方文档:Django官方文档
中文学习资料:自强学堂,官方文档中文版
还有慕课网Django入门与实践视频
其实都一个样,那么点儿知识,慢慢学,不懂了再翻翻查查,基础的入门知识也就会了。
代码:
models.py
from django.db import models


class Guest(models.Model):
    name = models.CharField(max_length=10)
    content = models.TextField()
    time = models.DateTimeField(auto_now_add=True)

    def __str__(self):
        return self.name
urls.py(该应用模板下的urls.py)
from django.conf.urls import url
from . import views

urlpatterns = [
    url(r'^$', views.guest, name='index'),
]
创建表单
forms.py
from django import forms


class GuestForm(forms.Form):
    name = forms.CharField(max_length=10, label="昵称")
    content = forms.CharField(label='内容', widget=forms.Textarea)
views.py
from django.http import HttpResponseRedirect
from django.shortcuts import render
from django.urls import reverse

from guest.forms import GuestForm
from guest.models import Guest


def guest(request):
    if request.method == 'POST':
        form = GuestForm(request.POST)
        if form.is_valid():
            name = form.cleaned_data['name']
            content = form.cleaned_data['content']
            Guest(name=name, content=content).save()
            return HttpResponseRedirect(reverse('guest:index'))
    else:
        form = GuestForm()
    mguests = Guest.objects.all()
    return render(request, 'guest/index.html', {'form': form, 'mguests': mguests})
页面
index.html
<html lang="en">
<head>
    <meta charset="UTF-8">
    <title>留言簿title>
    <style>
        .time{
        color:black;
        position:absolute;
        left:300px;
        }
        .title{
        text-align:center;
        color:black;
        background-color:#81d45e;
        height:60px;
        line-height:60px;
        border-radius:15px;
        font-size:20px;
        }
        .name{
        color:#cc0000;
        background-color:#9fc5e8;
        height:18px;
        line-height:18px;
        padding:10px 10px;
        -webkit-border-top-left-radius:5px;
        -webkit-border-top-right-radius:5px;
        font-size:18px;
        }
        .content{
        color:black;
        background-color:#e7e7e7;
        padding:10px 10px;
        -webkit-border-bottom-left-radius:5px;
        -webkit-border-bottom-right-radius:5px;
        font-size:13px;
        }

    style>
head>
<body>
<div class="title"><p>留言簿p>div>
<form action="{% url 'guest:index' %}" method="post">
    {% csrf_token %}
    {{ form.as_p }}
    <p><input type="submit" name="submit" value="留言">p>
form>

{% for guest in mguests %}
<div>
    <div class="name">{{ guest.name }}<span class="time">{{ guest.time|date:"Y-m-d H:i:s" }}span>div>
    <div class="content">{{ guest.content }}div>
    <br/>
div>
{% endfor %}


body>
html>
结果:
总结:
1.配置文件settings.py里
LANGUAGE_CODE = 'zh_Hans'
可设置后台admin里显示的语言为中文
TIME_ZONE = 'Asia/Shanghai'
时区,设置为自己所在地的时区
2.view.py里
return HttpResponseRedirect(reverse('guest:index'))
重定向到主页,reverse()里是用命名空间(namespace)和(name)连接的,不是具体的路径如guest/index.html
3.要注意模板中使用过滤器对时间或者文章内容的进一步处理,如时间格式化和内容换行符


