(五)Spring Boot配置静态资源访问,整合Thymeleaf模板
thymeleaf介绍
Thymeleaf是一款用于渲染XML/XHTML/HTML5内容的模板引擎。类似JSP,Velocity,FreeMaker等,相较与其他的模板引擎,它有如下三个极吸引人的特点:
- 最大的特点是能够直接在浏览器中打开并正确显示模板页面,而不需要启动整个Web应用。这样即可以让前端工程师在浏览器查看页面的静态效果,也可以让后端工程师在服务器查看带数据的动态页面效果。
- 提供自己的标准方言 和 Spring 标准方言两种,可以直接套用模板实现 JSTL、 OGNL表达式效果。同时开发人员也可以扩展和创建自定义的方言。
- 也可以轻易的与Spring MVC等Web框架进行集成作为Web应用的模板引擎,可以快速的实现表单绑定、属性编辑器、国际化等功能。
thymeleaf官网
https://www.thymeleaf.org/doc/tutorials/3.0/usingthymeleaf.html
SpringBoot整合thymeleaf
本篇使用 SpringBoot 2.1.3.RELEASE 版本整合 thymeleaf ,关于thymeleaf的使用语法,我们将在下一篇博客中讲解。
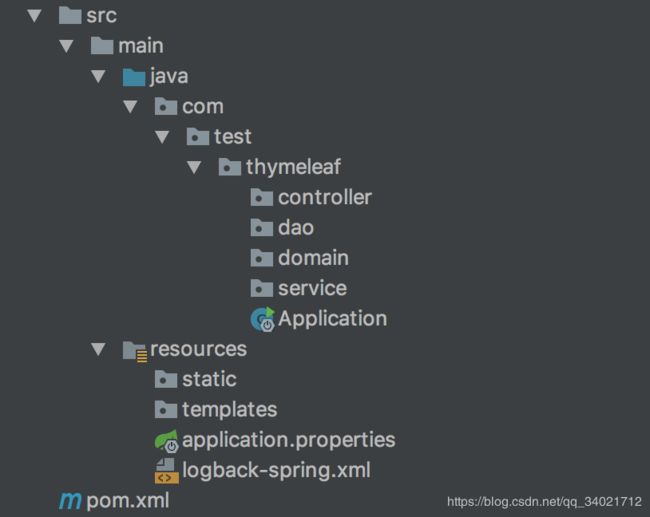
static 用来存放静态资源
templates 用来存放默认的模板配置路径
spring-boot 对于 Thymeleaf很多配置都有默认配置,比如:
- 默认页面映射路径为: classpath:/templates/
- 默认的文件后缀为: .html
- 默认的编码是: UTF-8
- 默认是开启页面缓存的:private boolean cache = true;
我们在使用Thymeleaf模板的时候,使用默认配置就可以了。只在开发环境的时候,把cache设置为false,避免看不到实时页面。在application.properties中可以配置thymeleaf模板解析器属性.就像使用springMVC的JSP解析器配置一样,Thymeleaf模板属性使用前缀是 spring.thymeleaf 具体可以配置的参数可以参考官网,属性对应org.springframework.boot.autoconfigure.thymeleaf.ThymeleafProperties这个类,上面的配置实际上就是注入到该类中的属性值.
官网配置属性地址如下:
https://docs.spring.io/spring-boot/docs/current/reference/html/common-application-properties.html
# THYMELEAF (ThymeleafAutoConfiguration)
#开启模板缓存(默认值:true)
spring.thymeleaf.cache=true
#是否在呈现模板之前检查模板是否存在
spring.thymeleaf.check-template=true
#检查模板位置是否正确(默认值:true)
spring.thymeleaf.check-template-location=true
#是否为Web框架启用Thymeleaf视图解析
spring.thymeleaf.enabled=true
#在SpringEL表达式中启用SpringEL编译器
spring.thymeleaf.enable-spring-el-compiler=false
#模板编码
spring.thymeleaf.encoding=UTF-8
#要被排除在解析之外的视图名称列表,用逗号分隔
spring.thymeleaf.excluded-view-names=
#要运用于模板之上的模板模式。另见TemplateMode(默认值:HTML5)
spring.thymeleaf.mode=HTML5
#在构建URL时添加到视图名称前的前缀(默认值:classpath:/templates/)
spring.thymeleaf.prefix=classpath:/templates/
#逗号分隔的视图名称列表(允许的模式),当设置了最大块大小时,应该是CHUNKED模式中唯一执行的视图名称列表。
spring.thymeleaf.reactive.chunked-mode-view-names=
#即使设置了最大块大小,也应该在FULL模式下执行逗号分隔的视图名称列表(允许的模式)。
spring.thymeleaf.reactive.full-mode-view-names=
#用于写入响应的数据缓冲区的最大大小
spring.thymeleaf.reactive.max-chunk-size=0B
##视图技术支持的媒体类型
spring.thymeleaf.reactive.media-types=
#写入HTTP响应的Content-Type值
spring.thymeleaf.servlet.content-type=text/html
#在构建URL时附加到视图名称的后缀。
spring.thymeleaf.suffix=.html
#Thymeleaf模板解析器在解析器链中的顺序。默认情况下,它排第一位。顺序从1开始,只有在定义了额外的TemplateResolver Bean时才需要设置这个属性。
spring.thymeleaf.template-resolver-order=
#可以解析的逗号分隔的视图名称列表
spring.thymeleaf.view-names=
pom.xml
  4.0.0
  com.test.thymeleaf
  spring-boot-thymeleaf
  1.0.0
  jar


        org.springframework.boot
        spring-boot-starter-parent
        2.1.3.RELEASE


            org.springframework.boot
            spring-boot-starter-thymeleaf


        ${project.artifactId}


                org.apache.maven.plugins
                maven-compiler-plugin

                    1.8
                    1.8
                    UTF-8


                org.springframework.boot
                spring-boot-maven-plugin
Controller.java
为了方便测试,不再查询数据库了,直接写死几个学生信息。
@RestController
public class TestThymeleafController {

    @RequestMapping("/index")
    public String getData(Model model){
        List list=new ArrayList<>();
        list.add(new Student("张三", 20, "北京"));
        list.add(new Student("李四", 30, "上海"));
        list.add(new Student("王五", 40, "河北"));
        list.add(new Student("赵六", 50, "山西"));
        model.addAttribute("list", list);
        return "/index";
    }
}
编写index.html
在默认的模板路径src/main/resources/templates下编写模板文件即可完成。这里我们新建一个index.html: 使用thymeleaf模板,要修改html标签,添加,这样的话才可以在其他标签里面使用th:*这样的语法.
    配置Thymeleaf模板


    配置Thymeleaf模板


            姓名
            年龄
            地址
application.properties
#配置tomcat
server.port=8080
server.servlet.context-path=/
#日志文件的路径
logging.config=classpath:logback-spring.xml
启动服务访问 http://localhost:8080/index
配置静态资源访问
官网文档:
https://docs.spring.io/spring-boot/docs/current/reference/html/boot-features-developing-web-applications.html#boot-features-spring-mvc-static-content
默认情况下,SpringBoot从类路径中名为 /static (或/public、/resources、/META-INF/resources) 的目录,或者ServletContext的根目录中提供静态内容。它使用SpringMVC中的ResourceHttpRequestHandler,因此您可以通过添加您自己的WebMvcConfig并覆盖addResourceHandler方法来修改该行为。
在一个独立的Web应用程序中,容器中的默认servlet也被启用并充当一个后备,如果spring决定不处理它,它将从servletcontext的根目录提供静态内容。大多数情况下,不会发生这种情况(除非修改默认的MVC配置),因为Spring总是可以通过DispatcherServlet处理请求。
默认情况下,资源映射到/** 但您可以使用spring.mvc.static-path-pattern属性对其进行更改。例如,将所有资源重新分配到/resources/**可以实现如下操作:
spring.mvc.static-path-pattern=/resources/**还可以使用spring.resources.static-locations属性(将默认值替换为目录位置列表)自定义静态资源位置。根servlet上下文路径“/”也自动添加为位置。
除了前面提到的"标准"静态资源位置之外,还为Webjars内容做了一个特殊的案例。如果以webjars格式打包,则任何路径为/webjars/**的资源都是从jar文件提供服务的。
注意:你也可以按照以前的 SpringMVC 工程 把静态资源放到webapp下也是可以访问的!如果你的应用将被打包成jar,那就不要使用src/main/webapp文件夹。尽管该文件夹是一个共同的标准,但它仅在打包成war的情况下起作用,并且如果产生一个jar,多数构建工具都会静悄悄的忽略它。
自定义资源映射
如果需要自定义资源映射,自定义类实现 WebMvcConfigurer 并重写方法 addResourceHandlers
@Configuration
public class MyWebAppConfigurer implements WebMvcConfigurer {

    @Override
    public void addResourceHandlers(ResourceHandlerRegistry registry) {
        registry.addResourceHandler("/**").addResourceLocations("classpath:/mystatic/");
    }

}
整合一个Bootstrap框架
刚才的页面很丑,我们配置一个样式,基于 Bootstrap UI Vanilla Cream 来美化一下。
官网地址:http://pixelkit.com/free-ui-kits/vanilla-cream/index.html (访问很慢)
github地址:https://github.com/Pixelkit/PixelKit-Bootstrap-UI-Kits/
文档地址:http://pixelkit.com/free-ui-kits/vanilla-cream/docs/
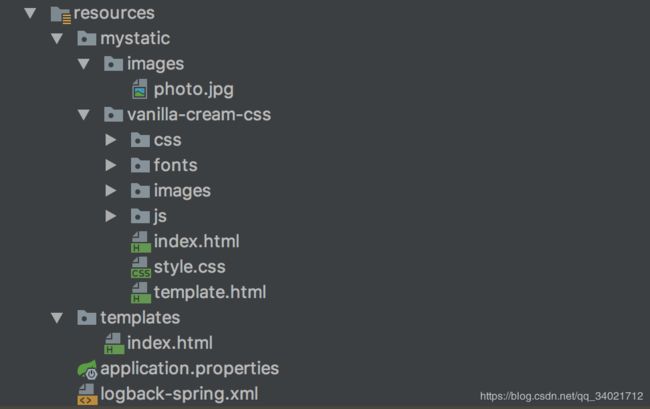
我们下载项目,然后将 vanilla-cream/vanilla-cream-css 文件夹拷贝到项目的自定义静态资源mystatic路径下。
并在mystatic下项目新建 images文件夹,放一张图片photo.jpg。

