fastDFS+Nginx文件服务器
了解fastDFS和Nginx:
FastDFS 是一个开源的高性能分布式文件系统(DFS)。 它的主要功能包括:文件存储,文件同步和文件访问,以及高容量和负载平衡。主要解决了海量数据存储问题,特别适合以中小文件(建议范围:4KB < file_size <500MB)为载体的在线服务。
Nginx 是一个高性能的HTTP和反向代理服务器,也是一个IMAP/POP3/SMTP服务器,nginx占有内存少,并发能力强,事实上nginx的并发能力确实在同类型的网页服务器中表现较好,中国大陆使用nginx网站用户有:百度、京东、新浪、网易、腾讯、淘宝等。。
安装与使用:
一、在Linux下安装fastDFS和nginx,这里不进行详细解释,百度会有很多教程
这里提供一个参考网址,博主介绍十分详细:fastDFS与Nginx安装教程
二、安装完成后进行命令行文件上传测试:
fastDFS启动 命令:
fdfs_trackerd /etc/fdfs/tracker.conf start
fdfs_storaged /etc/fdfs/storage.conf start
nginx 启动 命令:
cd /usr/local/nginx/sbin(先进入到nginx安装的bin目录下)
启动nginx命令:./nginx
重新启动nginx:./nginx -s reload
/**********************************************************/
上传一张照片试试:# /usr/bin/fdfs_upload_file /etc/fdfs/client.conf namei.jpg
上传完成后,命令行会返回字符串:group1/M00/00/00/wKgz6lnduTeAMdrcAAEoRmXZPp870.jpg
分别代表:组名/磁盘/目录/文件名
这个将是我们以后的访问地址,由于已经配置好了nginx,所以我们在浏览器访问:
http://192.168.27.129/group1/M00/00/00/wKgz6lnduTeAMdrcAAEoRmXZPp870.jpg
可以发现我们的图片已经出现,如果整个过程有错误,那么请跟着网上的教程一步一步做,切记不要心急,这里我主要介绍如何在Java代码中上传文件。
**一切安装就绪后,我们就要在java代码里面实现,目标:**通过前端页面向文件服务器上传图片,并将访问路径保存到数据库,通过浏览器能够直接访问该图片或文件。
一、所需代码概览:

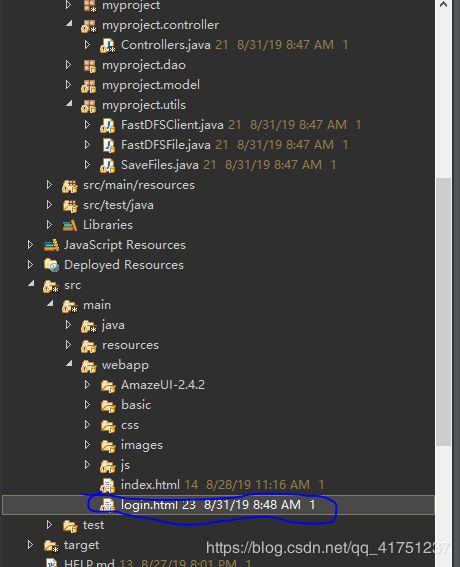
这里新建的是一个MavenProject的Springboot项目,你也可以直接新建新的Maven项目即可。主要的是:在src源码文件下新建一个存放工具类的包,这里我建的包名为:myproject.utils 包内新建三个Java文件 :
FastDFSClient.java对传入的固定格式文件进行增删查操作,主要为几个实现的方法。
FsstDFSFile.java对传入的文件进行格式调整,也就是这是写好的一个规范的文件类,所有要存储的文件都跟这个File类保持一致。
SaveFiles.java这是一个文件存入的类,写得很具体,是将前端传入的文件对应转换为一个FsstDFSFile类对象再调用FastDFSClient.java里面的方法存入。
注意这里需要导入对应的jar包,我们是Maven项目,直接向pom文件中添加依赖即可
	    org.csource
	    fastdfs-client-java
	    1.27-RELEASE
,由于这个依赖包目前没有放入中央仓库,因此需要手动复制进你项目的中央仓库,我提供的jar包地址:百度网盘连接:fastDFS_jar
提取码:30g6
下载后粘贴到你的中央仓库,也就是对应的文件目录下,在你的电脑上查找地址类似:D:\Program Files\apache-maven-3.6.1-bin\maven_res\org\csource\fastdfs-client-java\1.27-RELEASE
此时,我们直接上前面所述三个Java文件代码:
FastDFSClient.java
package myproject.utils;
import java.io.ByteArrayInputStream;
import java.io.IOException;
import java.io.InputStream;
import org.apache.tomcat.jni.FileInfo;
import org.csource.common.NameValuePair;
import org.csource.fastdfs.ClientGlobal;
import org.csource.fastdfs.StorageClient;
import org.csource.fastdfs.StorageServer;
import org.csource.fastdfs.TrackerClient;
import org.csource.fastdfs.TrackerServer;
import org.springframework.core.io.ClassPathResource;
import myproject.utils.FastDFSFile;
public class FastDFSClient {
public  static TrackerClient trackerClient;
public  static TrackerServer trackerServer;
public  static StorageServer storageServer;
public  static StorageClient storageClient;
static {
    try {
        String filePath = new ClassPathResource("fdfs_client.conf").getFile().getAbsolutePath();;
        ClientGlobal.init(filePath);
        trackerClient = new TrackerClient();
        trackerServer = trackerClient.getConnection();
        storageServer = trackerClient.getStoreStorage(trackerServer);
    } catch (Exception e) {

    }
}
/**********************************/
//文件上传
public static String[] upload(FastDFSFile file) {

    NameValuePair[] meta_list = new NameValuePair[1];
    meta_list[0] = new NameValuePair("author", file.getAuthor());

    long startTime = System.currentTimeMillis();
    String[] uploadResults = null;
    try {
    	StorageClient storageClient = new StorageClient(trackerServer, storageServer);
        uploadResults = storageClient.upload_file(file.getContent(), file.getExt(), meta_list);
    } catch (IOException e) {
        System.out.println(e);
    } catch (Exception e) {
    	System.out.println(e);
    }
    System.out.println("upload_file time used:" + (System.currentTimeMillis() - startTime) + " ms");

    if (uploadResults == null) {
       System.out.print("upload file fail, error code:" + storageClient.getErrorCode());
    }

    return uploadResults;
}

/**********************************/
//获取文件信息
public static org.csource.fastdfs.FileInfo getFile(String groupName, String remoteFileName) {
    try {
        storageClient = new StorageClient(trackerServer, storageServer);
        return storageClient.get_file_info(groupName, remoteFileName);

    } catch (IOException e) {
        System.out.println("IO Exception: Get File from Fast DFS failed"+e);
    } catch (Exception e) {
    	System.out.println("Non IO Exception: Get File from Fast DFS failed"+ e);
    }
    return null;
}
/**********************************/
//下载文件
public static InputStream downFile(String groupName, String remoteFileName) {
    try {
        storageClient = new StorageClient(trackerServer, storageServer);
        byte[] fileByte = storageClient.download_file(groupName, remoteFileName);
        InputStream ins = new ByteArrayInputStream(fileByte);
        return ins;
    } catch (IOException e) {
        System.out.println("IO Exception: Get File from Fast DFS failed"+e);
    } catch (Exception e) {
    	System.out.println("Non IO Exception: Get File from Fast DFS failed"+e);
    }
    return null;
}
/**********************************/
//删除文件
public static void deleteFile(String groupName, String remoteFileName)
        throws Exception {
    storageClient = new StorageClient(trackerServer, storageServer);
    int i = storageClient.delete_file(groupName, remoteFileName);
    System.out.println("delete file successfully!!!" + i);
}}
FsstDFSFile.java
package myproject.utils;
public class FastDFSFile {
private String name;
private byte[] content;
private String ext;
private String md5;
private String author;
public FastDFSFile(String fileName, byte[] file_buff, String ext2) {
	name = fileName;
	content = file_buff;
	ext = ext2;
}
public String getName() {
	return name;
}
public void setName(String name) {
	this.name = name;
}
public byte[] getContent() {
	return content;
}
public void setContent(byte[] content) {
	this.content = content;
}
public String getExt() {
	return ext;
}
public void setExt(String ext) {
	this.ext = ext;
}
public String getMd5() {
	return md5;
}
public void setMd5(String md5) {
	this.md5 = md5;
}
public String getAuthor() {
	return author;
}
public void setAuthor(String author) {
	this.author = author;
}}
SaveFiles.java
package myproject.utils;
import java.io.IOException;
import org.apache.logging.log4j.Logger;
import org.omg.CORBA.portable.InputStream;
import org.springframework.web.multipart.MultipartFile;
import myproject.utils.FastDFSFile;

public class SaveFiles{
public String saveFile(MultipartFile multipartFile) throws IOException{
    String[] fileAbsSolutePath={};
    String fileName=multipartFile.getOriginalFilename();
    String ext = fileName.substring(fileName.lastIndexOf(".") + 1);
    byte[] file_buff = null;
    java.io.InputStream inputStream= multipartFile.getInputStream();
    if(inputStream!=null){
        int len1 = inputStream.available();
        file_buff = new byte[len1];
        inputStream.read(file_buff);
    }
    inputStream.close();
    FastDFSFile file = new FastDFSFile(fileName, file_buff, ext);
    try {
    	fileAbsSolutePath = FastDFSClient.upload(file);  //upload to fastdfs
    } catch (Exception e) {
        System.out.println("Error upload file Exception!"+e);
    }
    if (fileAbsSolutePath==null) {
    	System.out.println("Error upload file failed,please upload again!");
    }
    String[] path=FastDFSClient.upload(file);//返回数组
    return "http://10.96.111.240/"+path[0]+"/"+path[1]; //拼接为图片访问路径
  }
}
以上是文件上传的核心代码,现在直接调用savefiles里面的方法即可实现图片上传。写完了这些,我们写一个controller类和一个前端页面进行测试:
Controller.java
package myproject.controller;
import java.io.File;

@RestController
public class Controllers {
	@RequestMapping("/foodRegist")
	public Food foodRegist(Food food,MultipartFile imageFile) throws IllegalStateException, IOException {
	/*************************************/
	//上传图片
	String path=null;
	try {
		SaveFiles saveFile =new SaveFiles();//实力化SaveFiles对象
        path=saveFile.saveFile(imageFile);//存入图片imageFile并返回图片路径
    } catch (Exception e) {
        System.out.println("upload file failed"+e);
    }
	if(path!=null){
		System.out.print("这是可以从浏览器直接访问的地址:"+path);
	}
	return null;
}
最后,编写一个前端页面,直接在wapp文件下新建即可:

这里我命名为login.html
login.html
启动tomcat运行项目,如果tomcat没有配置好,请网上查找springboot项目的相关教程,或者Maven项目教程,这里不进行详细解释:运行项目,成功启动tomcat后,在浏览器输入网址:localhost:8080/login.html 访问后出现;

点击选择文件,选择一张照片,点击上传,在eclipse里面会输出一个地址,类似于:
http://192.168.27.129/group1/M00/00/00/wKgbgV1nvOOAIuIXAAAzcQXJEHA936.JPG
复制该地址到浏览器,访问后发现我们存入的图片已经显示,现在整个过程完成,请留下你宝贵的一赞。