mysql数据库读写分离
目录
1.背景介绍
1.1web层
1.2数据访问层
2.软件环境
3.配置Master主服务器(Window)
3.1创建帐号授权
3.2修改my.Ini文件。
3.3查看Master状态
4、配置Slave从服务器(Linux)
4.1修改my.cnf文件,vim /etc/my.cnf
4.2重启mysql服务:
4.3连接Master
4.4启动Slave
4.5主从同步检查
4.6在从数据库创建一个帐号slaveuser,授予只读权限
5.验证主从复制效果
6.代码测试
6.1.c3p0-config.xml配置不同的url链接
6.2.C3p0Util,创建不同的连接,实现读写分离
6.3Dao实现
1.背景介绍
服务器减轻压力方案
1.1web层
网站实现nginx分布式负载均衡。这一篇有介绍,需要可以了解一下。
https://blog.csdn.net/qq_42035966/article/details/82086445
1.2数据访问层
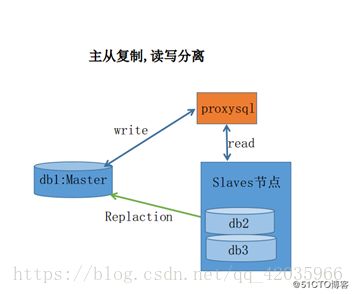
MySQL主从配置,实现读写分离。
如果还是传统的数据结构,或者只是单单靠一台服务器扛,如此多的数据库连接操作,数据库必然会崩溃,数据丢失的话,后果更是 不堪设想。利用MySQL主从配置,实现读写分离,减轻数据库压力。今天总结一下,方便大家学习参考一下。
2.软件环境
1台Master(主)数据库,这里我直接用windows本机数据库做主库,
1台Slave(从)数据库,在linux上安装mysql,做从库。
没安装的mysql的朋友可以参考这篇:https://blog.csdn.net/qq_42035966/article/details/82085696
Master服务器ip:192.168.0.111:3306
Slave服务器ip:192.168.0.124:3306
3.配置Master主服务器(Window)
3.1创建帐号授权
以root帐号登录我们window上的mysql,在mysql上创建一个用户,并允许其它Slave服务器可以通过远程访问Master,通过该用户读取二进制日志,实现数据同步。
mysql>create user repl; //创建新用户
mysql>GRANT REPLICATION SLAVE ON *.* TO 'repl'@'192.168.0.124' IDENTIFIED BY 'password';- REPLICATION SLAVE:表示将复制权限授予给用户。
- on:表示这些权限对哪些数据库和表生效,格式:数据库名.表名,这里写“*”表示所有数据库,所有表。如果我要指定将权限应用到test库的user表中,可以这么写test.user,一般主从复制*.*
- to:将权限授予哪个用户。格式:”用户名”@”登录IP或域名”。%表示没有限制,在任何主机都可以登录。比如:”yangxin”@”192.168.0.%”,表示yangxin这个用户只能在192.168.0 IP段登录,如果要配置多台从服务器,则再写一次,改掉ip。
- identified by:指定用户的登录密码
3.2修改my.Ini文件。
一般在mysql的data目录, 在[mysqld]后面添加如下
server-id=1   //给数据库服务的唯一标识,一般为大家设置服务器Ip的末尾号
log-bin=master-bin
log-bin-index=master-bin.index
修改完后重启MYSQL服务
cmd命令如下:

停止:net stop mysql
(其中mysql为你安装的mysql服务名称)
启动:net start mysql
3.3查看Master状态
mysql> SHOW MASTER STATUS;

#内容如下
+-------------------+----------+--------------+------------------+
| File | Position | Binlog_Do_DB | Binlog_Ignore_DB |
+-------------------+----------+--------------+------------------+
| master-bin.000001 | 1285 | | |
+-------------------+----------+--------------+------------------+
1 row in set (0.00 sec)
记下Position中的1285,我们从服务器配置要用到。
4、配置Slave从服务器(Linux)
4.1修改my.cnf文件,vim /etc/my.cnf
进入linux系统的mysql目录下
[mysqld]
server-id=2     #这里的id在所有从数据库中必须唯一
relay-log=slave-relay-bin
relay-log-index=slave-relay-bin.index
4.2重启mysql服务:
myql.server restart 重启MySQL服务 ,
./bin/mysql 进入MySQL命令窗口
4.3连接Master
mysql> change master to master_host='192.168.0.111', //Master 服务器Ip
master_port=3306,
master_user='repl',
master_password='repl',
master_log_file='master-bin.000001',//Master服务器产生的日志
master_log_pos=1285;         //Master服务器的Position
4.4启动Slave
mysql> start slave;
4.5主从同步检查
mysql> show slave status\G

//显示内容如下
==============================================
**************** 1. row *******************
Slave_IO_State:
Master_Host: 192.168.10.130
Master_User: rep1
Master_Port: 3306
Connect_Retry: 60
Master_Log_File: mysql-bin.000005
Read_Master_Log_Pos: 415
Relay_Log_File: localhost-relay-bin.000008
Relay_Log_Pos: 561
Relay_Master_Log_File: mysql-bin.000005
Slave_IO_Running: YES          ####必须为yes
Slave_SQL_Running: YES         ####必须为yes
Replicate_Do_DB:
……………省略若干……………
Master_Server_Id: 1
1 row in set (0.01 sec)
==============================================当内容中的Slave_IO_Running: YES、Slave_SQL_Running: YES 均为YES的时候,我们的配置就成功了。
4.6在从数据库创建一个帐号slaveuser,授予只读权限
mysql> GRANT SELECT ON *.* TO 'slaveuser'@'%' IDENTIFIED BY 'slaveuser';
5.验证主从复制效果
在主库分别插入库表数据等,查看从库是否同步。
如果复制无效,操作以下步骤
mysql> show slave status;          //显示从库状态,如果不是两个yes,则按以下步骤
mysql>  stop slave ;               //停止从库
mysql>  set GLOBAL SQL_SLAVE_SKIP_COUNTER=1;    //跳过slave上的1个错误
mysql>  start slave ;              //启动从库
mysql> show slave status;          //查看从库状态,出现两个yes
出现上方两个YES,则生效
6.代码测试
6.1.c3p0-config.xml配置不同的url链接
                jdbc:mysql://192.168.0.111:3306/test
                com.mysql.jdbc.Driver
                root
                root

                3
                10
                2
                10


                jdbc:mysql://192.168.0.127:3306/test
                com.mysql.jdbc.Driver
                slaveuser
                slaveuser
                3
                10
                2
                10
6.2.C3p0Util,创建不同的连接,实现读写分离
package utils;

import java.sql.Connection;
import java.sql.PreparedStatement;
import java.sql.ResultSet;
import java.sql.SQLException;
import javax.sql.DataSource;
import com.mchange.v2.c3p0.ComboPooledDataSource;

public class C3p0Util {
        private static DataSource masterds = new ComboPooledDataSource("master");
        private static DataSource slaveds = new ComboPooledDataSource("slave");

        /**
          *  获取master连接
         * @return
         * @throws SQLException
         */
        public static Connection getConnection() throws SQLException {
                return masterds.getConnection();
        }

        /**
         *  获取slave连接
         * @return
         * @throws SQLException
         */
        public static Connection getSlaveConnection() throws SQLException {
                return slaveds.getConnection();
        }

        /** 关闭连接
         * @param resultSet
         * @param pst
         * @param connection
         */
        public static void close(ResultSet resultSet, PreparedStatement pst,
                Connection connection) {
                if(resultSet!=null){
                        try {
                                resultSet.close();
                        } catch (SQLException e) {
                                e.printStackTrace();
                        }
                }
                if(pst!=null){
                        try {
                                pst.close();
                        } catch (SQLException e) {
                                e.printStackTrace();
                        }
                }
                if(connection!=null){
                        try {
                                connection.close();
                        } catch (SQLException e) {
                                e.printStackTrace();
                        }
                }
        }

}
6.3Dao实现
package dao;
import java.sql.Connection;
import java.sql.PreparedStatement;
import java.sql.SQLException;
import org.junit.Test;
import utils.C3p0Util;

public class Dao {
	@Test
	public void testSlave() {
		try {
			Connection connection = C3p0Util.getConnection();
//			查询
			String sql ="select * from student;";
//			新增
//			String sql ="insert into student(id,name) values(1,'小陈'),(2,'小郑');";
//			修改
//			String sql ="update student set name='骚' where id= 2";
//			删除
//			String sql ="delete from student where id=1;";

			PreparedStatement pst = connection.prepareStatement(sql);
			pst.execute();
		} catch (SQLException e) {
			e.printStackTrace();
		}

	}

	@Test
	public void testMaster() {
		try {
			Connection connection = C3p0Util.getSlaveConnection();
//			查询
			String sql ="select * from student;";
//			新增
//			String sql ="insert into student(id,name) values(1,'小陈'),(2,'小郑');";
//			修改
//			String sql ="update student set name='骚' where id= 2";
//			删除
//			String sql ="delete from student where id=2;";
			PreparedStatement pst = connection.prepareStatement(sql);
			boolean b = pst.execute();
			System.out.println(b);

		} catch (SQLException e) {
			e.printStackTrace();
		}
	}

}
