k8s集群service管理
集群service管理包括:
- 网络代理模式
- 服务代理
- 服务发现
- 发布服务
概述
Service 是对一组提供相同功能的 Pods 的抽象,并为它们提供一个统一的入口。
借助 Service,应用可以方便的实现服务发现与负载均衡,并实现应用的零宕机升级。
Service 通过标签来选取服务后端,一般配合 Replication Controller 或者 Deployment 来保证后端容器的正常运行。这些匹配标签的 Pod IP 和端口列表组成 endpoints,由 kube-proxy 负责将服务 IP 负载均衡到这些 endpoints 上。
Service 有四种类型:
- ClusterIP:默认类型,自动分配一个仅 cluster 内部可以访问的虚拟 IP
- NodePort:在 ClusterIP 基础上为 Service 在每台机器上绑定一个端口,这样就可以通过 NodeIP:NodePort 来访问该服务。如果 kube-proxy 设置了 –nodeport-addresses=10.240.0.0/16(v1.10 支持),那么仅该 NodePort 仅对设置在范围内的 IP 有效。
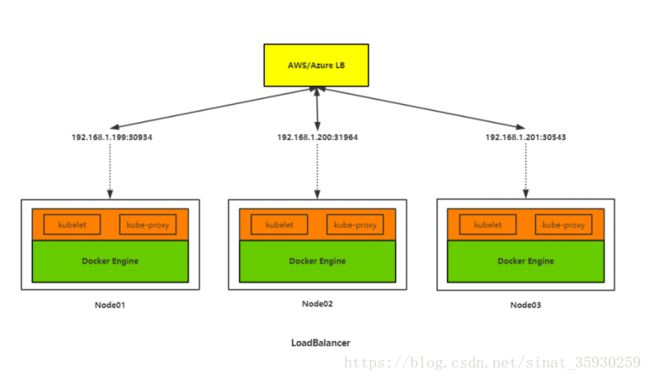
- LoadBalancer:在 NodePort 的基础上,借助 cloud provider 创建一个外部的负载均衡器,并将请求转发到 :NodePort
- ExternalName:将服务通过 DNS CNAME 记录方式转发到指定的域名(通过 spec.externlName 设定)。需要 kube-dns 版本在 1.7 以上。
另外,也可以将已有的服务以 Service 的形式加入到 Kubernetes 集群中来,只需要在创建 Service 的时候不指定 Label selector,而是在 Service 创建好后手动为其添加 endpoint。
网络代理模式
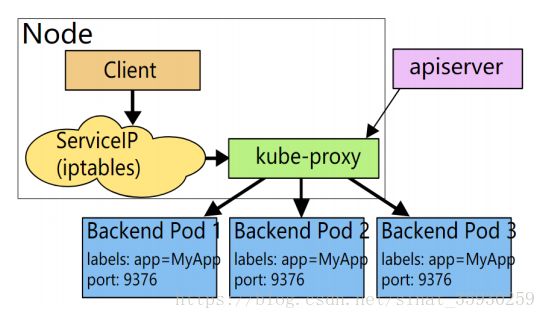
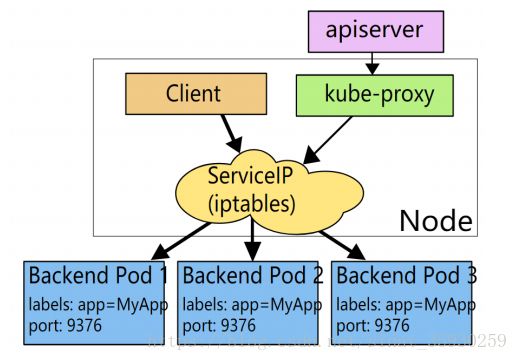
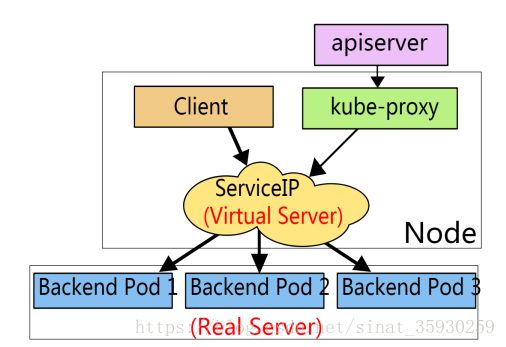
拥有三种代理模式:userspace、iptables和ipvs。
现在默认使用iptables,在1.8版本之后增加了ipvs功能。
早期代理的方式
client先请求serviceip,经由iptables转发到kube-proxy上之后再转发到pod上去。这种方式效率比较低。
当前iptables代理方式
client请求serviceip后会直接转发到pod上。这种模式性能会高很多。kube-proxy就会负责将pod地址生成在node节点iptables规则中。
ipvs代理方式
这种方式是通过内核模块ipvs实现转发,这种效率更高。
服务代理
创建yaml配置文件
创建一个service.yaml文件:
apiVersion: v1
kind: Service
metadata:
  name: my-service
spec:
  selector:
    app: MyApp
  ports:
  - name: http
    protocol: TCP
    port: 80
    targetPort: 80
  - name: https
    protocol: TCP
    port: 443
targetPort: 443在selector字段中指定了为哪一个标签的app进行负载均衡。ports字段指定了暴露的端口,每一个- name指定一组端口,targetPort为目标容器的端口。
创建service
kubectl create -f service.yaml查看service
然后通过命令kubectl get svc查看创建的service

通过命令kubectl get endpoints my-service查看创建的service当后端代理的pod的ip

并没有给它分配pod所以代理的ip为空。
配置service代理pod
现在想让刚创建的service代理nginx-pod
修改service.yaml文件中app:MyApp为app:nginx,这样就可以匹配到标签为app=nginx的pod了。
然后重新生效这个service:
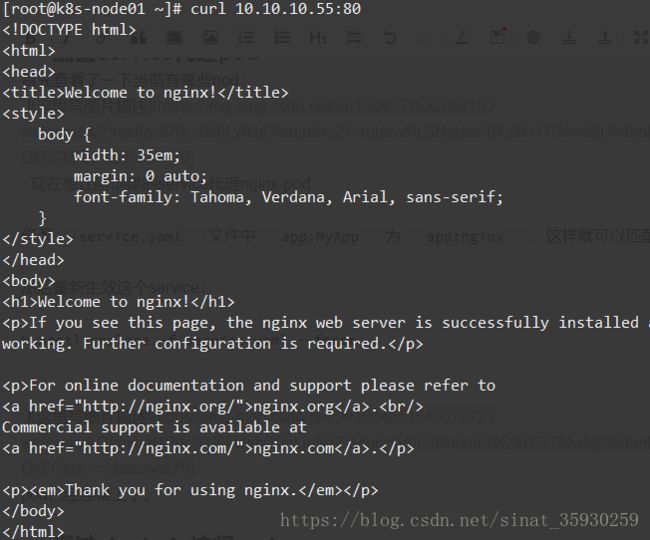
kubectl replace -f service.yaml --force通过clusterip访问pod
然后在节点上可以通过这个ip和端口的方式访问pod上的应用:
service服务发现
服务发现支持Service环境变量和DNS两种模式
环境变量
当一个pod运行到node,kubelet会为每个容器添加一组环境变量,Pod容器中程序就可以使用这些环境变量发现Service。
环境变量名格式如下:
{SVCNAME}_SERVICE_HOST
{SVCNAME}_SERVICE_PORT
其中服务名和端口名转为大写,连字符转换为下划线。查看方法是进入pod中输入
env查看环境变量,在程序中调用这个变量就可以访问这个组件。
限制:
1)Pod和Service的创建顺序是有要求的,Service必须在Pod创建之前被创建,否则环境变量不会设置到Pod中。
2)Pod只能获取同Namespace中的Service环境变量。
DNS
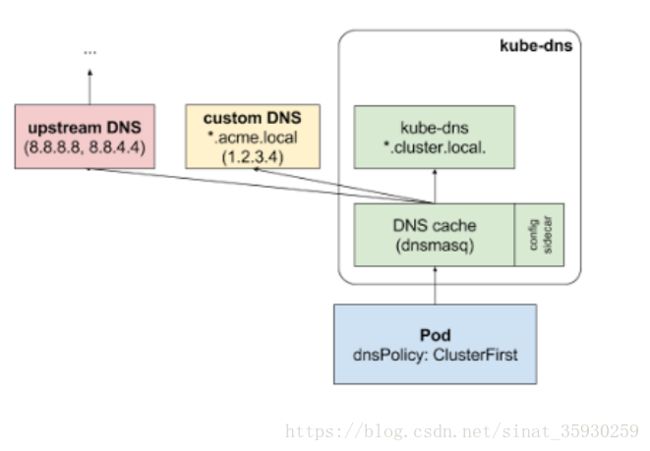
DNS服务监视Kubernetes API,为每一个Service创建DNS记录用于域名解析。这样Pod中就可以通过DNS域名获取Service的访问地址。
工作原理
kube-dns用于记录集群svc的域名解析相关记录,dnsmasq主要用于dns缓存。
配置kube-dns
通过kube-dns.yaml配置kube-dns:
apiVersion: v1
kind: Service
metadata:
  name: kube-dns
  namespace: kube-system
  labels:
    k8s-app: kube-dns
    kubernetes.io/cluster-service: "true"
    addonmanager.kubernetes.io/mode: Reconcile
    kubernetes.io/name: "KubeDNS"
spec:
  selector:
    k8s-app: kube-dns
  clusterIP: 10.10.10.2
  ports:
  - name: dns
    port: 53
    protocol: UDP
  - name: dns-tcp
    port: 53
    protocol: TCP
---
apiVersion: v1
kind: ServiceAccount
metadata:
  name: kube-dns
  namespace: kube-system
  labels:
    kubernetes.io/cluster-service: "true"
    addonmanager.kubernetes.io/mode: Reconcile
---
apiVersion: v1
kind: ConfigMap
metadata:
  name: kube-dns
  namespace: kube-system
  labels:
    addonmanager.kubernetes.io/mode: EnsureExists
---
apiVersion: extensions/v1beta1
kind: Deployment
metadata:
  name: kube-dns
  namespace: kube-system
  labels:
    k8s-app: kube-dns
    kubernetes.io/cluster-service: "true"
    addonmanager.kubernetes.io/mode: Reconcile
spec:
  # replicas: not specified here:
  # 1. In order to make Addon Manager do not reconcile this replicas parameter.
  # 2. Default is 1.
  # 3. Will be tuned in real time if DNS horizontal auto-scaling is turned on.
  strategy:
    rollingUpdate:
      maxSurge: 10%
      maxUnavailable: 0
  selector:
    matchLabels:
      k8s-app: kube-dns
  template:
    metadata:
      labels:
        k8s-app: kube-dns
      annotations:
        scheduler.alpha.kubernetes.io/critical-pod: ''
    spec:
      tolerations:
      - key: "CriticalAddonsOnly"
        operator: "Exists"
      volumes:
      - name: kube-dns-config
        configMap:
          name: kube-dns
          optional: true
      containers:
      - name: kubedns
        image: registry.cn-hangzhou.aliyuncs.com/google_containers/k8s-dns-kube-dns-amd64:1.14.7
        resources:
          # TODO: Set memory limits when we've profiled the container for large
          # clusters, then set request = limit to keep this container in
          # guaranteed class. Currently, this container falls into the
          # "burstable" category so the kubelet doesn't backoff from restarting it.
          limits:
            memory: 170Mi
          requests:
            cpu: 100m
            memory: 70Mi
        livenessProbe:
          httpGet:
            path: /healthcheck/kubedns
            port: 10054
            scheme: HTTP
          initialDelaySeconds: 60
          timeoutSeconds: 5
          successThreshold: 1
          failureThreshold: 5
        readinessProbe:
          httpGet:
            path: /readiness
            port: 8081
            scheme: HTTP
          # we poll on pod startup for the Kubernetes master service and
          # only setup the /readiness HTTP server once that's available.
          initialDelaySeconds: 3
          timeoutSeconds: 5
        args:
        - --domain=cluster.local
        - --dns-port=10053
        - --config-dir=/kube-dns-config
        - --v=2
        env:
        - name: PROMETHEUS_PORT
          value: "10055"
        ports:
        - containerPort: 10053
          name: dns-local
          protocol: UDP
        - containerPort: 10053
          name: dns-tcp-local
          protocol: TCP
        - containerPort: 10055
          name: metrics
          protocol: TCP
        volumeMounts:
        - name: kube-dns-config
          mountPath: /kube-dns-config
      - name: dnsmasq
        image: registry.cn-hangzhou.aliyuncs.com/google_containers/k8s-dns-dnsmasq-nanny-amd64:1.14.7
        livenessProbe:
          httpGet:
            path: /healthcheck/dnsmasq
            port: 10054
            scheme: HTTP
          initialDelaySeconds: 60
          timeoutSeconds: 5
          successThreshold: 1
          failureThreshold: 5
        args:
        - -v=2
        - -logtostderr
        - -configDir=/etc/k8s/dns/dnsmasq-nanny
        - -restartDnsmasq=true
        - --
        - -k
        - --cache-size=1000
        - --no-negcache
        - --log-facility=-
        - --server=/cluster.local/127.0.0.1#10053
        - --server=/in-addr.arpa/127.0.0.1#10053
        - --server=/ip6.arpa/127.0.0.1#10053
        ports:
        - containerPort: 53
          name: dns
          protocol: UDP
        - containerPort: 53
          name: dns-tcp
          protocol: TCP
        # see: https://github.com/kubernetes/kubernetes/issues/29055 for details
        resources:
          requests:
            cpu: 150m
            memory: 20Mi
        volumeMounts:
        - name: kube-dns-config
          mountPath: /etc/k8s/dns/dnsmasq-nanny
      - name: sidecar
        image: registry.cn-hangzhou.aliyuncs.com/google_containers/k8s-dns-sidecar-amd64:1.14.7
        livenessProbe:
          httpGet:
            path: /metrics
            port: 10054
            scheme: HTTP
          initialDelaySeconds: 60
          timeoutSeconds: 5
          successThreshold: 1
          failureThreshold: 5
        args:
        - --v=2
        - --logtostderr
        - --probe=kubedns,127.0.0.1:10053,kubernetes.default.svc.cluster.local,5,SRV
        - --probe=dnsmasq,127.0.0.1:53,kubernetes.default.svc.cluster.local,5,SRV
        ports:
        - containerPort: 10054
          name: metrics
          protocol: TCP
        resources:
          requests:
            memory: 20Mi
            cpu: 10m
      dnsPolicy: Default  # Don't use cluster DNS.
      serviceAccountName: kube-dns
yaml文件中为kube-dns指定了一个固定的ip,所以需要注意修改node节点kubelet配置的kube-dns是否为这个ip(我之前配置的不是,所以要修改)
通过下面的命令创建kube-dns服务:
kubectl create -f kube-dns.yaml修改node节点kubelet配置,将–cluster-dns=这一项的参数指定为yaml文件中为kube-dns指定的ip地址(这里我的是10.10.10.2),并重启kubelet。
问题记录
这里在部署的时候出现了这样的一个报错:
k8s.io/dns/pkg/dns/dns.go:150: Failed to list *v1.Service: Get https://10.10.10.1:443/api/v1/servi 10.10.99.225, 10.10.99.233, 10.10.99.228, not 10.10.10.1这个错误产生的原因是因为server证书的host中没有加入10.10.10.1这个ip,加入后重新生成server证书并分发,重启相关服务后构建kube-dns成功。
测试kube-dns
首先创建一个busybox用于测试:
apiVersion: v1
kind: Pod
metadata:
  name: busybox
  namespace: default
spec:
  containers:
  - image: busybox
    command:
      - sleep
      - "3600"
    imagePullPolicy: IfNotPresent
    name: busybox
  restartPolicy: Always
创建:
kubectl create -f busybox.yaml执行命令看能否解析到dns的ip:
kubectl exec -it busybox -- nslookup kubernetes.default同样的,对于其他的服务,也是可以解析的,只要在svc名字后边加上default即可:
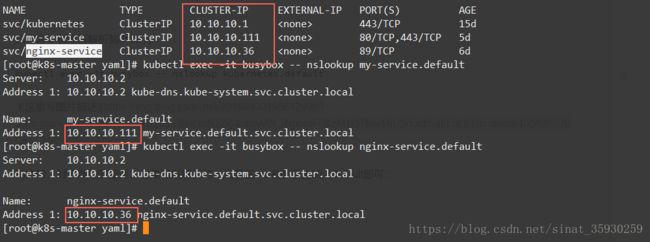
这样在后续程序中主需要通过svc名称访问程序即可,而不用在程序中写死ip,比较灵活。
集群应用发布
服务类型
ClusterIP:
分配一个内部集群IP地址,只能在集群内部访问(同Namespace内的Pod),默认ServiceType。
NodePort:
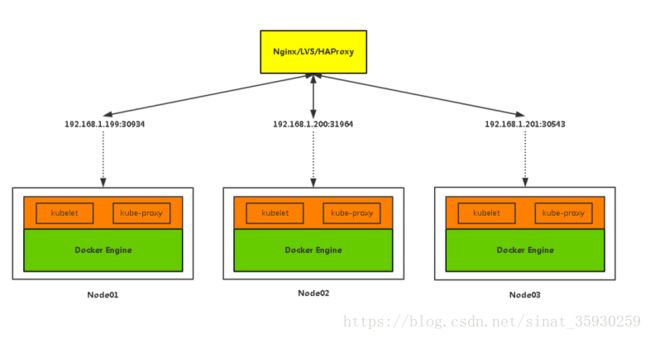
分配一个内部集群IP地址,并在每个节点上启用一个端口来暴露服务,可以在集群外部访问。
访问地址:
LoadBalancer:
分配一个内部集群IP地址,并在每个节点上启用一个端口来暴露服务。
除此之外,Kubernetes会请求底层云平台上的负载均衡器,将每个Node([NodeIP]:[NodePort])作为后端添加进去。
