spring boot +Swagger-ui 自动生成API文档
随着互联网技术的发展,现在的网站架构基本都由原来的后端渲染,变成了:前端渲染、先后端分离的形态,而且前端技术和后端技术在各自的道路上越走越远。
这样后段开发好了api 之后就要提交api 文档给前端的朋友。给前端的api 文档各个公司有各个公司的要求,有的是word 有的是 md 文档,或者是 postman 的一个连接。
好了废话不多说说一下 swagger -ui 吧
什么是Swagger
Swagger是一个Restful风格接口的文档在线自动生成和测试的框架
官网:http://swagger.io
官方描述:The World’s Most Popular Framework for APIs.
先看一下 swagger-ui 生成的api 的效果吧(这是一个增删改查的小李子)
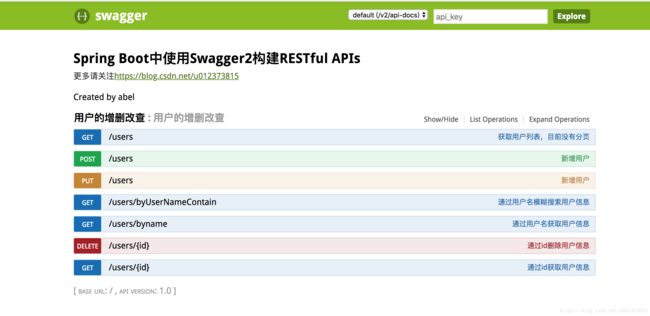
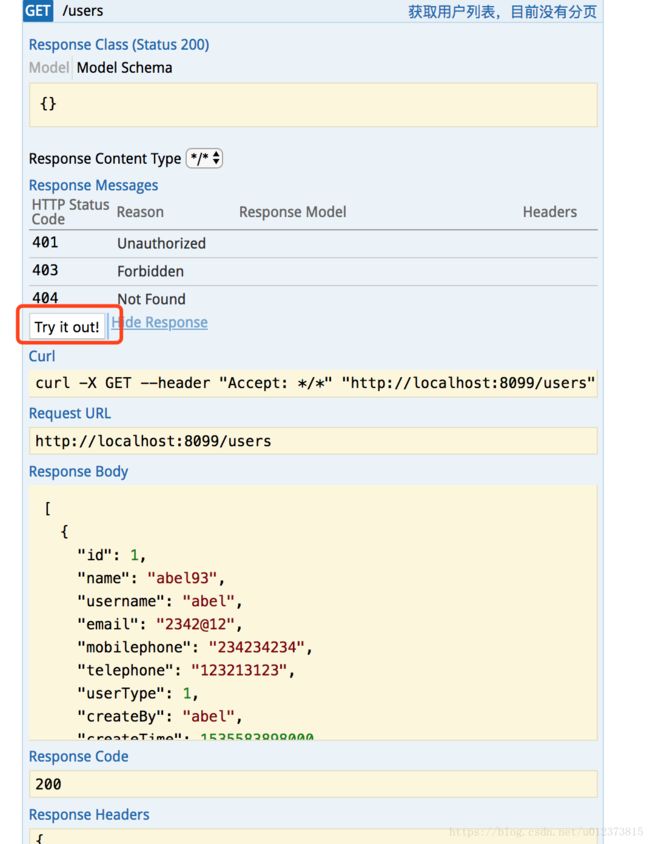
然后我们打开查询所有用户的api 看到api 内容

然后在服务器运行的状态下点击 try it out 测试查询功能
接着打开新增的api 查看

好了这个就是自动生成的api 效果。接下来我们就看怎么在我们的项目中使用swagger-ui 吧
springboot 集成 swagger -ui
1、添加依赖
<dependency>

            <groupId>io.springfoxgroupId>

            <artifactId>springfox-swagger2artifactId>

            <version>2.2.2version>

        dependency>

        <dependency>

            <groupId>io.springfoxgroupId>

            <artifactId>springfox-swagger-uiartifactId>

            <version>2.2.2version>

        dependency>
2、编写配置文件
在application 同级目录新建 Swagger2 文件
package com.abel.example;

import org.springframework.context.annotation.Bean;

import org.springframework.context.annotation.Configuration;
import springfox.documentation.builders.ApiInfoBuilder;
import springfox.documentation.builders.PathSelectors;
import springfox.documentation.builders.RequestHandlerSelectors;
import springfox.documentation.service.ApiInfo;
import springfox.documentation.spi.DocumentationType;
import springfox.documentation.spring.web.plugins.Docket;
import springfox.documentation.swagger2.annotations.EnableSwagger2;

/**
 * Created by yangyibo on 2018/9/7.
 */
@Configuration
@EnableSwagger2
public class Swagger2 {
    /**
     * 创建API应用
     * apiInfo() 增加API相关信息
     * 通过select()函数返回一个ApiSelectorBuilder实例,用来控制哪些接口暴露给Swagger来展现,
     * 本例采用指定扫描的包路径来定义指定要建立API的目录。
     *
     * @return
     */
    @Bean
    public Docket createRestApi() {
        return new Docket(DocumentationType.SWAGGER_2)
                .apiInfo(apiInfo())
                .select()
                .apis(RequestHandlerSelectors.basePackage("com.abel.example.controller"))
                .paths(PathSelectors.any())
                .build();
    }

    /**
     * 创建该API的基本信息(这些基本信息会展现在文档页面中)
     * 访问地址:http://项目实际地址/swagger-ui.html
     * @return
     */
    private ApiInfo apiInfo() {
        return new ApiInfoBuilder()
                .title("Spring Boot中使用Swagger2构建RESTful APIs")
                .description("更多请关注https://blog.csdn.net/u012373815")
                .termsOfServiceUrl("https://blog.csdn.net/u012373815")
                .contact("abel")
                .version("1.0")
                .build();
    }
}
3、在controller上添加注解,自动生成API
注意:
package com.abel.example.controller;
import javax.servlet.http.HttpServletRequest;
import java.util.Map;
import com.abel.example.bean.User;
import io.swagger.annotations.*;
import org.apache.log4j.Logger;
import org.springframework.beans.factory.annotation.Autowired;
import org.springframework.http.HttpStatus;
import org.springframework.http.ResponseEntity;
import org.springframework.stereotype.Controller;
import org.springframework.web.bind.annotation.*;
import com.abel.example.service.UserService;
import com.abel.example.util.CommonUtil;
@Controller
@RequestMapping(value = "/users")
@Api(value = "用户的增删改查")
public class UserController {
@Autowired
private UserService userService;
/**
* 查询所有的用户
* api :localhost:8099/users
* @return
*/
@RequestMapping(method = RequestMethod.GET)
@ResponseBody
@ApiOperation(value = "获取用户列表,目前没有分页")
public ResponseEntity注解含义:
@Api:用在类上,说明该类的作用。

@ApiOperation:注解来给API增加方法说明。

@ApiImplicitParams : 用在方法上包含一组参数说明。

@ApiImplicitParam:用来注解来给方法入参增加说明。

@ApiResponses:用于表示一组响应

@ApiResponse:用在@ApiResponses中,一般用于表达一个错误的响应信息

      code:数字,例如400

      message:信息,例如"请求参数没填好"

      response:抛出异常的类

@ApiModel:描述一个Model的信息(一般用在请求参数无法使用@ApiImplicitParam注解进行描述的时候)
@ApiModelProperty:描述一个model的属性
注意:@ApiImplicitParam的参数说明:

paramType会直接影响程序的运行期,如果paramType与方法参数获取使用的注解不一致,会直接影响到参数的接收。
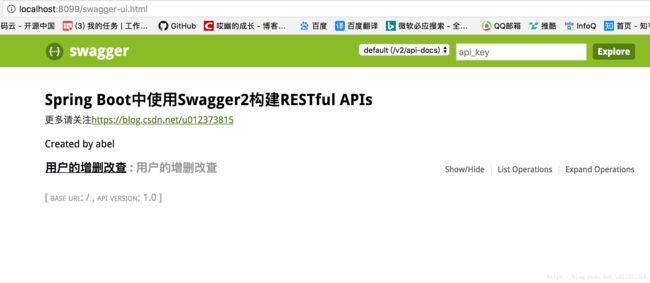
4、启动项目效果图:
服务器启动后访问 http://localhost:8099/swagger-ui.html 效果如下
点击查看效果

本文项目全部代码:https://github.com/527515025/springBoot/tree/master/springboot-swagger-ui
本文参考:https://blog.csdn.net/machihaoyu/article/details/78475699
https://blog.csdn.net/tuposky/article/details/77965139
https://blog.csdn.net/sanyaoxu_2/article/details/80555328