在前后端分离的SpringBoot项目中集成Shiro权限框架
项目背景
公司在几年前就采用了前后端分离的开发模式,前端所有请求都使用ajax。这样的项目结构在与CAS单点登录等权限管理框架集成时遇到了很多问题,使得权限部分的代码冗长丑陋,CAS的各种重定向也使得用户体验很差,在前端使用vue-router管理页面跳转时,问题更加尖锐。于是我就在寻找一个解决方案,这个方案应该对代码的侵入较少,开发速度快,实现优雅。最近无意中看到springboot与shiro框架集成的文章,在了解了springboot以及shiro的发展状况,并学习了使用方法后,开始在网上搜索前后端分离模式下这两个框架的适应性,在经过测试后发现可行,完全符合个人预期。
解决方案
本文中项目核心包为SpringBoot1.5.9.RELEASE以及shiro-spring 1.4.0,为了加快开发效率,持久化框架使用hibernate-JPA,为增加可靠性,sessionId的管理使用了shiro-redis开源插件,避免sessionId断电丢失,同时使得多端可共享session,项目结构为多模块项目,详见下图。

其中spring-boot-shiro模块为本文重点,该模块包含shiro核心配置,shiro数据源配置以及各种自定义实现,登录相关服务等。该模块在项目中使用时可直接在pom中引用,并在spring-boot-main入口模块中配置相应数据库连接信息即可,且该模块可以在多个项目中复用,避免重复开发。spring-boot-module1为模拟真实项目中的业务模块,可能会有多个。spring-boot-common中包含通用工具类,常量,异常等等。多模块项目的搭建在本文中不作赘述。
母模块pom.xml代码如下
    4.0.0
    com.xxx
    spring-boot-parent
    pom
    1.0-SNAPSHOT

        spring-boot-main
        spring-boot-module1
        spring-boot-shiro
        spring-boot-common


        UTF-8
        UTF-8
        1.8
        1.5.9.RELEASE
        1.4.0


            org.springframework.boot
            spring-boot-starter-web
            ${spring-boot.version}


            org.springframework.boot
            spring-boot-starter-tomcat
            ${spring-boot.version}
            provided


            org.springframework.boot
            spring-boot-starter-test
            ${spring-boot.version}
            test


            org.springframework.boot
            spring-boot-devtools
            ${spring-boot.version}
            true


            org.springframework.boot
            spring-boot-starter-data-jpa
            ${spring-boot.version}


            org.apache.shiro
            shiro-spring
            ${shiro.version}


            com.alibaba
            fastjson
            1.2.8


            com.alibaba
            druid
            1.0.28


            mysql
            mysql-connector-java
            5.1.39
            runtime
spring-boot-shiro模块接口如下图

传统结构项目中,shiro从cookie中读取sessionId以此来维持会话,在前后端分离的项目中(也可在移动APP项目使用),我们选择在ajax的请求头中传递sessionId,因此需要重写shiro获取sessionId的方式。自定义MySessionManager类继承DefaultWebSessionManager类,重写getSessionId方法,代码如下
import org.apache.shiro.web.servlet.ShiroHttpServletRequest;
import org.apache.shiro.web.session.mgt.DefaultWebSessionManager;
import org.apache.shiro.web.util.WebUtils;
import org.springframework.util.StringUtils;
import javax.servlet.ServletRequest;
import javax.servlet.ServletResponse;
import java.io.Serializable;

/**
 * Created by Administrator on 2017/12/11.
 * 自定义sessionId获取
 */
public class MySessionManager extends DefaultWebSessionManager {

    private static final String AUTHORIZATION = "Authorization";

    private static final String REFERENCED_SESSION_ID_SOURCE = "Stateless request";

    public MySessionManager() {
        super();
    }

    @Override
    protected Serializable getSessionId(ServletRequest request, ServletResponse response) {
        String id = WebUtils.toHttp(request).getHeader(AUTHORIZATION);
        //如果请求头中有 Authorization 则其值为sessionId
        if (!StringUtils.isEmpty(id)) {
            request.setAttribute(ShiroHttpServletRequest.REFERENCED_SESSION_ID_SOURCE, REFERENCED_SESSION_ID_SOURCE);
            request.setAttribute(ShiroHttpServletRequest.REFERENCED_SESSION_ID, id);
            request.setAttribute(ShiroHttpServletRequest.REFERENCED_SESSION_ID_IS_VALID, Boolean.TRUE);
            return id;
        } else {
            //否则按默认规则从cookie取sessionId
            return super.getSessionId(request, response);
        }
    }
}
如何配置让shiro执行我们的自定义sessionManager呢?下面看ShiroConfig类。
package com.xxx.shiro.config;
import org.apache.shiro.authc.credential.HashedCredentialsMatcher;
import org.apache.shiro.mgt.SecurityManager;
import org.apache.shiro.session.mgt.SessionManager;
import org.apache.shiro.spring.security.interceptor.AuthorizationAttributeSourceAdvisor;
import org.apache.shiro.spring.web.ShiroFilterFactoryBean;
import org.apache.shiro.web.mgt.DefaultWebSecurityManager;
import org.crazycake.shiro.RedisCacheManager;
import org.crazycake.shiro.RedisManager;
import org.crazycake.shiro.RedisSessionDAO;
import org.springframework.beans.factory.annotation.Value;
import org.springframework.context.annotation.Bean;
import org.springframework.context.annotation.Configuration;
import org.springframework.web.servlet.HandlerExceptionResolver;
import java.util.LinkedHashMap;
import java.util.Map;
/**
* Created by Administrator on 2017/12/11.
*/
@Configuration
public class ShiroConfig {
@Value("${spring.redis.shiro.host}")
private String host;
@Value("${spring.redis.shiro.port}")
private int port;
@Value("${spring.redis.shiro.timeout}")
private int timeout;
@Value("${spring.redis.shiro.password}")
private String password;
@Bean
public ShiroFilterFactoryBean shirFilter(SecurityManager securityManager) {
System.out.println("ShiroConfiguration.shirFilter()");
ShiroFilterFactoryBean shiroFilterFactoryBean = new ShiroFilterFactoryBean();
shiroFilterFactoryBean.setSecurityManager(securityManager);
Map filterChainDefinitionMap = new LinkedHashMap();
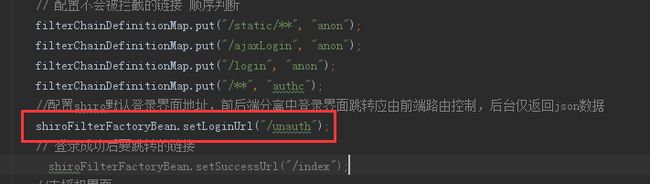
//注意过滤器配置顺序 不能颠倒
//配置退出 过滤器,其中的具体的退出代码Shiro已经替我们实现了,登出后跳转配置的loginUrl
filterChainDefinitionMap.put("/logout", "logout");
// 配置不会被拦截的链接 顺序判断
filterChainDefinitionMap.put("/static/**", "anon");
filterChainDefinitionMap.put("/ajaxLogin", "anon");
filterChainDefinitionMap.put("/login", "anon");
filterChainDefinitionMap.put("/**", "authc");
//配置shiro默认登录界面地址,前后端分离中登录界面跳转应由前端路由控制,后台仅返回json数据
shiroFilterFactoryBean.setLoginUrl("/unauth");
// 登录成功后要跳转的链接
// shiroFilterFactoryBean.setSuccessUrl("/index");
//未授权界面;
// shiroFilterFactoryBean.setUnauthorizedUrl("/403");
shiroFilterFactoryBean.setFilterChainDefinitionMap(filterChainDefinitionMap);
return shiroFilterFactoryBean;
}
/**
* 凭证匹配器
* (由于我们的密码校验交给Shiro的SimpleAuthenticationInfo进行处理了
* )
*
* @return
*/
@Bean
public HashedCredentialsMatcher hashedCredentialsMatcher() {
HashedCredentialsMatcher hashedCredentialsMatcher = new HashedCredentialsMatcher();
hashedCredentialsMatcher.setHashAlgorithmName("md5");//散列算法:这里使用MD5算法;
hashedCredentialsMatcher.setHashIterations(2);//散列的次数,比如散列两次,相当于 md5(md5(""));
return hashedCredentialsMatcher;
}
@Bean
public MyShiroRealm myShiroRealm() {
MyShiroRealm myShiroRealm = new MyShiroRealm();
myShiroRealm.setCredentialsMatcher(hashedCredentialsMatcher());
return myShiroRealm;
}
@Bean
public SecurityManager securityManager() {
DefaultWebSecurityManager securityManager = new DefaultWebSecurityManager();
securityManager.setRealm(myShiroRealm());
// 自定义session管理 使用redis
securityManager.setSessionManager(sessionManager());
// 自定义缓存实现 使用redis
securityManager.setCacheManager(cacheManager());
return securityManager;
}
//自定义sessionManager
@Bean
public SessionManager sessionManager() {
MySessionManager mySessionManager = new MySessionManager();
mySessionManager.setSessionDAO(redisSessionDAO());
return mySessionManager;
}
/**
* 配置shiro redisManager
*
* 使用的是shiro-redis开源插件
*
* @return
*/
public RedisManager redisManager() {
RedisManager redisManager = new RedisManager();
redisManager.setHost(host);
redisManager.setPort(port);
redisManager.setExpire(1800);// 配置缓存过期时间
redisManager.setTimeout(timeout);
redisManager.setPassword(password);
return redisManager;
}
/**
* cacheManager 缓存 redis实现
*
* 使用的是shiro-redis开源插件
*
* @return
*/
@Bean
public RedisCacheManager cacheManager() {
RedisCacheManager redisCacheManager = new RedisCacheManager();
redisCacheManager.setRedisManager(redisManager());
return redisCacheManager;
}
/**
* RedisSessionDAO shiro sessionDao层的实现 通过redis
*
* 使用的是shiro-redis开源插件
*/
@Bean
public RedisSessionDAO redisSessionDAO() {
RedisSessionDAO redisSessionDAO = new RedisSessionDAO();
redisSessionDAO.setRedisManager(redisManager());
return redisSessionDAO;
}
/**
* 开启shiro aop注解支持.
* 使用代理方式;所以需要开启代码支持;
*
* @param securityManager
* @return
*/
@Bean
public AuthorizationAttributeSourceAdvisor authorizationAttributeSourceAdvisor(SecurityManager securityManager) {
AuthorizationAttributeSourceAdvisor authorizationAttributeSourceAdvisor = new AuthorizationAttributeSourceAdvisor();
authorizationAttributeSourceAdvisor.setSecurityManager(securityManager);
return authorizationAttributeSourceAdvisor;
}
/**
* 注册全局异常处理
* @return
*/
@Bean(name = "exceptionHandler")
public HandlerExceptionResolver handlerExceptionResolver() {
return new MyExceptionHandler();
}
}
在定义的SessionManager的Bean中返回我们的MySessionManager,然后在SecurityManager的Bean中调用setSessionManager(SessionManager sessionManager)方法加载我们的自定义SessionManager。
附上
MyShiroRealm的代码
package com.xxx.shiro.config;

import com.xxx.shiro.entity.SysPermission;
import com.xxx.shiro.entity.SysRole;
import com.xxx.shiro.entity.UserInfo;
import com.xxx.shiro.service.UserInfoService;
import org.apache.shiro.authc.*;
import org.apache.shiro.authz.AuthorizationInfo;
import org.apache.shiro.authz.SimpleAuthorizationInfo;
import org.apache.shiro.realm.AuthorizingRealm;
import org.apache.shiro.subject.PrincipalCollection;
import org.apache.shiro.util.ByteSource;

import javax.annotation.Resource;

/**
 * Created by Administrator on 2017/12/11.
 * 自定义权限匹配和账号密码匹配
 */
public class MyShiroRealm extends AuthorizingRealm {
    @Resource
    private UserInfoService userInfoService;

    @Override
    protected AuthorizationInfo doGetAuthorizationInfo(PrincipalCollection principals) {
//        System.out.println("权限配置-->MyShiroRealm.doGetAuthorizationInfo()");
        SimpleAuthorizationInfo authorizationInfo = new SimpleAuthorizationInfo();
        UserInfo userInfo = (UserInfo) principals.getPrimaryPrincipal();
        for (SysRole role : userInfo.getRoleList()) {
            authorizationInfo.addRole(role.getRole());
            for (SysPermission p : role.getPermissions()) {
                authorizationInfo.addStringPermission(p.getPermission());
            }
        }
        return authorizationInfo;
    }

    /*主要是用来进行身份认证的,也就是说验证用户输入的账号和密码是否正确。*/
    @Override
    protected AuthenticationInfo doGetAuthenticationInfo(AuthenticationToken token)
            throws AuthenticationException {
//        System.out.println("MyShiroRealm.doGetAuthenticationInfo()");
        //获取用户的输入的账号.
        String username = (String) token.getPrincipal();
//        System.out.println(token.getCredentials());
        //通过username从数据库中查找 User对象,如果找到,没找到.
        //实际项目中,这里可以根据实际情况做缓存,如果不做,Shiro自己也是有时间间隔机制,2分钟内不会重复执行该方法
        UserInfo userInfo = userInfoService.findByUsername(username);
//        System.out.println("----->>userInfo="+userInfo);
        if (userInfo == null) {
            return null;
        }
        if (userInfo.getState() == 1) { //账户冻结
            throw new LockedAccountException();
        }
        SimpleAuthenticationInfo authenticationInfo = new SimpleAuthenticationInfo(
                userInfo, //用户名
                userInfo.getPassword(), //密码
                ByteSource.Util.bytes(userInfo.getCredentialsSalt()),//salt=username+salt
                getName()  //realm name
        );
        return authenticationInfo;
    }

}
传统项目中,登录成功后应该重定向请求,但在前后端分离项目中,通过ajax登录后应该返回登录状态标志以及相关信息。Web层登录方法代码如下
    /**
     * 登录方法
     * @param userInfo
     * @return
     */
    @RequestMapping(value = "/ajaxLogin", method = RequestMethod.POST)
    @ResponseBody
    public String ajaxLogin(UserInfo userInfo) {
        JSONObject jsonObject = new JSONObject();
        Subject subject = SecurityUtils.getSubject();
        UsernamePasswordToken token = new UsernamePasswordToken(userInfo.getUsername(), userInfo.getPassword());
        try {
            subject.login(token);
            jsonObject.put("token", subject.getSession().getId());
            jsonObject.put("msg", "登录成功");
        } catch (IncorrectCredentialsException e) {
            jsonObject.put("msg", "密码错误");
        } catch (LockedAccountException e) {
            jsonObject.put("msg", "登录失败,该用户已被冻结");
        } catch (AuthenticationException e) {
            jsonObject.put("msg", "该用户不存在");
        } catch (Exception e) {
            e.printStackTrace();
        }
        return jsonObject.toString();
    }
本项目使用SpringMVC框架,可以自行修改使用其他MVC框架。登录成功则返回sessionId作为token给前端存储,前端请求时将该token放入请求头,以Authorization为key,以此来鉴权。如果出现账号或密码错误等异常则返回错误信息。
传统项目中,登出后应重定向请求,到登录界面或其他指定界面,在前后端分离的项目中,我们应该返回json信息。在上面提到的ShiroConfig中配置了默认登录路由
在Web层加入方法
/**
     * 未登录,shiro应重定向到登录界面,此处返回未登录状态信息由前端控制跳转页面
     * @return
     */
    @RequestMapping(value = "/unauth")
    @ResponseBody
    public Object unauth() {
        Map map = new HashMap();
        map.put("code", "1000000");
        map.put("msg", "未登录");
        return map;
    }
此处简单提示未登录返回状态码,也可自行定义信息。
在项目中,权限相关表可能不在业务库中,因此有必要单独配置权限相关表的数据源。详细配置可以参见《Spring Boot多数据源配置与使用》一文。
Shiro数据源配置代码
package com.xxx.shiro.datasource;

import java.util.Map;
import javax.persistence.EntityManager;
import javax.sql.DataSource;
import org.springframework.beans.factory.annotation.Autowired;
import org.springframework.beans.factory.annotation.Qualifier;
import org.springframework.boot.autoconfigure.orm.jpa.JpaProperties;
import org.springframework.boot.orm.jpa.EntityManagerFactoryBuilder;
import org.springframework.context.annotation.Bean;
import org.springframework.context.annotation.Configuration;
import org.springframework.data.jpa.repository.config.EnableJpaRepositories;
import org.springframework.orm.jpa.JpaTransactionManager;
import org.springframework.orm.jpa.LocalContainerEntityManagerFactoryBean;
import org.springframework.transaction.PlatformTransactionManager;
import org.springframework.transaction.annotation.EnableTransactionManagement;

/**
 * Created by Administrator on 2017/12/11.
 */
@Configuration
@EnableTransactionManagement
@EnableJpaRepositories(
        entityManagerFactoryRef="shiroEntityManagerFactory",
        transactionManagerRef="shiroTransactionManager",
        basePackages= { "com.xxx.shiro.dao" })
public class ShiroDataSourceConfig {
    @Autowired
    private JpaProperties jpaProperties;

    @Autowired
    @Qualifier("shiroDataSource")
    private DataSource shiroDataSource;

    @Bean(name = "shiroEntityManager")
    public EntityManager shiroEntityManager(EntityManagerFactoryBuilder builder) {
        return shiroEntityManagerFactory(builder).getObject().createEntityManager();
    }

    @Bean(name = "shiroEntityManagerFactory")
    public LocalContainerEntityManagerFactoryBean shiroEntityManagerFactory (EntityManagerFactoryBuilder builder) {
        return builder
                .dataSource(shiroDataSource)
                .properties(getVendorProperties(shiroDataSource))
                .packages("com.xxx.shiro.entity")
                .persistenceUnit("shiroPersistenceUnit")
                .build();
    }

    private Map getVendorProperties(DataSource dataSource) {
        return jpaProperties.getHibernateProperties(dataSource);
    }

    @Bean(name = "shiroTransactionManager")
    PlatformTransactionManager shiroTransactionManager(EntityManagerFactoryBuilder builder) {
        return new JpaTransactionManager(shiroEntityManagerFactory(builder).getObject());
    }
}
IDEA下JpaProperties可能会报错,可以忽略。
入口模块结构如下图
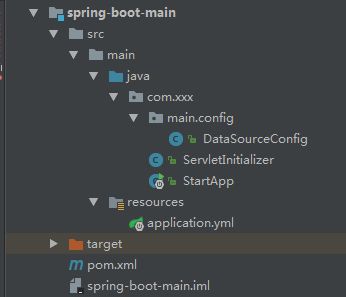
DataSourceConfig中配置了多个数据源的Bean,其中shiro数据源Bean代码
    /**
     * shiro数据源
     * @return
     */
    @Bean(name = "shiroDataSource")
    @Qualifier("shiroDataSource")
    @ConfigurationProperties(prefix="spring.datasource.shiro")
    public DataSource shiroDataSource() {
        return DataSourceBuilder.create().build();
    }
ServletInitializer和StartApp为SpringBoot在外部tomcat启动配置,不赘述。
SpringBoot的相关配置在application.yml中,shiro配置代码如下图

Primary为主库配置。当在某个项目中引入spring-boot-shiro模块时,只需要在配置文件中加入shiro数据源及redis的相关配置,并在DataSourceConfig加入shiro数据源Bean即可。
Shiro框架会根据用户登录及权限状态抛出异常,建议使用SpringMVC的全局异常捕获来处理异常,避免重复代码。该项目中代码如下
package com.xxx.shiro.config;

import com.alibaba.fastjson.support.spring.FastJsonJsonView;
import org.apache.shiro.authz.UnauthenticatedException;
import org.apache.shiro.authz.UnauthorizedException;
import org.springframework.web.servlet.HandlerExceptionResolver;
import org.springframework.web.servlet.ModelAndView;
import javax.servlet.http.HttpServletRequest;
import javax.servlet.http.HttpServletResponse;
import java.util.HashMap;
import java.util.Map;

/**
 * Created by Administrator on 2017/12/11.
 * 全局异常处理
 */
public class MyExceptionHandler implements HandlerExceptionResolver {

    public ModelAndView resolveException(HttpServletRequest httpServletRequest, HttpServletResponse httpServletResponse, Object o, Exception ex) {
        ModelAndView mv = new ModelAndView();
        FastJsonJsonView view = new FastJsonJsonView();
        Map attributes = new HashMap();
        if (ex instanceof UnauthenticatedException) {
            attributes.put("code", "1000001");
            attributes.put("msg", "token错误");
        } else if (ex instanceof UnauthorizedException) {
            attributes.put("code", "1000002");
            attributes.put("msg", "用户无权限");
        } else {
            attributes.put("code", "1000003");
            attributes.put("msg", ex.getMessage());
        }

        view.setAttributesMap(attributes);
        mv.setView(view);
        return mv;
    }
}
该Bean在ShiroConfig中已有注册代码。
至此,shiro框架的集成就结束了。至于shiro框架的使用细节,可以自行查阅相关资料。项目代码本人测试可正常工作,未应用到生产环境,仅供学习交流使用。
参考文章
1. 《在前后端分离的项目中,后台使用shiro框架时,怎样使用它的会话管理系统(session),从而实现权限控制》
2. 《Spring Boot多数据源配置与使用》
3. 《springboot整合shiro-登录认证和权限管理》
需要源码的朋友可以看看我的另一篇博文《SpringBoot+Shiro+MyBatisPlus搭建前后端分离的多模块项目》
更优雅的源代码,更新的springboot版本,热点问题解答,可以看看最新博文《SpringBoot2.0,Thymeleaf与Shiro整合》