Alios-Things 点亮led
Alios Things 点亮led
1 实现步骤
点个灯是为了上手,了解一些最基础的东西,比如程序框架,外设的一般操作方式。 Alios即然是一个OS,程序框架必然和裸机操作不同,先看个简单的hello-world,代码如下
#include

static void app_delayed_action(void *arg)
{
    LOG("helloworld %s:%d %s\r\n", __func__, __LINE__, aos_task_name());
    aos_post_delayed_action(5000, app_delayed_action, NULL);
}

int application_start(int argc, char *argv[])
{
    LOG("application started.");
    aos_post_delayed_action(1000, app_delayed_action, NULL);
    aos_loop_run();

    return 0;
}
头文件aos.h是alios动力的源头,先不管有多复杂,照抄就是了。
application_start是程序的入口点,硬件上电初始化后,要跳到这里来执行。 aos_post_delayed_action(1000, app_delayed_action, NULL)的作用是延迟执行指定的代码,在1秒钟后执行app_delayed_action函数,这个用法有点和Android中的Handler.postDelay方法类似。
然后在app_delay_action函数中,反复延迟调用自身,从而达到反复执行的目的。 在入口函数中的aos_loop_run则是进入事件循环,该干啥就干啥。
点灯用到GPIO,alios要忽略硬件之间的差异,必然得提供一份统一的API及差异化的硬件配置,统一的API提供了GPIO的初始化、读写操作,而差异化的硬件配置则针对特定的硬件平台。 这个差异化的配置文件位于board目录下,针对Alios Things Development Kit来说,该文件为
AliOS-Things\board\developerkit\hal\hal_gpio_stm32_l4.h
部分代码摘录如下 :
#include "stm32l4xx_hal.h"
#include
#include
#include
#include
#include "aos/kernel.h"

#define PINS_IN_GROUP  16
#define GROUP_GPIOA    0
#define GROUP_GPIOB    1
#define GROUP_GPIOC    2
#define GROUP_GPIOD    3
#define GROUP_GPIOE    4
#define GROUP_GPIOF    5
#define GROUP_GPIOG    6
#define GROUP_GPIOH    7

#define HAL_GPIO_0                 ((uint8_t)0)        /* represent GPIOA pin 0 */
#define HAL_GPIO_1                 ((uint8_t)1)        /* represent GPIOA pin 1 */
#define HAL_GPIO_2                 ((uint8_t)2)        /* represent GPIOA pin 2 */
#define HAL_GPIO_3                 ((uint8_t)3)        /* represent GPIOA pin 3 */
#define HAL_GPIO_4                 ((uint8_t)4)        /* represent GPIOA pin 4 */
#define HAL_GPIO_5                 ((uint8_t)5)        /* represent GPIOA pin 5 */
#define HAL_GPIO_6                 ((uint8_t)6)        /* represent GPIOA pin 6 */
#define HAL_GPIO_7                 ((uint8_t)7)        /* represent GPIOA pin 7 */
#define HAL_GPIO_8                 ((uint8_t)8)        /* represent GPIOA pin 8 */
#define HAL_GPIO_9                 ((uint8_t)9)        /* represent GPIOA pin 9 */
#define HAL_GPIO_10                ((uint8_t)10)       /* represent GPIOA pin 10 */
#define HAL_GPIO_11                ((uint8_t)11)       /* represent GPIOA pin 11 */
#define HAL_GPIO_12                ((uint8_t)12)       /* represent GPIOA pin 12 */
#define HAL_GPIO_13                ((uint8_t)13)       /* represent GPIOA pin 13 */
#define HAL_GPIO_14                ((uint8_t)14)       /* represent GPIOA pin 14 */
#define HAL_GPIO_15                ((uint8_t)15)       /* represent GPIOA pin 15 */

#define HAL_GPIO_16                ((uint8_t)16)       /* represent GPIOB pin 0 */
#define HAL_GPIO_17                ((uint8_t)17)       /* represent GPIOB pin 1 */
#define HAL_GPIO_18                ((uint8_t)18)       /* represent GPIOB pin 2 */
#define HAL_GPIO_19                ((uint8_t)19)       /* represent GPIOB pin 3 */
#define HAL_GPIO_20                ((uint8_t)20)       /* represent GPIOB pin 4 */
#define HAL_GPIO_21                ((uint8_t)21)       /* represent GPIOB pin 5 */
#define HAL_GPIO_22                ((uint8_t)22)       /* represent GPIOB pin 6 */
#define HAL_GPIO_23                ((uint8_t)23)       /* represent GPIOB pin 7 */
#define HAL_GPIO_24                ((uint8_t)24)       /* represent GPIOB pin 8 */
#define HAL_GPIO_25                ((uint8_t)25)       /* represent GPIOB pin 9 */
有了这些基础,接下来就可以点灯了。 开发板上提供了LED1, LED2,LED3,对应的硬件连接如图 :
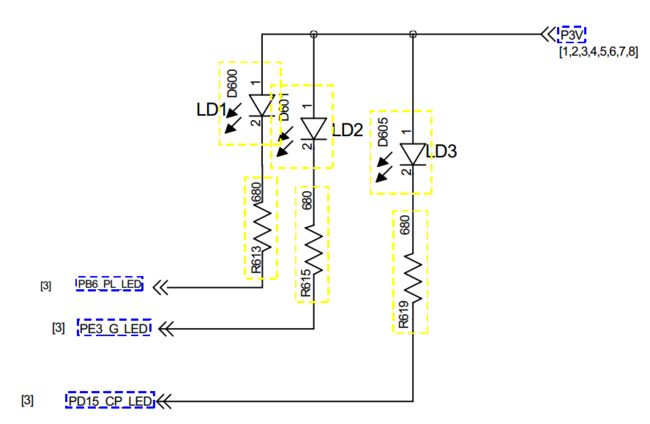
对应前面的GPIO映射得知在ALIOS中其编号为22,接下来修改代码如 :
#include
#include

#define LED1 22
gpio_dev_t led;


static void app_delayed_action(void *arg)
{
    //LOG("helloworld %s:%d %s\r\n", __func__, __LINE__, aos_task_name());
    // 取反
    hal_gpio_output_toggle(&led);
    aos_post_delayed_action(500, app_delayed_action, NULL);
}

int application_start(int argc, char *argv[])
{
    LOG("application started.");
    /* gpio port config */
    led.port = LED1;
    /* set as output mode */
    led.config = OUTPUT_PUSH_PULL;
    /* configure GPIO with the given settings */
    hal_gpio_init(&led);

    aos_post_delayed_action(1000, app_delayed_action, NULL);
    aos_loop_run();

    return 0;
}
2 结果
然后编译,上传到开发板,LED1开始闪烁。
转自:http://www.stmcu.org.cn/module/forum/forum.php?mod=viewthread&tid=616501&highlight=alios