Android中使用Kotlin协程(Coroutines)和Retrofit进行网络请求(一)
-
写在前面
在Android开发中的网络请求是一个十分重要的功能,它包含请求配置,发送数据,解析数据,状态展示,线程调度切换等等,在过去java开发中,我们通常使用retrofit和rxjava来简化网络请求的操作.今天我们来看看用Kotlin协程和retrofit来进行网络请求操作,比起rxjava,kotlin协程的优势是更容易理解和阅读,异步请求的写法和执行更类似于同步代码.我们先通过一个最简单的demo来看看如何用协程和Retrofit进行网络请求. -
项目配置
打开AndroidStudio,版本3.3以上,新建一个项目,选择kotlin语言,勾选AndroidX(AndroidX是google用来统一的包名的,后面应该所有的项目都会使用AndroidX包替代support包,没有适应的要尽快适应),选择emptyActivity,创建好项目之后,打开app目录下build.gradle,在dependencies{…}中添加以下几句// Kotlin Android Coroutines implementation 'org.jetbrains.kotlinx:kotlinx-coroutines-core:1.1.1' implementation 'org.jetbrains.kotlinx:kotlinx-coroutines-android:1.1.1' // Gson implementation "com.google.code.gson:gson:2.8.5" // Retrofit implementation "com.squareup.retrofit2:retrofit:2.5.0" implementation "com.squareup.retrofit2:converter-gson:2.5.0"上面几句一看就懂,我就不多解释了.
-
插件安装
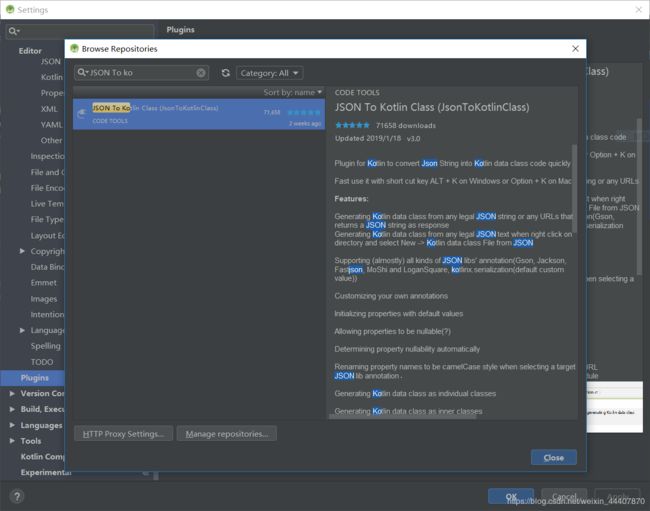
在开始写代码之前我们还要先安装一个插件,就是通过json数据生成kotlin对象的插件,在之前java开发中,我们通常使用的插件是GsonFormat,现在我们要使用一个插件JSON To Kotlin Class
点击File->Settings->Plugins->Browse repositories,在搜索框中输入JSON To Kotlin Class,然后点击install就可以自动下载安装插件了,注意,安装完成之后需要重启Android Studio.
-
代码实现
首先,我们给activity一个布局,让它看起来是这这样的

布局代码如下<androidx.constraintlayout.widget.ConstraintLayout xmlns:android="http://schemas.android.com/apk/res/android" xmlns:app="http://schemas.android.com/apk/res-auto" xmlns:tools="http://schemas.android.com/tools" android:layout_width="match_parent" android:layout_height="match_parent" tools:context=".MainActivity"> <EditText android:id="@+id/editText" android:layout_width="200dp" android:layout_height="wrap_content" android:layout_marginStart="8dp" android:layout_marginTop="8dp" android:layout_marginEnd="8dp" android:ems="10" android:hint="pleas input the name" android:inputType="textPersonName" app:layout_constraintStart_toStartOf="parent" app:layout_constraintTop_toTopOf="parent" tools:ignore="Autofill" /> <Button android:id="@+id/btn_search" android:layout_width="wrap_content" android:layout_height="wrap_content" android:text="search" app:layout_constraintBottom_toBottomOf="@id/editText" app:layout_constraintStart_toEndOf="@id/editText" app:layout_constraintTop_toTopOf="@id/editText" /> <TextView android:id="@+id/tv_content" android:layout_width="wrap_content" android:layout_height="wrap_content" app:layout_constraintTop_toBottomOf="@id/editText" app:layout_constraintLeft_toLeftOf="parent" android:layout_marginStart="8dp" android:layout_marginTop="8dp" android:layout_marginEnd="8dp" android:layout_marginBottom="8dp" /> <ProgressBar android:id="@+id/progress_bar" android:layout_width="wrap_content" android:layout_height="wrap_content" app:layout_constraintStart_toStartOf="parent" app:layout_constraintEnd_toEndOf="parent" app:layout_constraintTop_toTopOf="parent" app:layout_constraintBottom_toBottomOf="parent" android:visibility="gone" /> androidx.constraintlayout.widget.ConstraintLayout>上面有一个搜索框,输入要搜索的关键字,点击search,就会发起网络请求,请求成功后,会将结果显示在下面的空白地方,这里的搜索我们用一个公开的Github的接口来演示
首先我们想想在java中retrofit怎么使用的,新建一个用于网络请求的interface,在这里我们同样这么使用:
import retrofit2.Call
import retrofit2.http.GET
import retrofit2.http.Path
interface GitHubService {
    @GET("users/{user}/repos")
    fun getListRepos(@Path("user") user: String): Call<List<Repo>>
}
这一部分和java使用retrofit是一样的,注解Get表示请求放视,后面表示路径,user表示替代路径中的{}部分,演示一个最简单的例子,我们先返回一个标准的Call.
我们也是要通过Gson把请求结果转化成bean对象的,在上面代码中有个 Repo类,这个类就是通过上面介绍的插件自动生成的,右键点击包名,选择new-> kotlin data class file from json.粘贴json,就可以自动生成kotlin的data class了.
这里为了简单起见,我就摘录了其中几个字段import com.google.gson.annotations.SerializedName data class Repo( val id: Int, @SerializedName("name") val name: String, @SerializedName("full_name") val fullName: String, @SerializedName("description") val description: String? )好了,准备工作都做好了,现在看看到底如何使用它.
为了简单起见,我们就在acitivity中进行网络请求(实际项目开发中你不应该直接在acitivity中请求网络,你应该在一个专门的网络服务类中进行),现在我们要用协程开控制网络请求并且不能阻塞主线程,首先我们要拥有一个CoroutineScope,否则我们无法启动一个协程,这好办,我们直接用MainActivity继承CoroutineScope,继承它必须实现一个coroutineContext对象的初始化,下面我们直接看代码class MainActivity : AppCompatActivity(), CoroutineScope { //job用于控制协程,后面launch{}启动的协程,返回的job就是这个job对象 private lateinit var job: Job //继承CoroutineScope必须初始化coroutineContext变量 // 这个是标准写法,+其实是plus方法前面表示job,用于控制协程,后面是Dispatchers,指定启动的线程 override val coroutineContext: CoroutineContext get() = job + Dispatchers.Main override fun onCreate(savedInstanceState: Bundle?) { super.onCreate(savedInstanceState) //在onCreate中初始化job job = Job() setContentView(R.layout.activity_main) } override fun onDestroy() { super.onDestroy() //当acitivity结束之后,我们不需要再请求网络了,结束当前协程 job.cancel() } }下面我们进行retrofit的初始化操作,这部分和java的是一样的
val retrofit = Retrofit.Builder()
        .baseUrl("https://api.github.com/")
        .addConverterFactory(GsonConverterFactory.create())//通过Gson转换请求结果
        .build()
        .create(GitHubService::class.java)
下面关键部分来了,点击请求网络部分
btn_search.setOnClickListener {
		//启动一个协程
        launch {
        	//因为还是在主线程,所以可以直接操作UI
            progress_bar.visibility = View.VISIBLE
            /*因为Android规定网络请求必须在子线程,
            所以这里我们通过withContext获取请求结果,
            通过调度器Dispatcher切换到IO线程,
            这个操作会挂起当前协程,但是不会阻塞当前线程*/
            val result = withContext(Dispatchers.IO) {
            	/*这里已经是在子线程了,所以使用的是excute()而不是enqueue()
            	execute()返回的是Response类型
          		withContext会把闭包最后一行代码的返回值返回出去
          		所以上面的result就是Response类型*/
                retrofit.getListRepos(editText.text.toString()).execute()
            }
            //上面请求结束之后,又返回到了主线程
            //打一个log,用于一会儿测试看看activity关闭了,协程还会不会继续执行
            Log.d("mark", result.toString())
            progress_bar.visibility = View.GONE
            if (result.isSuccessful) {
            	//因为返回到了主线程,所以可以直接操作UI
                result.body()?.forEach {
                	//为了简单起见,我们只打印请求结果的一个字段
                    tv_content.append("${it.fullName}\n")
                }
            }
        }
    }
我们看看上面launch{…}中的代码,你会发现这个流程和顺序代码非常相似,整个过程没有回调,非常类似于用户的直观感受
关于launch和withContext如果有不明白的,参见我上一篇博客Kotlin语言中协程(Coroutines)的使用.
所以整个activity的代码如下:import androidx.appcompat.app.AppCompatActivity import android.os.Bundle import android.util.Log import android.view.View import kotlinx.android.synthetic.main.activity_main.* import kotlinx.coroutines.* import retrofit2.Retrofit import retrofit2.converter.gson.GsonConverterFactory import kotlin.coroutines.CoroutineContext class MainActivity : AppCompatActivity(), CoroutineScope { private lateinit var job: Job override val coroutineContext: CoroutineContext get() = job + Dispatchers.Main override fun onCreate(savedInstanceState: Bundle?) { super.onCreate(savedInstanceState) job = Job() setContentView(R.layout.activity_main) val retrofit = Retrofit.Builder() .baseUrl("https://api.github.com/") .addConverterFactory(GsonConverterFactory.create()) .build() .create(GitHubService::class.java) btn_search.setOnClickListener { launch { progress_bar.visibility = View.VISIBLE val result = withContext(Dispatchers.IO) { retrofit.getListRepos(editText.text.toString()).execute() } Log.d("mark", result.toString()) progress_bar.visibility = View.GONE if (result.isSuccessful) { result.body()?.forEach { tv_content.append("${it.fullName}\n") } } } } } override fun onDestroy() { job.cancel() super.onDestroy() } }activity没有findViewById的操作,是因为我们添加了kotlin-android-extensions插件,这个在Android Studio3.3版本中创建工程选择kotlin会在build.gradle文件中自动添加,所以刚才我们不需要再手动配置了,使用了这个插件我们就可以把xml中View的Id当作对象,直接在activity或fragment中使用.
运行一下看看结果,我们再搜索框输入google,看看结果,会先显示progressbar,请求完成之后会显示结果,跟我们用java回调实现的网络请求效果一模一样吧,但是逻辑却更简单

我们在请求成功后会打印一个log,如果我们在请求过程中关闭activity,再仔细看看log会否打印,结果是不会打印.这就说明了,在onDestory执行的时候,通过job.cancel()协程也被关闭了,后面的代码不会执行,这样就避免了因为activity生命周期造成的内存泄漏问题.好了,我们通过一个简单的demo展示了如果使用coroutines和retrofit进行网络请求,后面的blog会演示更高级的网络请求操作,敬请继续关注
转载请注明出处.