Spring Boot整合之模板引擎(Thymeleaf、Freemarker、jsp)
1. Thymeleaf模板
1.1 在pom.xml中添加Thymeleaf依赖
    org.springframework.boot
    spring-boot-starter-thymeleaf
1.2 在 application.properties 中添加 Thymeleaf模板配置,如下
#thymeleaf模板
# 关闭缓存
spring.thymeleaf.cache=false
#设定thymeleaf文件前缀,默认为src/main/resources/templates
spring.thymeleaf.prefix=classpath:/templates/
spring.thymeleaf.suffix=.html
#去除thymeleaf的html严格校验
spring.thymeleaf.mode=HTML5
#模板编码
spring.thymeleaf.encoding=UTF-8
#设置写入http响应的内容类型值
spring.thymeleaf.servlet.content-type=text/html
#在呈现之前检查模板是否存在
spring.thymeleaf.check-template=true
1.3 编写Controller
package com.wyp.controller;

import org.springframework.stereotype.Controller;
import org.springframework.web.bind.annotation.RequestMapping;

import java.util.Map;

@Controller
@RequestMapping("thymeleaf")
public class ThymeleafController {

    @RequestMapping(value = "thymeleaf")
    public String index(Map map){
        map.put("admin","123");
        return "index";
    }

}
1.4 在 templates 目录中创建名为 index.html 文件,内容如下:
Title
1.5 运行SpringbootLpplication,结果如下
我这里地址路径之所以有个springboot,是因为我在application.properties中加了一个地址,如下,如果不加的话就可以去掉访问地址中的springboot
server.servlet.context-path=/springboot
2. Freemarker模板
2.1 在pom.xml中添加Freemarker依赖
    org.springframework.boot
    spring-boot-starter-freemarker
2.2 在 application.properties 中添加 Freemarker模板配置,如下
# Freemarker 模板配置
spring.freemarker.allow-request-override=false
spring.freemarker.cache=true
spring.freemarker.check-template-location=true
spring.freemarker.charset=UTF-8
spring.freemarker.content-type=text/html
spring.freemarker.expose-request-attributes=false
spring.freemarker.expose-session-attributes=false
spring.freemarker.expose-spring-macro-helpers=false
spring.freemarker.prefix=
spring.freemarker.suffix=.ftl
2.3 编写Controller
package com.wyp.controller;

import org.springframework.stereotype.Controller;
import org.springframework.web.bind.annotation.RequestMapping;

import java.util.Map;

/**
 * Spring Boot整合Freemarker模板
 */
@Controller
@RequestMapping("Freemarker")
public class FreemarkerController {

    @RequestMapping("Freemarker")
    public String Test(Map map){
        map.put("admin","Hello! Freemarker");
        return "freemarker";
    }

}
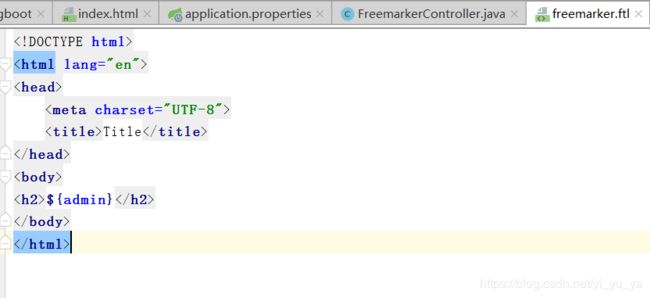
2.4 在 templates 目录中创建名为 freemarker.html 文件,然后在修改为 freemarker.ftl文件,内容如下:
    Title


    ${admin}
2.5 运行SpringbootLpplication,结果如下
3. JSP模板
注(必看):如果读者在整合JSP模板之前整合了上面的 Freemarker模板和Thymeleaf模板,请先将上面两个模板的依赖屏蔽,否则会报如下错误:
Error resolving template [test], template might not exist or might not be accessible by any of the configured Template Resolvers
3.1 添加依赖
    javax.servlet
    jstl
    1.2


    org.apache.tomcat.embed
    tomcat-embed-jasper
3.2 创建目录和配置文件
1. 在main下面创建webapp/WEB-INF/jsp,JSP页面放在:/src/main/webapp/WEB-INF/jsp/目录下,如:
/src/main/webapp/WEB-INF/jsp/index.jsp
2. CSS或JavaScript之类的静态文件:/src/main/resources/static/目录下,如:
/src/main/resources/static/css/main.css
3. 对于属性文件放在:/src/main/resources/目录下,如:
/src/main/resources/application.properties
4.配置application.properties
只需要添加这2个就可以了,如下:
#页面默认前缀目录
spring.mvc.view.prefix=/WEB-INF/jsp/
#页面默认后缀目录
spring.mvc.view.suffix=.jsp
如果不在application.properties中配置,在application.yml中配置:spring节点下面:
|
3.3 编写Controller
package com.wyp.controller;

import org.springframework.stereotype.Controller;
import org.springframework.web.bind.annotation.RequestMapping;

import java.util.Map;

/**
 * Spring Boot整合jsp
 */
@Controller
@RequestMapping("/jsp")
public class TestController1 {

    @RequestMapping("/index")
    public String hello(Map map){
        map.put("admin","Hello! JSP");
        return "test";
    }

}
3.4 创建JSP页面
<%--
  Created by IntelliJ IDEA.
  User: Tiramisu
  Date: 2018/11/10/010
  Time: 11:18
  To change this template use File | Settings | File Templates.
--%>
<%@ page contentType="text/html;charset=UTF-8" language="java" %>


    Title


    ${admin}


