caffemodel的剪枝与压缩(二)
利用Network Slimmng对FSSD进行prune,在voc07上获得79.64的map,TITAN X上150FPS的效果,链接:https://github.com/dlyldxwl/fssd.pytorch 觉得都有用的看官朋友们,给个star
随便写了点注释,代码贴上来了,写的比较粗糙,很容易看懂,无需多言.
# coding:utf-8
# by chen yh


import caffe
import numpy as np
import shutil
import matplotlib.pyplot as plt


'''
These parameters need modification:
    root: root directory ;
    model: your caffemodel ;
    prototxt: your prototxt ;


    prune layer: need prune layer name, a list ;
    input layer: input of these layers is output of prune layer,each element is a list ;
    th : thereshold of each prune layer,a list.


Please ensure lenth of prune layer, input layer and th.

picture and get get_sum_l1 functions can help you find suitable threshold.
'''


def get_prune(net,layer,threshold): # 返回layer中低于阈值threshold的卷积核的序号
    weight_ori=net.params[layer][0].data
    #bias_ori=net.params[layer][1].data


    sum_l1 = []
    for i in range(weight_ori.shape[0]):
        sum_l1.append((i,np.sum(abs(weight_ori[i, :, :, :]))))#sum_l1存放每个卷积核的所有权重绝对值之和


    de_keral=[] #de_keral存放大于阈值的卷积核的序号
    for i in sum_l1:
        if i[1]>threshold:
            de_keral.append(i[0])


    print layer + "层需要prune的卷积核有" + str(weight_ori.shape[0]-len(de_keral)) + "个,保留的卷积核有" + str(len(de_keral)) + "个"
    return de_keral


def prune(net,pk,lk): # 输出两个字典,键都是修剪层的layer的名字,值分别是修剪层的weight和bias
    w_new={} #键是layer,值是保存后的weight
    b_new={} #键是layer,值是保存后的bias
    for l in pk.keys(): #待剪层权重处理 w_n = w[pk[l],:,;,;]
        w_old = net.params[l][0].data
        b_old = net.params[l][1].data
        w_n = w_old[pk[l],:,:,:]
        b_n = b_old[pk[l]]
        w_new[l] = w_n
        b_new[l] = b_n
        # net_n.params[l][0].data[...] = w_n
        # net_n.params[l][1].data[...] = b_n


    for l in lk.keys():#以待剪层为输入的层权重处理
        if l not in pk.keys(): # bottom被修剪后本身没有被修剪,所以其权重只需要在原来的net上面取切片,w_n = w[:,lk[l],:,:]


            if l != "conv4_3_norm": #对传统卷积层的处理
                w_o = net.params[l][0].data
                b_o = net.params[l][1].data
                b_new[l] = b_o # bias保留,因为这些层没有剪卷积核
                w_n = w_o[:, lk[l], :, :]
                w_new[l] = w_n
            else: #对特殊层的处理,参数个数不是2
                w_o = net.params[l][0].data
                w_n = w_o[lk[l],]
                w_new[l] = w_n


        else: #pk 和 lk共有的层,也就是这层的bottom和层本身都被修剪过,所以权重不能在原来的net上切片,利用保存了的w_new取切片.
            w_o = w_new[l]
            w_n = w_o[:,lk[l],:,:]
            w_new[l] = w_n


    return w_new,b_new


def get_prototxt(pk,pro_n): #复制原来的prototxt,并修改修剪层的num_output,这一段代码有点绕,有空的话优化为几个单独的函数或者弄个类
    with open(pro_n,"r") as p:
        lines = p.readlines()
    k=0
    with open(pro_n,"w") as p:
        while k < len(lines): #遍历所有的lines,此处不宜用for.
            if 'name:' in lines[k]:
                l_name = lines[k].split('"')[1] #获取layer name
                if l_name in pk.keys(): #如果name在待修剪层中,则需要修改,下面进入一个找channel的循环块.
                    while True:
                        if "num_output:" in lines[k]:
                            channel_n = "    num_output: "+str(len(pk[l_name]))+"\n"
                            p.write(channel_n)
                            k=k+1
                            break
                        else:
                            p.write(lines[k])
                            k=k+1
                else: #name不在待修剪层中,直接copy行
                    p.write(lines[k])
                    k=k+1


            else:
                p.write(lines[k])
                k=k+1
    print "deploy_rebirth_prune.prototxt已写好"


def savemodel(net,net_n,w_prune,b_prune,path): #储存修改后的caffemodel
    for layer in net.params.keys():
        if layer in w_prune.keys():
            net_n.params[layer][0].data[...] = w_prune[layer]
            if layer in b_prune.keys():
                net_n.params[layer][1].data[...] = b_prune[layer]
        else:
            weight = net.params[layer]
            for index, w in enumerate(weight):
                try:
                    net_n.params[layer][index].data[...] = w.data
                except ValueError:
                    print layer+"层权重广播出现问题"


    net_n.save(path+"deploy_prune_new.caffemodel")
    print "剪枝结束,保存模型名为deploy_prune_new.caffemodel"


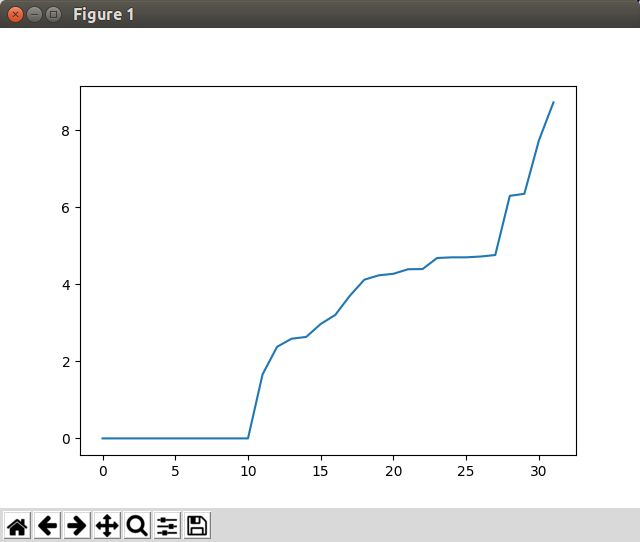
def picture(net, layer):  #将某一layer所有卷积核的权重绝对值之和排序后画图
    weight = net.params[layer][0].data


    sum_l1 = []
    for i in range(weight.shape[0]):
        sum_l1.append(np.sum(abs(weight[i, :, :, :])))


    sum_l1.sort()


    x = [i for i in range(len(sum_l1))]
    plt.plot(x, sum_l1)
    plt.legend()
    plt.show()


def get_sum_l1(net,txt_path,v): #定向输出各个层的卷积核的权重绝对值之和到指定文件,v为保存的前多少个值
    with open(txt_path,"w") as t:
        for layer in net.params.keys():
            weight = net.params[layer][0].data
            sum_l1 = []
            try:
                for i in range(weight.shape[0]):
                    sum_l1.append(np.sum(abs(weight[i, :, :, :])))
            except IndexError:
                print layer + "该层非卷积层"


            sum_l1.sort()
            t.write(layer +'\n')
            for i in range(v):
                try:
                    t.write(str(sum_l1[i]) + '  ')
                except IndexError:
                    print layer + "层没有"+str(v)+"个参数"
                    break
            t.write("\n\n")


if __name__== "__main__":


    root = "/home/cyh/python_file/123/"
    model = root + "VGG_coco_SSD_300x300_iter_400000.caffemodel"
    prototxt = root + "deploy_vgg.prototxt"


    py = {}  # 键是prune_layer,值是对应的prune的卷积核的序号,也就是p_k
    iy = {}  # 键是以prune_layer为input的layer,值也是对应的p_k


    prune_layer = ["conv5_3","fc6"]
    input_layer = [["fc6"], ["fc7"]]
    th = [10,30]  # al元素的个数保持和prune_layer个数一致,阈值可以自己设


    caffe.set_mode_gpu()
    net = caffe.Net(prototxt,model,caffe.TEST)
    pro_n = root + "deploy_prune_new.prototxt"
    shutil.copyfile(prototxt,pro_n)


    for (layer1,layer2,t) in zip(prune_layer,input_layer,th):
        py[layer1] = get_prune(net,layer1,threshold=t)
        for m in layer2: #以prune_layer为输入的layer可能有多个,所以input_layer每个元素是一个列表,此处对列表中每一个元素赋值
            iy[m]=py[layer1]


    while (raw_input("按1将生成deploy_prune_new.prototxt:")) == "1":
        w_prune,b_prune = prune(net,py,iy)
        get_prototxt(py,pro_n)


        while (raw_input("按1将生成剪枝后的模型:")) == "1":
            net_n = caffe.Net(pro_n, caffe.TEST)
            savemodel(net,net_n,w_prune,b_prune,root)
            break
        break
说明:1.代码中有些函数是"可视化"作用的,主函数中未调用,有需要的自己试;
2.修剪卷积核的依据是卷积核的所有权重的绝对值之和,和channel pruning 不一样,但是都可以减少inference时间,有空我会试一下论文中重构feature map的方法,肯定效果更好;
3.前几天请教另一位博友,发现了另一种pruning方法,明天可能会写出脚本实现;.
4.代码是以vgg_ssd为base model进行裁剪的,因为训练的比较好仅有fc7层有2个卷积核是确定冗余的,如果提高阈值可以多剪卷积核,但是需要retrain回归精度;
5.用该代码我试过mobilenet v1的model,发现第一个卷积层就有接近10个卷积核是冗余的,如下图所示.所以对于大部分model,代码应该是可以work的,并且会奏效
代码给出链接.
