纳税服务系统一(用户模块)【简单增删改查、日期组件、上传和修改头像】...
前言
为了更好地掌握SSH的用法,使用一个纳税服务系统来练手…..搭建SSH框架环境在上一篇已经详细地说明了。http://blog.csdn.net/hon_3y/article/details/72630031
用户模块:本文主要的知识点:
用户模块需求
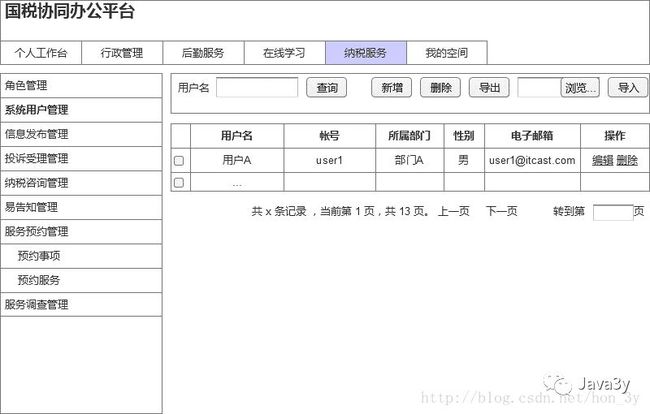
拥有增删改查和导入导出到EXCEL的功能:
 这里写图片描述
添加用户:有了这个界面,我们就知道实体表的属性有什么了。
 a
a
添加配置文件
每个模块都应该有自己的配置文件,这样的话就方便我们管理模块之间的功能,不用把所有的配置都写在总文件中。
因此,我们在user模块创建了一个user包,下面又创建了config包来管理配置文件
 这里写图片描述
JavaBean与映射文件
JavaBean
根据上面需求要添加用户的属性,直接写就行了。
public class User implements Serializable {    private String id;    private String dept;    private String account;    private String name;    private String password;    private String headImg;    private boolean gender;    private String state;    private String mobile;    private String email;    private Date birthday;    private String memo;    public static String USER_STATE_VALID = "1";//有效,    public static String USER_STATE_INVALID = "0";//无效    public User() {    }    public User(String id, String dept, String account, String name, String password, String headImg, boolean gender, String state, String mobile, String email, Date birthday, String memo) {        this.id = id;        this.dept = dept;        this.account = account;        this.name = name;        this.password = password;        this.headImg = headImg;        this.gender = gender;        this.state = state;        this.mobile = mobile;        this.email = email;        this.birthday = birthday;        this.memo = memo;    }    //各种setter和getter}class User implements Serializable {

    private String id;
    private String dept;
    private String account;
    private String name;
    private String password;

    private String headImg;
    private boolean gender;
    private String state;
    private String mobile;
    private String email;
    private Date birthday;
    private String memo;

    public static String USER_STATE_VALID = "1";//有效,
    public static String USER_STATE_INVALID = "0";//无效

    public User() {
    }

    public User(String id, String dept, String account, String name, String password, String headImg, boolean gender, String state, String mobile, String email, Date birthday, String memo) {
        this.id = id;
        this.dept = dept;
        this.account = account;
        this.name = name;
        this.password = password;
        this.headImg = headImg;
        this.gender = gender;
        this.state = state;
        this.mobile = mobile;
        this.email = email;
        this.birthday = birthday;
        this.memo = memo;
    }

    //各种setter和getter
}
User.hbm.xml
映射文件也非常简单,因为没有关联关系字段,直接写属性就行了。
"http://hibernate.sourceforge.net/hibernate-mapping-3.0.dtd">

<hibernate-mapping>
    <class name="zhongfucheng.user.entity.User" table="user">
        <id name="id" type="java.lang.String">
            <column name="id" length="32" />
            <generator class="uuid.hex" />
        id>
        <property name="name" type="java.lang.String">
            <column name="name" length="20" not-null="true" />
        property>
        <property name="dept" type="java.lang.String">
            <column name="dept" length="20" not-null="true" />
        property>
        <property name="account" type="java.lang.String">
            <column name="account" length="50" not-null="true" />
        property>
        <property name="password" type="java.lang.String">
            <column name="password" length="50" not-null="true" />
        property>
        <property name="headImg" type="java.lang.String">
            <column name="headImg" length="100" />
        property>
        <property name="gender" type="java.lang.Boolean">
            <column name="gender" />
        property>
        <property name="email" type="java.lang.String">
            <column name="email" length="50" />
        property>
        <property name="mobile" type="java.lang.String">
            <column name="mobile" length="20" />
        property>
        <property name="birthday" type="java.util.Date">
            <column name="birthday" length="10" />
        property>
        <property name="state" type="java.lang.String">
            <column name="state" length="1" />
        property>
        <property name="memo" type="java.lang.String">
            <column name="memo" length="200" />
        property>
    class>

hibernate-mapping>
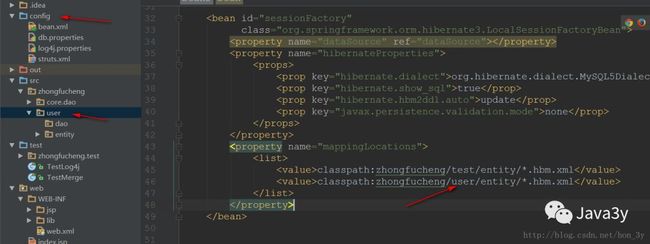
写完映射文件,记得要在Spring的总配置文件中读取映射文件…值得注意的是,用户模块专门用一个user包来管理下面的代码,这样好管理!
 这里写图片描述
编写Dao
UserDao接口
/** * UserDao接口,继承着UserDao * */public interface UserDao extends BaseDao {}
public interface UserDao extends BaseDao<User> {

}
UserDaoImpl实现类
把UserDaoImple对象添加到IOC容器中管理
注意:因为我们在BaseDao中使用的是HibernateDaoSupport这个API,因此我们在UserDao中是需要在XML配置,注入SessionFactory的。
在总配置文件中是有专门注入SessionFactory的bean配置的
    <bean id="baseDao" abstract="true">
        <property name="sessionFactory" ref="sessionFactory">property>
    bean>
/** * 继承着BaseDaoImpl实现类,就有了CRUD的方法 * 又实现了UserDao接口,那么UserDao接口就可以对User模块有相对应的补充 * * */public class UserDaoImpl extends BaseDaoImpl implements UserDao {}

public class UserDaoImpl extends BaseDaoImpl<User> implements UserDao {


}
<context:component-scan base-package="zhongfucheng.user"/>
<import resource="classpath:zhongfucheng/user/config/user-bean.xml"/>
编写Service
Service接口
/** * Created by ozc on 2017/5/23. */ public interface UserService { //新增 public void save(User user); //更新 public void update(User user); //根据id删除O public void delete(Serializable id); //根据id查找 public User findObjectById(Serializable id); //查找列表 public List findObjects(); }
public interface UserService {
//新增
public void save(User user);
//更新
public void update(User user);
//根据id删除O
public void delete(Serializable id);
//根据id查找
public User findObjectById(Serializable id);
//查找列表
public List findObjects() ;
}
UserServiceImpl
package zhongfucheng.user.service.impl;import org.springframework.beans.factory.annotation.Autowired;import org.springframework.beans.factory.annotation.Qualifier;import org.springframework.stereotype.Service;import zhongfucheng.user.dao.UserDao;import zhongfucheng.user.entity.User;import zhongfucheng.user.service.UserService;import java.io.Serializable;import java.util.List;/** * Created by ozc on 2017/5/23. */@Servicepublic class UserServiceImpl implements UserService {    @Qualifier("userDaoImpl")    @Autowired    private UserDao userDaoImpl;    @Override    public void save(User user) {        userDaoImpl.save(user);    }    @Override    public void update(User user) {        userDaoImpl.update(user);    }    @Override    public void delete(Serializable id) {        userDaoImpl.delete(id);    }    @Override    public User findObjectById(Serializable id) {        return userDaoImpl.findObjectById(id);    }    @Override    public List findObjects() {        return userDaoImpl.findObjects();    }}

import org.springframework.beans.factory.annotation.Autowired;
import org.springframework.beans.factory.annotation.Qualifier;
import org.springframework.stereotype.Service;
import zhongfucheng.user.dao.UserDao;
import zhongfucheng.user.entity.User;
import zhongfucheng.user.service.UserService;

import java.io.Serializable;
import java.util.List;

/**
 * Created by ozc on 2017/5/23.
 */

@Service
public class UserServiceImpl implements UserService {


    @Qualifier("userDaoImpl")
    @Autowired
    private UserDao userDaoImpl;


    @Override
    public void save(User user) {
        userDaoImpl.save(user);
    }

    @Override
    public void update(User user) {
        userDaoImpl.update(user);
    }

    @Override
    public void delete(Serializable id) {

        userDaoImpl.delete(id);
    }

    @Override
    public User findObjectById(Serializable id) {
        return userDaoImpl.findObjectById(id);
    }

    @Override
    public List findObjects() {
        return userDaoImpl.findObjects();

    }
}
UserAction
UserAction应该根据增删改查应该有这么几个方法:
/** * 1.提供新增页面 * 2.确定新增用户方法 * 3.提供修改页面 * 4.确定修改用户方法 * 5.删除用户 * 6.批量删除用户 * 7.提供列表展示页面 * * */
package zhongfucheng.user.action;import com.opensymphony.xwork2.ActionSupport;/** * Created by ozc on 2017/5/23. *//** * 1.提供新增页面 * 2.确定新增用户方法 * 3.提供修改页面 * 4.确定修改用户方法 * 5.删除用户 * 6.批量删除用户 * 7.提供列表展示页面 * * * */public class UserAction extends ActionSupport {    public String listUI() {        return null;    }    public String addUI() {        return null;    }    public String editUI() {        return null;    }    public String edit() {        return null;    }    public String delete() {        return null;    }    public String add() {        return null;    }    public String deleteSelect() {        return null;    }}

import com.opensymphony.xwork2.ActionSupport;

/**
 * Created by ozc on 2017/5/23.
 */

/**
 * 1.提供新增页面
 * 2.确定新增用户方法
 * 3.提供修改页面
 * 4.确定修改用户方法
 * 5.删除用户
 * 6.批量删除用户
 * 7.提供列表展示页面
 *
 *
 * */
public class UserAction extends ActionSupport {

    public String listUI() {

        return null;
    }

    public String addUI() {

        return null;
    }
    public String editUI() {

        return null;
    }
    public String edit() {

        return null;
    }
    public String delete() {

        return null;
    }
    public String add() {

        return null;
    }

    public String deleteSelect() {

        return null;
    }

}
在Struts配置文件中配置
        "-//Apache Software Foundation//DTD Struts Configuration 2.0//EN"
        "http://struts.apache.org/dtds/struts-2.0.dtd">

<struts>
    <package name="user-action" extends="struts-default" namespace="/user">
        <action name="user_*" class="zhongfucheng.user.action.UserAction" method="{1}">

        action>

    package>

struts>
<include file="zhongfucheng/user/config/user-struts.xml"/>
完成美工设计页面显示
对美工给的页面进行调整
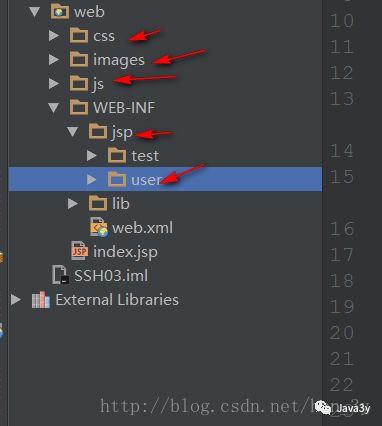
导入到项目中:
 这里写图片描述
我们发现在JSP页面中,以下的代码是经常会出现的,因此我们把它封装一下:
 这里写图片描述
创建一个公共文件,封装经常用到的jsp页面:
 这里写图片描述
要使用的地方,直接导入就行了:
    <%@include file="/common/header.jsp"%>    用户管理
    <%@include file="/common/header.jsp"%>
    <title>用户管理title>

head>
接下来只要对各个功能进行填充逻辑代码,就可以了。
添加用户UI
    public String addUI() {        return "addUI";    }
        return "addUI";
    }
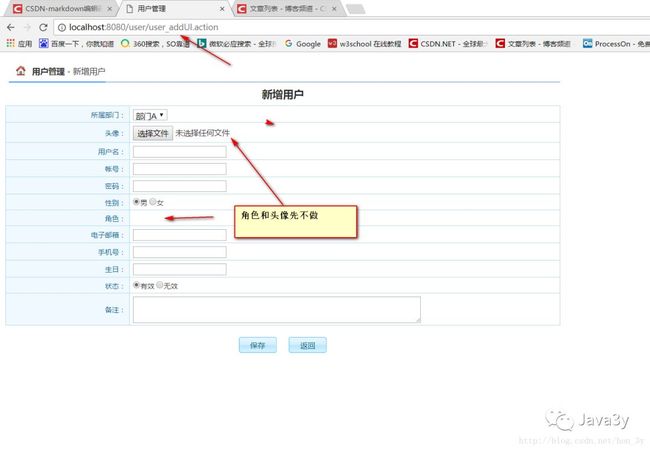
效果如图所示:我们的头像和角色先不做,把其他的先做了再看看。
 这里写图片描述
确定添加用户
写上我们请求的路径:
    /*************注入Service************************/    @Qualifier("userServiceImpl")    @Autowired    private UserService userServiceImpl;    /************数据自动封装,给出setter和getter*************************/    private User user;    public User getUser() {        return user;    }    public void setUser(User user) {        this.user = user;    }    /************得到Service返回的数据*************************/    private List userList;    public String add() {    userServiceImpl.save(user);    //跳转到列表显示页面    return "list";    }
    @Qualifier("userServiceImpl")
    @Autowired
    private UserService userServiceImpl;


    /************数据自动封装,给出setter和getter*************************/
    private User user;
    public User getUser() {
        return user;
    }
    public void setUser(User user) {
        this.user = user;
    }
    /************得到Service返回的数据*************************/
    private List userList;

    public String add() {
    userServiceImpl.save(user);

    //跳转到列表显示页面
    return "list";
    }
                                        user_listUI
            <result name="list" type="redirectAction">
                <param name="actionName">user_listUIparam>
            result>
列表展示
    /************得到Service返回的数据*************************/    //这里一定要给setter和getter方法,这样JSP才能够得到属性。不然就得不到了!!!我在这里弄了很久!!!!    private List userList;    public List getUserList() {        return userList;    }    public void setUserList(List userList) {        this.userList = userList;    }    public String listUI() {        userList = userServiceImpl.findObjects();        return "listUI";    }
    //这里一定要给setter和getter方法,这样JSP才能够得到属性。不然就得不到了!!!我在这里弄了很久!!!!
    private List userList;
    public List getUserList() {
        return userList;
    }
    public void setUserList(List userList) {
        this.userList = userList;
    }

    public String listUI() {
        userList = userServiceImpl.findObjects();

        return "listUI";

    }
JSP通过iterator得到数据,直接写就行了。因为Action中该属性有getter方法:
"/> )">编辑 )">删除
<tr bgcolor="f8f8f8">
<td align="center"><input type="checkbox" name="selectedRow" value="id "/> "/>td>
<td align="center"><s:property value="name"/>td>
<td align="center"><s:property value="account"/>td>
<td align="center"><s:property value="dept"/>td>
<td align="center"><s:property value="gender?'男':'女'"/>td>
<td align="center"><s:property value="email"/>td>
<td align="center">
<a href="javascript:doEdit(id "/>)">编辑a>
<a href="javascript:doDelete(id "/>)">删除a>
td>
tr>
s:iterator>
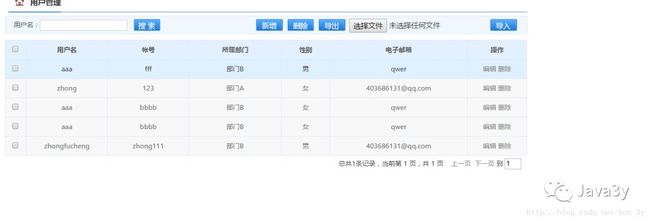 这里写图片描述
修改功能
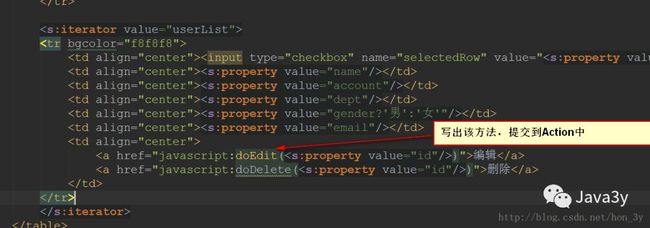 这里写图片描述
    public String editUI() {        //外边已经传了id过来了,我们要找到id对应的User        if (user.getId() != null && user != null) {            //直接获取出来,后面JSP会根据User有getter就能读取对应的信息!            user = userServiceImpl.findObjectById(this.user.getId());    }        return "editUI";    }

        //外边已经传了id过来了,我们要找到id对应的User
        if (user.getId() != null && user != null) {

            //直接获取出来,后面JSP会根据User有getter就能读取对应的信息!
            user = userServiceImpl.findObjectById(this.user.getId());
    }
        return "editUI";
    }
action="${basePath}user/user_edit.action" public String edit() { //Struts2会自动把JSP带过来的数据封装到User对象上 if (user.getId() != null && user != null) { userServiceImpl.update(user); } //跳转回列表展示 return "list"; }
//Struts2会自动把JSP带过来的数据封装到User对象上
if (user.getId() != null && user != null) {
userServiceImpl.update(user);
}
//跳转回列表展示
return "list";
}
 这里写图片描述
删除功能
delete方法就非常简单了:
        function doDelete(id) {            document.forms[0].action = "${basePath}user/user_delete.action?user.id="+id;            document.forms[0].submit();        }
            document.forms[0].action = "${basePath}user/user_delete.action?user.id="+id;
            document.forms[0].submit();
        }
    public String delete() {        if (user.getId() != null && user != null) {            userServiceImpl.delete(user.getId());        }        return "list";    }

        if (user.getId() != null && user != null) {
            userServiceImpl.delete(user.getId());
        }

        return "list";
    }
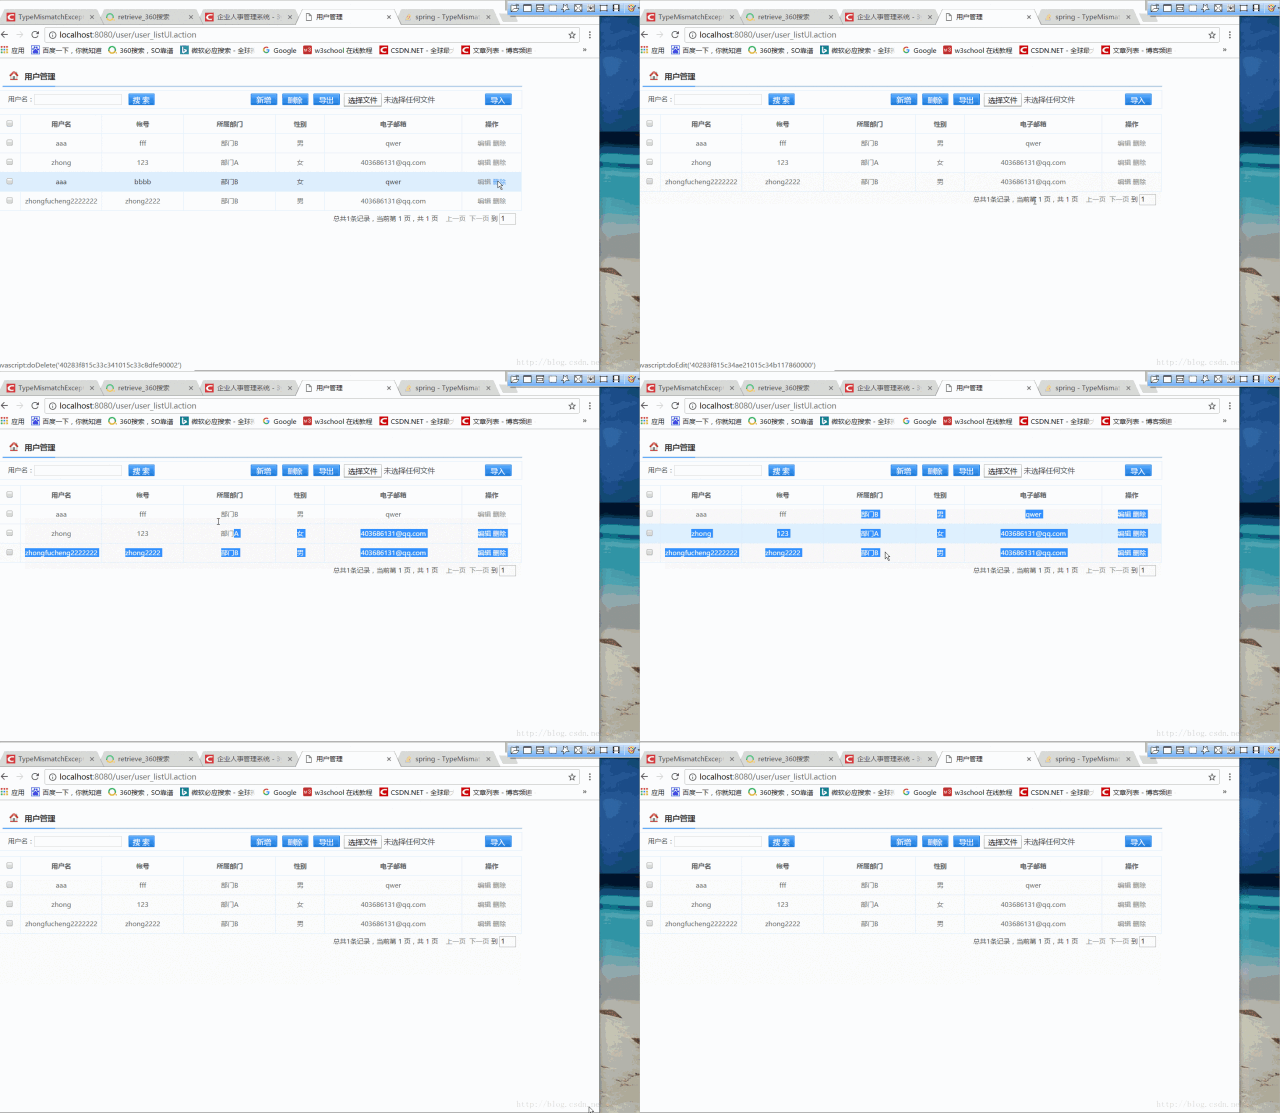 这里写图片描述
批量删除
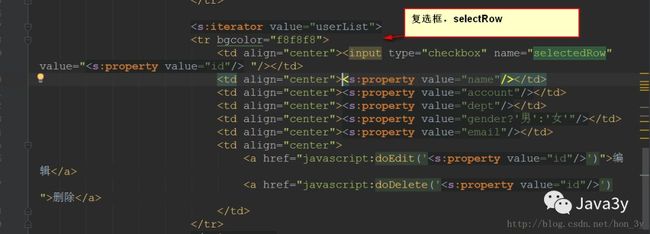 这里写图片描述
响应点击事件:
        function doDeleteAll() {            document.forms[0].action = "${basePath}user/user_deleteSelect.action";            document.forms[0].submit();        }
            document.forms[0].action = "${basePath}user/user_deleteSelect.action";
            document.forms[0].submit();

        }
    private String[] selectedRow;    public String[] getSelectedRow() {        return selectedRow;    }    public void setSelectedRow(String[] selectedRow) {        this.selectedRow = selectedRow;    }    public String deleteSelect() {        for (String s : selectedRow) {            userServiceImpl.delete(s);        }        return "list";    }
    public String[] getSelectedRow() {
        return selectedRow;
    }
    public void setSelectedRow(String[] selectedRow) {
        this.selectedRow = selectedRow;
    }

    public String deleteSelect() {
        for (String s : selectedRow) {
            userServiceImpl.delete(s);
        }
        return "list";
    }
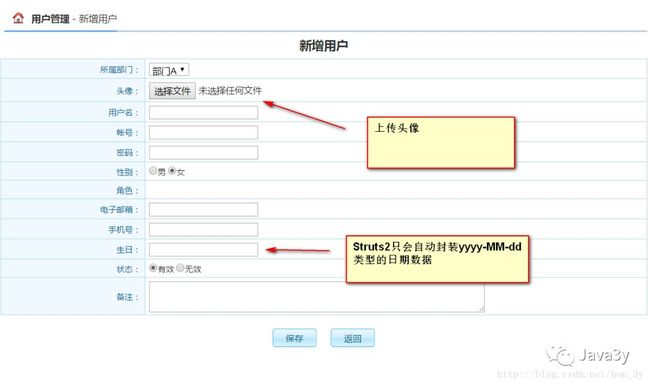
前面我们在写用户模块的时候还有一些没有解决掉的问题:
 这里写图片描述
日期组件
我们都知道Struts2仅仅只会自动封装yyyy-MM-dd格式的日期数据,如果不是这个格式,它就会报错。我们也可以自定义类型转换器来让Struts2匹配多种的日期格式。自定义类型转换器我们已经会了。
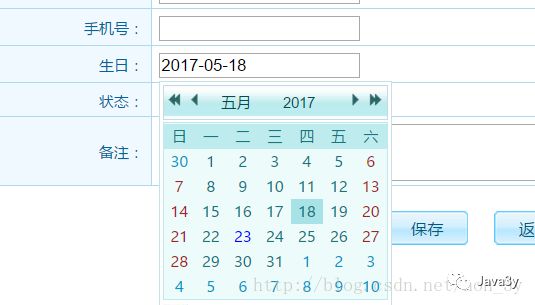
我们来用用wdatepicker日期组件,这个组件从源头上就把日期格式定义成yyyy-MM-dd格式了。
导入文件夹到js目录
 a
a
引入日期组件
添加用户界面和编辑用户界面都要引入:
"${basePath}js/datepicker/WdatePicker.js">script>
在日期上使用
                    生日:
            <td class="tdBg" width="200px">生日:td>
            <td><s:textfield id="birthday" name="user.birthday" readonly="true" onfocus="WdatePicker({'skin':'whyGreen','dateFmt':'yyyy-MM-dd'});"/>td>
        tr>
 这里写图片描述
编辑页面
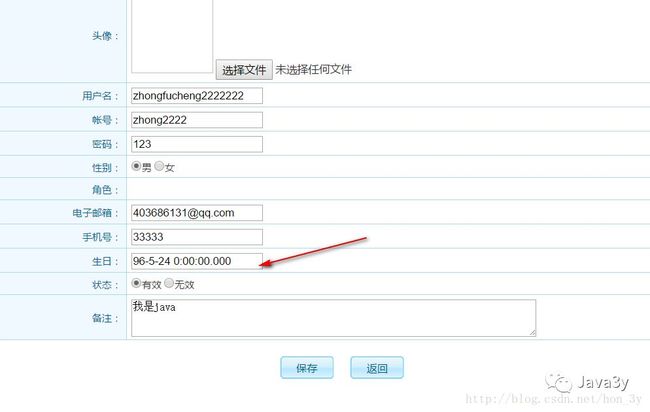
当使用了日期控件的时候,如果不指定格式,回显日期的格式是有点乱的:
 这里写图片描述
因此,我们在指定回显的日期格式:
    生日:                                                                td>
    <td>
        <s:textfield id="birthday" name="user.birthday" readonly="true"
                     onfocus="WdatePicker({'skin':'whyGreen','dateFmt':'yyyy-MM-dd'})">
            <s:param name="value">
                <s:date name='user.birthday' format='yyyy-MM-dd'/>
            s:param>
        s:textfield>
    td>
新增上传头像
我们在学习Struts2的时候已经说过Struts2也为我们封装了上传文件的功能。用起来特别简单:http://blog.csdn.net/hon_3y/article/details/71091593
Action处理
Action给出对应的属性值,和setter()方法
    /*************上传头像************************/    private File headImg;    private String headImgFileName;    private String headImgContentType;    public void setHeadImg(File headImg) {        this.headImg = headImg;    }    public void setHeadImgFileName(String headImgFileName) {        this.headImgFileName = headImgFileName;    }    public void setHeadImgContentType(String headImgContentType) {        this.headImgContentType = headImgContentType;    }
    private File headImg;
    private String headImgFileName;
    private String headImgContentType;

    public void setHeadImg(File headImg) {
        this.headImg = headImg;
    }

    public void setHeadImgFileName(String headImgFileName) {
        this.headImgFileName = headImgFileName;
    }

    public void setHeadImgContentType(String headImgContentType) {
        this.headImgContentType = headImgContentType;
    }
Action业务方法
    public String add() throws IOException {        if (user != null) {            //判断用户有没有传入头像            if (headImg != null) {                //得到要把头像上传到服务器的路径                javax.servlet.ServletContext servletContext = ServletActionContext.getServletContext();                String realPath = servletContext.getRealPath("upload/user");                //由于用户上传的名字可能会相同,如果相同就被覆盖掉,因此我们要修改上传文件的名字【独一无二】                headImgFileName = UUID.randomUUID().toString() + headImgFileName.substring(headImgFileName.lastIndexOf("."));                FileUtils.copyFile(headImg, new File(realPath, headImgFileName));            }            //设置图片与用户的关系            user.setHeadImg(headImgFileName);            userServiceImpl.save(user);            //跳转到列表显示页面            return "list";        }        return null;    }
        if (user != null) {

            //判断用户有没有传入头像
            if (headImg != null) {
                //得到要把头像上传到服务器的路径
                javax.servlet.ServletContext servletContext = ServletActionContext.getServletContext();
                String realPath = servletContext.getRealPath("upload/user");

                //由于用户上传的名字可能会相同,如果相同就被覆盖掉,因此我们要修改上传文件的名字【独一无二】
                headImgFileName = UUID.randomUUID().toString() + headImgFileName.substring(headImgFileName.lastIndexOf("."));
                FileUtils.copyFile(headImg, new File(realPath, headImgFileName));
            }

            //设置图片与用户的关系
            user.setHeadImg(headImgFileName);

            userServiceImpl.save(user);
            //跳转到列表显示页面
            return "list";
        }
        return null;
    }
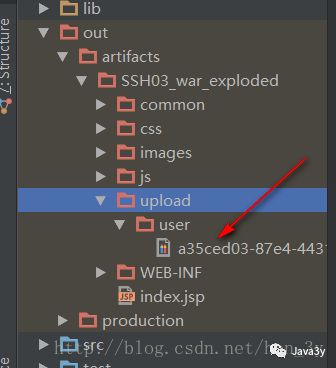
效果:
 这里写图片描述
修改上传头像
editUI
在编辑显示的时候,需要判断该用户是否有没有上传图片,有的话才显示。不然就会出现一张无法显示的图片。
<%--未必用户就有上传图片,因此需要判断一下--%>  " width="100" height="100"/>
<%--未必用户就有上传图片,因此需要判断一下--%>
<s:if test="%{user.headImg != null && user.headImg != ''}">
<img src="${basePath}upload/user/user.headImg "/>" width="100" height="100"/>
s:if>
<input type="file" name="headImg"/>
td>
Action处理
用户修改时,Action的处理和新增是一样的。也是判断JSP页面有没有把图片带过来,如果有,修改就行了。
    public String edit() throws IOException {        //Struts2会自动把JSP带过来的数据封装到User对象上        if (user.getId() != null && user != null) {            if (headImg != null) {                //得到要把头像上传到服务器的路径                javax.servlet.ServletContext servletContext = ServletActionContext.getServletContext();                String realPath = servletContext.getRealPath("upload/user");                //由于用户上传的名字可能会相同,如果相同就被覆盖掉,因此我们要修改上传文件的名字【独一无二】                headImgFileName = UUID.randomUUID().toString() + headImgFileName.substring(headImgFileName.lastIndexOf("."));                FileUtils.copyFile(headImg, new File(realPath, headImgFileName));                //设置图片与用户的关系                user.setHeadImg(headImgFileName);            }            userServiceImpl.update(user);        }        return "list";    }
        //Struts2会自动把JSP带过来的数据封装到User对象上
        if (user.getId() != null && user != null) {
            if (headImg != null) {

                //得到要把头像上传到服务器的路径
                javax.servlet.ServletContext servletContext = ServletActionContext.getServletContext();
                String realPath = servletContext.getRealPath("upload/user");
                //由于用户上传的名字可能会相同,如果相同就被覆盖掉,因此我们要修改上传文件的名字【独一无二】
                headImgFileName = UUID.randomUUID().toString() + headImgFileName.substring(headImgFileName.lastIndexOf("."));
                FileUtils.copyFile(headImg, new File(realPath, headImgFileName));

                //设置图片与用户的关系
                user.setHeadImg(headImgFileName);
            }

            userServiceImpl.update(user);
        }
        return "list";
    }
效果:
这里写图片描述总结
这一篇几乎都是我们经常用的知识点,只是CRUD而已了。
如果文章有错的地方欢迎指正,大家互相交流。习惯在微信看技术文章,想要获取更多的Java资源的同学,可以关注微信公众号:Java3y