《深度学习--Caffe之经典模型详解与实战》pyhon编写手写字识别脚本-1(jetson TX2)
手写字检测
(基于jetson TX2 ,Ubuntu16.04)
#-*- coding: UTF-8 -*-
import os
import sys
import numpy as np
import matplotlib.pyplot as plt
caffe_root ='/home/nvidia/caffe/'
# os.chdir(caffe_root) #os.chdir()用于改变当前工作目录到指定的路径
sys.path.insert(0,caffe_root+'python')
import caffe
MODEL_FILE='/home/nvidia/caffe/examples/mnist/lenet.prototxt'
PRETRAINED = '/home/nvidia/caffe/examples/mnist/lenet_iter_10000.caffemodel'
IMAGE_FILE='/home/nvidia/caffe/examples/images/0.bmp'
input_image = caffe.io.load_image(IMAGE_FILE, color=False)
net = caffe.Classifier(MODEL_FILE, PRETRAINED)


# 预测图片分类,没有crop时,oversample过采样为false
prediction = net.predict([input_image], oversample = False)
caffe.set_mode_gpu()
# 打印分类结果
print 'predicted class:', prediction[0].argmax()
python导入caffe模块的问题
出现如下问题: ImportError: No module named _caffe
from caffe import layers as L, params as P, to_proto
ImportError: No module named caffe
这是由于没有将caffe的python模块添加到python的引用目录中导致的,解决方法:
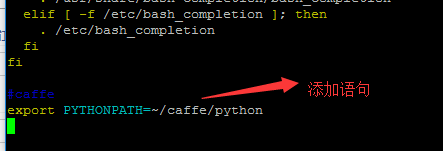
sudo vim ~/.bashrc在文件最后写入如下内容:
export PYTHONPATH=~/caffe/python:$PYTHONPATH1该问题解决,再运行,出现如下问题:
from ._caffe import Net, SGDSolver, NesterovSolver, AdaGradSolver, \
ImportError: No module named _caffe
这是由于caffe的python模块没有编译的原因,解决方法,重新编译pycaffe
sudo make pycaffe出现如下信息:
LD -o .build_release/lib/libcaffe.so.1.0.0
CXX/LD -o python/caffe/_caffe.so python/caffe/_caffe.cpp
touch python/caffe/proto/__init__.py
PROTOC (python) src/caffe/proto/caffe.proto 最后在CAFFE_ROOT/python/caffe/中生成_caffe.so才可以成功导入_caffe模块。

import caffe失败 No module named caffe
在成功编译caffe的源码之后,可以在python环境中使用caffe。
在Ubuntu环境下,打开python解释程序,输入import caffe时:出现以下错误
- >>>import caffe
- Traceback (most recent call last):
- File "
" , line 1, in - ImportError: No module named caffe
二、解决思路
上述语句中 “~” 号表示caffe 所在的根目录。
基本思路是把caffe中的python导入到解释器中
三、解决方法
放到配置文件中,可以永久有效果,命令操作如下:
A.把环境变量路径放到 ~/.bashrc文件中,打开文件
- sudo vim ~/.bashrc
在文件下方写入
- export PYTHONPATH=~/caffe/python:$PYTHONPATH
B.关闭文件,在终端写入下面语句,使环境变量生效
- source ~/.bashrc
具体步骤的图文展示
1、打开
2、写入
3、生效
linux系统中如何进入退出vim编辑器,方法及区别
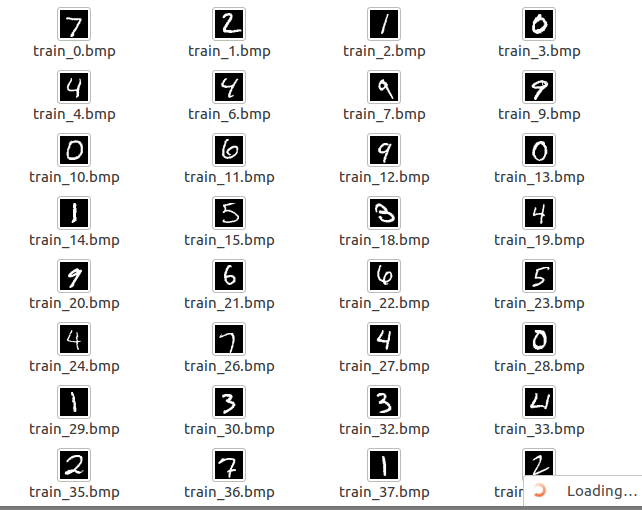
mnist手写字体库图片转换
https://jingyan.baidu.com/article/495ba8410ff14d38b30ede01.html
#-*- coding: UTF-8 -*-
#!/usr/bin/python
#!/usr/bin/env python

import numpy as np
import struct
import matplotlib.pyplot as plt
# from PIL import Image
import Image


# 确认已经下载并解压得到MNIST_data/t10k-images.idx3-ubyte文件
# filename = 'MNIST_data/t10k-images.idx3-ubyte'
filename = 't10k-images-idx3-ubyte'
# filename = '/home/nvidia/caffe/data/mnist/t10k-images-idx3-ubyte'
binfile = open(filename, 'rb')
buf = binfile.read()


index = 0
magic, numImages, numRows, numColumns = struct.unpack_from('>IIII', buf, index)
index += struct.calcsize('>IIII')


for img in range(0, numImages):
    im = struct.unpack_from('>784B', buf, index)
    index += struct.calcsize('>784B')
    im = np.array(im, dtype='uint8')
    im = im.reshape(28,28)
    '''
    fig = plt.figure()
    plotwindow = fig.add_subplot(111)
    plt.imshow(im, cmap='gray')
    plt.show()
    '''
    im = Image.fromarray(im)
    im.save('mnist_test/train_%s.bmp' %img, 'bmp') # 需要在当前目录下存在mnist_test目录
nvidia@tegra-ubuntu:~/caffe/data/mnist$ sudo chmod -R 777 mnistimg.py
nvidia@tegra-ubuntu:~/caffe/data/mnist$ ./mnistimg.py
http://blog.csdn.net/baggio1006/article/details/6332769
#!/usr/bin/env python
先将终端所在路径切换到python脚本文件的目录下nvidia@tegra-ubuntu:~/caffe/data/mnist$ ./mnistimg.py
然后给脚本文件运行权限,一般755就OK,如果完全是自己的私人电脑,也不做服务器什么的,给777的权限问题也不大(具体权限含义参考chmod指令的介绍,就不赘述了):
chmod 755 ./*.py
然后执行。
如果在脚本内容的开头已经给出了类似于如下的注释:
#!/usr/bin/env python
那就可以直接在终端里运行:
./*.py
如果没有这个注释
就在终端中执行:
python ./*.py
./mnistimg.py: line 13: filename: command not found
./mnistimg.py: line 15: syntax error near unexpected token `('
./mnistimg.py: line 15: `binfile = open(filename, 'rb')'
解决SyntaxError: Non-ASCII character '\xe7' in file demo.py on line 15问题
SyntaxError: Non-ASCII character '\xe7' in file demo.py on line 15, but no encoding declared; see http://python.org/dev/peps/pep-0263/ for details
出现这种错的解决办法:
在文件头上加上:
# -*- coding: cp936 -*-
或者
# -*- coding: utf-8 -*

关于Python脚本开头两行的:#!/usr/bin/python和# -*- coding: utf-8 -*-的作用 – 指定
http://blog.csdn.net/xw_classmate/article/details/51933904
文件编码声明的各种例子
针对上面的规则,下面给出各种,合法的,非法的,例子,供参考:
合法的python文件编码声明
- 带声明了解释器的,Emacs风格的,(注释中的)文件编码声明
- 例子1:
1234
#!/usr/bin/python# -*- coding: latin-1 -*-importos, sys... - 例子2:
1234
#!/usr/bin/python# -*- coding: iso-8859-15 -*-importos, sys... - 例子3:
1234
#!/usr/bin/python# -*- coding: ascii -*-importos, sys...
- 例子1:
- 不带声明了解释器的,直接用纯文本形式的:
123
# This Python file uses the following encoding: utf-8importos, sys... - 文本编辑器也可以有多种(其他的)定义编码的方式:
1234
#!/usr/local/bin/python# coding: latin-1importos, sys...- 很明显,其中的没用-*-,直接用了coding加上编码值
- 不带编码声明的,默认当做ASCII处理:
123
#!/usr/local/bin/pythonimportos, sys...
非法的python文件编码声明举例
- 少了coding:前缀
1234
#!/usr/local/bin/python# latin-1importos, sys... - 编码声明不在第一行或第二行:
12345
#!/usr/local/bin/python## -*- coding: latin-1 -*-importos, sys... - 不支持的,非法的字符编码(字符串)声明:
1234
#!/usr/local/bin/python# -*- coding: utf-42 -*-importos, sys...


