View体系之View的滑动
View体系之View的滑动
本文原创,转载请注明出处。
欢迎关注我的 简书 ,关注我的专题 Android Class 我会长期坚持为大家收录简书上高质量的 Android 相关博文。
写在前面:
最近在学习研究总结 View 的知识体系,前天完成了系列的第一篇文章:
View体系之View的位置与事件
今天带来 View 体系的第二篇文章,View 的滑动。
Android 手机因为设备面积有限,滑动就是一个展示更多内容的手段,并且平滑的滑动处理,还能给用户比较好的体验。
在 Android 中,常见的滑动方式有三种:
- View 的 scrollTo / scrollBy 方法。
- 补间动画或属性动画。
- 改变 View 的 LayoutParams 的 margin 属性,来达到滑动的效果。
首先关于补间动画实现的效果,之前我写过一个总结,可以看这里。
帧动画和补间动画看这篇足够了
而属性动画本文不打算做讲解,因为未来肯定我会写一篇关于属性动画的学习,先挖一个坑,未来会填上。
所以本文会着重讲解其他两种方式,来实现 Android 中 View 的滑动。
ScrollTo / SrcollBy
首先不谈他们两个有什么区别,关于他们的效果一开始给我就弄得一头雾水。首先我理解的 View 的平移是 View 自身位置的移动,而 ScrollTo / ScrollBy 移动的是 View 的内容。
View 的内容是什么意思呢,一开始我也不理解,但是看下写了一个 Demo 就明白了。
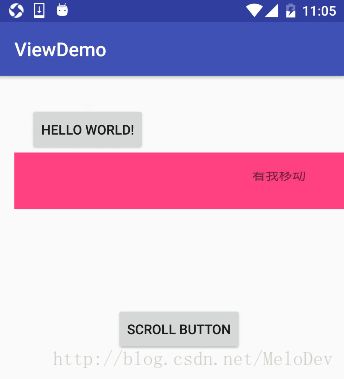
首先我点击下方 ScrollButton 按钮,移动上方粉色背景的 TextView。
tvMove.scrollBy(30, 10);可以看到效果是:“看我移动” 这四个字向右上方向移动了。再来理解两个概念,首先是 View 的绘制区域和 View 的布局区域。
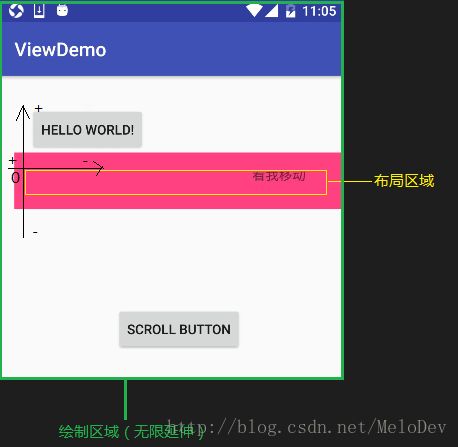
首先来观察被移动的 TextView 绿色框是 View 的 Canvas 绘制区域,它是没有边界并且无线延伸的,不受 TextView 自身大小和屏幕大小的控制。黄色框是 TextView 的布局区域,框出来的部分不是粉色边界是因为这个 TextView 被我加了一个 padding 20dp,所以得出一个结论 Padding 属性并不会增大布局区域的大小。布局区域内部盛装的就是这个 View 的内容了。
当我调用 View.scrollTo/scrollBy 方法时,移动的仅仅是 View 的布局区域内的内容,也就是黄色框中的区域。移动是没有界限的,可以随意移动到任何地方,但是显示是有界限的,内容只能显示在布局区域中,这也就是为什么“看我移动”四个字被上部分被截掉了。
移动的原则是以图中布局区域的左上角为原点,以上左为正移动,注意这里的移动方向与昨天说的 View 的坐标系恰好相反。
关于 scrollTo 和 scrollBy 移动的是什么、怎么移动的已经说明白了,那就来看看他们的区别吧,很好理解。
/**
 * Set the scrolled position of your view. This will cause a call to
 * {@link #onScrollChanged(int, int, int, int)} and the view will be
 * invalidated.
 * @param x the x position to scroll to
 * @param y the y position to scroll to
 */
public void scrollTo(int x, int y) {

    if (mScrollX != x || mScrollY != y) {
        int oldX = mScrollX;
        int oldY = mScrollY;
        mScrollX = x;
        mScrollY = y;
        //回调onScrollChanged方法
        onScrollChanged(mScrollX, mScrollY, oldX, oldY);
        if (!awakenScrollBars()) {
            invalidate();
        }
    }
}
/**
* Move the scrolled position of your view. This will cause a call to
* {@link #onScrollChanged(int, int, int, int)} and the view will be
* invalidated.
* @param x the amount of pixels to scroll by horizontally
* @param y the amount of pixels to scroll by vertically
*/
public void scrollBy(int x, int y) {
scrollTo(mScrollX + x, mScrollY + y);
} 代码很好理解,scrollTo 是将 View 的布局内容移动到一个绝对的坐标位置,scrollBy 是根据现在的偏移量,继续偏移多少。这也就是为什么如果用 scrollTo 的方式偏移,点一次就不会再动了。如果是 scrollBy 的方式,点击按钮可以一直偏移。
LayoutParams
LayoutParams 这种方式还是很好理解的,比如我直接更改 View 的 margin 属性,就可以达到我们的目的啦。
        DemoRelativeLayout.LayoutParams layoutParams = (DemoRelativeLayout.LayoutParams) btViewDemo.getLayoutParams();
        layoutParams.leftMargin += 100;
        layoutParams.topMargin += 100;
        btViewDemo.setLayoutParams(layoutParams);
注意这里的 LayoutParams 要强转成当前 View 的父布局类型。
未来会比较全面地研究属性动画。
弹性滑动
接下来是本文的最后一个模块的内容。首先看看上面的两种滑动方式,差别还是很大的。我们已经分析出 scrollTo/scrollBy 这两种方式是对 View 中的内容进行移动,而 LayoutParams 方式移动的是 View 本身。但是它们都有一个共同点,就是移动的过程就是瞬间完成的。也就是发生了“瞬移”。这种突兀的移动给用户的效果就不是很好了,渐变平滑的移动才是我们想要的。所以这里来说说弹性移动。
Scroller
我们可以对 View 的内容,通过 Scroller 来进行弹性滑动。Scroller 的使用典型代码如下:
    public DemoButton(Context context, AttributeSet attrs, int defStyleAttr) {
        super(context, attrs, defStyleAttr);
        init();
    }

    private void init() {
        mScroller = new Scroller(getContext());
    }

    @Override
    public void computeScroll() {
        super.computeScroll();
        if (mScroller.computeScrollOffset()) {
            scrollTo(mScroller.getCurrX(), mScroller.getCurrY());
            postInvalidate();
        }
    }

    public void smoothScrollTo(int destX, int destY) {
        int scrollX = getScrollX();
        int delta = destX - scrollX;
        mScroller.startScroll(scrollX, 0, delta, 0, 5000);
        invalidate();
} btViewDemo.smoothScrollTo(500,500);Scroller 的使用典型代码就是这些。它是如何进行弹性滑动的呢?来看看 Scroller 的源码实现吧:
    /**
     * Start scrolling by providing a starting point, the distance to travel,
     * and the duration of the scroll.
     *
     * @param startX Starting horizontal scroll offset in pixels. Positive
     *        numbers will scroll the content to the left.
     * @param startY Starting vertical scroll offset in pixels. Positive numbers
     *        will scroll the content up.
     * @param dx Horizontal distance to travel. Positive numbers will scroll the
     *        content to the left.
     * @param dy Vertical distance to travel. Positive numbers will scroll the
     *        content up.
     * @param duration Duration of the scroll in milliseconds.
     */
    public void startScroll(int startX, int startY, int dx, int dy, int duration) {
        mMode = SCROLL_MODE;
        mFinished = false;
        mDuration = duration;
        mStartTime = AnimationUtils.currentAnimationTimeMillis();
        mStartX = startX;
        mStartY = startY;
        mFinalX = startX + dx;
        mFinalY = startY + dy;
        mDeltaX = dx;
        mDeltaY = dy;
        mDurationReciprocal = 1.0f / (float) mDuration;
}首先可以看到,startScroll 方法用来记录了起始位置、终止位置、位移、以及移动的开始时间和移动的时长 duration。并没有真正的触发什么方法去滑动。真正滑动开始的起始点是 startScroll下方的 invalidate 方法。
invalidate 方法可以让 View 调用 onDraw 方法进行重绘,未来我们会研究 View 的绘制流程。在 View 调用 onDraw 时,会调用 computeScroll 方法,在 computeScroll 方法中我们再次调用 postInvalidate 再次重绘,这样就形成了一个闭环,滑动就这样开始了。
我们来看看computeScrollOffset是怎么规定计算每次的滑动距离的:
    /**
     * Call this when you want to know the new location.  If it returns true,
     * the animation is not yet finished.
     */
    public boolean computeScrollOffset() {
        if (mFinished) {
            return false;
        }
        // 计算已经滑动了多长时间
        int timePassed = (int)(AnimationUtils.currentAnimationTimeMillis() - mStartTime);

        if (timePassed < mDuration) {
            switch (mMode) {
            case SCROLL_MODE:
                // 用类似于插值器的方式,计算当前时间占得总时间比例。
                final float x = mInterpolator.getInterpolation(timePassed * mDurationReciprocal);
                //mCurrX mCurrY 就是这个比例*总位移对应的每一段的距离
                mCurrX = mStartX + Math.round(x * mDeltaX);
                mCurrY = mStartY + Math.round(x * mDeltaY);
                break;
            case FLING_MODE:
                final float t = (float) timePassed / mDuration;
                final int index = (int) (NB_SAMPLES * t);
                float distanceCoef = 1.f;
                float velocityCoef = 0.f;
                if (index < NB_SAMPLES) {
                    final float t_inf = (float) index / NB_SAMPLES;
                    final float t_sup = (float) (index + 1) / NB_SAMPLES;
                    final float d_inf = SPLINE_POSITION[index];
                    final float d_sup = SPLINE_POSITION[index + 1];
                    velocityCoef = (d_sup - d_inf) / (t_sup - t_inf);
                    distanceCoef = d_inf + (t - t_inf) * velocityCoef;
                }

                mCurrVelocity = velocityCoef * mDistance / mDuration * 1000.0f;

                mCurrX = mStartX + Math.round(distanceCoef * (mFinalX - mStartX));
                // Pin to mMinX <= mCurrX <= mMaxX
                mCurrX = Math.min(mCurrX, mMaxX);
                mCurrX = Math.max(mCurrX, mMinX);

                mCurrY = mStartY + Math.round(distanceCoef * (mFinalY - mStartY));
                // Pin to mMinY <= mCurrY <= mMaxY
                mCurrY = Math.min(mCurrY, mMaxY);
                mCurrY = Math.max(mCurrY, mMinY);

                if (mCurrX == mFinalX && mCurrY == mFinalY) {
                    mFinished = true;
                }

                break;
            }
        }
        else {
            mCurrX = mFinalX;
            mCurrY = mFinalY;
            mFinished = true;
        }
        return true;
    }
关键代码都已经给了注释,可以看到这里设计的非常巧妙,没用计时器甚至于 View 都不相关,就实现了平滑滑动。
当然实现平滑滑动还可以用属性动画,这也许是最好的方式,未来再说。还可以使用 Handler 的 sendDelay 的方式,达到一段时间内,移动一段距离达到弹性滑动的效果。不过我感觉这种方式很一般,不推荐。
本文到这里就结束了,下文会写写我对事件分发的理解,以及 View 的绘制流程。


