邮件服务器的配置
邮件服务器
邮件服务器是一种用来负责电子邮件收发管理的设备。它比网络上的免费邮箱更安全和高效,因此一直是企业公司的必备设备。
https://baike.baidu.com/item/邮件服务器
邮件服务器工作原理

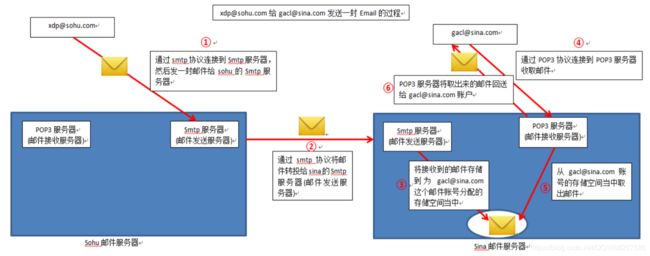
[email protected]用户写好一封Email发送到sohu的Smtp服务器
sohu的Smtp服务器开始处理[email protected] 用户的请求,它会根据收件人的地址判断,当前收件人是不是自己管辖的用户,如果是,就直接将Email存放到为该收件人的分配的邮箱空间当中。sohu的Smtp服务器判断收件人地址发现,这一封Email的收件人[email protected]是Sina的邮件服务器管理的,于是又将Email转发给Sina的Smtp服务器
Sina的Smtp服务器开始处理sohu的Smtp服务器发送过来的Email,Sina的Smtp服务器根据收件人的地址判断,发现收件人自己管辖的用户,于是就直接将Email存放到为[email protected] 用户的分配的邮箱空间当中
[email protected]用户将邮件发出去之后,就通知[email protected] 用户去收取。[email protected] 用户于是就连接上Sina的POP3服务器收取邮件
POP3服务器从[email protected] 用户的邮箱空间当中取出Email
POP3服务器将取出来的Email发给[email protected] 用户
邮件服务器相关组件及相关协议
组件:

MUA(Mail User Agent):“邮件用户代理”MUA是用在客户端的软件 ,主要的功能就是接收邮件主机的电
子邮件,并提供用户浏览与编写邮件的功能
MDA(Mail Delivery Agent):“邮件投递代理”将MTA接收的信件依照信件的流向(送到哪里)将该信件放
置到本机账户下的邮件文件中(收件箱),或者再经由MTA将信件送到下个MTA
MTA(Mail Transfer Agent): MTA是用在邮件主机上的软件,主要的邮件服务器。MTA就是“邮件传送代
理”,负责用户寄信与收信
MRA(Mail Retrieval Agent): 负责实现IMAP与POP3协议,与MUA进行交互 (Dovecot)
协议:
SMTP(Simple Mail Transfer Protocol): 传输发送邮件所使用的标准协议
IMAP(Internet Message Access Protocol): 接收邮件使用的标准协议之一
POP3(Post Office Protocol 3): 接收邮件使用的标准协议之一
邮件服务器端口
SMTP TCP:25 SSL:994
IAMP TCP:143 SSL:993
POP TCP:110 SSL:995
邮件服务器软件
Sendmail 早期的Linux系统中,默认使用的发件服务是由Sendmail服务程序提供
Postfix 相较于Sendmail服务程序,Postfix服务程序减少了很多不必要的配置步骤,而且在稳定性、并发性
方面也有很大改进
TruboMail
Coremail
Exchange #微软
Extmail #开源
WebMail #开源
邮件客户端软件
Outlook
Foxmail
Mailbox
Thunderbird
邮件服务器的部署
1.关闭防火墙&Selinux
[root@linux ~]# systemctl stop firewalld
[root@linux ~]# setenforce 0
setenforce: SELinux is disabled
[root@linux ~]# getenforce
Disabled
2.安装Postfix、dovecot、cyrus-sasl
[root@linux ~]# yum install postfix dovecot cyrus-sasl-* -y
Loaded plugins: fastestmirror
c7                                                         | 3.6 kB  00:00:00
Loading mirror speeds from cached hostfile
Package 2:postfix-2.10.1-6.el7.x86_64 already installed and latest version
Package cyrus-sasl-lib-2.1.26-21.el7.x86_64 already installed and latest version
Resolving Dependencies
--> Running transaction check
---> Package cyrus-sasl.x86_64 0:2.1.26-21.el7 will be installed
---> Package cyrus-sasl-devel.x86_64 0:2.1.26-21.el7 will be installed
---> Package cyrus-sasl-gssapi.x86_64 0:2.1.26-21.el7 will be installed
---> Package cyrus-sasl-md5.x86_64 0:2.1.26-21.el7 will be installed
---> Package cyrus-sasl-plain.x86_64 0:2.1.26-21.el7 will be installed
---> Package cyrus-sasl-scram.x86_64 0:2.1.26-21.el7 will be installed
---> Package dovecot.x86_64 1:2.2.10-8.el7 will be installed
--> Processing Dependency: libclucene-shared.so.1()(64bit) for package: 1:dovecot-2.2.10-8.el7.x86_64
--> Processing Dependency: libclucene-core.so.1()(64bit) for package: 1:dovecot-2.2.10-8.el7.x86_64
--> Running transaction check
---> Package clucene-core.x86_64 0:2.3.3.4-11.el7 will be installed
--> Finished Dependency Resolution

Dependencies Resolved

==================================================================================
 Package                   Arch           Version                Repository  Size
==================================================================================
Installing:
 cyrus-sasl                x86_64         2.1.26-21.el7          c7          88 k
 cyrus-sasl-devel          x86_64         2.1.26-21.el7          c7         310 k
 cyrus-sasl-gssapi         x86_64         2.1.26-21.el7          c7          41 k
 cyrus-sasl-md5            x86_64         2.1.26-21.el7          c7          56 k
 cyrus-sasl-plain          x86_64         2.1.26-21.el7          c7          38 k
 cyrus-sasl-scram          x86_64         2.1.26-21.el7          c7          42 k
 dovecot                   x86_64         1:2.2.10-8.el7         c7         3.2 M
Installing for dependencies:
 clucene-core              x86_64         2.3.3.4-11.el7         c7         528 k

Transaction Summary
==================================================================================
Install  7 Packages (+1 Dependent package)

Total download size: 4.3 M
Installed size: 13 M
Downloading packages:
----------------------------------------------------------------------------------
Total                                                 24 MB/s | 4.3 MB  00:00
Running transaction check
Running transaction test
Transaction test succeeded
Running transaction
  Installing : cyrus-sasl-2.1.26-21.el7.x86_64                                1/8
  Installing : clucene-core-2.3.3.4-11.el7.x86_64                             2/8
  Installing : 1:dovecot-2.2.10-8.el7.x86_64                                  3/8
  Installing : cyrus-sasl-devel-2.1.26-21.el7.x86_64                          4/8
  Installing : cyrus-sasl-plain-2.1.26-21.el7.x86_64                          5/8
  Installing : cyrus-sasl-md5-2.1.26-21.el7.x86_64                            6/8
  Installing : cyrus-sasl-gssapi-2.1.26-21.el7.x86_64                         7/8
  Installing : cyrus-sasl-scram-2.1.26-21.el7.x86_64                          8/8
  Verifying  : cyrus-sasl-scram-2.1.26-21.el7.x86_64                          1/8
  Verifying  : cyrus-sasl-gssapi-2.1.26-21.el7.x86_64                         2/8
  Verifying  : cyrus-sasl-md5-2.1.26-21.el7.x86_64                            3/8
  Verifying  : clucene-core-2.3.3.4-11.el7.x86_64                             4/8
  Verifying  : cyrus-sasl-plain-2.1.26-21.el7.x86_64                          5/8
  Verifying  : cyrus-sasl-devel-2.1.26-21.el7.x86_64                          6/8
  Verifying  : 1:dovecot-2.2.10-8.el7.x86_64                                  7/8
  Verifying  : cyrus-sasl-2.1.26-21.el7.x86_64                                8/8

Installed:
  cyrus-sasl.x86_64 0:2.1.26-21.el7
  cyrus-sasl-devel.x86_64 0:2.1.26-21.el7
  cyrus-sasl-gssapi.x86_64 0:2.1.26-21.el7
  cyrus-sasl-md5.x86_64 0:2.1.26-21.el7
  cyrus-sasl-plain.x86_64 0:2.1.26-21.el7
  cyrus-sasl-scram.x86_64 0:2.1.26-21.el7
  dovecot.x86_64 1:2.2.10-8.el7

Dependency Installed:
  clucene-core.x86_64 0:2.3.3.4-11.el7

Complete!
3.配置DNS服务器
DNS服务器只用做正向解析
[root@linux ~]# vi /etc/named.conf
 listen-on port 53 { any; };
 allow-query     { any; };				#只做这两项的更改
[root@linux ~]# vi /etc/named.rfc1912.zones
 38 zone "bk.com" IN {
 39         type master;
 40         file "bk.com.zone";
 41         allow-update { none; };
 42 }; 							#在文件最后添加这几行内容

[root@linux ~]# cd /var/named/
[root@linux named]# cp -a named.localhost bk.com.zone
[root@linux named]# vi bk.com.zone
  1 $TTL 1D
  2 @       IN SOA  bk.com. root.bk.com. (
  3                                         0       ; serial
  4                                         1D      ; refresh
  5                                         1H      ; retry
  6                                         1W      ; expire
  7                                         3H )    ; minimum
  8 @               NS      ns.bk.com.
  9 ns      IN      A       192.168.130.128
 10         IN      MX 10   mail.bk.com.
 11 mail    IN      A       192.168.130.128
[root@linux named]# systemctl restart named
[root@linux named]# vi /etc/resolv.conf
nameserver 192.168.130.128				#添加服务器的IP地址
[root@linux named]# vi /etc/hosts
192.168.130.128 mail.bk.com			#添加服务器的IP地址
4.postfix配置
[root@linux ~]# vi /etc/postfix/main.cf	#该文件为postfix的主配置文件
myhostname = mail.bk.com 					#75,邮件主机名
mydomain = bk.com 							#83,邮件域名
myorigin = $mydomain						#99,发件人所在的域名,如@bk.com
inet_interfaces = all 						#116,监听的网络接口
inet_protocols = all 						#119,协议ipv4/ipv6
mydestination = $myhostname,$mydomain 	#164,接收邮件时收件人的域名
mynetworks =0.0.0.0/0 						#264,网络
relay_domains = $mydestination 			#296,转发的域
home_mailbox = Maildir/ 					#419,采用系统用户的话,邮件箱为用户家目录下

#postfix 基于cyrus-sasl认证项
smtpd_sasl_auth_enable = yes
smtpd_sasl_security_options = noanonymous
broken_sasl_auth_clients = yes
smtpd_recipient_restrictions =
permit_sasl_authenticated,reject_unauth_destination,permit_mynetworks
smtpd_client_restrictions = permit_sasl_authenticated
5.Sasl2配置
[root@linux ~]# vi /etc/sysconfig/saslauthd
MECH=shadow			 #7,指定以本地系统用户名认证
[root@linux ~]# touch /usr/lib64/sasl2/smtpd.conf		#创建SMTP认证的配置文件,此文件为64bit操作系统配置文件,32bit操作系统该文件位于/usr/lib/目录下
[root@linux ~]# vi /usr/lib64/sasl2/smtpd.conf
  1 pwcheck_method: saslauthd
  2 mech_list: PLAIN LOGIN
  3 log_level:3
6.Dovecot配置
[root@linux ~]# vi /etc/dovecot/dovecot.conf
protocols = imap pop3 lmtp 			#24,使用协议
listen = * 							#31,*监听协议ipv4

[roo@linux ~]# vi /etc/dovecot/conf.d/10-auth.conf
disable_plaintext_auth = no #10
auth_mechanisms = plain #100

[root@linux ~]# vi /etc/dovecot/conf.d/10-mail.conf
mail_location = maildir:~/Maildir #24

[root@linux ~]# vi /etc/dovecot/conf.d/10-ssl.conf
ssl = no #8
7.启动服务
[root@linux ~]# systemctl start postfix && systemctl enable postfix
[root@linux ~]# systemctl start dovecot && systemctl enable dovecot
Created symlink from /etc/systemd/system/multi-user.target.wants/dovecot.service to /usr/lib/systemd/system/dovecot.service.
[root@linux ~]# systemctl start saslauthd && systemctl enable saslauthd
Created symlink from /etc/systemd/system/multi-user.target.wants/saslauthd.service to /usr/lib/systemd/system/saslauthd.service.
8.创建用户,方便测试
[root@linux ~]# useradd alice
[root@linux ~]# echo 'alice' | passwd --stdin alice
Changing password for user alice.
passwd: all authentication tokens updated successfully.
[root@linux ~]# useradd tom
[root@linux ~]# echo 'tom' | passwd --stdin tom
Changing password for user tom.
passwd: all authentication tokens updated successfully.
9.使用 telnet 工具进行发信、收信测试
[root@linux ~]# yum install telnet -y
Loaded plugins: fastestmirror
Loading mirror speeds from cached hostfile
Resolving Dependencies
--> Running transaction check
---> Package telnet.x86_64 1:0.17-64.el7 will be installed
--> Finished Dependency Resolution

Dependencies Resolved

==================================================================================
 Package           Arch              Version                  Repository     Size
==================================================================================
Installing:
 telnet            x86_64            1:0.17-64.el7            c7             64 k

Transaction Summary
==================================================================================
Install  1 Package

Total download size: 64 k
Installed size: 113 k
Downloading packages:
Running transaction check
Running transaction test
Transaction test succeeded
Running transaction
  Installing : 1:telnet-0.17-64.el7.x86_64                                    1/1
  Verifying  : 1:telnet-0.17-64.el7.x86_64                                    1/1

Installed:
  telnet.x86_64 1:0.17-64.el7

Complete!
#使用telnet工具测试
[root@linux ~]# telnet localhost 25
Trying ::1...
Connected to localhost.
Escape character is '^]'.
220 mail.bk.com ESMTP Postfix
HELO localhost
250 mail.bk.com
MAIL FROM:[email protected]
250 2.1.0 Ok
RCPT TO:[email protected]
250 2.1.5 Ok
DATA
354 End data with .
Subject:Test Mail
HELLO!
This is test mail!
.
250 2.0.0 Ok: queued as ADCFC6078DD2
QUIT
221 2.0.0 Bye
Connection closed by foreign host.
#刚才发送的信件就到了用户的Maildir目录下
[root@linux ~]# ls /home/tom/Maildir/new/
1543926902.V803I6078e34M85822.linux
[root@linux ~]# cat /home/tom/Maildir/new/1543926902.V803I6078e34M85822.linux
Return-Path:
X-Original-To: [email protected]
Delivered-To: [email protected]
Received: from localhost (localhost [IPv6:::1])
        by mail.bk.com (Postfix) with SMTP id ADCFC6078DD2
        for ; Tue,  4 Dec 2018 20:34:27 +0800 (CST)
Subject:Test Mail
Message-Id: <[email protected]>
Date: Tue,  4 Dec 2018 20:34:27 +0800 (CST)
From: [email protected]

HELLO!
This is test mail!
#收信测试
[root@linux ~]# telnet localhost 110
Trying ::1...
Connected to localhost.
Escape character is '^]'.
+OK Dovecot ready.
USER tom
+OK
PASS tom
+OK Logged in.
LIST
+OK 1 messages:
1 411
.
RETR 1
+OK 411 octets
Return-Path:
X-Original-To: [email protected]
Delivered-To: [email protected]
Received: from localhost (localhost [IPv6:::1])
        by mail.bk.com (Postfix) with SMTP id ADCFC6078DD2
        for ; Tue,  4 Dec 2018 20:34:27 +0800 (CST)
Subject:Test Mail
Message-Id: <[email protected]>
Date: Tue,  4 Dec 2018 20:34:27 +0800 (CST)
From: [email protected]

HELLO!
This is test mail!
.
quit
+OK Logging out.
Connection closed by foreign host.


