SpringBoot 高级知识
SpringBoot 高级知识
文章目录
- SpringBoot 高级知识
- Spring Boot
- SpringBoot 设置 application.properties 提示
- 视图技术。
- 一、JSON技术
- 二、MVC 分离开发
- MVC框架。
- 一、验证框架。
- 部署 SpringBoot 应用。
- 一、Jar 文件运行。
- 二、War 方式部署。
- 三、多环境部署。
- Testing 单元测试。
- 一、Mockito 模拟测试。
- Service 测试
- 测试 MVC
- 二、面向数据库的单元测试。
- Rest 风格。
- 一、Swagger UI
- MongoDB。
- 一、使用 shell
- 二、SpringBoot 集成 MonaoDB
- Redis 。
- 安装Redis
- 临时Redis
- Redis 服务
- 使用 Redis 。
- 安全设置
- Spring Boot 集成 Redis
- 内置 StringRedisTemplate 与 RedisTemplate。
- Elasticsearch。
- Cache 。
- Spring Session。
- 一、Nginx 的安装和配置。
- Nginx 的安装
- Nginx 的配置
- 二、Spring Session。
- SpringBoot 和 zookeeper 。
- 监控 SpringBoot 应用。
Spring Boot
- 约定代码结构或命名规范来减少配置数量。
- 采用更简洁的方式来替代 XML。
- 用 Gradle 代替 Maven (我比较擅长使用 Maven)。
- 通过注解约定其含义来减少配置数量。
- 定制开箱即用的 starter。
SpringBoot 设置 application.properties 提示
https://blog.csdn.net/Roobert_Chao/article/details/88796849
视图技术。
一、JSON技术
二、MVC 分离开发
- 集成 WebSimulate。
MVC框架。
一、验证框架。
部署 SpringBoot 应用。
一、Jar 文件运行。
二、War 方式部署。
三、多环境部署。
Testing 单元测试。
SpringBoot测试,改变了之前的一些不方便的地方,一是测试自动进行事务回滚。
二是可以模拟 service ,三是引入 @sql,模拟好测试场景。
- 之前我们常用的 Junit 在这里仍然使用,更加重要的是 使用 assert 与 suite。
一、Mockito 模拟测试。
Mockito ,Java Mockito 框架,用于模拟任何 Spring 管理的 Bean ,比如在单元测试中模拟一个第三方系统 service 接口返回的数据,而不会真正调用第三方系统。
- Spring Boot 测试脚手架
@RunWith(SpringRunner.class)		// 指明的类来提供单元测试。
@SpringBootTest		// 默认根据包名逐级向上查找,一直找到 @SpringBootApplication 来判断是否是主程序,并在测试的时候,启动该类的上下文环境。
public class UserServiceTest{
	@Autowired
	UserService userService;
	@Test
	@DirtiesContext  // 提示 Spring 重新加载 Spring 上下文
	public void testService(){
	}
}
Service 测试
单元测试不能实际调用 service ,因此单元测试中使用 了 @MockBean
@MockBean    // 注解可以自动注入 Spring 管理的 userService。
private UserService userService;
// 通过 Mockito 工具创建的 UserService$xxxxx 实例,。
- 使用模拟
// given 是 Mockito 的一个静态方法,用来模拟一个 Service 方法调用返回。
// anyInt() 指示可以传入任何参数,willReturn 方法说明这个调用将返回 100。
given(this.UserService.getUser(anyInt()).willReturn(expectedCredit));
测试 MVC
在 Spring MVC Test 中,带有 @Service 、@Component 的类不会自动扫描注册为 Spring 容器管理的 Bean 。
用来在 Servlet 容器内对 Controller 进行单元测试,并非发起 HTTP 请求调用 Controller
- 可以通过 @WebMvcTest 来完成 MVC 单元测试。
@WebMvcTest(UserController.class)
public class UserControllerTest{
	@AutoWired
	private MockMvc mvc;		//
	@Test
	public void testMvc(){
		mvc.perform(get("user/{id}",userId))
			.andExpect(content().string(String.valueOf(expectedCredit)));
	}
}
- MVC 测试的返回结果的比较。(perform 方法返回 ResultActions 实例,重载了andExpect()方法来对MVC调用结果尽心比较)
- status().isOk(); 期望成功调用 HTTP Status 为 200
- content().contentType(MediaType.APPLICATION_JSON); 期望返回的内容是 json
- jsonPath("$.name").value(“json”) 检查返回的内容
- view().name("/success.btl") 期望返回的视图名称
比较 Model- model().size(1) Model 的大小。
- model().attributeExists(“person”) 存在
- model().attribute(“person”,“world”) 期望有这样的返回
比较 forward 和 redirect- forwardedUrl(“index.html”);
- redirectedUrl(“index.html”)
比较内容- content().xml(xmlContent ); 返回内容是 XML ,并且与 xmlContent 一致
Mock 测试,对那些不容易构建的对象用一个虚拟对象来代替测试的方法。
- 模拟对象(mock)
通过 mock 方法可以模拟任何一个类或者接口。@RunWith(MockitoJunitRunner.class) LinkedList mockedList = mock(LinkedList.class); List ist = mock(List.class); - 模拟方法参数(when、verify)
when(userService.getUser(anyInt())).thenReturn(1000); // 传入明确的参数 when(userService.getUser(eq(userId))).thenReturn(1000); // 通过 verify 方法类更为精确的校验模拟对象是否被调用。 verify(userService,times(2)).getUser(eq(userId)); // 期望调用两次,如果只发生一次则报异常。 - 模拟方法返回值(thenReturn、thenThrow)
//  模拟返回值
when(userService.getUser(eq(userId))).thenReturn(1000);
//  模拟异常抛出
when(userService.getUser(eq(userId))).thenThrow(new Exception("异常的抛出"));
// 模拟无参数异常抛出
doThrow(new Exception("异常的抛出")).when(list).clear();
list.clear();
二、面向数据库的单元测试。
- @Sql
@RunWith(SpringRunner.class)		// 指明的类来提供单元测试。
@SpringBootTest		// 默认根据包名逐级向上查找,一直找到 @SpringBootApplication 来判断是否是主程序,并在测试的时候,启动该类的上下文环境。
@ActiveProfiles("test")    // test 是专门用于测试的数据库,需要新建,及配置文件的加载
@Transactional
public class UserServiceTest{
	@Autowired
	UserService userService;
	@Test
	@Sql({"user.sql"})
	public void testService(){
		User user = new User();
		user.setId(1);
		user.setName("123456");
		// 修改用户名称。
		boolean success = userService.updateUserName(user);
		assertTrue(success);
	}
}
###  user.sql 文件是
INSERT INTO `user` (id,`name`,`department_id`) values(1,'ijz','1');
### @ActiveProfiles("test")     为测试环境设置新的 applicaion-test.properties
- XLSUnit
Rest 风格。
一、Swagger UI
Swagger 规范是一个 JSON 格式的文件,包含项目基本信息及接口描述信息,可以在static/swagger3 下创建一个 sample.json 文件
MongoDB。
一、使用 shell
二、SpringBoot 集成 MonaoDB
Redis 。
内存存储的数据结构服务器。存放在 Redis 中的数据不大于内存容量,否则会因为操作系统虚拟内存导致性能降低。
安装Redis
临时Redis
- 进入官网,下载相应的版本 https://redis.io/
官网暂无支持 windows 版本的内容,要下载windows版本的可访问我的网盘,包含客户端以及压缩包:链接:支持windows版本的Redis ,
提取码:fzoc
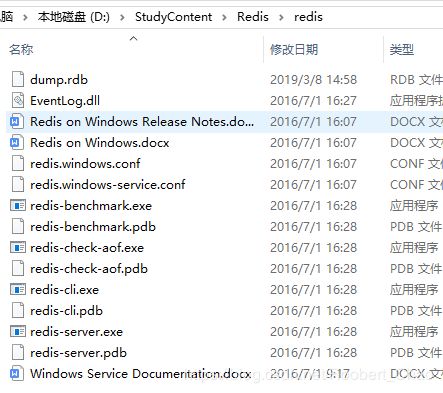
redis.windows.conf 是redis的配置文件。
redis-server.exe  服务器端。
redis-cli  命令行客户端。
redis-benchmark:Redis性能测试工具,测试Redis在你的系统及你的配置下的读写性能。
- 进入 cmd ,启动服务命令
redis-server redis.windows.conf,出现下图显示内容表示启动成功了。

- path 中添加 命令,方便使用 Redis 。(可不使用,根据个人习惯)
- 设置之后可通过 redis-cli 命令进入,不需要进入 Redis 目录。

Redis 服务
//  添加到系统服务当中,则会一直启动,正如 MySql 那样。
redis-server--service-install redis.windows-service.conf--loglevel verbose
使用 Redis 。
重新打开一个终端,进入 src 目录,运行 ./redis-cli,进入Redis 客户端管理工具。
安全设置
- Mac 系统内容
- 打开 redis.conf 中设置访问密码,文件中添加一行密码:
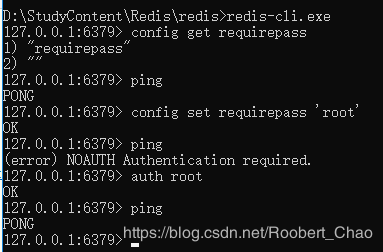
requirepass rootroot - 设置重新加载 redis.conf ,命令是: ./redis-server …/redis.conf
- 再次输入 ping 命令,将报没有授权,
auth "rootroot" // 使用 auth 命令来验证合法性,随后的操作才能成功。
Spring Boot 集成 Redis
### pom.xml

	org.springframework.boot
	spring-boot-starter-data-redis


### application.properties
spring.redis.host=127.0.0.1
spring.redis.password=rootroot
spring.redis.port=6379
### #最大的连接数
属性 max-active 指定了 Spring Boot 应用的最大连接数,0 表示无限制。
spring.redis.pool.max-active=8
内置 StringRedisTemplate 与 RedisTemplate。
StringRedisTemplate 继承了 RedisTemplate,与 RedisTemplate 不同的是重新设置了序列化策略,使用 StringRedisSerializer 类来序列化 Key-Value,以及 List、Hsah、Set 等数据结构中的元素。
| Redis | Spring Boot 集成 Redis |
|---|---|
| set testenv para | redisClient.opsForValue().set(“testenv”,“para”); |
| get testenv | redisClient.opsForValue().get(“testenv”); |
| lpush platform:message hello,world | redisClient.opsForList().leftPush(“platform:message”,“hello,world”); |
| lpush platform:message hello,springboot | redisClient.opsForList().leftPush(“platform:message”,“hello,springboot”); |
Elasticsearch。
Cache 。
Spring Session。
一、Nginx 的安装和配置。
SpringBoot 应用通常会部署在多个 Web 服务器上同时提供服务,
1、单个应用宕(dàng)机不会停止服务,升级应用可以逐个升级不必停止服务。
2、提高了应用整体的吞吐量。
这种方式称为水平扩展。前端通过 Nginx 提供反向代理,回鹘管理通过 Spring Session ,使用 Redis 来存放 Session 。部署SpringBoot 项目到任意一台 Web 服务器上,从而提高了系统的可靠性和可伸展性。
一、系统提升处理能力。(系统升级)
- 1、重置扩展架构,提升现有系统硬件的处理能力。(硬件花销大,应用系统不需要做任何改变)
- 2、水平扩展架构,部署系统到更多的服务器上,同时提供服务。(成本便宜,会话管理是一个难点。)
二、Spring Boot 应用水平扩展有两个问题:- 一是 将用户的请求派发到水平部署的任意一台SpringBoot应用。(使用反向代理服务器来实现)
- 二是会话管理,对于同一个用户请求,通过 反向代理服务器派发到不同的 Web 服务器上,也能共享会话信息。
三、两种方式实现共享会话- 复制会话:Web 服务器通常支持 Session 复制,一台应用的会话信息改变将立即复制到其他集群的 Web 服务器上。(每次都要复制,效率低)
- 集中式会话:所有 Web 服务器都共享一个会话,会话信息通常存放在一台服务器上,使用 Redis 服务器来存放会话。
四、正/反向代理。- 1、正向代理:局域网内通过一个正向代理服务器访问外网。
- 2、反向代理:接收 internet 上的连接请求,然后将请求转发给内部网络上的服务器,并将从服务器上得到的结果返回给 internet 上请求连接的客户端,此时代理服务器对外就表现为一个反向代理服务器。
Nginx 的安装
轻量级的 Web 服务器/反向代理服务器及电子邮件代理服务器。
- conf / nginx.conf 找到

- logs 目录下,access.log,记录了用户的请求信息和响应。error.log,记录了 Nginx 运行的错误日志。nginx.pid,包含了 Nginx 的进程号。
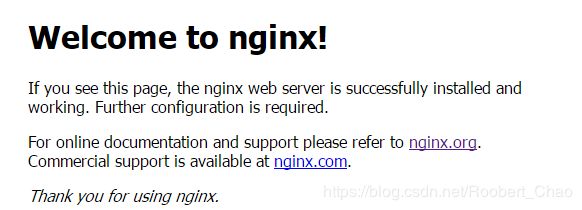
- nginx 启动命令,默认监听 80 端口。
- nginx -s stop ,快速停止服务器。
- nginx -s quit ,停止服务器,等待请求处理完毕后关闭。
- nginx -s reload,重新加载配置文件。
Nginx 的配置
- Nginx 的配置文件 conf/nginx.conf 下包含多个指令块,主要的是http 与 location 。
- http 块:可以配置多个 Server ,配置代理、缓存、日志定义等绝大多数功能和第三方模块。
- location 块:配置请求的路由,以及各种页面的处理情况。
http{
	include mine.types;
	default_type application/octet-stream;
	sendfile on;
	keepalive_timeout 65;
	upstream backend{
		server 127.0.0.1:9000;
		server 127.0.0.1:9001;
	}
	server {
		listen 80;
		server_name localhost;
		location / {
			proxy_pass http://backend;
		}
	}
}
// 紧接着创建一个 SpringBoot 应用,并分别以 9000 和 9001 两个端口启动,
// 然后再 Spring Session 的基础上来完成 应用的水平扩展。
二、Spring Session。
默认情况下,Spring Boot 使用的是 Tomcat 的 Session 实现。
- 指定 session 的存储方式。
- spring.session.store-type=Redis|JDBC|Hazelcast|none
- 1、Redis,Session 数据存放在 Redis 中。
- 2、JDBC,会话数据存放在数据库中。
- 3、Hazelcast ,Session 数据存放到 Hazelcast 。
- 4、None,禁用 Spring Session 功能。
### application.properties
spring.session.store-type=Redis
spring.redis.host=127.0.0.1
spring.redis.host=6379
spring.redis.password=rootroot
- 编写测试代码,检查 Redis 连接是否成功。
@Controller
public class SpringSessionController{
	Log log = LogFactory.getLog(SpringSessionController.class);
	@RequestMapping("/session.html")
	public @ResponseBody String putSession(HttpServletSession request){
		HttpSession session = request.getSession();
		log.info(session.getClass());
		log.info(session.getId());
	}
}
- 访问 /session.html 后,通过 Redis 客户端工具访问 Redis 。输入如下
 keys spring:session:*
 查看所有 "spring:session:" 开头的 keys
 其中 "spring.session.sessions" 代表一个会话id,
 hgetall "会话id"   // 查看会话所有信息
 HMGET  "会话id" 存入 Redis 的Key , //  查看存入Redis 的 内容的信息
SpringBoot  默认创建的 Key :
 1、creationTime :创建时间。
 2、maxInactiveInterval:指定过期时间(秒)。
 3、lastAccessedTime:上次访问时间。
 4、sessionAttr:以"sessionAttr:",为前缀的会话信息。

// 使用 ttl 查看会话过期的时间。
ttl spring:session:sessions:expires:key
SpringBoot 和 zookeeper 。
监控 SpringBoot 应用。
Java EE 规范中由 JMX 来监控管理应用。
SpringBoot 也提供了 Actuator 功能来完成类似的监控。
| 能查看和监控一下的信息 |
|---|
| SpringBoot 的配置信息 |
| SpringBoot 配置的 Bean 信息 |
| 最近请求的 Http 请求 |
| 数据源、NoSql 等数据状态 |
| 在线查看日志内容,在线日志配置修改 |
| 所有@RequestMapping 注解的URL 路径 |
| 自动配置信息汇总 |
| 打印虚拟机的线程栈 |
| Dump 内存 |
| 应用的各种指标汇总 |
| 自定义监控指标 |
安装 Actuator。
使用 Actuator功能 与 SpringBoot 使用其他功能一样简单。
### pom.xml

    org.springframework.boot
    spring-boot-starter-actuator
    2.1.3.RELEASE
- 得到结果:

- 通过网页显示的链接可以访问
- (1)、http://localhost:8081/actuator/info
- (2)、http://localhost:8081/actuator/health
### application.properties

# actuator监控权限配置
management.security.enabled = false
#配置默认监控端口号
management.port = 54001

# 设置系统监控的访问端口
management.server.port=8081
endpoints.default.web.enabled=true
---  考虑到系统监控涉及到系统安全,
---  SpringBoot的actuator启动端点监控web端默认加载默认只有两个info, health。(下面表格红色部分)
## 包含所有节点页面
management.endpoints.web.exposure.include=*
## 排除env、beans
management.endpoints.web.exposure.exclude=env,beans
### 所有监控都在 /actuator 下,可以更改配置,修改成想要的路径:
management.context-path=/manage
- 详细的一些配置如下:
| ID | 描述 | 敏感(Sensitive) |
|---|---|---|
| autoconfig | 显示一个auto-configuration的报告,该报告展示所有auto-configuration候选者及它们被应用或未被应用的原因 | true |
| beans | 显示一个应用中所有Spring Beans的完整列表 | true |
| configprops | 显示一个所有@ConfigurationProperties的整理列表 | true |
| dump | 执行一个线程转储 | true |
| env | 暴露来自Spring ConfigurableEnvironment的属性 | true |
health |
展示应用的健康信息(当使用一个未认证连接访问时显示一个简单的’status’,使用认证连接访问则显示全部信息详情) | false |
info |
显示任意的应用信息 | false |
| metrics | 展示当前应用的’指标’信息 | true |
| mappings | 显示一个所有@RequestMapping路径的整理列表 | true |
| shutdown | 允许应用以优雅的方式关闭(默认情况下不启用) | true |
| httptrace | 显示trace信息(默认为最新的一些HTTP请求) | true |
- 自定义监控
SpringBoot 2 提供注解 @Endpoint 来自定义一个监控类,并在方法上使用 @ReadOperation来显示监控指标。使用 @WriteOperation来动态更改监控指标。
- 数据源为 HikariCP 的监控类,提供了数据源配置的最大连接数、空闲连接数、占用连接数等信息,同时也允许动态设置最大连接数。


