springboot 项目的实战
https://www.cnblogs.com/DFX339/p/8858141.html
- 博客园
- 首页
- 新随笔
- 联系
- 管理
- 订阅

随笔- 60 文章- 0 评论- 10
SpringBoot+MyBatis+Mysql 详细示例
SpringBoot与MyBatis整合,底层数据库为mysql的使用示例
项目下载链接:https://github.com/DFX339/bootdemo.git
新建maven项目,web项目,项目名为 bootdemo
项目结构目录如下:还有个pom.xml文件没有在截图里面
项目需要编写的文件主要有:
项目启动类: Application.java ServletInitializer.java
前端控制器类:UserController.java
业务层的接口与实现类:UserIservice.java UserService.java
Mybatis的接口: UserMapper.java
接口对应的mapper文件:UserMapper.xml
实体类:User.java
maven项目的配置文件: pom.xml

(1)编写实体类 User.java
![]()
package smm.springboot_ftl.bean;

/**
 * User实体类
 * @author Administrator
 *
 */
public class User {

    private int id;
    private String username;
    private String password;
    private int age;

    public User(){}

    public int getId() {
        return id;
    }

    public void setId(int id) {
        this.id = id;
    }

    public String getUsername() {
        return username;
    }

    public void setUsername(String username) {
        this.username = username;
    }

    public String getPassword() {
        return password;
    }

    public void setPassword(String password) {
        this.password = password;
    }

    public int getAge() {
        return age;
    }

    public void setAge(int age) {
        this.age = age;
    }

}
![]()
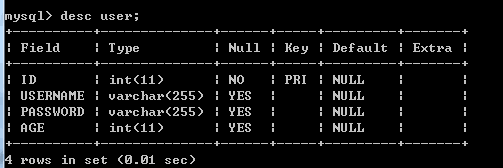
(2)登录mysql数据库,新建数据库 springboot_mybatis(数据库名)
新建表 user(表名),表的字段如图所示
(3)编写持久层接口: UserMapper.java (定义操作数据库的方法) 这里切记要用@Mapper注解标识
![]()
package smm.springboot_ftl.mapper;

import org.apache.ibatis.annotations.Mapper;

import smm.springboot_ftl.bean.User;

@Mapper
public interface UserMapper {

    public void insert(User user);

    public void update(User user);

    public void delete(int id);

    public User find(int id);
}
![]()
(4)编写持久层接口对应的mapper.xml文件: UserMapper.xml (编写增删改查对应的sql语句)
存储位置: src/main/resources/mapper
![]()
INSERT INTO USER(ID,USERNAME,PASSWORD,AGE) VALUES(#{id},#{username},#{password},#{age}); UPDATE USER SET USERNAME=#{username} , PASSWORD=#{password} , AGE = #{age} WHERE ID=#{id} DELETE FROM USER WHERE ID=#{0}
![]()
(5)编写业务层接口: UserIService.java
![]()
package smm.springboot_ftl.service;

import org.springframework.stereotype.Component;

import smm.springboot_ftl.bean.User;


public interface UserIService {

    public void insert(User user);
    public void update(User user) ;

    public User find(int id);

    public void delete(int id);
}
![]()
(6)编写业务层接口的实现类:UserService.java (切记要使用@Service("userService")类标识类,表示这是service)
@ComponentScan({"ssm.springboot_ftl.mapper"}):是为了找到对应的UserMapper对象
![]()
package smm.springboot_ftl.service;

import javax.annotation.Resource;

import org.springframework.context.annotation.ComponentScan;
import org.springframework.stereotype.Component;
import org.springframework.stereotype.Service;

import smm.springboot_ftl.bean.User;
import smm.springboot_ftl.mapper.UserMapper;


@ComponentScan({"ssm.springboot_ftl.mapper"})
@Service("userService")
public class UserService implements UserIService{

    @Resource
    private UserMapper userMapper;

    @Override
    public void insert(User user) {
        userMapper.insert(user);
    }

    public void update(User user) {
        userMapper.update(user);
    }

    public User find(int id) {
        return userMapper.find(id);
    }

    public void delete(int id){
        userMapper.delete(id);
    }
}
![]()
(7)编写前端控制器类: UserController.java
切记需要使用 @RestController 标识这个类,SpringBoot中新加的注解。
@RestController注解,相当于@Controller+@ResponseBody两个注解的结合,返回json数据不需要在方法前面加@ResponseBody注解了,但使用@RestController这个注解,就不能返回jsp,html页面,视图解析器无法解析jsp,html页面
如果需要返回数据到jsp或者html页面,则使用@Controller注解。这里推荐使用@Controller注解,因为需要直接返回数据的时候可以增加@ResponseBody注解
@ComponentScan({"smm.springboot_ftl.service"}) :标识业务层的类,用来找到业务层对象,smm.springboot_ftl.service是业务类的路径
@MapperScan("smm.springboot_ftl.mapper") :标识持久层mapper接口,用来找到mapper对象, smm.springboot_ftl.mapper是接口的路径
这三个注解都不能少!!! 少了SpringBoot就无法正常启动了!!
![]()
package smm.springboot_ftl.action;

import java.util.Map;

import javax.annotation.Resource;

import org.mybatis.spring.annotation.MapperScan;
import org.springframework.boot.SpringApplication;
import org.springframework.boot.autoconfigure.EnableAutoConfiguration;
import org.springframework.boot.autoconfigure.SpringBootApplication;
import org.springframework.context.annotation.ComponentScan;
import org.springframework.stereotype.Controller;
import org.springframework.web.bind.annotation.RequestMapping;
import org.springframework.web.bind.annotation.RequestMethod;
import org.springframework.web.bind.annotation.RestController;
import org.springframework.web.servlet.ModelAndView;

import smm.springboot_ftl.bean.User;
import smm.springboot_ftl.service.UserService;
/**
 * 在定义一个Rest接口时,我们通常会使用GET,POST,PUT,DELETE几种方式来完成我们所需要进行CRUD的一些操作,
 * 我们在这里罗列和教大家在实际开发中的使用,一些基本概念我们就不再赘述,例如使用POST的优缺点,可使用参数的大小限制等地:

    GET:一般用于查询数据,不办函数据的更新以及插入操作。由于明文传输的关系,我们一般用来获取一些无关用户的信息。

    POST:一般用于数据的插入操作,也是使用最多的传输方式,但是在H5调用时会有跨域的问题,一般使用JSONP来解决。

    PUT:我们使用PUT方式来对数据进行更新操作。

    DELETE:用于数据删除,注意在数据库内是逻辑删除(改变数据状态,用户不再查询得到,但还保留在数据库内)还是物理删除(真删了)。

 * @author Administrator
 *
 */
@RestController
@ComponentScan({"smm.springboot_ftl.service"})
@MapperScan("smm.springboot_ftl.mapper")
public class UserController {

    @Resource
    private UserService userService;

     @RequestMapping("/say")
     public String say(){
         return "springboot-a"+userService;
     }

    @RequestMapping("/find")
    public String find(){
        User user =  userService.find(18);
        ModelAndView mav = new ModelAndView();
        mav.addObject("user","sadf");
        return "HelloWord"+"fasdf--"+user.getUsername()+"--"+user.getPassword();
    }


    @RequestMapping("/ajax")
    public String find1(){
        return "[''message':'123dfx']";
    }

//    public static void main(String[] args){
//        SpringApplication.run(UserController.class,args);
//    }
}
![]()
(8)ServletInitializer.java 这个类的主要内容如下:
![]()
package smm.springboot_ftl;

import org.springframework.boot.builder.SpringApplicationBuilder;
import org.springframework.boot.web.support.SpringBootServletInitializer;

public class ServletInitializer extends SpringBootServletInitializer {

    @Override
    protected SpringApplicationBuilder configure(SpringApplicationBuilder application) {
        return application.sources(Application.class);
    }

}
![]()
(9)SpringBoot的配置文件: application.properties 文件内容如下:
存储位置: src/main/resources
server.context-path : 配置访问该项目的项目路径,不配置时默认为 / ,配置后必须加上项目名才能访问项目
![]()
server.context-path=/HelloWorld

spring.datasource.driver-class-name =com.mysql.jdbc.Driver
spring.datasource.url =jdbc:mysql://localhost:3306/springboot_mybatis
spring.datasource.username =root
spring.datasource.password =root

mybatis.typeAliasesPackage=smm.springboot_ftl.bean
mybatis.mapperLocations=classpath:/mapper/UserMapper.xml

## Freemarker \u914D\u7F6E
## \u6587\u4EF6\u914D\u7F6E\u8DEF\u5F84
spring.freemarker.template-loader-path=classpath:/templates/
spring.freemarker.cache=false
spring.freemarker.charset=UTF-8
spring.freemarker.check-template-location=true
spring.freemarker.content-type=text/html
spring.freemarker.expose-request-attributes=true
spring.freemarker.expose-session-attributes=true
spring.freemarker.request-context-attribute=request
spring.freemarker.suffix=.ftl
![]()
(10)配置maven项目的配置文件,pom.xml
![]()
    4.0.0
    smm
    bootdemo
    war
    0.0.1-SNAPSHOT
    bootdemo Maven Webapp
    http://maven.apache.org


        org.springframework.boot
        spring-boot-starter-parent
        1.5.6.RELEASE


        bootdemo


                true
                org.apache.maven.plugins
                maven-compiler-plugin
                3.5.1

                    ${compiler.source}
                    ${compiler.target}
                    ${project.build.sourceEncoding}

                        ${project.basedir}/src/main/webapp/WEB-INF/lib


                org.springframework.boot
                spring-boot-maven-plugin


        UTF-8
        1.7
        1.7


        3.1.0
        2.3.1
        1.2
        4.12


            junit
            junit
            ${junit.version}
            test


            javax.servlet
            javax.servlet-api
            ${servlet.version}
            provided


            javax.servlet.jsp
            javax.servlet.jsp-api
            ${jsp.version}
            provided


            javax.servlet
            jstl
            ${jstl.version}


            org.objenesis
            objenesis
            1.2


            org.mybatis.spring.boot
            mybatis-spring-boot-starter
            1.2.0


            org.springframework.boot
            spring-boot-starter-web


            org.springframework.boot
            spring-boot-starter-tomcat
            provided


            org.springframework.boot
            spring-boot-starter-test
            test


            org.springframework.boot
            spring-boot-configuration-processor
            true


            mysql
            mysql-connector-java
            5.1.6
            runtime


            org.springframework.boot
            spring-boot-starter-freemarker
![]()
(11)启动项目,访问项目。
进入 Application.java
右击 --》 Run As --》 Java Application
启动成功后,在浏览器通过URL访问: http://当前ip:8080/server.context-path指定的值 /RequestMapping对应的值
例如: http://127.0.0.1:8080/HelloWorld/find
访问结果如图所示:(注意,这里自己要往数据库中插入一条数据,id为UserController类中find方法对应的id)