SpringMVC整合Swagger框架
Swagger可视化API,不仅能查看API,还能测试。
第一步:项目中引入相关jar包:
        ....

            com.mangofactory
            swagger-springmvc
            1.0.2


            com.fasterxml.jackson.core
            jackson-databind
            2.5.3
第二步: 添加自定义config文件
package com.tuzki.businessapi.controller;

import org.springframework.beans.factory.annotation.Autowired;
import org.springframework.context.annotation.Bean;

import com.mangofactory.swagger.configuration.SpringSwaggerConfig;
import com.mangofactory.swagger.models.dto.ApiInfo;
import com.mangofactory.swagger.plugin.EnableSwagger;
import com.mangofactory.swagger.plugin.SwaggerSpringMvcPlugin;

/**
 *
 * @author Horace
 * @version 创建时间:2015年12月2日 下午4:03:14
 *
 */
@EnableSwagger
public class MySwaggerConfig
{


   private SpringSwaggerConfig springSwaggerConfig;

    /**
     * Required to autowire SpringSwaggerConfig
     */
    @Autowired
    public void setSpringSwaggerConfig(SpringSwaggerConfig springSwaggerConfig)
    {
        this.springSwaggerConfig = springSwaggerConfig;
    }

    /**
     * Every SwaggerSpringMvcPlugin bean is picked up by the swagger-mvc
     * framework - allowing for multiple swagger groups i.e. same code base
     * multiple swagger resource listings.
     */
    @Bean
    public SwaggerSpringMvcPlugin customImplementation()
    {
        return  new SwaggerSpringMvcPlugin(this.springSwaggerConfig).apiInfo(apiInfo()).includePatterns("(/user/login)|(/company/.*)"); //开放多个独立的接口
    }

    private ApiInfo apiInfo()
    {
        ApiInfo apiInfo = new ApiInfo(
        	"Title",
                "Desc",
                "service",
                "author email",
                "Licence Type",
                "License URL");
        return apiInfo;
    }
}
补充2:代码中includePatterns方法是添加Swagger展示(开放)具体的那些接口。里面是正则表达式,内容是接口的uri。如果是多个独立的接口的话,可以使用()和|(模仿上面代码)就行处理就行了。
第三步:将此配置加入到Spring容器中,如下:
   @ResponseBody
    @RequestMapping(
            value = "addUser", method = RequestMethod.POST, produces = "application/json; charset=utf-8")
    @ApiOperation(value = "添加用户", httpMethod = "POST", response = BaseResultVo.class, notes = "add user")
    public String addUser(@ApiParam(required = true, name = "postData", value = "用户信息json数据") @RequestParam(
            value = "postData") String postData, HttpServletRequest request)
    {
        LOGGER.debug(String.format("at function, %s", postData));
        if (null == postData || postData.isEmpty())
        {
            return super.buildFailedResultInfo(-1, "post data is empty!");
        }

        UserInfo user = JSON.parseObject(postData, UserInfo.class);
        int result = userService.addUser(user);
        return buildSuccessResultInfo(result);
}其中@ApiOperation和@ApiParam为添加的API相关注解,个参数说明如下:
@ApiOperation(value = “接口说明”, httpMethod = “接口请求方式”, response = “接口返回参数类型”, notes = “接口发布说明”;其他参数可参考源码;
@ApiParam(required = “是否必须参数”, name = “参数名称”, value = “参数具体描述”
第五步:添加Swagger UI配置
在GitHub上下载SwaggerUI项目(地址为https://github.com/swagger-api/swagger-ui),将dist下所有内容拷贝到本地项目webapp下面,结果目录如下图所示:

补充1:放到项目中可能swagger-ui.js会报js错误(比如params.in找不到该定义),可以用swagger-ui.min.js(带.min.文件和原文件功能是一样的,只是被压缩过)文件的内容进行替换。
第六步:将index.html中http://petstore.swagger.wordnik.com/v2/swagger.json修改为http://localhost:8080/{projectname}/api-docs
第七步:启动项目,访问地址查看效果
http://localhost:8080/business-api/api-docs(business-api为我的项目名) 返回JSON格式的数据,如下

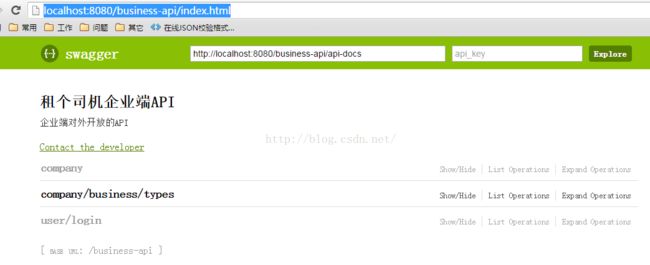
http://localhost:8080/business-api/index.html(business-api为我的项目名)返回经过swagger-ui美化后的界面,如下
1.http://www.mamicode.com/info-detail-471331.html Swagger与SpringMVC项目整合
2.http://www.java3z.com/cwbwebhome/article/article8/Regex/Java.Regex.Tutorial.html Java正则表达式教程
