SpringBoot+Swagger2实现API接口管理
点开这篇文章的人我相信你对swagger2已经有了一定的认识,关于Swagger的介绍我不再做多余的介绍,网上有很多优秀的文章 。在这篇文章里我以一个小的web案例介绍SpringBoot整合Swagger2,话不多少直接上码!
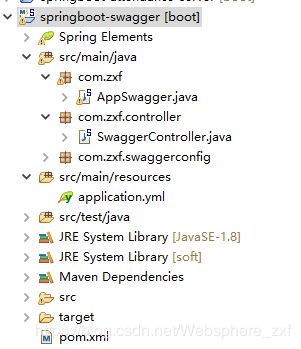
项目结构:
项目获取地址:https://github.com/XiaoFengSophia/springboot-swagger
pom.xml
这里要注意下,你的springboot版对swagger2有影响,我的springboot版本为2.0.1,尝试了很多版本的swagger,最后只有2.7.0的swagger兼容!整合时如果包一些稀奇古怪的错八成是两者的版本有冲突。
			org.springframework.boot
			spring-boot-starter-web


			org.springframework.boot
			spring-boot-starter


			org.springframework.boot
			spring-boot-starter-test
			test


            io.springfox
            springfox-swagger2
            2.7.0


            io.springfox
            springfox-swagger-ui
            2.7.0
application.yml
###服务启动端口号
server:
  port: 8091
swaggerConfig
@Configuration
public class SwaggerConfig {

	@Bean
	public Docket createRestApi() {
		return new Docket(DocumentationType.SWAGGER_2).apiInfo(apiInfo()).select()
				// api扫包
				.apis(RequestHandlerSelectors.basePackage("com.zxf.controller"))
				.paths(PathSelectors.any())
				.build();
	}

	private ApiInfo apiInfo() {
		return new ApiInfoBuilder()
				.title("蓝鸽集团物联网人工智能产品部接口文档")
				.description("智能教育在线一体化")
				.termsOfServiceUrl("http://www.langoo.com")
				// .contact(contact)
				.version("版本:1.0")
				.build();
	}


}
controller
@RestController
@Api("支付服务文档接口")
public class SwaggerController {
	@PostMapping("/addUserInf")
	@ApiOperation(value = "增加信息")
    public String addUserInf() {

    	return  "addUserInf";
    }
	@GetMapping("/deleteInf")
	@ApiOperation(value = "删除信息", notes = "根据删除信息")
	@ApiImplicitParam(name = "userId", value = "用户编码", required = true, dataType = "String", paramType = "query")
	public String deleteInf(String userId) {
		System.out.println(userId);
		return "deleteInf";
	}
	@PostMapping("/updateUser")
	@ApiOperation(value = "更新信息", notes = "根据用户编码更新信息")
	@ApiImplicitParam(name = "userId", value = "用户编码", required = true, dataType = "String", paramType = "query")
	public String updateUser(String userId) {
		System.out.println(userId);
		return "updateUser";
	}

}
启动类
@SpringBootApplication
@EnableSwagger2//开启swagger2
public class AppSwagger {

	public static void main(String[] args) {
		SpringApplication.run(AppSwagger.class, args);
	}

}
访问:http://localhost:8091/swagger-ui.html#/swagger45controller
界面,这个是原始界面,朋友们可以自行找一些好看的UI! 点击方法可以查看具体信息,也可以直接测试
至此,SpringBoot整合Swagger结束,是不是很简单呢!


